Updating JetFormBuilder Fields Based on Other Fields’ Values: Use Cases
WordPress form input fields can be filled out manually when a user types something there and dynamically when the data is being fetched from somewhere else.
If you use JetFormBuilder in conjunction with JetEngine, you have almost unlimited possibilities in fetching data dynamically, basically from anywhere on the website, be it other fields of the same form or posts, custom post types, custom fields, etc. You can even get values from other websites using JetEngine’s REST API tool.
Simple Cases
Let’s look at quite simple cases when the data for the field is taken from other fields, be it the inputs of the current form or meta fields existing on your website.
Getting data from other form fields (including calculated)
This is the most straightforward case when the data will be taken from other fields of the same form. To do so, click the “+ Add Dynamic Value” button on the right panel while editing the form field.
You can choose one of the fields within your form. To get it, click on the wrench icon, and you will see a list of all the fields in macro format. Also, you can add extra macros, such as current date, time, and the value “this,” which means the current field.

You can use math operators (but they will work only for numeric fields) and conditionals. So, the dynamic value will be displayed if the condition is met.
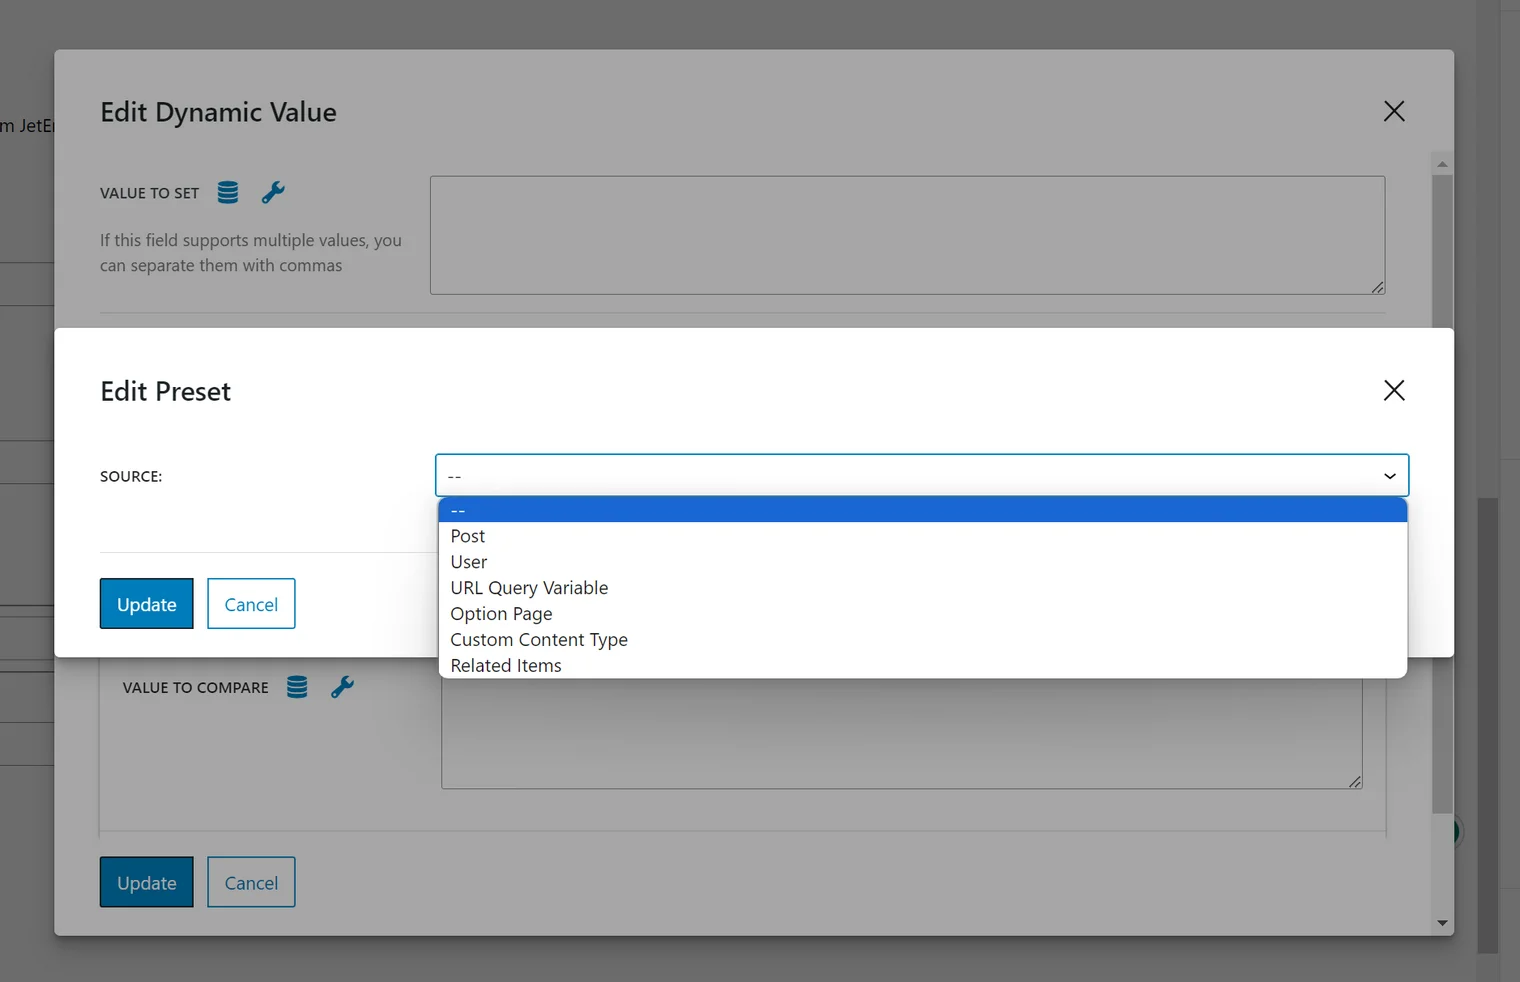
Other data sources, except the existing form fields, are the current and queried post’s meta fields, users, and query variables. Also, if you have JetEngine installed, Option Pages, Custom Content Types, and Related Items will be available (if such JetEngine modules are activated).
A Calculated field is another field type meant to be populated dynamically. It allows you to perform even complex math calculations.
Here are some ideas for using a calculated field with other field types:
- Calculate a price with taxes or with an additional discount. Place a number that will take part in the calculation (e.g., the percent to be added or subtracted) as a hidden field value. Then, perform a calculation with that field. Here is a full guide on how to do it.
- Repeater fields can also be used in the calculation. Read this guide for the instructions.
- You can get the data for calculations not only from the form fields but also from the current field meta field, which can also be fetched dynamically. Another cool idea is using Option Pages’ values. For example, you set a different discount every day or week. This discount may apply to many forms and their fields, so if you are using Option Pages, it’s enough to change it once on your Dashboard instead of editing every form.
Getting data from posts and meta fields for Radio, Checkbox, and Select fields
Radio, Checkbox, and Select field types have even more options for being populated dynamically. You can read the full documentation about these fields here.
Let me mention the options you have other than a manual input:
- Posts. You can use not only the current post but any post of any post type you have on your website. Also, you can type the name of a particular meta field of that post, and it will be fetched there.
- Terms. Here, you can choose any taxonomy, and all the categories/tags pertaining to it will be shown. Alternatively, you can choose a particular field.
- Meta field. Just type a meta field to get values from. This meta field type should also be of Checkbox/Radio/Select type to generate multiple values.
- Glossary. This option is available only if you have JetEngine installed. It’s very convenient if you want to create a list of choices once and then reuse it multiple times. Read more about the Glossary feature here.
- Generate dynamically. This is the most interesting type with many options:
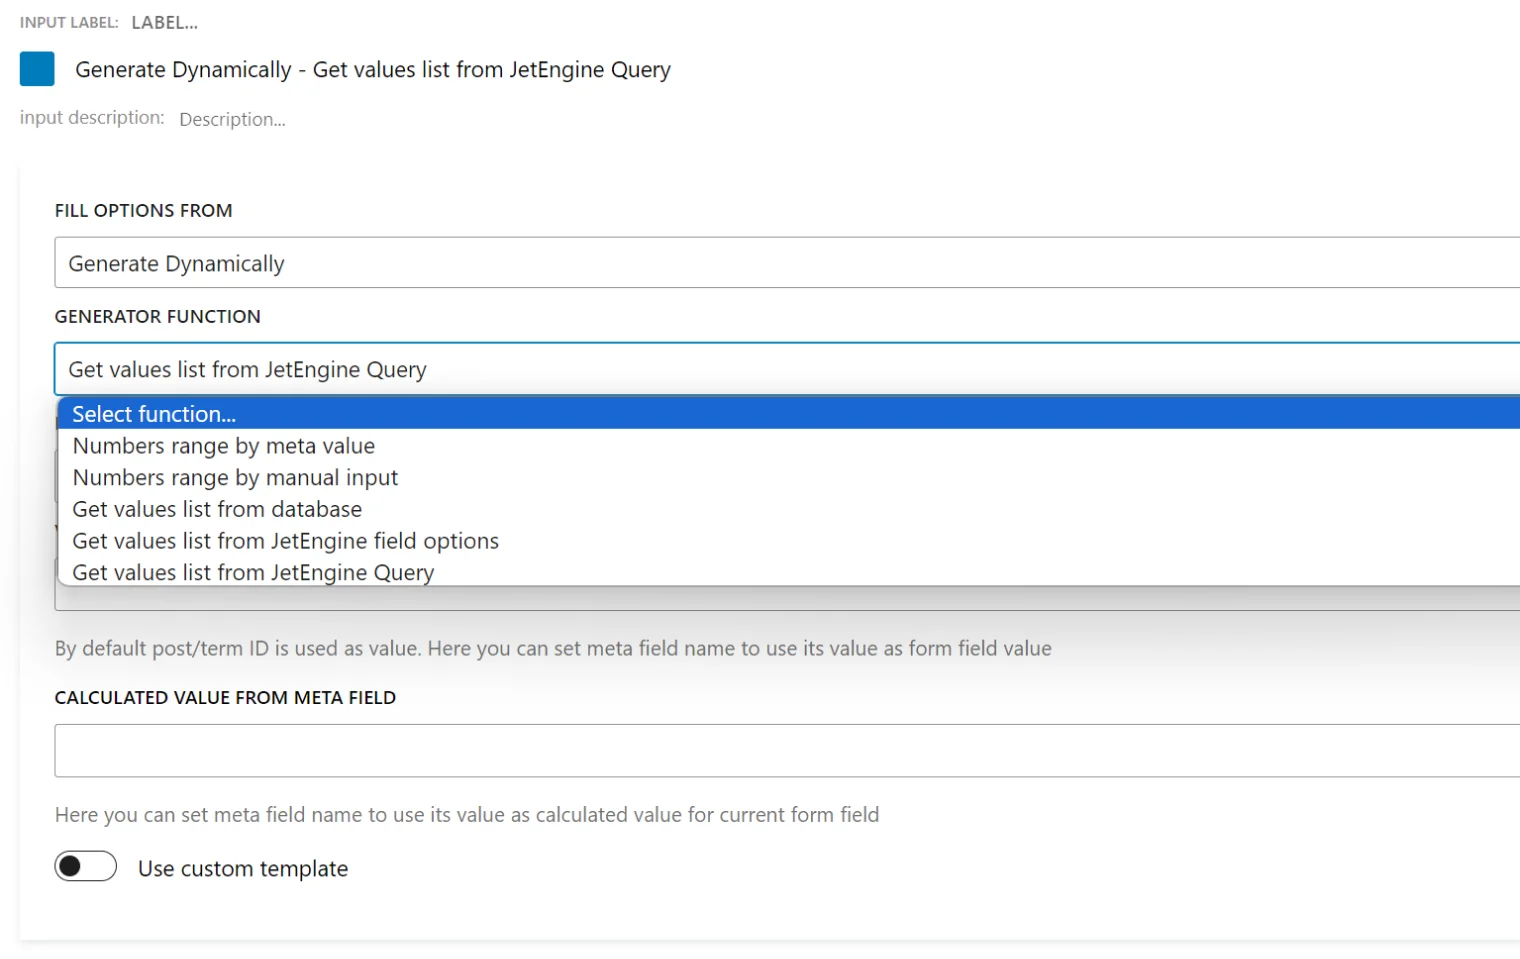
As you can see from the screenshot above, you have a lot of options for generations.
Let’s have a brief look at them:
- “Numbers range by meta value” means that it will generate a range from 1 to the value you have in the meta field you put in the settings. For example, in the meta field, you have a maximum number of guests to book an apartment. So, the number range to choose from will be created accordingly.
- “Numbers range by manual input” is exactly what the name suggests and is intuitive.
- “Get values list from database” lets you get values from the WordPress database field you specify. It can be extremely handy in certain situations.
- “Get values list from JetEngine list options.” If you use JetEngine, you probably know that you can add meta fields not only to the custom post types you create but also to default post types and users with the help of the meta box feature. So, just type an existing meta field name and get a list of options.
- “Get values list from JetEngine Query” is one of the most advanced options to be generated. So, I will be back to setting up this type in the next section because it definitely deserves your attention.
Advanced Cases
Let’s look at more advanced cases when there are some dependencies and custom queries involved.
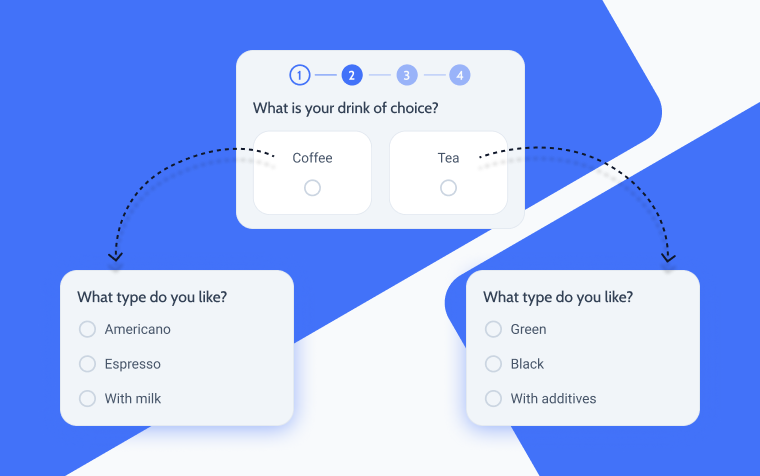
Hierarchical select
JetFormBuilder is a plugin that offers most of its cool features for free. However, there is a set of premium add-ons. There are 18 of them in a package, and the number is growing. Using them, you can do even more with the form builder: generate PDFs, set up recurring payments, schedule forms, process payments using WooCommerce cart, and much more.
In this section, I want to dwell in more detail on the Hierarchical Select add-on. It’s actually very simple to use: after the activation, you will see a new control that you can use to populate the fields for subcategories.
This tool will be very useful if you have a category with nested subcategories, and customers should be able to select categories depending on the parent category.
For example, you sell trucks and buses. If the customer chooses “Trucks,” they should be able to choose between the subcategories: “Box trucks” and “Pickups,” so these subcategories appear in the fields. But if the customer chooses “Buses,” different subcategories will appear: “Minibuses” and “Coaches”.
Setting up this functionality is pretty intuitive, and we’ve provided a full guide in this article.
REST API
REST API is used for exchanging data. The most straightforward use case involving forms and REST API is when two different websites do that. JetEngine has a very powerful module for dealing with REST API that even stands out when compared with the specialized plugins.
There can be two scenarios when REST API is involved:
- you send some data via the form using REST API;
- the form checkbox/radio/select fields are being populated using a query that takes data from the remote website using REST API.
📚 I’ve created a very detailed guide with examples of how to send and receive data submitted via forms. Please read it here. For example, you can set up event registration forms on different sites, then collect all the data in another “central” website, and then display the participant’s data there on the front end. It’s absolutely possible to implement with JetEngine and JetFormBuilder, and zero coding is involved.
Regarding the second scenario, when the form is populated from the values that are updated on the remote site, check the next section about getting values from a custom query. The difference is that you should have the REST API module activated and, instead of the Post query type, create the REST API query type.
Get values list from custom query
This is the type I’ve already mentioned above, and it will be available only if you have the JetEngine plugin installed and activated on your website.
To generate option values using this type, you need to use Checkbox/Radio/Select field types, choose “Generate dynamically,” and then “Get values list from JetEngine Query.”
Query Builder, the unique and very powerful feature of JetEngine, plays a central role here. To put it simply, in WordPress, to display values, you should first query them from the database. To do so, you need to give instructions about what exactly you want to pull from there, in other words, query parameters. Normally, you do such queries by setting up widgets/blocks or by clicking some buttons already on the front end. The most common example of querying is filters.
Another way to make WordPress queries is coding, and when you see the list of the latest posts in a blog, this is it. Query generators like this are widely used to save time and not write such queries manually.
But what if I tell you that you can first create a query of any complexity completely visually, save it, cache it, and then use and reuse it as a data source in many different places? This is exactly what Query Builder does. Another reason why it’s a back-end tool is that it offers all the possible options and combinations of them and works with any post types, users, taxonomies, and even REST API, form records, and SQL queries.
To create a custom query, go to JetEngine > Query Builder > Create New, name your query, select a type, choose post type, and set up all the parameters.
So, let’s see how to populate a form field using such a query. I will use this travel agency demo website as an example. Let’s say I’m creating a form where customers can book a property belonging to the “Resort” category with more than two bedrooms.
I will create a query where I set up both parameters:
Now, I will use this query as a source for the checkbox field of the form. Here, after choosing the “Get values list from JetEngine Query” option, we need to fill in a field name.
I will put this macro: 26|ID|post_title
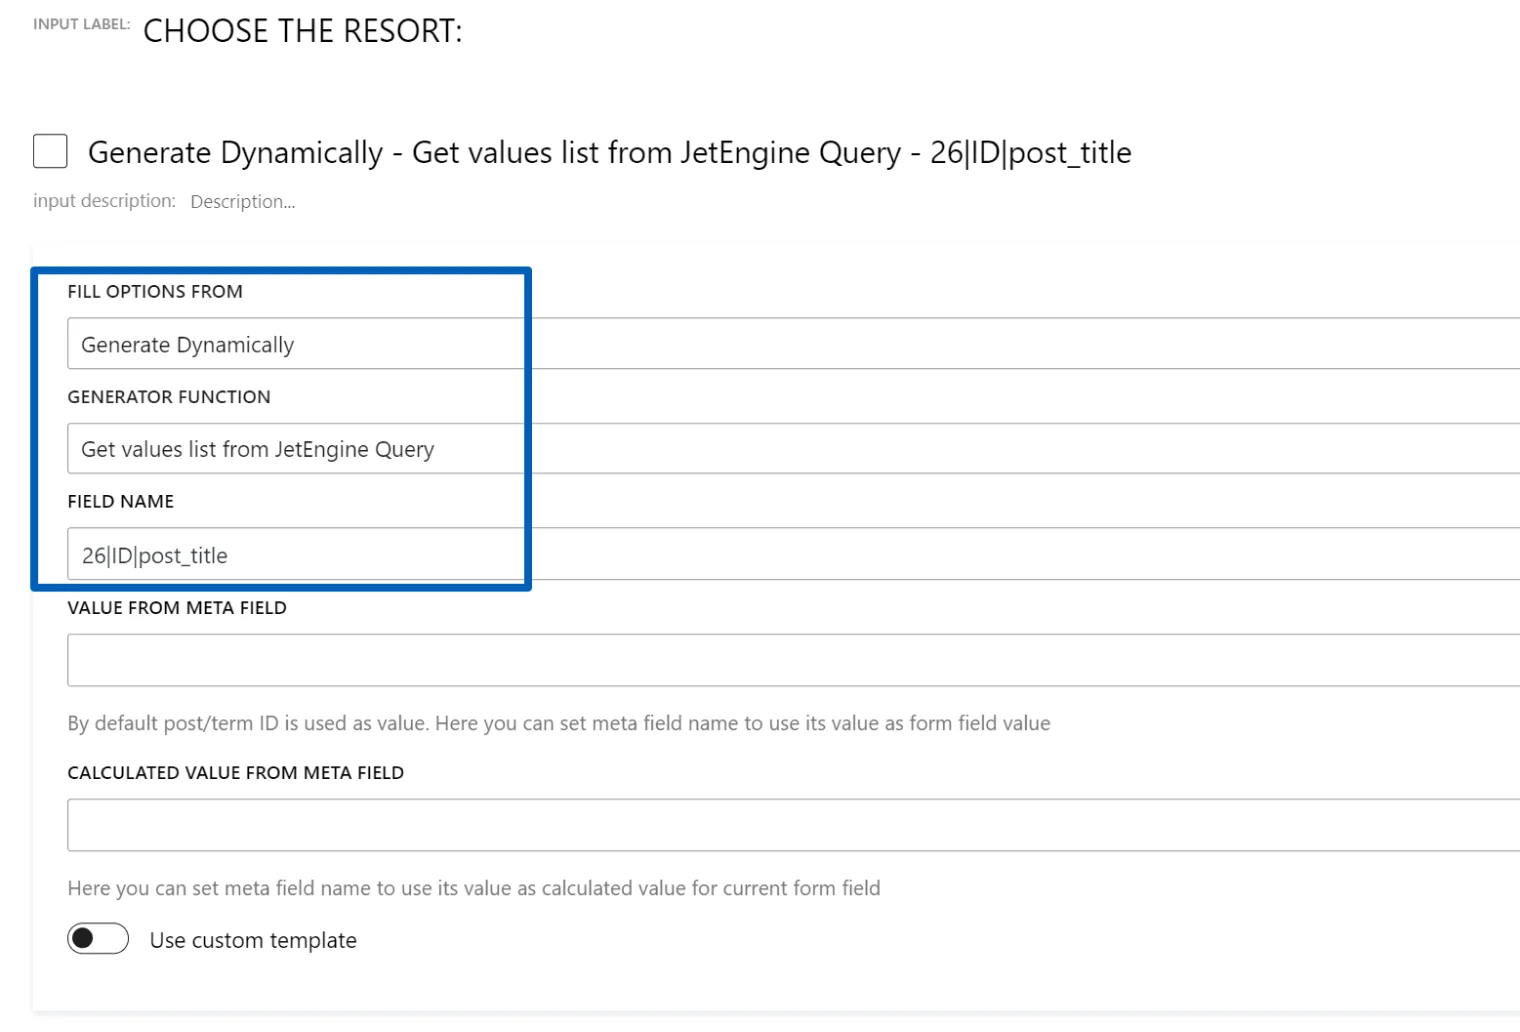
- “26” means the ID of the query I’m using. To find the query ID, look at the end of the URL in the address bar of your browser while editing the query. For example, it will look like this:
https://mywebsite.com/wp-admin/admin.php?page=jet-engine-query&query_action=edit&id=26- “ID” means the property I use; in this case, it’s the post ID.
- “post_title” means that I want to use the post titles as labels for options.
You can find more details about creating such fields in the documentation here.
This is the result, and the advantage is that if I add more properties to the “Resort” category with more than two rooms, they will be automatically added to the form, so I don’t have to update everything manually. This not only saves a lot of time but also helps to avoid mistakes or outdated forms.

Getting related items of existing form fields
Finally, let’s take the previously described case to an even more advanced level and populate the field using data from another field, not just its value (or the calculated one). I want to populate my checkbox fields with items that are related to the items from another field.
⏬ To make it possible, download this free add-on from GitHub and install it as any other plugin. With this add-on, you will be able to add fields from the existing form to the query macros and fetch values connected to them.
The goal
Let’s use the same demo website of the tourist company and even the previous example of the resorts. Each of these resorts has a list of activities connected to the property. For example, “Tree Guest House” has “Lake trip” and “Forest trip” adventures available, and customers should be able to choose one of them.
I’ve already mentioned a hierarchical selection in this article, which has a bit of similar logic. However, it’s different because there are two post types involved: Properties and Activities, which are not nested categories.
The implementation
So, we have Properties and Activities post types. First, a Relation should be created. Go to JetEngine > Relations and create a relation between these post types. It will be one-to-many, with “Properties as a Parent.” The reason is that one property can offer several activities, but the activity can belong only to one property.
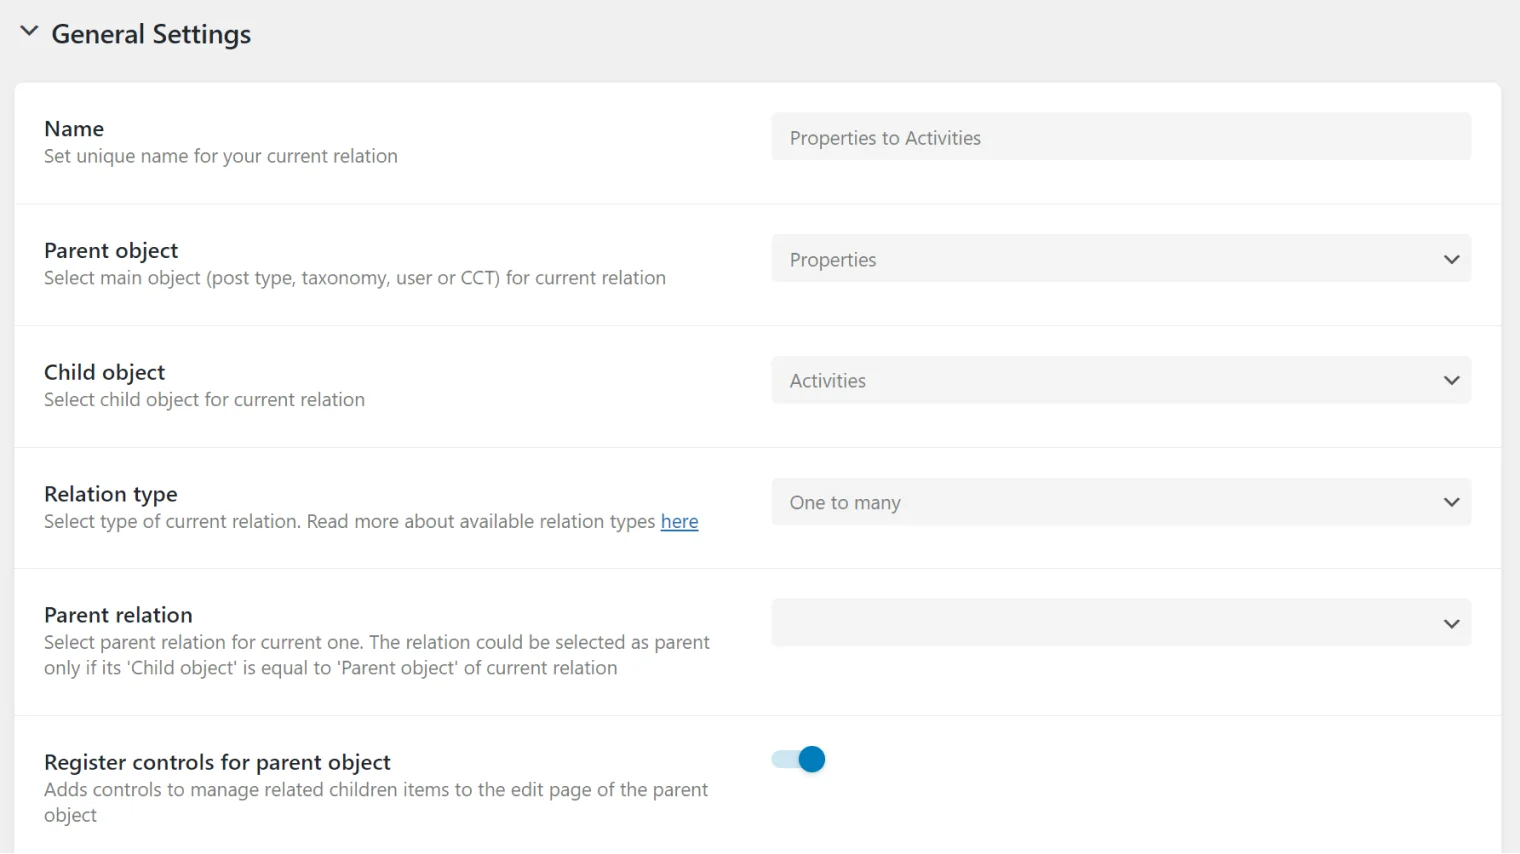
Now, let’s create the query:
Choose the post type Activities (because this post type will be displayed), then go to the Post & Page tab, to the “Post In” section, and let’s create a macro.
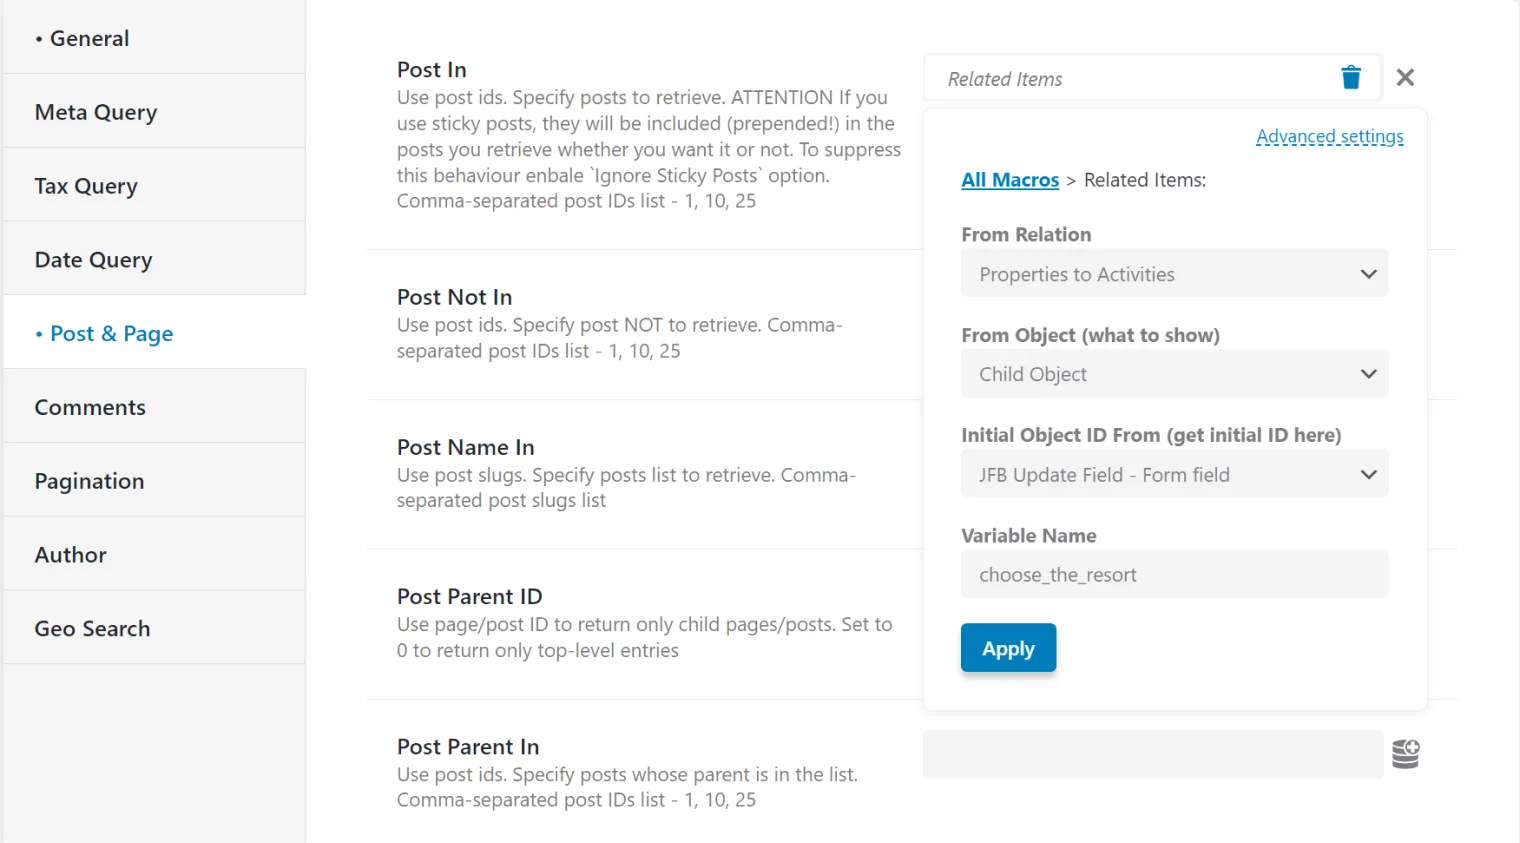
Click on the database icon and choose Related Items from the list. In the setting, choose the Properties to Activities relation that you’ve just created, and choose the Child Object (the object to be displayed). And now, in the next list, you will see the option that appeared thanks to the add-on I’ve mentioned at the beginning of this section. Choose it: JFB Update field – Form Field. All we need to do now is paste the field name with the items from which we want to get related items.
In our case, it’s the field with the resorts I mentioned earlier in this article. I copy the name from the form field and paste it into the query field. Save the query, and that’s it.
This is how it should look like:
💡 You can read more about macros in JetEngine here.
The last thing left here is to put the value in the field in the format query ID|property ID|field label.
However, because we have a field from which we get initial values, there will be one more little thing to do.
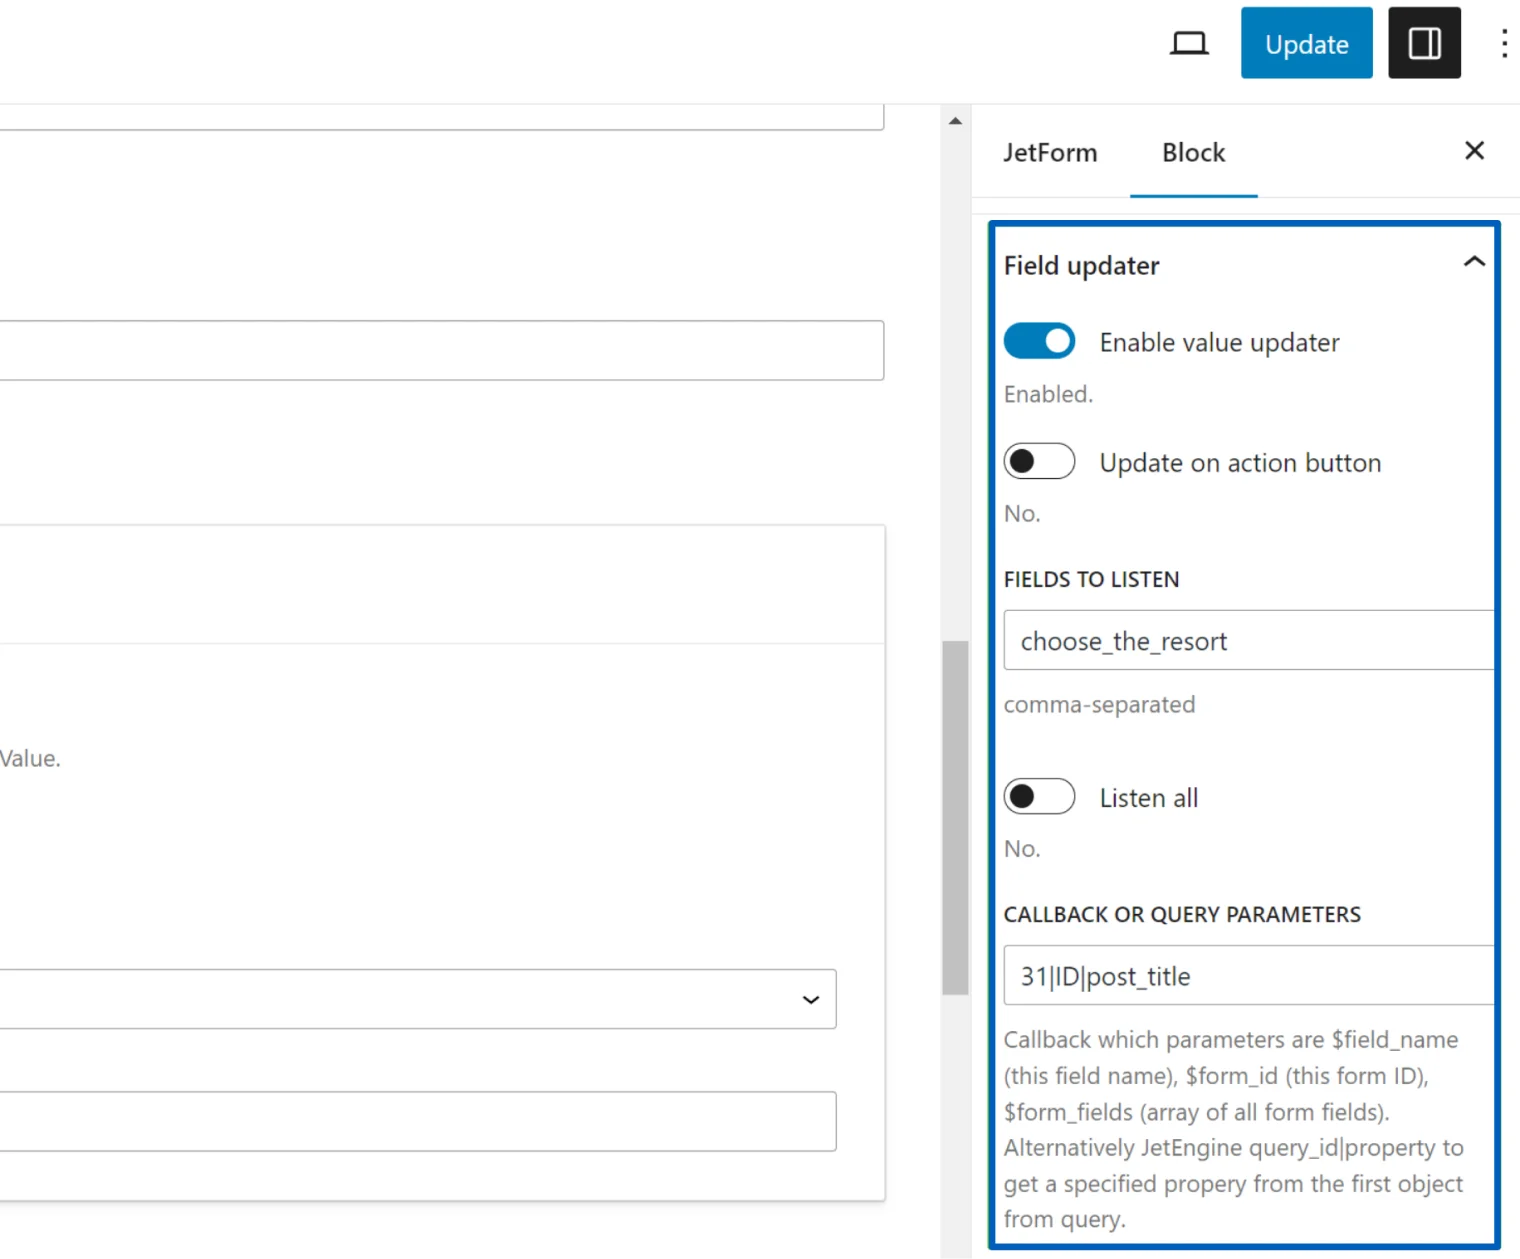
Create a Radio field, choose Generate Dynamically, then “Get values list from JetEngine Query,” type the query macro: mine is 31|ID|post_title, where 31 is the query ID that I took from the URL on the browser address bar while editing the query, ID is the object, and post_title will be used for labels.
Now, go to the editor’s right panel and open the Field updater section (this section appears after the custom add-on is installed). Activate the toggle and paste the field name in the “Field to Listen” input; in our case, it’s the “choose_the_property” one, the same one we used in the query. This means that the form will fetch the value of that field and pull the related items.
This is what it looks like:
Now, depending on the customer’s choice of resort, a list of available bonus activities will be displayed, and the customer can choose from them, too. Also, if you add more activities related to the properties, delete them, or update them, the values will be automatically fetched to the form, and you don’t have to worry about updating them.
Here is the final result:
Populating Text/Textarea/Hidden fields based on custom queries and other fields
By default, Text, Textarea, or Hidden fields don’t have the option to be populated using the custom query. But with the free add-on I’ve mentioned in the previous section, you can populate even these field types.
Let’s say you want to fetch an item related to the Hidden field to obtain some extra information when the customer sends a form.
Follow the same steps as in the previous section: create a relation and the custom query. But Text/Hidden fields don’t have the option to get options from the query by default as Checkbox/Radio/Select fields do.
With the add-on, they appear on the right panel in the Field updater section. Field the macro (in our case, it’s 31|ID|post_title) there, and now, your Text/Textarea/Hidden field will get populated. The only difference is that it will pull only the first value from the array (only the first related item), not all of them, because of the field type.
Getting values from repeater fields
Using the Field Updater free add-on, you can dynamically update repeater form fields as well. It can work within one repeater.
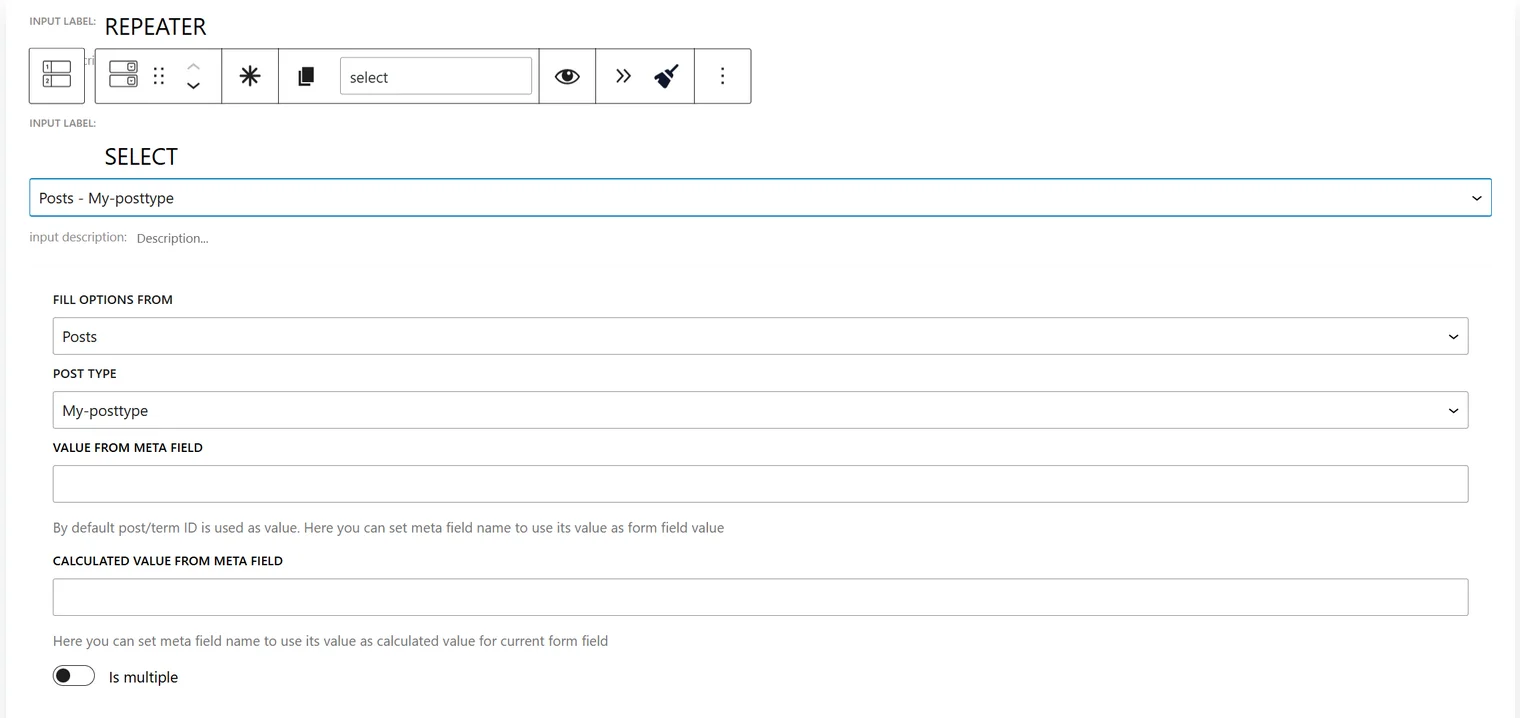
Let’s create a repeater with three fields inside it:
- Select field – with a label and name “Select”;
- Radio field – with a label and name “Radio-Title”;
- Radio field – with a label and name “Radio-Date.”
I want the Select field to fetch all the posts with the “My posttype” post type, so I’ll choose the “Posts” value in the Fill options from field and choose the “My posttype” post type. This part is straightforward.
Then, I want to populate the Radio-Title and Radio-Date fields dynamically based on the selection from the Select field. These fields should fetch posts that are not selected in the Select field. The Radio-Title field should display the titles, and the Radio-Date field should display the publishing date of these posts.
For example, my Select field fetches all the posts from the “My-posttype” type has these values (posts):
- Post 1;
- Post 2;
- Post 3;
- Post 4.
If I select the “Post 3” value in the Select field, the Radio-Title field will display: “Post 1” and “Post 2.” If I select “Post 2” in the Select field, the Radio-Title field will display “Post 1” and “Post 3,” etc.
The Radio-Date field will use the same logic but display the publishing dates of these posts (while Radio displays the titles).
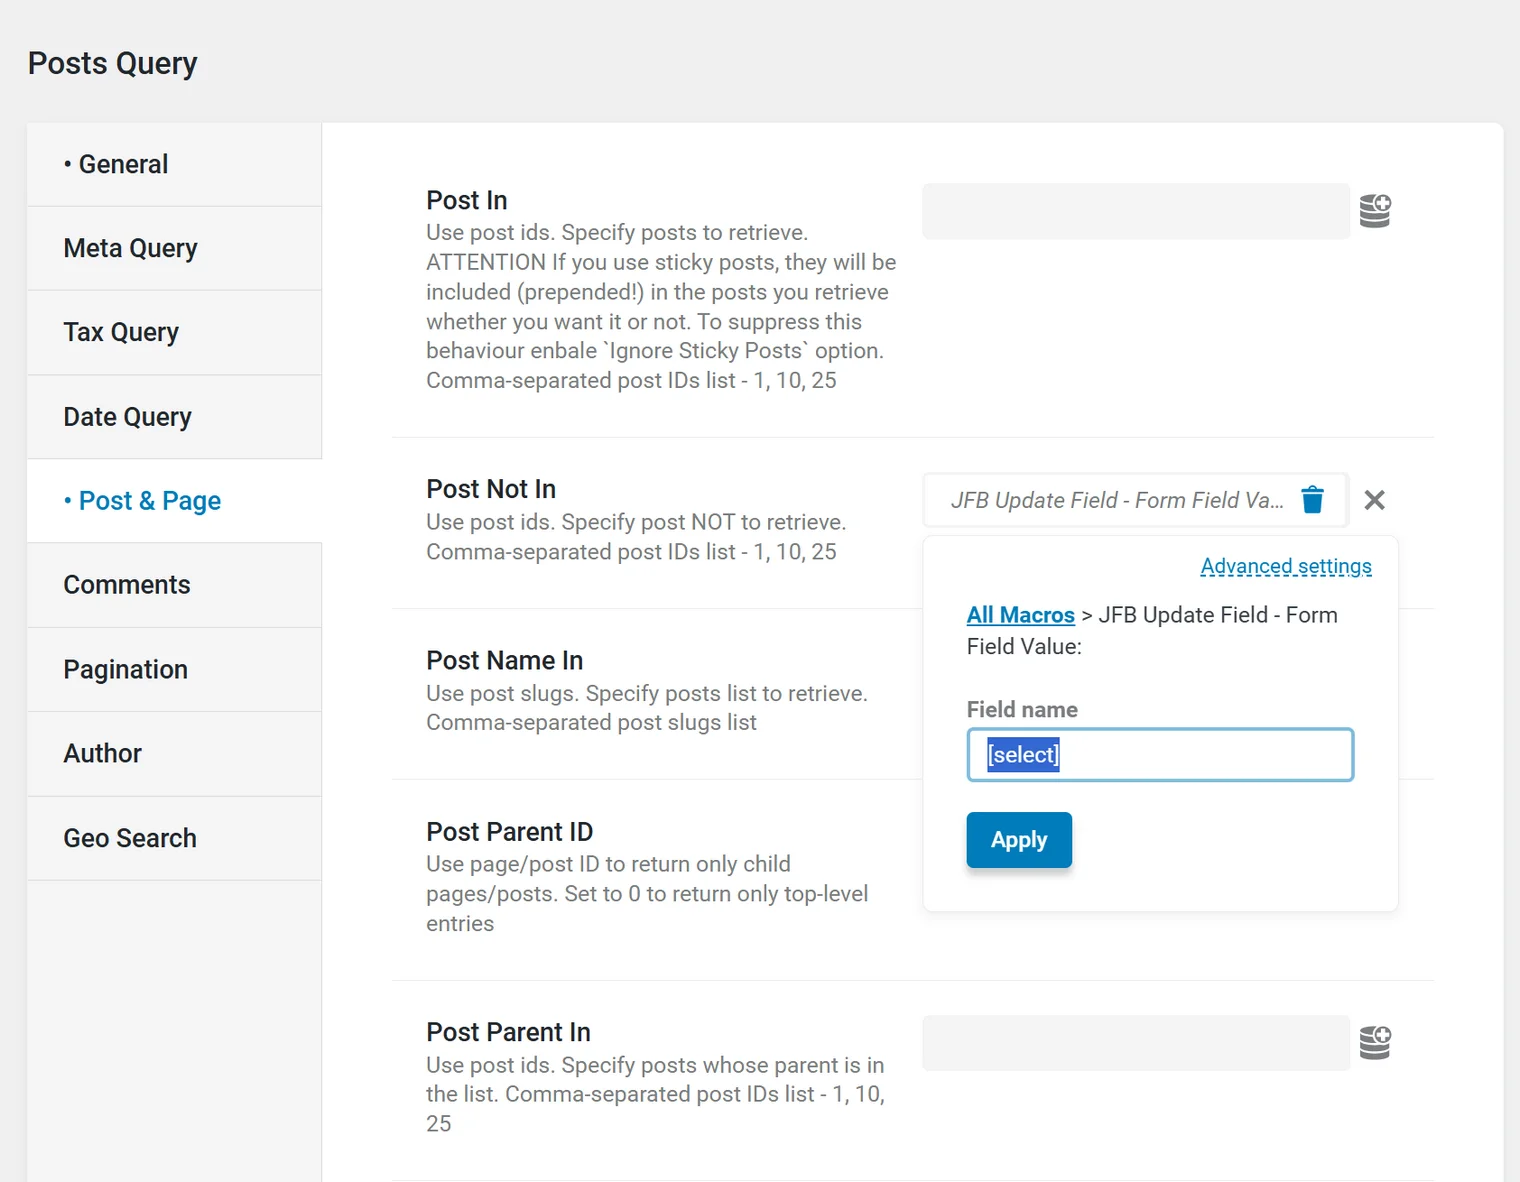
To implement it, let’s first create a query. It should be a Post Query query type, then select the “My posttype” post type. Now, click on the Post & Page tab, and in the Post Not In field, let’s create a macro. Click on the database icon, select the “JFB Update field – Form Field,” and insert the field that should be taken into account so that all the values, except for the one selected in this field, will be displayed in the Radio-Title and Radio-Date fields.
You should put the field in the square brackets because it’s a repeater:
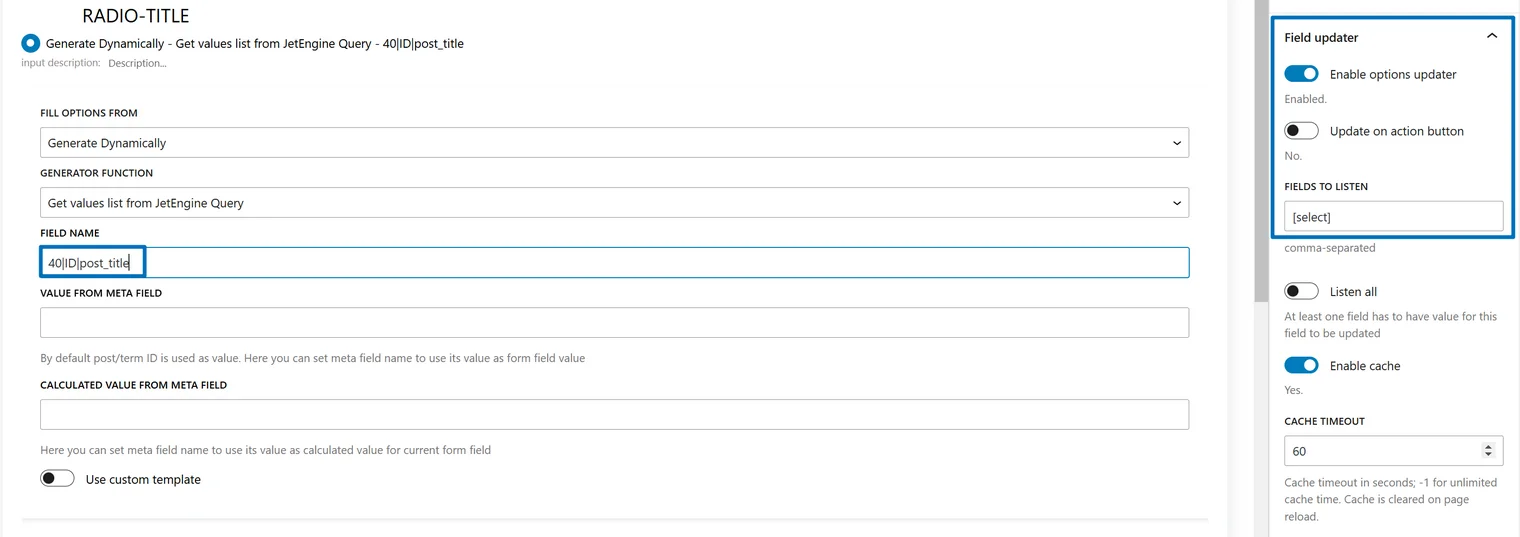
Now, let’s get back to the form and for the Radio-Title field settings, you should select Generate Dynamically, then “Get values list from JetEngine Query,” type the query macro: mine is 40|ID|post_title, where 40 is the query ID that I took from the URL on the browser address bar while editing the query, ID is the object, and post_title will be used for labels.
On the right panel, activate the Field updater toggle and type the field to listen in square brackets. It’s [select] in our case.
Repeat the same for the Radio-Date field, but replace “post_title” with “post_date,” so the macro will look like this: 40|ID|post_date.
You can use other fields as well (post_author, post_modified, etc.). The full list can be found on the query page when the Preview query toggle is activated.
This is the result. It’s just a simple use case for using the Field Updater with a repeater, so feel free to use your imagination when working with real projects and cases.
Takeaway
In this article, I discussed many different cases in which WordPress form field values are generated depending on the values of other fields in this form. These ranged from simple examples, such as when there are calculated fields, to complex ones, such as when the form fields are being processed and take part in custom queries.
Such an approach and dynamically generated values are very good assets for highly dynamic websites that don’t require constant manual maintenance and updates. Other than that, they are able to display items that are not always possible to display manually, so it’s definitely worth it to learn about JetFormBuilder’s opportunities to make your websites even better.
Still have some questions?

Written bу
Related articles