Calculated Field
The Calculated Field can take the values from the form fields and meta fields and use them to perform operations.

General Settings
This settings tab includes the basic customization fields:

- FIELD LABEL — a name that appears above the field and is visible to users;
- FORM FIELD NAME — a value that is used as an ID of this field. By default, it is generated from the FIELD LABEL value, but it can be changed if needed.
- FIELD DESCRIPTION — a description displayed under the field. It can be added to explain how to complete the field.
Field Settings
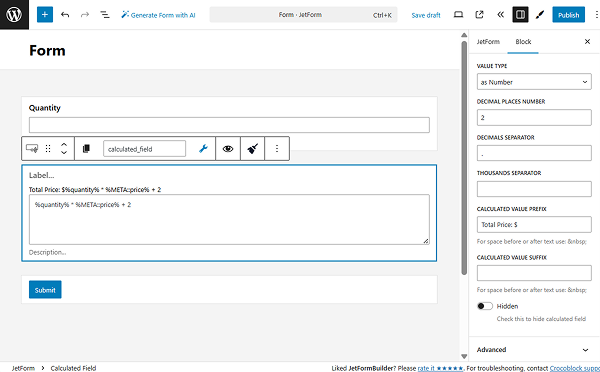
In the Field settings, one can set the math formula to calculate the field values. For example:
%quantity% * %META::price%Where %quantity% is a macro for form field value (“quantity” is a field name to get value from) and %META::price% is a macro for current post meta value (“price” is a meta key to get value from).
Also, the following macros can be used for booking:
%ADVANCED_PRICE::_check_in_out%This macro returns the advanced rate multiplied by the number of days booked (“_check_in_out” is the name of the field that returns the number of days booked).
%META::_apartment_price%This macro returns the price per 1 day/night.
A set of options that allows customizing the input of the field:
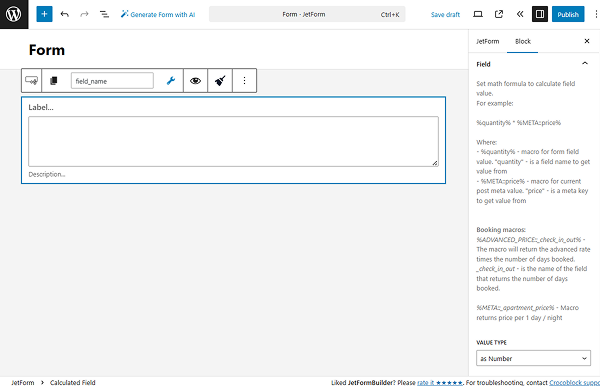
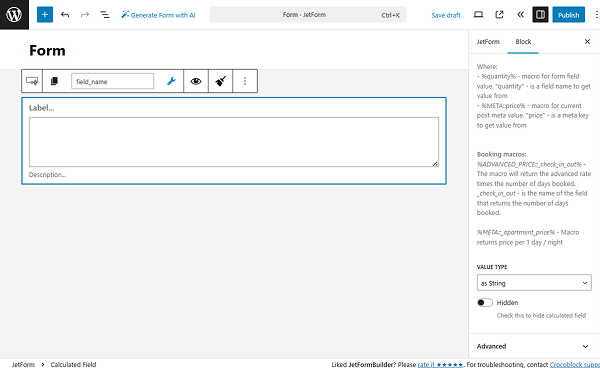
- VALUE TYPE — a value type stored in the Calculated Field. There are three options available: “as Number,” “as String,” and “as Date.”
As Number
With the “as Number” VALUE TYPE, the Calculated Field will calculate the numeric values taken from the form fields.
These numeric values can be set in the settings of the needed field. Some of the fields have corresponding customization fields: the CALCULATE field for the Select, Radio, and Checkbox Fields, the VALUE FOR CALCULATED FIELD for the Advanced Choices Field, and the CALCULATED VALUE for the Switcher Field.
When this VALUE TYPE is used, the value should be put within “%” characters. The formula will look similar to this:
%first_field% + %second_field%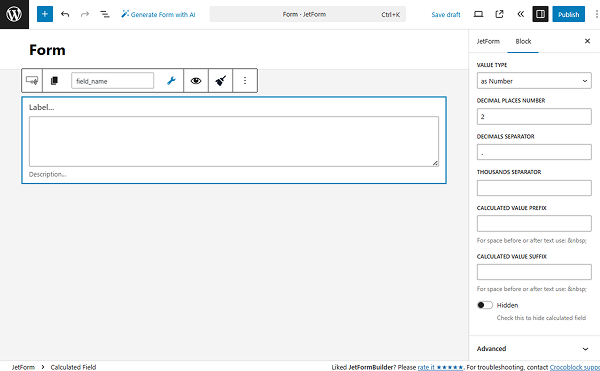
- DECIMAL PLACES NUMBER — the number of digits that will be displayed to the right of the decimal point;
- DECIMALS SEPARATOR — the separator put after the decimals. By default, it is set to “.”;
- THOUSANDS SEPARATOR — the separator put after the decimals. By default, there is no separator set;
- CALCULATED VALUE PREFIX — the text that will be shown before the resulting value here;
- CALCULATED VALUE SUFFIX — the text that will be displayed after the calculated value;
- Hidden — a toggle that can be activated to make the current field invisible to users.
Also, check out more about Advanced Math Calculations.
As String
If selected, this option can concatenate string values. For example, the “as String” VALUE TYPE can be added to summarize the content completed in the form.
In this case, the set VALUE will be taken from the fields to make concatenations and not its CALCULATE value.
If one selects the “as String” option, the values should be put inside the single or double quotes. For instance, like:
'%first_field% %second_field%'or
'%first_field%' + '%second_field%'With the “as String” option selected as VALUE TYPE, no additional settings are displayed. However, there is a common customization field left for both “as Number” and “as String” VALUE TYPES, the Hidden toggle.
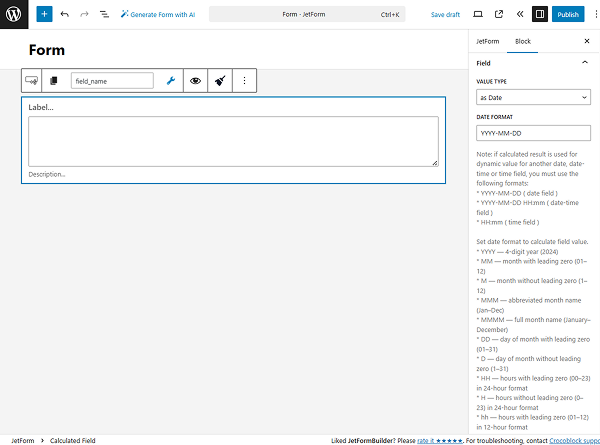
As Date
This VALUE TYPE allows calculating the date/time/datetime with other number values in order to get the result in date format.
- YYYY-MM-DD (Date Field);
- YYYY-MM-DD HH:mm (Datetime Field);
- HH:mm (Time Field).
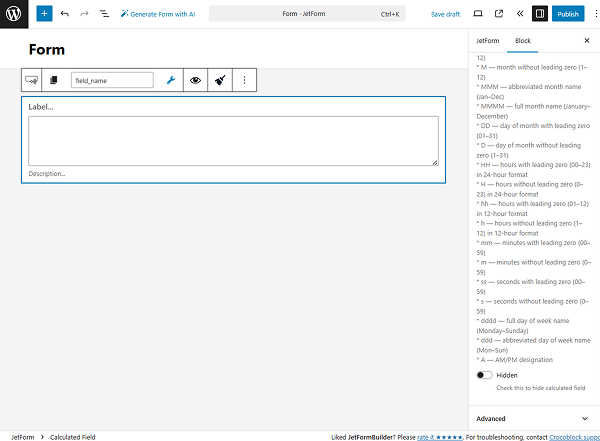
The following date and time formats should be used to calculate the field values:
- YYYY — 4-digit year (e.g., 2024);
- MM — month with leading zero (01–12);
- M — month without leading zero (1–12);
- MMM — abbreviated month name (Jan–Dec);
- MMMM — full month name (January–December);
- DD — day of the month with leading zero (01–31);
- D — day of the month without leading zero (1–31);
- HH — hours with leading zero (00–23) in 24-hour format;
- H — hours without leading zero (0–23) in 24-hour format;
- hh — hours with leading zero (01–12) in 12-hour format;
- h — hours without leading zero (1–12) in 12-hour format;
- mm — minutes with leading zero (00–59);
- m — minutes without leading zero (0–59);
- ss — seconds with leading zero (00–59);
- s — seconds without leading zero (0–59);
- dddd — full day of the week name (Monday–Sunday);
- ddd — abbreviated day of the week name (Mon–Sun);
- A — AM/PM designation.
When this VALUE TYPE is used, the value should be put within “%” characters. The formula will look similar to this:
%event_start_date|T% + %event_duration|toDayInMs%where “event_start_date” is the FORM FIELD NAME of the Date Field, “T” is a macro indicating timestamp (transforms the date into timestamp), “event_duration” is the FORM FIELD NAME of the Number Field, and “toDayInMs” macro transforms the number from days to milliseconds.
If such a formula is taken, the result will show the end date of the event.
In order for the calculation to work fine, one should define the correct value in the DATE FORMAT field. More about formats can be found in the field description.
One more toggle presented in the “as Date” VALUE TYPE settings is Hidden, the same as for the “as Number” and “as String” VALUE TYPES.
Advanced Settings
One more settings tab of the Calculated Field is Advanced. It contains the following fields for customization:
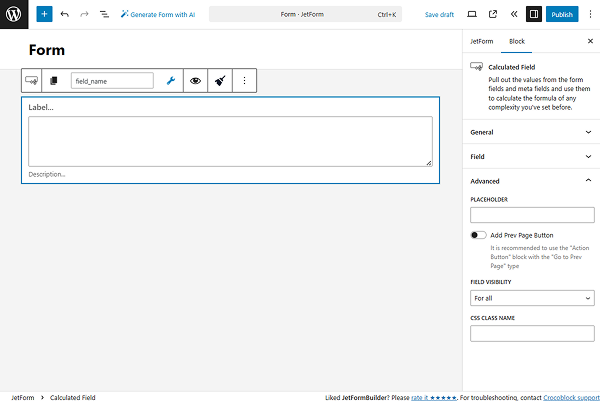
- PLACEHOLDER — a placeholder of the field value that will be shown before the calculations are made in the field;
- Add Prev Page Button — a toggle that adds a “Prev Page” button to the form;
- FIELD VISIBILITY — a selector that allows picking for whom the field will be visible: for all users, only for logged-in users, or only for not logged-in users;
- CSS CLASS NAME — a field that allows customizing the appearance of the field with CSS code.
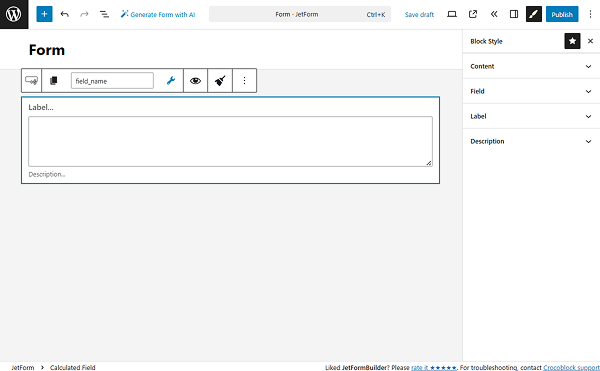
Style Settings
To open the style settings, one should press the “brush” button.
With the Style tab, the following settings can be customized:
How to Perform Calculation and Concatenation
To perform calculations, one should put the formula in the Calculated Field.
As Number
If the “as Number” FIELD TYPE is selected, the following types of values can be used in the formula:
- Static numbers —these could be either whole or fractions;
- Form field value — to get the value, the macro code %field_name% should be used, where “field_name” is the title you put to the FORM FIELD NAME bar;
- Meta field value — the value will be taken from the meta field that is attached to the post where the form is placed. To get the value, use the macro code %META::field_name%, where “field_name” is the name of the field.
Also, once the “wrench” icon above the Calculated Field is clicked, a list of macros is available. There, the form field macros and extra macros, including date operations, can be found.
One can do all sorts of mathematical operations with those values. Just type the formula into the Calculated Field text area. For example, let’s take a close look at the formula:
%quantity% * %META::price% + 2This means that the field will take the value from the “quantity” form field, multiply it by the value of the “price” meta field, and add two to it.
In the Calculated Field formula, one can also add conditions for which the ternary operators can be used. More information can be found in the How to Use Conditional Formulas in the Calculated Field tutorial.
Despite the fact that the formula is put into the field’s text area during editing, the users will see only the result of the calculations.
As String
If the “as String” FIELD TYPE is selected, the fields from the current form can be concatenated.
For instance, two Text Fields can be concatenated with the following formula:
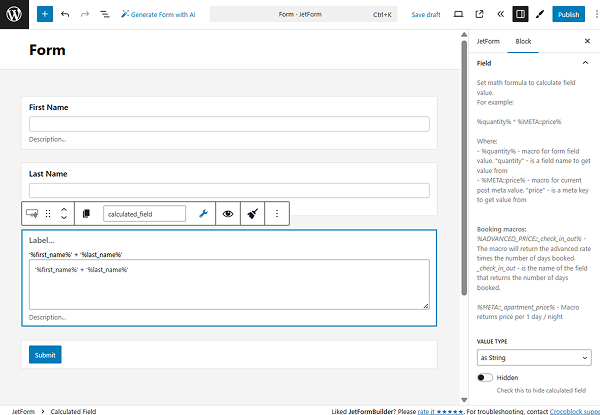
'%first_name%' + '%last_name%'where “first_name’” and “last_name” are the FORM FIELD NAMES of the needed fields.
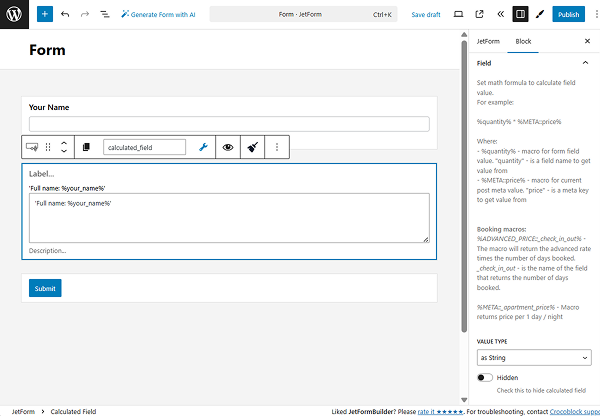
Or, one can add a custom text before or after the values. For instance, the form includes two fields: Text Field with a “your_name” FORM FIELD VALUE and Calculated Field with the following formula inside:
'Full name: %your_name%'With this formula, a value put inside the “Your name” Text Field on the front end will be immediately displayed after the “Full name:” string.
As Date
If the “as Date” VALUE TYPE is selected, the two values taken from the Time/Date/Datetime Field and another number field can be calculated.
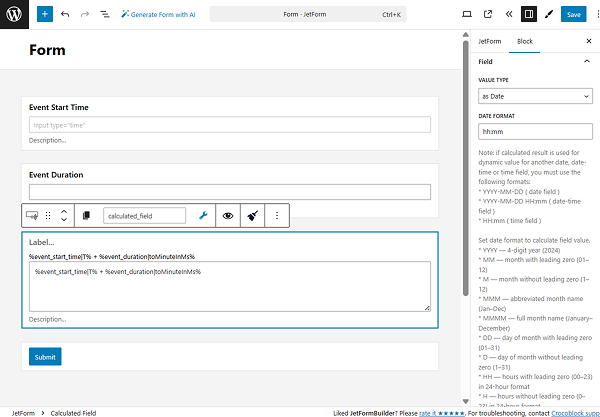
For instance, the formula to calculate the time duration of the event will look like this:
%event_start_time|T% + %event_duration|toMinuteInMs%
where “event_start_time” is the FORM FIELD NAME of the Time Field, “T” is a macro indicating timestamp (transforms the time into a timestamp), “event_duration” is the FORM FIELD NAME of the Number Field, and “toMinuteInMs” macro transforms the number from minutes to milliseconds.
Also, with this formula, one should change the DATE FORMAT to “hh:mm” where “hh” is hours with a leading zero (01–12) in 12-hour format and “mm” is minutes with a leading zero (00–59).
More about the macros used for date/time/datetime calculations can be found in the Macros in Date, Time, and Datetime Blocks tutorial.
That’s all about the Calculated Field available with the JetFormBuilder plugin for WordPress.