How to Create a Multi-Step Form: Complete Setup Guide
A multi-step form is an online data collection method that splits long and complex forms into easier-to-handle pages or screens. Rather than displaying all the questions at once, which can be overwhelming, a multi-step form directs users through a step-by-step process using navigational buttons like “Next” or “Continue“.
This guide focuses on creating a WordPress multi-step form with a progress bar, step navigation, and “Save Progress” functionality with the help of the JetFormBuilder plugin.
Table of Contents:
- How Multi-Step Forms Work in JetFormBuilder
- Create a Basic Multi-Step Form
- Configure Navigation Buttons
- Enable the Progress Bar
- Improve Long Forms with the Save Form Progress Add-on
- Best Practices for Multi-Step Forms
- Troubleshooting Common Multi-Step Form Issues
- FAQ
Breaking a long form into steps improves completion rates by letting users focus on the information and avoiding the overwhelming feeling in front of the endless form. The progress bar helps users understand where they are in the process, and “Next” and “Previous” buttons allow them to shift back and forth through the form. This approach would be particularly useful and efficient for:
- booking forms;
- application forms;
- surveys and questionnaires;
- registration forms.
💡Pro Tip: Multi-step forms feel shorter and easier to complete when each step focuses on a single task or topic.
How Multi-Step Forms Work in JetFormBuilder
As it was already stated, a multi-step form divides a long form into smaller pages, making it easier for users to complete. Instead of displaying all fields at once, the form guides users through the process step by step.
In JetFormBuilder, a multi-step form is built using four key elements: form fields, the Form Page Break block, navigation buttons, and an optional progress bar.
- Form fields collect information from users. These can be Text Fields, Phone Number Fields, Radio and Checkboxes, Select Fields, and other input types available in JetFormBuilder. Fields are usually grouped by topic. For example, the first step may collect personal information, while the second step gathers booking details or survey answers.
- The Form Page Break Field is an element that divides a form into separate steps. Every time you add a Form Page Break Field, a new page of the form is started. It allows you to organize fields into smaller sections and guide users through the process one step at a time.
- Navigation buttons allow users to move between form steps. Depending on your setup, each step can include a Next Page Field to continue to the next page, a Prev Page Field to return to the previous page, and an Action Button on the final step to send the form. These buttons help users review their information and complete the form at their own pace.
- The progress bar (or step indicator) shows users how far they have progressed through the form. When enabled, it displays the current step and the remaining steps. You can also add custom labels to make each stage easier to understand. A progress bar improves the user experience by setting clear expectations and showing how much of the form is left to complete.
Create a Basic Multi-Step Form
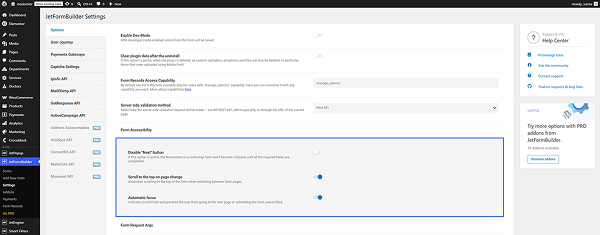
Before proceeding to the form settings, navigate to the WordPress Dashboard > JetFormBuilder > Settings tab and adjust the settings available for multi-optional forms in the Form Accessibility section.
First, we navigate to WordPress Dashboard > JetFormBuilder > Add New Form.
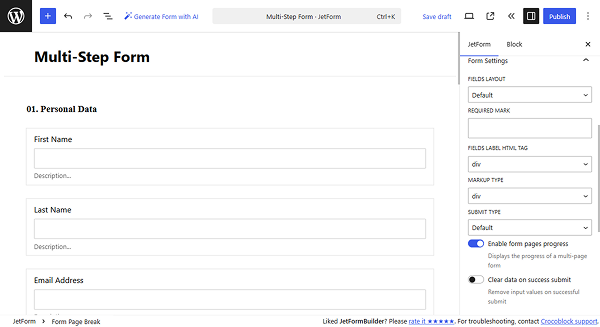
Enter the form’s title — in this case, it is “Multi-Step Form”. We will create a multi-step booking form.
When you create a new form, the Code Editor opens by default. You can exit it to access the Welcome block, where you can choose a form pattern or generate a form with OpenAI. Otherwise, you can hit the “Start from scratch” button and use the three fields added by default; you can delete them to begin anew.
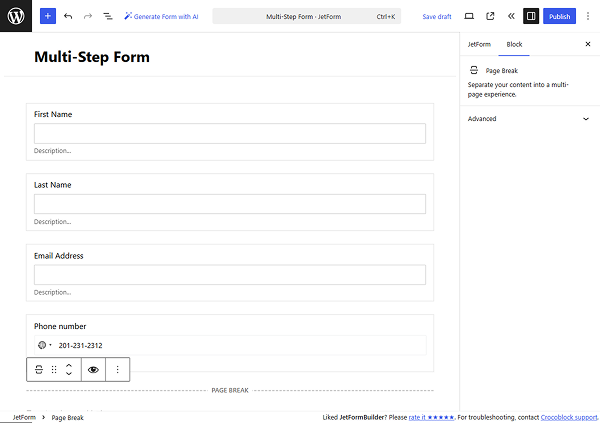
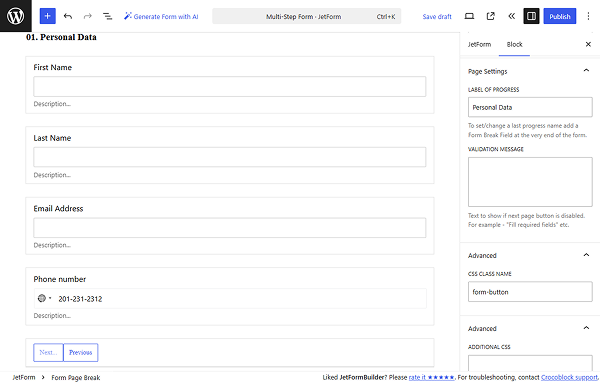
In this case, we click the “Start from scratch” button. For the first step, we keep the default Text Field for the first name. Then add two more Text Fields for the last name and email address, and a Phone Field.
Once the fields for the first step are ready, add the Form Page Break block. This block separates the form into pages, and every Page Break starts a new step.
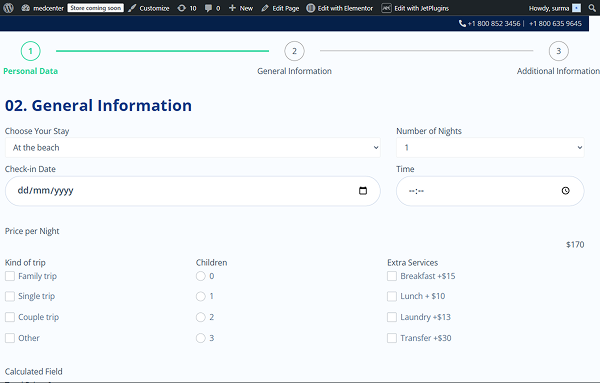
Now, let’s add fields for the second step to gather the booking details. In this case, we use Select, Checkboxes, Date, and Time Fields to allow users to fill in the details.
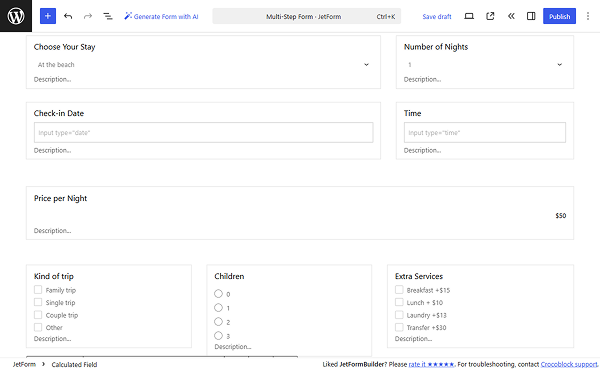
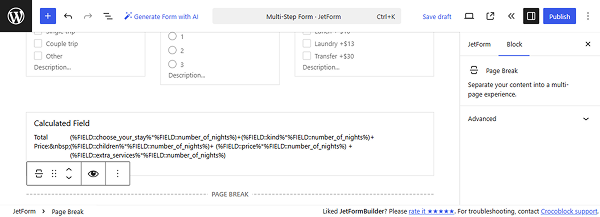
In this example, the Calculated Field displays the booking price based on the user’s selections. To separate this step, we add the Page Break Field.
In the same way, you can add as many steps as needed. In this example, we add the final step using the WYSIWYG Field for comments and the Media Field for file uploads.

Depending on the type of form, the last page may contain review fields or a consent checkbox. However, the Action Button field is necessary to allow users to submit the form.
Set up the Post Submit Actions for your form according to your requirements.
Configure Navigation Buttons
Once the form structure is ready, you can configure the navigation buttons that allow users to move between steps. JetFormBuilder provides two ways to add navigation controls to a multi-step form, making navigation more intuitive and flexible:
- using the built-in navigation buttons included in the Form Page Break block;
- using separate Next Page and Previous Page blocks.
Both approaches provide the same functionality. The main difference is where the buttons can be placed within the form layout.
Built-in Form Page Break buttons
By default, the Form Page Break Field can display navigation buttons that allow users to move between form steps.
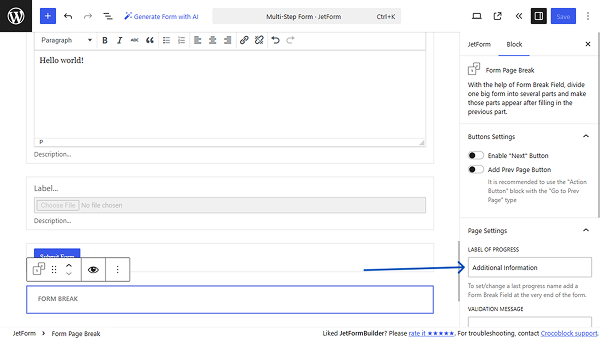
In the Buttons Settings section, you can enable both or only the needed button, and customize the labels in the BUTTON LABEL inputs.
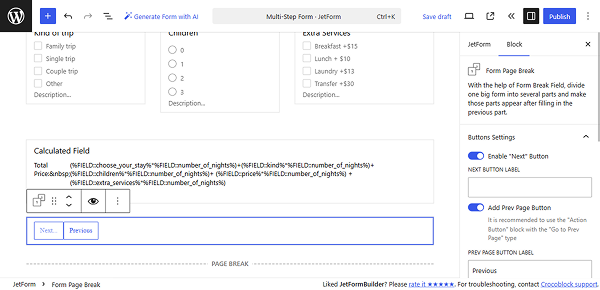
In the Page Settings section, you can set a custom LABEL OF PROGRESS. To set or change a last step name, add a Form Break Field at the very end of the form after the Action Button.
This is the simplest setup because the navigation controls are managed directly inside the Form Page Break block.
Separate Next and Previous Page blocks
If you need more control over the form layout, you can add the dedicated Next Page and Prev Page blocks.
These blocks work together with the Page Break blocks that define the form steps. Unlike the built-in navigation controls, they can be placed anywhere within the current step.
The Next Page block moves users to the next step of the form. It should be added at the bottom of the step, except for the last one.
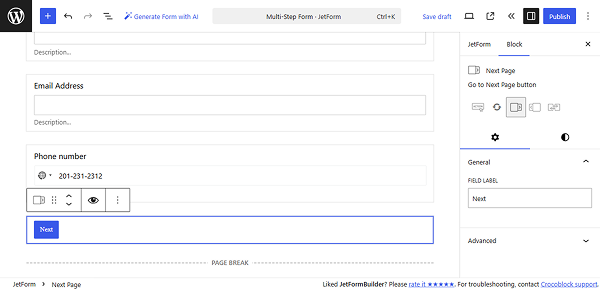
After inserting the block, you can customize its label in the block settings. By default, the button displays “Submit,” but you can change it to better match your form’s flow in the FIELD LABEL input.
The Prev Page block allows users to return to the previous step and review or edit their information. It is commonly placed next to the Next Page button on the second and subsequent steps.
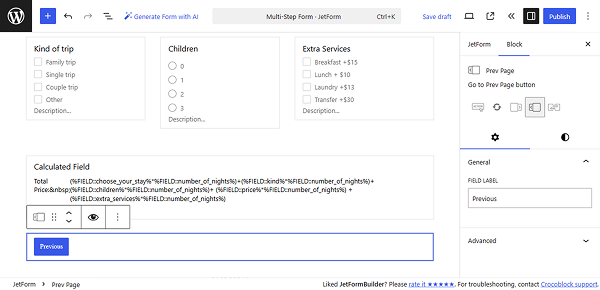
This approach is useful when your design requires custom button positioning or more advanced layouts.
Both methods work the same way and provide the same user experience.
The built-in Form Page Break buttons are usually the easiest option for standard forms, while the separate Next Page and Prev Page blocks offer more flexibility when you need custom layouts or button placement.
Choose the option that best matches your form design and workflow.
Enable the Progress Bar
A Progress Bar helps users understand where they are in the form and how many steps remain before completion. This is especially useful for longer forms, as it provides visual feedback and sets clear expectations throughout the process.
To enable the progress bar, navigate to the Form Settings section. Then, locate the Enable form pages progress toggle and enable it.
Once enabled, JetFormBuilder will display a progress indicator above the form pages on the front end.
Improve Long Forms with the Save Form Progress Add-On
Multi-step forms are easier to complete than long single-page forms, but users may still leave the page before reaching the final step. This is especially common when forms require a significant amount of information or supporting documents.
The Save Form Progress add-on helps prevent data loss by allowing users to continue filling out a form after leaving and returning to the page.
When enabled, the add-on stores the entered form data locally in the user’s browser. If the user closes the tab, refreshes the page, closes a pop-up with the form, or leaves the website before submitting the form, their progress can be restored when they return.
This feature is particularly useful for forms that require more time to complete, such as:
- application forms;
- booking forms;
- surveys and questionnaires;
- order request forms;
- registration forms with multiple steps.
The Save Form Progress add-on is an optional enhancement that can be added when you need draft-saving functionality.
Refer to the How to Enable Saving Progress for Multi-Step Forms guide for the complete setup process, add-on settings, and configuration options.
Best Practices for Multi-Step Forms
To improve completion rates and make the process more user-friendly, utilize a logical multi-step structure and keep these tips in mind:
- Group related fields together — organize fields by topic and place related questions on the same step. For example, keep personal information, booking details, and additional requests on separate pages.
- Keep each step short — avoid overwhelming users with too many fields at once. Short, focused steps make the form feel easier to complete. Users are more likely to finish a form when each step contains only the information needed for a single task.
- Use clear step names — if you enable the progress bar, use descriptive labels such as “Personal Information”, “Booking Details”, or “Confirmation” instead of generic names like “Step 1” and “Step 2”.
- Minimize required fields — only mark fields as required when they are truly necessary. Reducing the number of mandatory fields can improve completion rates and user experience.
- Test the entire flow before publishing — before making the form live, test every step on the front end. Verify that navigation buttons, progress indicators, validation messages, and submit actions work as expected.
Troubleshooting Common Multi-Step Form Issues
Now, let’s focus on the common issues our clients face and find solutions and steps to check.
Progress Bar doesn’t display or displays incorrectly
If the progress bar is missing or appears incorrectly, check the following:
- ensure the Enable form pages progress toggle is enabled in the form settings;
- test the form on the front end, not only in the editor preview;
- clear any website, browser, and plugin cache;
- verify that the progress bar has not been enabled in multiple forms on one page.
Users lose data after leaving the page
By default, multi-step forms do not save entered data when users close the page or browser before submitting the form.
To preserve entered information between sessions, enable the Save Form Progress add-on instead of trying to solve this with custom code.
Users are confused after submission
A default success message may not provide enough feedback after the form is submitted. Consider improving the post-submission experience by:
- customizing the success message;
- adding clear instructions about the next steps;
- redirecting users to a dedicated Thank You page.
Need to change the Last Page labels
To set or change a last step label, add a Form Break Field at the very end of the form after the Action Button. Type the needed name in the LABEL OF PROGRESS input.
FAQ
Enable the Form Pages Progress option in the form settings to display a progress bar. If you need users to navigate by clicking individual steps, additional customization may be required depending on your form layout and design requirements.
Yes. Add a Form Break Field at the very end of the form after the Action Button. Type the needed name in the LABEL OF PROGRESS input.
Keep the number of fields to a minimum, avoid unnecessary calculations, optimize uploaded files, and use caching where appropriate. Testing the form on the front end can also help identify performance bottlenecks caused by third-party plugins or custom code.
No. Instead, JetFormBuilder offers a Progress Bar that helps users understand where they are in the form and how many steps remain before completion. To enable the progress bar, navigate to the Form Settings section and enable the Enable form pages progress toggle.
You can improve the user experience by redirecting users to a dedicated Thank You page after submission. Otherwise, you can use the Limit Form Responses add-on to define how many times the form can be submitted, so it will not be available once the limit is reached.
This behavior may occur depending on the submission method and page state. If you want to avoid confusion, consider redirecting users to a Thank You page instead of displaying the success message on the same page.
Yes. With the Save Form Progress add-on enabled, users can return to the form and restore previously entered information instead of starting from scratch.
No. Multi-step forms work without the Save Form Progress add-on. The add-on is an optional feature designed for longer forms where users may leave the page before completing the submission.
That’s it. Now you know how to create a WordPress multi-step form with a progress bar, step navigation, and Save Form Progress functionality with the help of the JetFormBuilder plugin.