How to Create a Registration Form With Email Verification
With the help of the JetFormBuilder plugin, it is possible to create a front-end registration form with email confirmation. To register on the site, the user should input the login and email address and follow the verification link sent to the mailbox. Once the user follows the link, the registration process is completed.
Email verification helps validate the user request before the form is submitted. Also, it makes the registration process fast and effortless — creating a password to complete the registration is not required. The user can use an automatically generated password to log in to the site in the future.
- Create a New Form
- Set Up Post Submit Actions
- General Messages Settings
- Display the Form on the Front End
- Test the Flow
- Verify Emails Manually from the WordPress Dashboard
Create a New Form
In the WordPress Dashboard, navigate to the WordPress Dashboard > JetFormBuilder > Add New tab to start creating a new form.
In the form editing page, enter the form name.
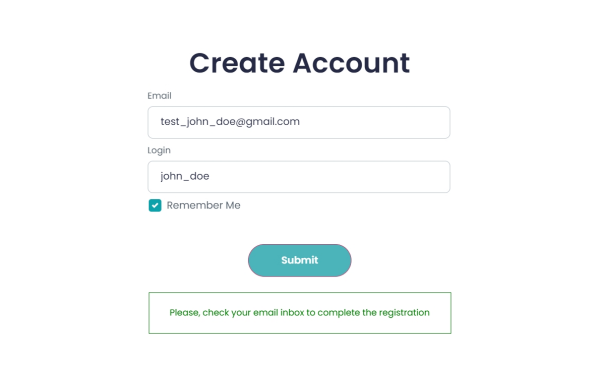
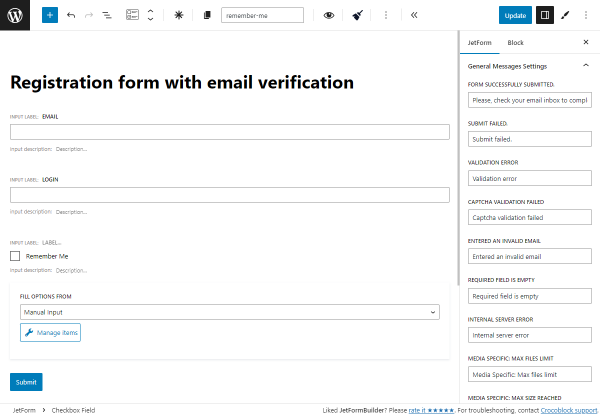
The form will contain two Text Fields and one Checkbox Field. The first Text Field will allow the user to enter the email address, and the second Text Field will allow entering the login. The Checkbox Field will serve as a “Remember Me” field.
In the Welcome block, pick the “Register User” pattern.
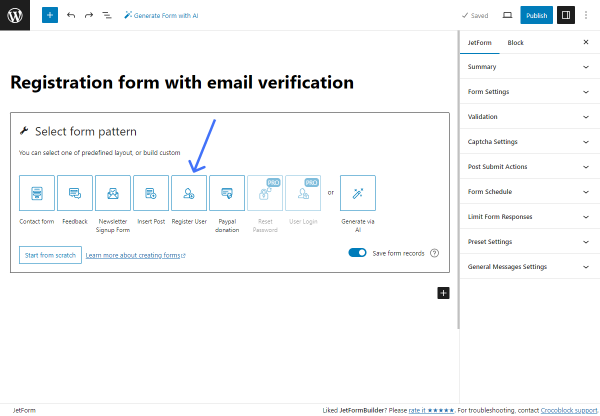
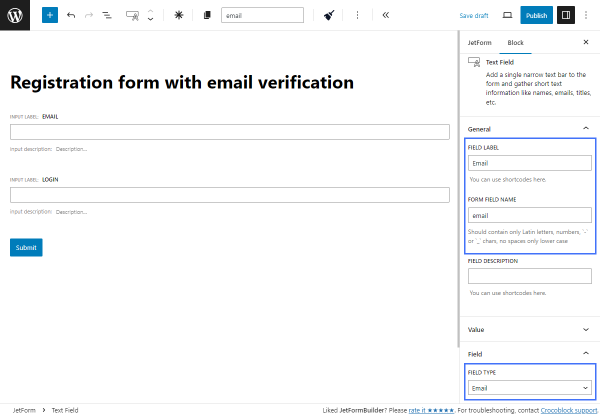
It adds two Text Fields: “Email” and “Login.”
In the right sidebar with Block settings, you can change the FIELD LABEL and FORM FIELD NAME of the Text Fields according to your preferences.
Also, note that the FIELD TYPE of the “Email” field should stay as “Email.”
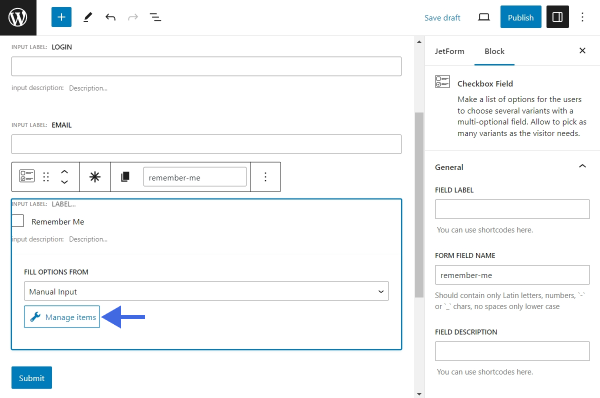
Then, add a Checkbox Field below. Leave the FIELD LABEL empty and define the FORM FIELD NAME — for example, type “remember-me.”
Press the “Manage items” button to configure the options for this Checkbox Field.
In the opened pop-up, click the “Add new Option” button. Complete a LABEL field — “Remember Me.” Insert “1” as the VALUE option.
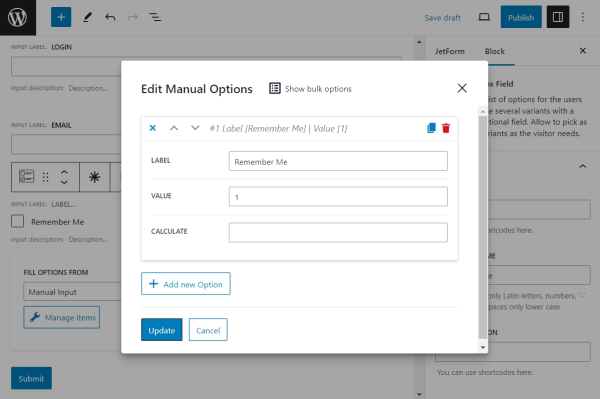
Once done, “Update” the changes.
Set Up Post Submit Actions
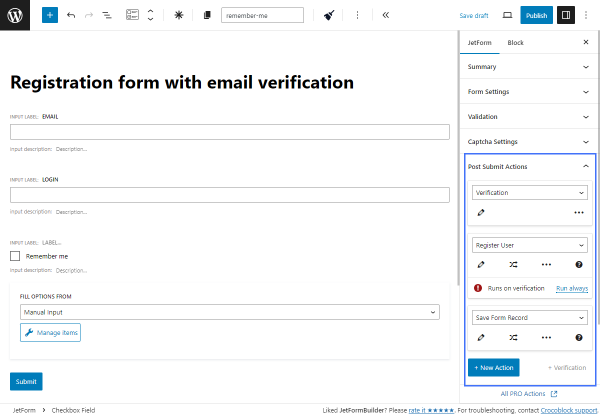
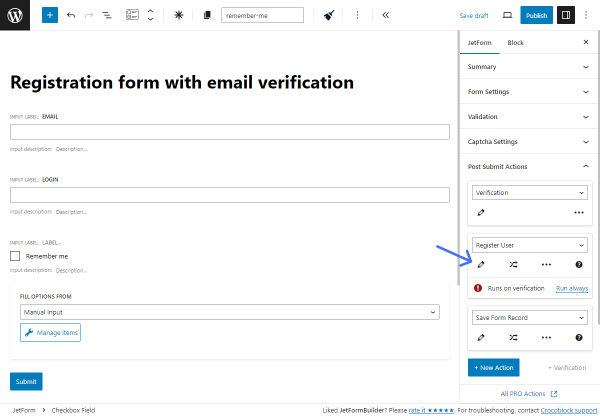
Switch the Block settings tab in the right sidebar to the JetForm tab. Unfold the Post Submit Actions section.
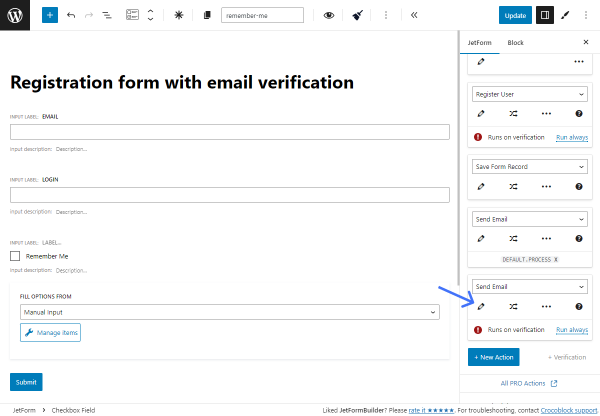
The “Register User” pattern added three post-submit actions: “Verification,” “Register User,” and “Save Form Record.”
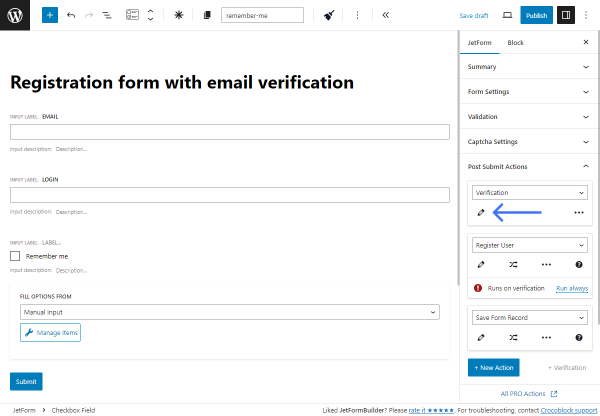
Configure the “Verification” action
Click the “pencil” icon under the “Verification” action to open the customization pop-up.
The “Verification” action sends an email with a verification link to the specified email address. The user should press this link within the defined timeframe to complete the verification. Once the verification is complete, the rest of the Post Submit Actions will be executed.
The WHO CAN VERIFY THE SUBMISSION setting defines who has the authority or capability to verify or approve a submitted form:
- User & Administrator. The user can verify the form with the email, and the admin can verify it manually from the WordPress Dashboard;
- Administrator. Only administrators have the authority to verify the submission.
After setting the verification permission, enter the number of hours into the LINK LIFESPAN field. This setting defines the timeframe within which the verification link remains active. If the LINK LIFESPAN field is left empty or if “0” is entered, the verification link will not have an expiration time.
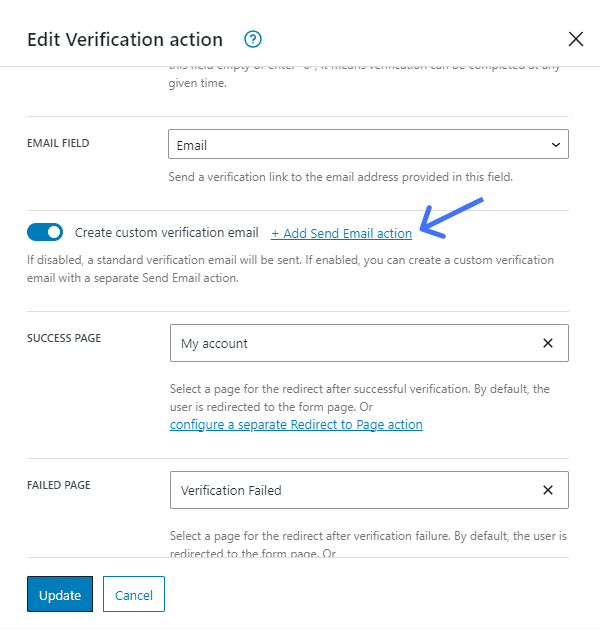
After that, choose the email field from the suggestions under the EMAIL FIELD drop-down menu. Once the email field is specified, a new toggle will appear, encouraging you to Create custom verification email.
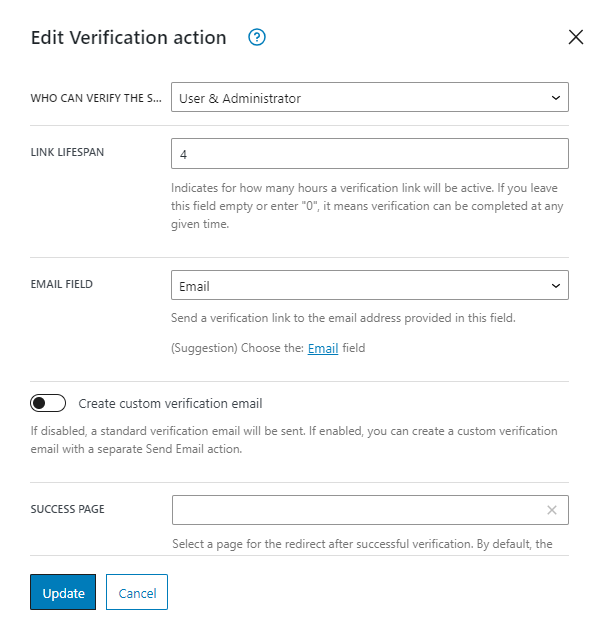
If the toggle remains disabled, a standard email will be sent to the user from the Administration Email Address set in the WordPress Dashboard > Settings > General tab.
Enable the Create custom verification email toggle and proceed to the rest of the action settings. We will set up the “Send Email” action later.
Move on to the SUCCESS PAGE and the FAILED PAGE settings. Select a page where the user should be redirected in case of a successful or failed verification. If no page is selected, the user will be redirected to the page where the form was initially submitted. It is also possible to “configure a separate Redirect to Page action” for each case.
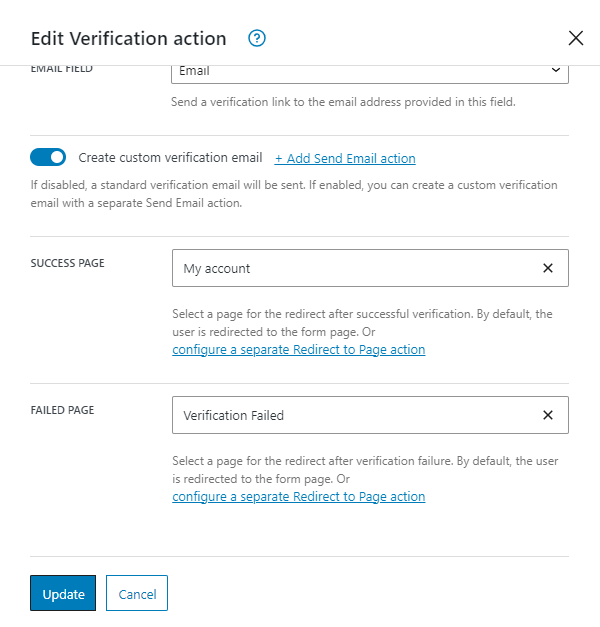
In our example, we will redirect the user to a “My Account” page after successful verification and to a static “Verification Failed” page if the user fails to complete the verification.
Once you finish the setup of this action, click the “Update” button to save the changes.
Set up the “Register User” action with an auto-generated password
Press the “pencil” icon to edit the “Register User” action’s settings.
In the FIELDS MAP section, the “Email” and “Login” fields are already mapped. Therefore, the value entered by the user into the “Login” field will be saved as the user login, and the value of the “Email” field will be saved as the user’s email.
Then, map both the Password and the Confirm Password fields with the “Secure unique token” option. The “Secure unique token” option is added by the “Verification” action and represents a unique password auto-generated after form submission. This way, the form lets the user sign up with only their email and login, not requiring them to create a password manually at this stage. Later, this password will be sent to the user with a “Send Email” action.
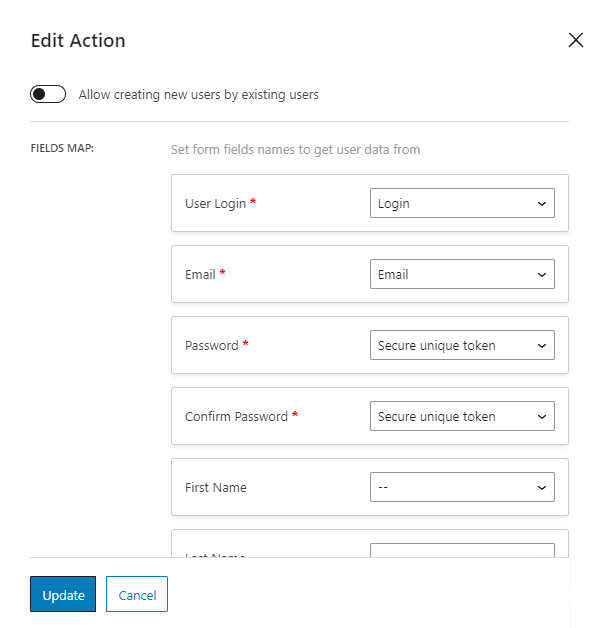
Scroll past the FIELDS MAP section and select the User Role, which should be assigned to the newly registered user (e.g., “Subscriber”).
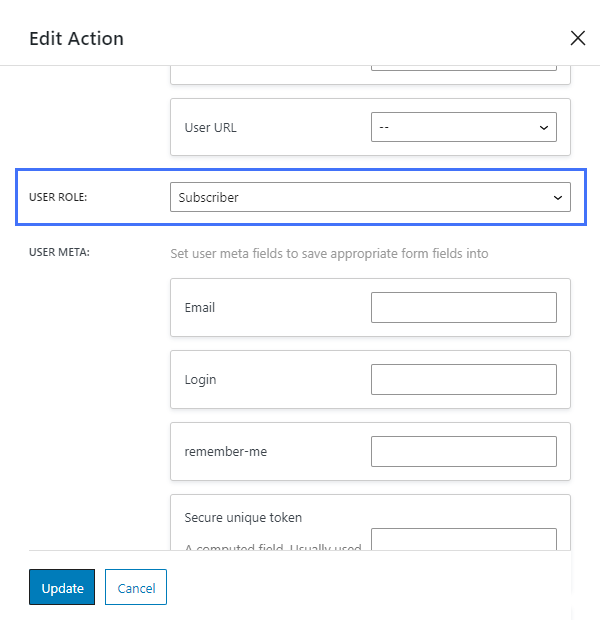
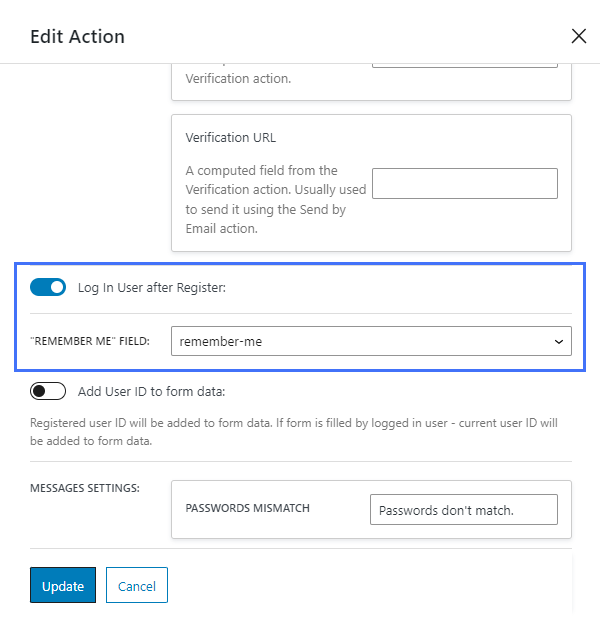
Next, scroll down to find and activate the Log In User after Register: toggle. This way, the user will be automatically logged in after completing the verification process.
Select the “remember-me” Checkbox Field as the “REMEMBER ME” FIELD option. This field helps to keep the user authenticated for a longer period of time — after checking the “Remember Me” checkbox, the user will remain logged in for fourteen days; if not, only for two days.
We have finished setting up the “Register User” action. Save the settings and proceed to the next step.
“Save Form Record” action
The “Save Form Record” action stores the submitted form data on the Form Records Page. On this page, you can verify emails manually as described in the Verify Emails Manually from the WordPress Dashboard chapter of this tutorial.
In our case, we don’t need to modify the action settings, but you can configure them according to your needs.
Add a “Send Email” action for a custom verification email
Now, it is time to create a custom verification email.
Open the settings of the “Verification” action once more to click the “+ Add Send Email action” button. It will automatically add a new “Send Email” action where each part of the verification email can be customized.
Leave the MAIL TO and FROM FIELD settings intact and proceed to configure the rest of the fields.
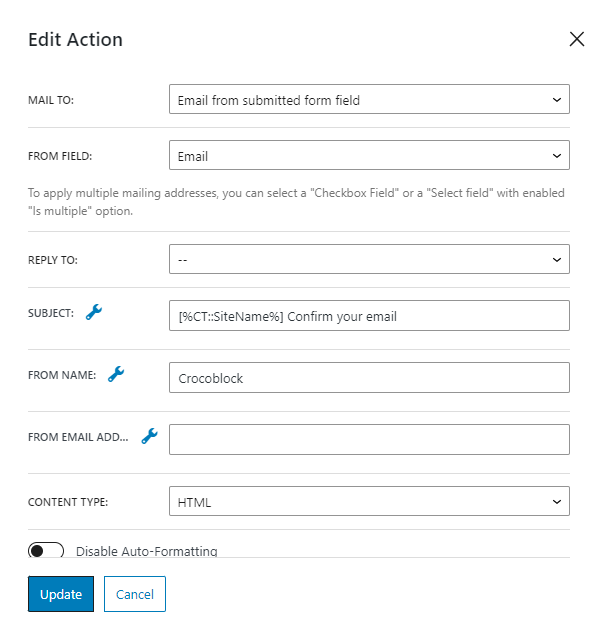
After setting up the REPLY TO, SUBJECT, FROM NAME, and FROM EMAIL ADDRESS fields, select the “HTML” CONTENT TYPE to allow the processing of HTML tags in the content of the email.
Then, edit the content of the email according to your needs. It is also possible to insert Macros to retrieve the values entered by the user into the form fields. To see the list of available Macros, click the wrench-shaped icon near the CONTENT field label.
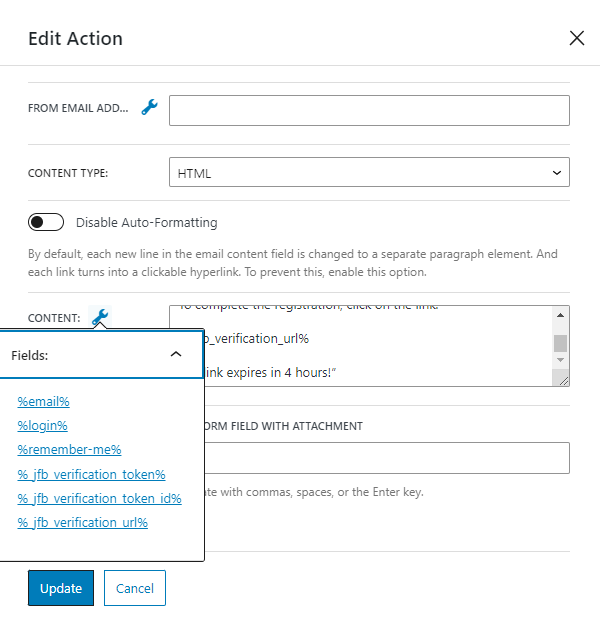
The list contains general Macros that represent each form field and three special Macros added by the “Verification” action:
- %_jfb_verification_token% — represents a unique token generated for the user. If this token was set as the user password in the “Register User” action settings, you can insert the %_jfb_verification_token% macro in the email content to send the user this automatically generated password. The user will use it to log in;
- %_jfb_verification_token_id% — represents the ID of the verification token in the database. A reference to each verification token is saved in the “jet_fb_tokens” database table; however, the token itself is not stored there;
- %_jfb_verification_url% — a verification link the user receives to complete the verification process. The link contains the verification token and its ID.
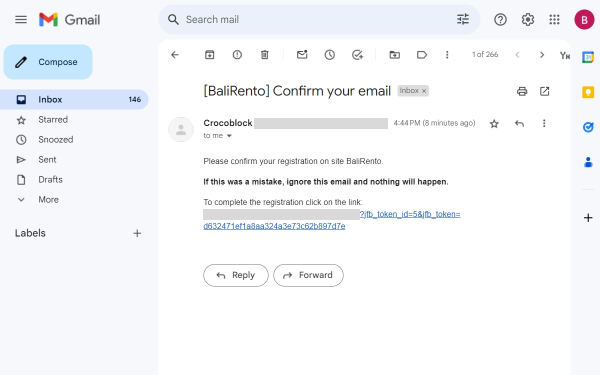
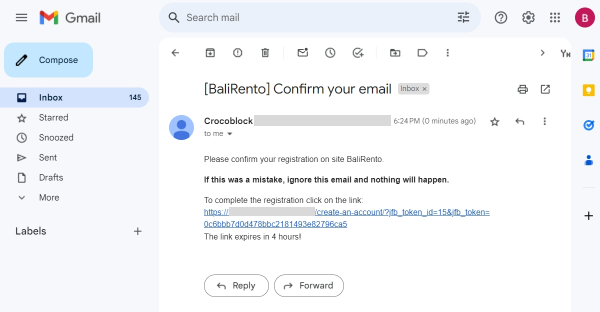
We used only the %_jfb_verification_url% macro from the above list and composed such an email:
“Please confirm your registration on the site %CT::SiteName%.
<b>If this was a mistake, ignore this email, and nothing will happen.</b>
To complete the registration, click on the link:
%_jfb_verification_url%
The link expires in 4 hours!”
Click the “Update” button to close the customization window and proceed to the following “Send Email” action.
Add a “Send Email” action to send the password details
The next step is to compose an email, which will be sent to users after they complete the registration. The letter will include an automatically generated password that users can utilize to log into the site until they opt to modify it.
Press the blue “+ New Action” button to add a new “Send Email” action, and click the pencil-shaped icon under the action name to call the customization pop-up.
Select the “Email from submitted form field” option for the MAIL TO field. Then, pick the “Email” field in the FROM FIELD drop-down menu, which appears below.
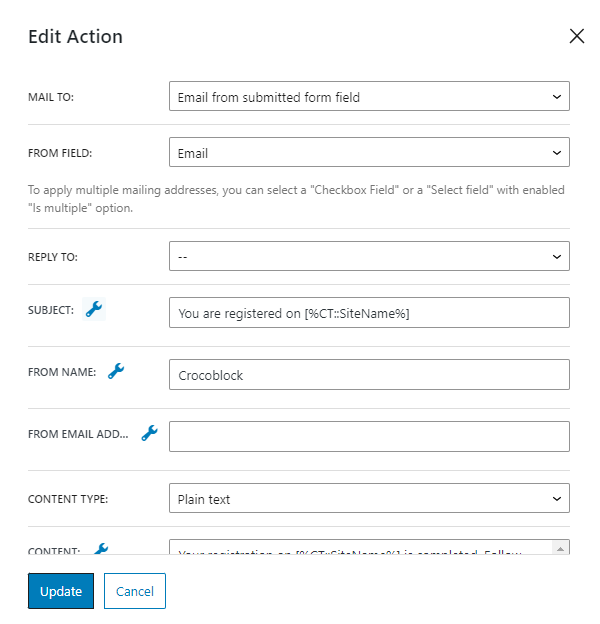
After setting up the REPLY TO, SUBJECT, FROM NAME, and FROM EMAIL ADDRESS fields, select the “Plain Text” CONTENT TYPE option. To allow the processing of HTML tags in the content of the email, select the “HTML” CONTENT TYPE.
Finally, compose the content of the letter, which the users receive after they complete the registration. Include the %_jfb_verification_token% macro to send the users their auto-generated passwords.
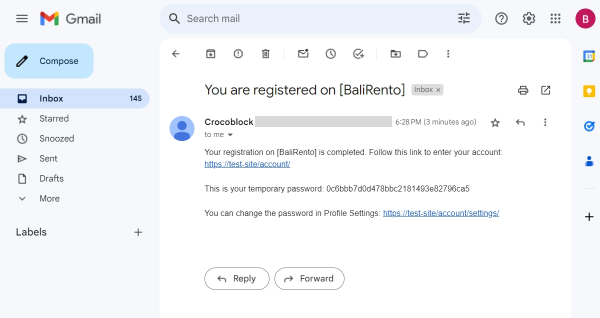
We composed such a letter:
“Your registration on [%CT::SiteName%] is completed. Follow this link to enter your account:
This is your temporary password: %_jfb_verification_token%
You can change the password in Profile Settings:
https://test-site/account/settings/”
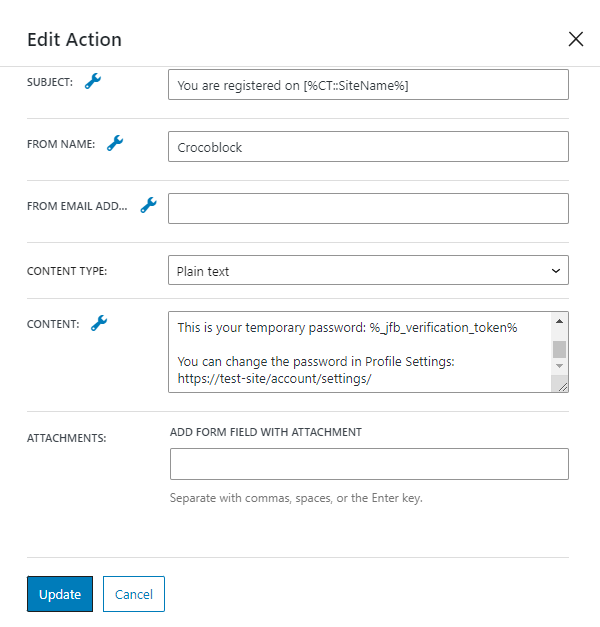
Once you are finished with the settings, “Update” the changes.
General Messages Settings
Scroll past the Post Submit Actions settings tab and unfold the General Messages Settings. Settings in this tab allow changing the default notifications that pop up after the form submission.
Most importantly, change the default FORM SUCCESSFULLY SUBMITTED message and encourage users to check their mailbox after they submit the form. For example: “Please, check your email inbox to complete the registration.”
Once you finish customizing the form messages, the form is complete. Hit the “Publish/Update” button to save the result.
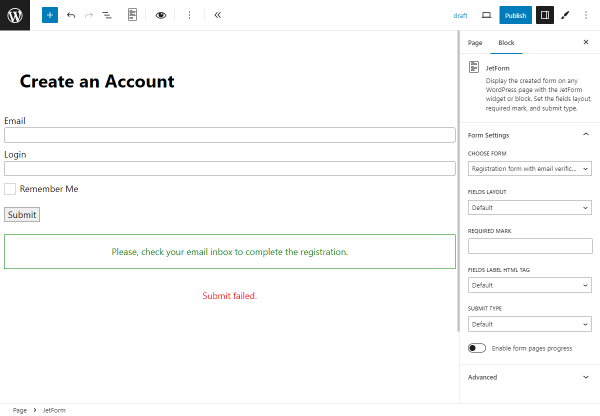
Display the Form on the Front End
Head to the page or template where the registration form should be located.
If editing the page with Block Editor, use the JetForm block to display the form in the needed part of the page.
If editing with Elementor, use the JetForm widget to place the form on the page.
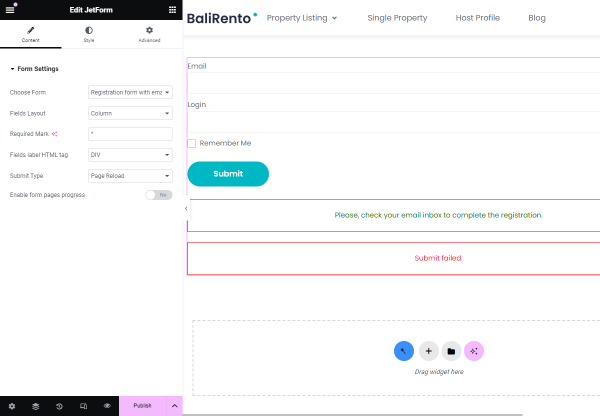
For more details, follow the detailed How to Display a Form on the Front End guide to learn how to add the form in any page builder.
Test the Flow
Move to the front end and complete the form to register a new user. Use an email address you can access.
Check the email inbox for a new letter containing the verification link. Follow the link to complete the registration.
After following the link, one should be redirected to the page previously selected in the settings of the “Verification” action. The registration is complete, and a new user is created in WordPress.
Also, the second email is sent to the user containing the password to the account.
Verify Emails Manually from the WordPress Dashboard
With the “Save Form Record” post-submit action, you can reach the submitted form data in the WordPress Dashboard > JetFormBuilder > Form Records tab.
If the form has the “Verification” action, the submitted form can have three Statuses:
- Verified – if the user verified the form from the email or the administrator verified it manually. You can set who can verify the form (only admin or user and admin) in the “Verification” action WHO CAN VERIFY THE SUBMISSION setting;
- Waiting verification – if the user or admin hasn’t verified the form yet;
- Verification token expired – if the user or admin didn’t manage to verify the form in the timeframe set in the LINK LIFESPAN settings of the “Verification” action. Then, the user needs to submit the form one more time to verify it.
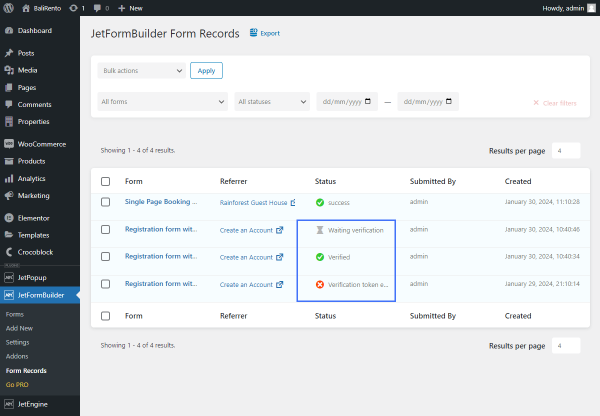
If the submitted form has the “Waiting verification” Status, it contains the “Verify manually” action by clicking which the form obtains the “Verified” Status.

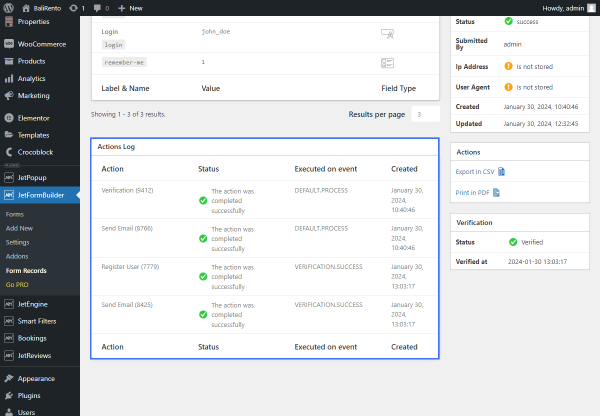
If you hit the “View” action under the form with the “Verification” post-submit action, you’ll see the Verification section.
This section shows the verification Status: “Pending,” “Expired,” or “Verified.” It also displays the time when the verification Expires, Expired, or was Verified according to the Status.
If the verification has a “Pending” Status, the section contains the “Verify” button with which the administrator can verify the form.
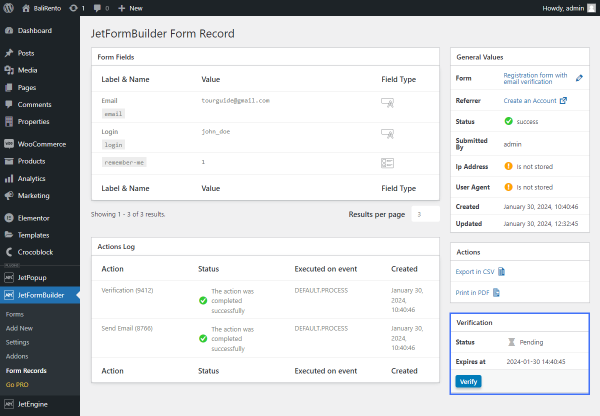
Also, pay attention to the Actions Log sections: if the form is expired or waiting for verification, only two actions are completed: “Verification” and “Send Email” with the custom verification email.
If the user or administrator verifies the form, the next two actions are completed: “Register User” and “Send Email” with the password details.
That’s it; you have learned how to create a registration form with a double opt-in using only the free version of the JetFormBuilder plugin.