Booking Form
Develop and implement a WordPress booking form letting users make online reservations fast and easy.
Contents:
- Why You Need a WordPress Booking Form
- Top WordPress Booking Form Features
- WordPress Form Pattern Structure
- How to Create a WordPress Simple Booking Form
- WordPress Booking Form Pro Features
Why You Need a WordPress Booking Form
Booking forms allow business owners to streamline the online booking routine. Add a multi-step WordPress booking form to the website for all booking requests to land in the same place.
A dedicated booking form can be used to arrange a flight reservation, a room reservation, hotel accommodation, and more. To create a WordPress simple booking form, you’ll need the JetFormBuilder Pattern and some time. Customize the form fields and add a payment gateway to it if necessary.
Top WordPress Booking Form Features
- Use the shortcode to add a WordPress simple booking form to posts, pages, widgets;
- Receive form submissions to the default admin email or custom email address;
- Turn detailed booking forms into multi-step and make them user-friendly;
- Make personal information fields Required;
- Add Date and Time fields to obtain the essential reservation details;
- Provide the ability to add +1 guest if needed;
- Show the automatically calculated booking total price before the form submission;
- Use reCAPTCHA v3 validation to protect the booking form from spam;
- Provide the Success, Validation, and Error Messages during form submission;
- Apply custom style settings to booking form fields;
- Autosave the form progress and inputted data if the form filling process was interrupted;
- Build email marketing lists with MailChimp, GetResponse, Active Campaign, Zapier, and Make integrations.
WordPress Form Pattern Structure
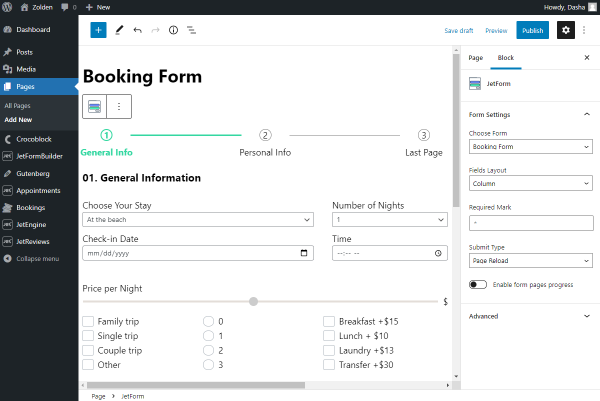
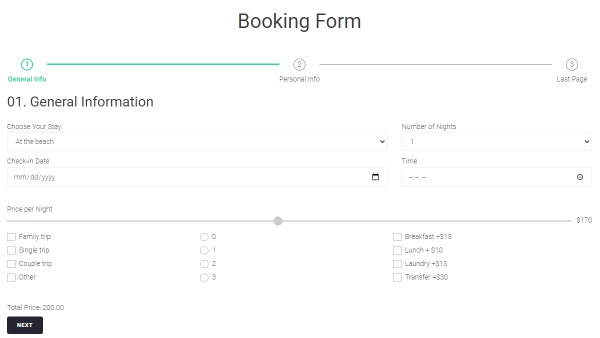
Step 1 – General information
- Choose Your Stay. A Select field for choosing the desired location;
- Number of Nights. A Select field for picking the number of days to stay;
- Check-in Date. A Date field for filling in the arrival day;
- Time. A Time field for filling in the arrival time;
- Price per Night. A Range field with prices per night;
- Kind of Trip. A Checkbox field for indicating the journey type;
- Children. A Radio field to submit the number of children;
- Extra Services. A Checkbox field for picking additional services;
- Total Price. A Calculated field with the set formula to calculate the total price;
- Next/Previous button. A Form Break Field that splits form into steps.
Step 2 – Personal information
- Name. A required Text field for filling in the customer’s name;
- Last Name. A required Text field for filling in the customer’s last name;
- Phone. A required Text field for filling in the phone number;
- Gender. A Radio field for indicating the customer’s gender;
- Additional Information. A Textarea field for providing extra details about the booking;
- Next Guest. A Repeater field for submitting the +1 guest’s details;
- Next/Previous buttons. A Form Break Field allows you to switch between the form steps.
Step 3 – Additional information
- Leave a Comment. A Textarea field for providing extra details about the booking;
- Choose File Button. A Media field to upload additional files if needed;
- Submit. A Submit field to submit a WordPress simple booking form.
How to Create a Custom WordPress Booking Form
Building an online booking system is a multi-structured task. Needless to say that in this situation, you may want the user not only to look at the available booking options but also have a possibility to reserve preferred apartments. That’s why you may like WordPress Booking Form Pattern from the JetFormBuilder plugin.
Create a new form
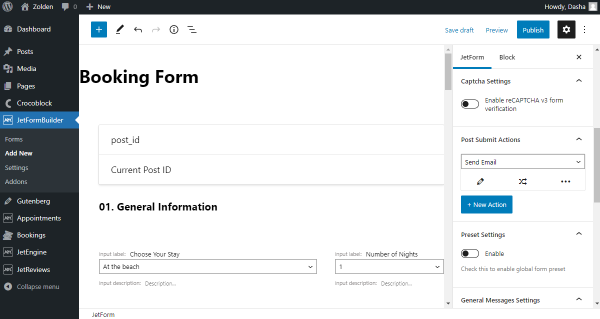
Begin the work from JetFormBuilder > Add New and give a name to the form.

You can delete the default Hidden, Text, and Submit Fields. We don’t need them as we will work with Pattern that already includes other essential fields for booking.
Place a Booking form pattern
The Pattern is a layout that can be customized and styled up. It includes fields that can likely be used to meet specific needs.
Although mind that to style the form, you may need to install the JetStyleManager plugin. It will allow you to apply any desired changes to the form appearance.
Navigate to adding the new block by clicking on the “Plus” icon on the top left side of the WordPress Editor. Open the Patterns tab and choose the “JetForms” option from the drop-down menu. Find and place the Booking Form on the page.
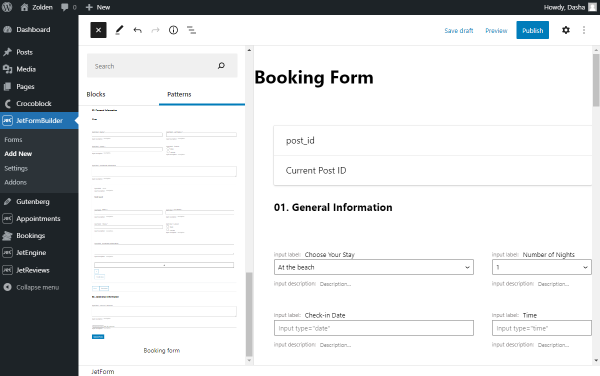
This pattern comprises three parts. Let’s take a closer look at each of them and the inserted fields.
Above all the sections, there is a Hidden Field that the users will not see. Apply it if you need to use the data for calculations.

General Information consists of the following fields:
- Select Fields — allow customers to select the type and duration of stay;
- Date Field — set for check-in date input;
- Time Field — fixes the time of the guest arrival;
- Range Field — lets users set out the wished price per night;
- Checkbox Fields — for several options to choose from, responsible for kind of a trip and extra services provided;
- Radio Field — gives options where only one can be picked. In this case, it is to inform if the user is traveling with children;
- Calculated Field — counts the total price drawing attention to the previously input data;
- Form Break Field — divides form into parts that are displayed separately. Click on it and change its label of progress to show it under the step indicator.
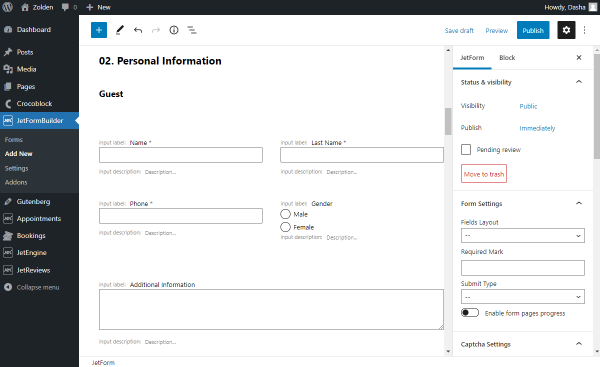
Personal Information is responsible for the guest data input and encloses such fields:
- Text Fields — for the personal identification details needed for the execution of entrance;
- Radio Fields — define the gender of guest;
- Textarea Field — additional information a user would like to add;
- Repeater Field — provides the form with a repeatable block that will double itself when the user clicks on it, works for adding guests that travel together with the user filling out the form;
- Form Break Field — enables a user to proceed to the next part of the form.
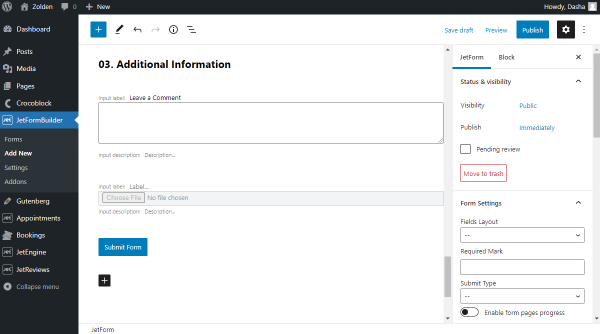
Additional Information is the last part of the Form Pattern that involves a couple of other fields:
- Wysiwyg Field — admits a user to type the desired styled information or some other content;
- Media Field — set for uploading some pictures needed for the convenient booking. For instance, it can be a photo of required documents;
- Submit Field — the final point on the way to sending a WordPress Booking Form.
Edit or delete all the desired fields. It is possible as they are not preset.
Work on the JetForm settings
JetForm Settings are capable of changing the layout of the whole form.
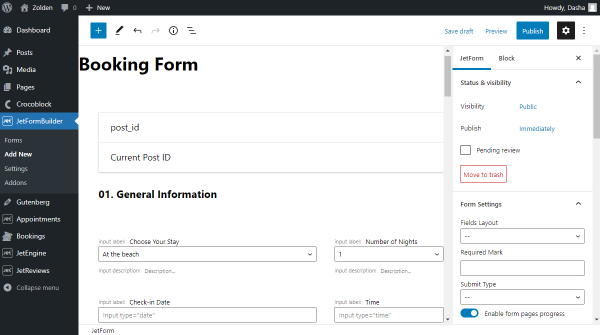
- Form Settings embrace the following:
- Fields Layout — defines the relation of the field label and the field bar. Choose “Column” if you want to put the label above the bar, and “Row” if one line is desired;
- Required Mark — lets you adjust a symbol that is used to determine the necessary fields;
- Submit Type — enables setting a “Page Reload” or “AJAX” option that will not reload the page;
- Enable form pages progress — if you work with the Form Break Field you can add a step indicator to the form parts.
- Captcha Settings can also be set up to meet all the requirements. You can learn about it in detail from our reCAPTCHA video overview.
- Post Submit Actions are the most vital part of the booking form creation process. They define in which way information will be processed after the form submission.
The first action we will set is “Send Email.”
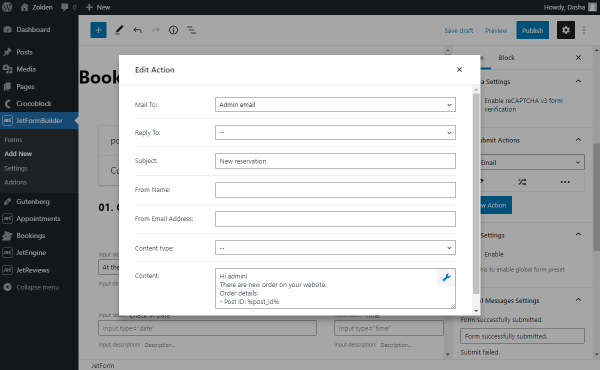
Edit this action according to your requirements. If you want to send a reply to the customer, you can also add an Email Text Field to the form. When you have finished editing, push the “Update” button.
One more post-submit action that can be added to the booking form is “Insert/Update Post,” which creates or edits the existing post type to insert data to the post automatically when a customer fills in the form.
To adjust this section properly, you may need to install and activate the JetEngine plugin. It will help to create meta fields for all the input data.
Create meta fields for all the fields that require input information and click on the “Add Meta Box” button. Once you are done, return to the form and open the “Insert/Update Post” Submit Action edit window.
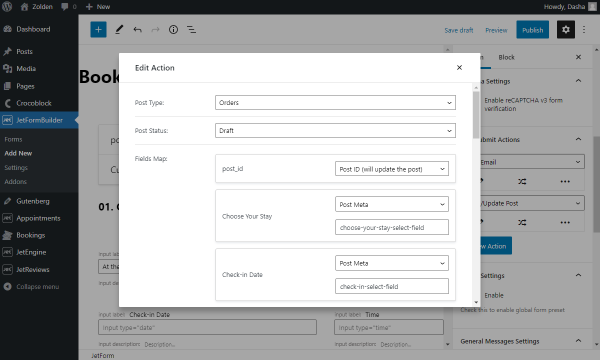
Select Post Type where the data will be inserted, its Status, and Fields Map. The last tab is accountable for the meta fields you have just created. Type the Meta Field Names in the corresponding fields. Update the action.
- Preset Settings. You may also enable the preset setting for this Booking pattern to add recurring data. Thus, the form would be more user-friendly.
Payment customization
Let us also enable a possibility to pay for the apartments. To do this, proceed to JetFormBuilder > Settings > Payments Gateways.
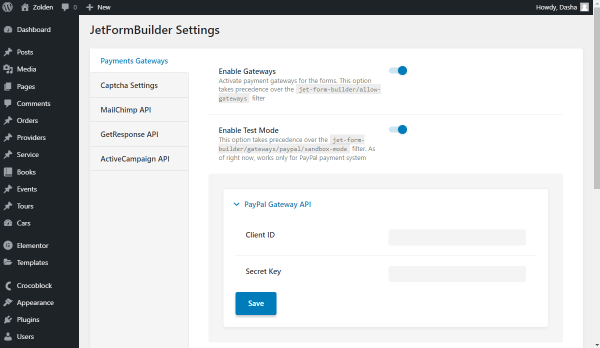
Enable Gateways to start working with payments and toggle Test Mode to check the function before the actual charge. Put the Client ID and Secret Key, read more about how to get them.
Besides PayPal, you can use Stripe Payments to enable another payment option on the website.
Go back to the form editor and enable PayPal Checkout in the Gateways Settings. Consider editing it consequently.
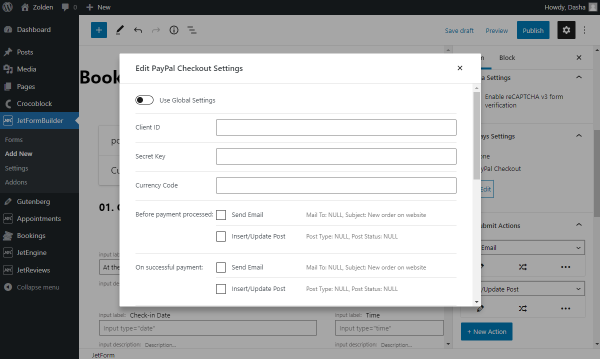
- Client ID and Secret Key — the same values that were input earlier in the JetFormBuilder Settings;
- Currency Code — shows what currency will be used for the payment;
- Before payment processed and On successful payment — in charge of what options will be performed. These are Post Submit Actions that you have configured for the form.
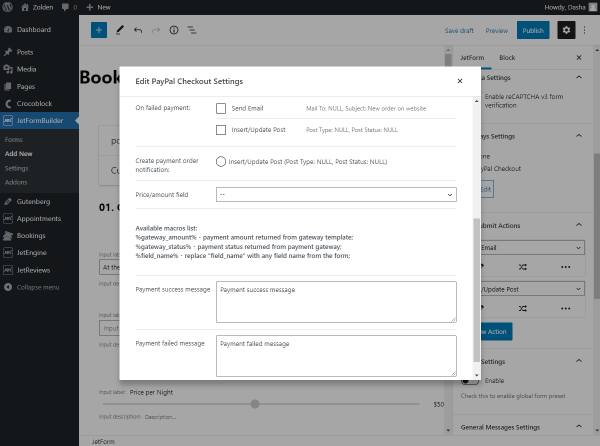
- On failed payment — pick actions to be performed when the payment is failed ;
- Create payment order notification – choose here the associated post-submit action;
- Price/Amount field — set where to pull the price from;
- Payment success and failed messages — type in the notifications displayed to users in the relevant situations.
Update settings to attach PayPal to the WordPress booking form with payment. Work on the Preset and General Messages Settings supplementary if needed, and click on the “Publish” button once you are done editing the form.
Now let’s check how to add the newly created form to the page.
Add a form to the page
Head to Pages > Add New. You can add the form to Gutenberg or create an Elementor Booking Form. Put the JetForm block on the page.
The Booking Form is already displayed with the step indicator above. If you have changed their Labels of Progress, they will be shown here.
If you want to change the “Last Page” label, you need to add one more Form Break Field after the Submit Field in the form editor and give it a name.
There you can also change Form Settings. However, if you have already applied these settings while creating the form with JetFormBuilder, there is no need to do it one more time. Those settings will override these.
Moreover, you can add some CSS classes in the Advanced Settings if needed.
Let’s publish the page and check it on the front-end.
That is it. We’ve created a WordPress simple booking form that’s ready to cover customer reservations.