
How to Build a WordPress Login Form
Learn how to configure and manage the complete user authentication provided by the JetFormBuilder plugin and the User Login Action add-on, which together allow registration, verification, and login, changing user passwords, logging out, as well as combining some functionalities via the same form (e.g., a login and a register form or a login and a reset password form).
- Build a Form
- Configure the Render States
- Set the Post Submit Actions
- Add the Form to Your Site
- Test the Flow
To implement this functionality, the JetFormBuilder plugin and User Login Action add-on should be installed and activated first. You can download this add-on from your JetFormBuilder account and install and activate it as any other WordPress plugin. The JetFormBuilder WordPress Plugin Installation tutorial details different installation methods.
Here we explain the advanced functionality, but the simplest login form can be built as follows:
- insert the Text Fields for the user’s name and password;
- add the “User Login” Post Submit Action;
- add the form to a page and execute it.
For more details, follow the How to Create WordPress Login Form video to learn how to build a simple login form.
Since in this tutorial we intend to combine registering and logging in, the form that allows filling out all the needed fields in the User Profile or inserting the Meta Box fields should be created. Here, the next list of tutorials can be useful:
- How to Create a Users Page with Profile Builder tutorial 一 explains how to create a Users page in WordPress using the JetEngine plugin;
- Getting Started with Profile Builder video 一 explains importing presets, configuring the Profile Builder module, creating an account page, and adding and editing posts via frontend forms using JetEngine and JetFormBuilder;
- How to Update Posts from Front End tutorial 一 exemplifies creating and configuring an account page and adding and editing posts via frontend forms.
Also, the case explained in this tutorial includes the usage of combined functionalities (login, register user, and reset password forms). If you create a form without multiple purposes (e.g., only a login or register form), omit the usage of Conditional Blocks, Render States, etc. Thus, you can use only the necessary Post Submit Actions (e.g., do not provide verification).
The following tutorials can be handy:
- How to Combine Registration and Login in One Form Using Render States tutorial 一 explains how to combine the functionalities of registration and login in one form using Render States;
- Create a Login & Reset Password Form with JetFormBuilder! video 一 describes how to combine logging in and resetting the password in the same form.
Build a Form
In this case, we build a form that combines logging in, registering a user, and resetting a password. Each part is inserted into the Conditional Block with specific Conditional Visibility for the Conditional Blocks using the Render States.
Read the Conditional Logic for Form Fields on WordPress article or watch the WordPress Form Conditional Logic: Show & Hide Fields Dynamically video to learn behavior scenarios for the whole form or particular fields based on the previously entered data or user choices.
In the first step, we create a form from scratch and type its name.
The second step is creating the login form. You can use a pre-built “User Login” template and modify it.
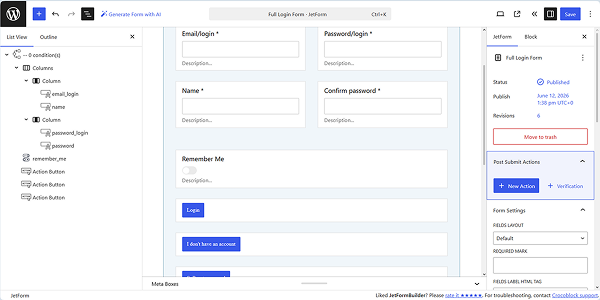
Still, here, we insert the Conditional Block, divide it into two Columns, and add the Text Fields for the email, user name, and password, respectively; a Switcher Field for a “Remember Me” toggle, and an Action Button.
Further, we insert two other Action Buttons and change the texts they display; thus, we have the “Login”, “I don’t have an account”, and “Reset password” Action Buttons.
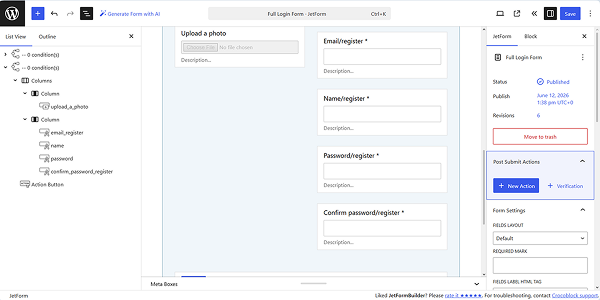
In the third step, we create the register user form. To do it, we insert the second Conditional Block, which has two Columns. We insert a Media Field to upload the user’s photo while registering in the left Column, and the Text Fields to enter data to be saved in the User Profile (e.g., Email, Name, Password, etc) and the Action Button, which displays the “Submit” text, in the right Column.
Additionally, you can Update User via forms. Watch the How to Create a User Profile Edit Form in WordPress video to in-depth understand how to do it, or follow the How to Edit User Accounts From the Front End step-by-step guide to learn how to update personal user information from the front end via the form using the JetEngine and JetFormBuilder WordPress plugins.
In the last fourth step, we build a reset password form. Here, we insert the Conditional Block and add the Reset Password Fields and Reset Password Button blocks in it.
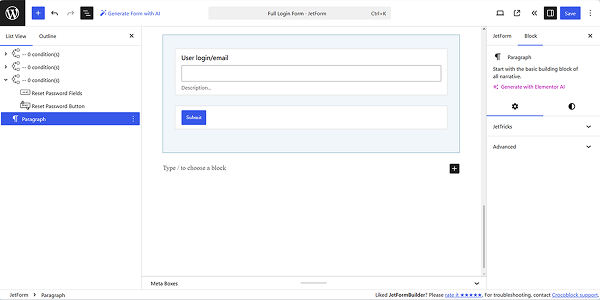
Once completed, save the form.
Watch the How to Make Forms With JetFormBuilder Tutorial 2025 or read the Creating a Form tutorial for an in-depth understanding of the usage of patterns and/or fields.
In addition, watch the Create Custom File Upload Forms on WordPress with Crocoblock JetFormBuilder video to learn how to upload images and other files using both the core plugin and the premium Drag & Drop File Upload Addon.
Configure the Render States
The next stage is setting the Conditional Visibility for the Conditional Blocks using the Render States. Here, we start from the login form.
First, to open the Conditional Block settings window of this form, press the button with the “crossed-arrows” icon on the top tool panel or the “pencil” button in the Block section on the right.
Then, in the newly opened Conditional Logic pop-up, set the “Show if..” WHICH FUNCTION NEED EXECUTE?, “Is render state” OPERATOR, and “DEFAULT STATE” RENDER STATE options.
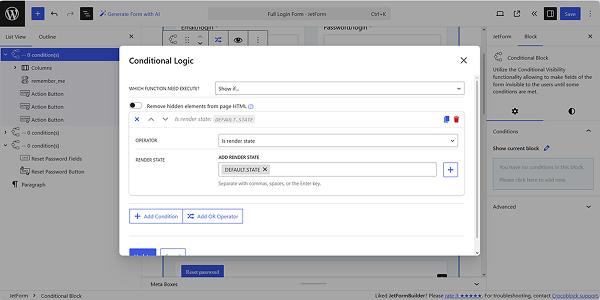
Second, move to the register user form. Here, we set the custom Render State: in the Conditional Block setting window of the register user form, we press the button with the “crossed-arrows” icon on the top tool panel or the “pencil” button in the Block section on the right.
Then, in the newly opened Conditional Logic pop-up, we set the “Show if..” WHICH FUNCTION NEED EXECUTE?, “Is render state” OPERATOR, and create a custom “REGISTER” Render State.
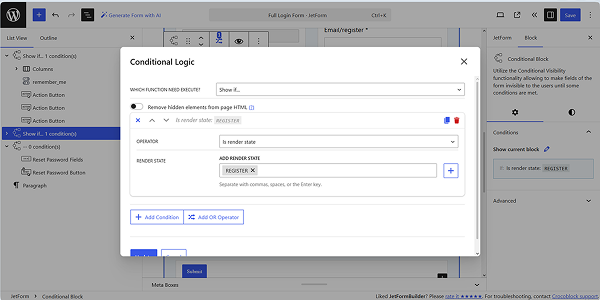
Third, in the same way, create a custom “DEFAULT.STATE.2” Render State for the last reset password form and add two Render States 一 this custom “DEFAULT.STATE.2” and “RESET.PASSWORD”.
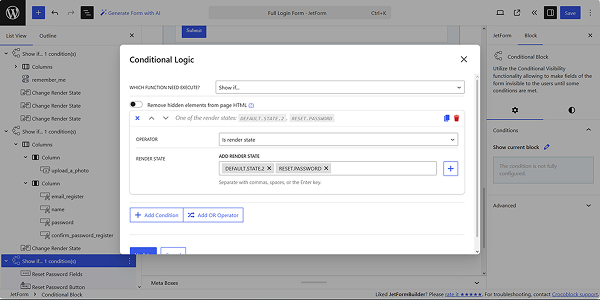
Thus, we have three Conditional Blocks, each of which includes a specific form and has the Render State referring to the inserted form.
More details can be found in the How to Set Up the Reset Password Field tutorial and WordPress Login Form with Reset Password video.
Finally, change the current states of the Action Buttons in the login form. Here, the “Action Button” state for all corresponding buttons is set by default. We move to the login form, press the settings of the “I don’t have an account” Action Button, change the current state from the “Action Button” to the “Change Render State”, and select the “REGISTER” option in the SWITCH STATE drop-down.
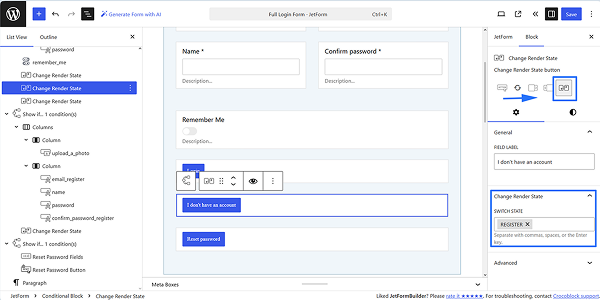
In the same way, we change the current state of the “Reset password” Action Button and select the “DEFAULT.STATE.2” option in the SWITCH STATE drop-down.
Once completed, we save the form and move to the Post Submit Actions.
Set the Post Submit Actions
Navigate to the JetForm > Post Submit Actions tab. Here, press the “+ New Action” button and select the needed action in the newly appeared Add new action pop-up.
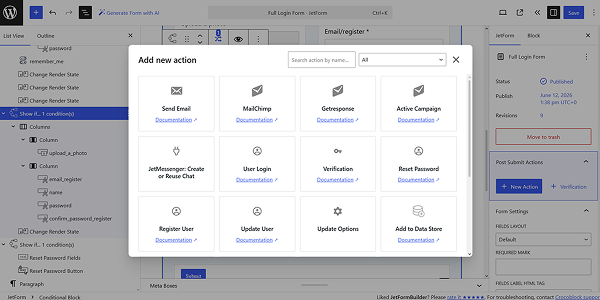
Usually, the “Save Form Record” Post Submit Action is set by default to track every stage of the form processing. Watch the Manage Your WordPress Form Submissions using Form Records Page video to learn how to view, organize, filter, and delete submitted forms easily via the JetFormBuilder dashboard on the Form Records Page.
Next, add the “User Login” Post Submit Action. Once the “User Login” button in the newly-appeared Add new action pop-up is pressed, the Edit User Login pop-up will be opened.
In this pop-up, we select the form’s fields associated with the USER LOGIN FIELD (the “Email/ login” form field, in this case), the USER PASSWORD FIELD (the “Password/login” form field), and the REMEMBER FIELD (the “Remember me” field).
Finally, we enable the Whether to use secure cookie toggle for secure authorization because our site will run on the HTTPS protocol.
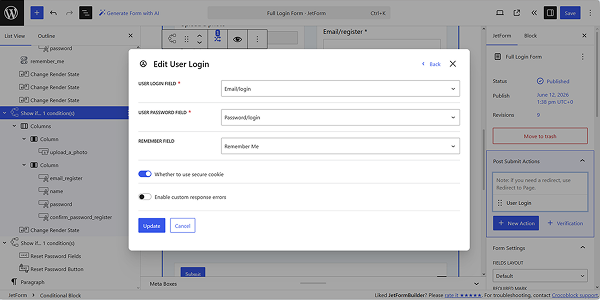
Then, press the “Update” button to save the “User Login” Post Submit Action settings.
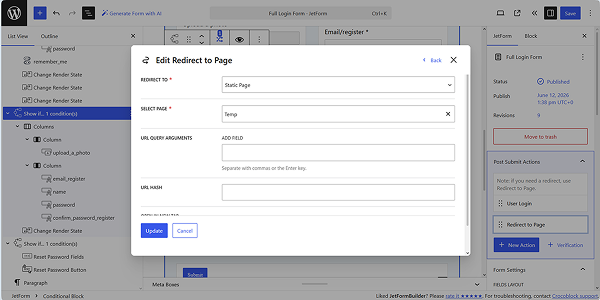
For redirection to another page, press the “+ New Action” button and select “Redirect to Page”.
In the newly appeared “Edit Redirect to Page” pop-up, set the page for redirection. In this case, we picked the “Static Page” REDIRECT TO option and specified the page for redirection in the SELECT PAGE drop-down list.
Press the “Update” button on the Edit Redirect to Page pop-up and publish/save the form.
The next step is verification by email. Click the “+ Verification” button under the “User Login” Post-Submit Action or add the “Verification” action.
Since the “Verification” action allows verifying the user’s email before processing other Post Submit Actions, this action should be placed before other actions. So, the form will send an email with a confirmation link to the address entered by the user. After the user follows the confirmation link, the verification is completed, and the form is submitted successfully.
Fill out the needed fields in the Edit Verification pop-up.
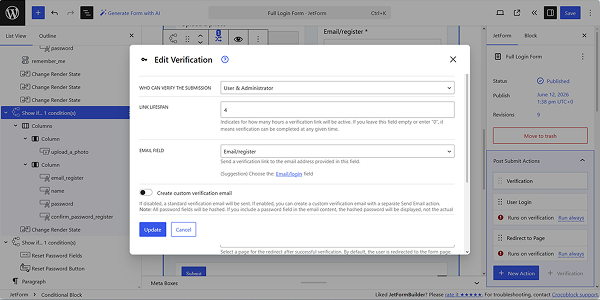
Once completed, press the “Update” button at the bottom of the pop-up.
More details can be found in the How to Verify Users by Email Before Registration tutorial. Also, watch the How to Verify User Email After Login (Not Before!) video to learn a method to ensure users verify their email addresses after logging into your website and only restrict what they can do until after they verify their email address.
In addition, the Advanced Form Validation can be set for individual fields or the form as a whole.
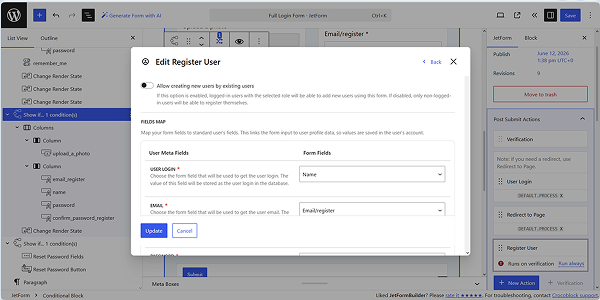
The next Post Submit Action is the “Register User”, which can be added as any other action. Here, we set the following options in the appeared Edit Register User pop-up: assign the form’s fields to the corresponding user account fields.
Read the How to Build WordPress Registration Form With Payment tutorial to learn how to configure the Paypal and Stripe settings to enable payment to be collected upon registration.
The last Post Submit Action is the “Reset Password”, which can be added separately or in the frame of adding the Reset Password block.
Once added, specify the form’s fields in the “Edit Reset Password” pop-up. In this pop-up, we assign the pop-up’s fields to the reset password form fields: USER FIELD, PASSWORD FIELD, and CONFIRM PASSWORD FIELD.
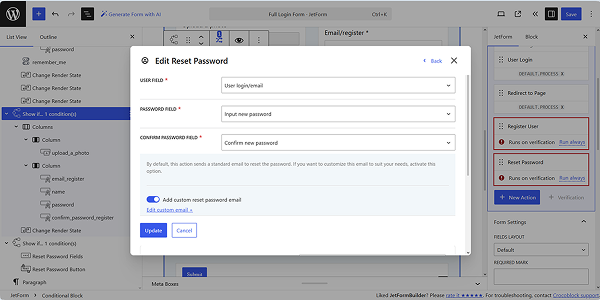
The final step of configuring the Post Submit Actions is the specification of action events, which are executed when a specific action is performed.
Click the “Edit Conditions & Events” button under the first action, “User Login.” Inside the Edit Action Conditions & Events pop-up, switch to the Events match tab and assign the “ON.DEFAULT.STATE” event selected from the ADD EVENT drop-down list. Click the “Update” button to save the settings.
The same event we set for the “Redirect to Page” action.
For the “Register User” action, we add the “REGISTER” event, and for the “Reset Password” action, we set two events: the “ON.DEFAULT.STATE.2” and “ON.RESET.PASSWORD”.
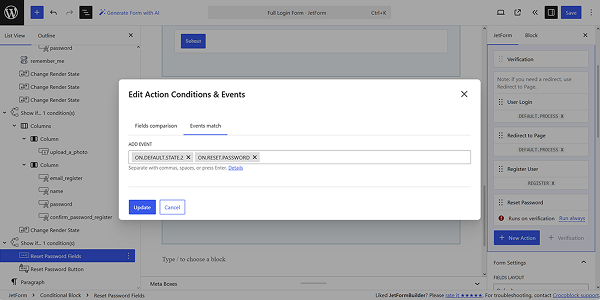
Once completed, save the form.
Add the Form to Your Site
Open a page in an editor you prefer. In this tutorial, we use Elementor. We created the page and named it the “Login” page.
The Displaying a JetFormBuilder Form in Any Page Builder tutorial details this process for Elementor, Block Editor (Gutenberg), and the Bricks theme.
Then, find the JetForm widget and drag-and-drop it to the page. Here, select the developed form in the Choose Form drop-down list. Read the How to Display a Form on the Front End tutorial for more details on the JetForm widget/block/element settings.
In the next stage, publish the page.
Also, you can insert the form into a pop-up to display it further while scrolling a specific page. Read the How to Set Up a WordPress Pop-up Form tutorial, which exemplifies this case.
In this tutorial, we added the login form to the header. In particular, we opened a header template, inserted the Button widget, typed the needed Text, and finally, added the link to the page with the inserted form to the Link field.
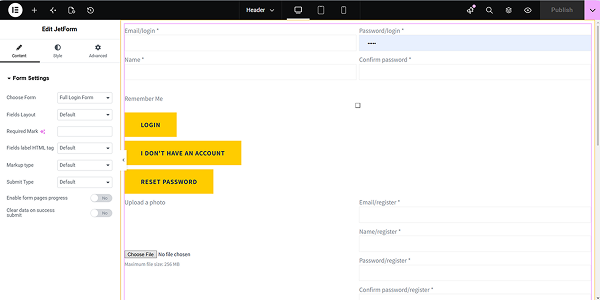
Save the template.
Test the Flow
Navigate to the front end to check if the form works correctly.
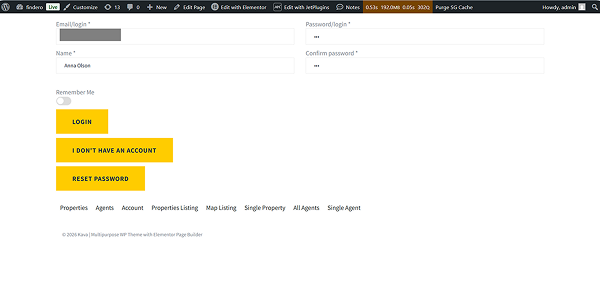
Here, we pressed the “LOGIN” button in the header, and then we were redirected to the page with the login form.
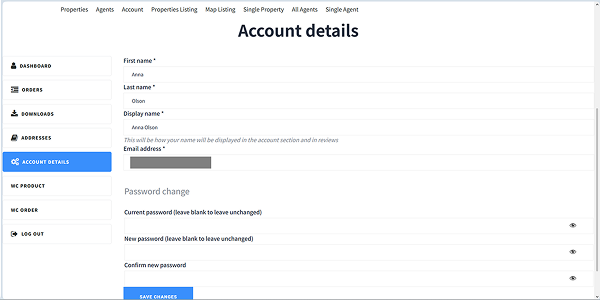
After submitting the form, you will be redirected to your account. Read the How to Create User Account Page With Different Dashboard Structures tutorial to learn how to build an account according to your needs using the JetEngine plugin, or read the How to Create My Account Page With Endpoint Templates tutorial to know how to use the JetWooBuilder plugin for WooCommerce.
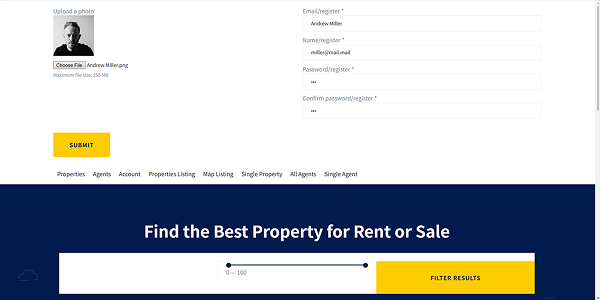
If you press the second button 一 “I DON’T HAVE AN ACCOUNT”, you will be redirected to the page, which contains the register user form. Here you can insert the corresponding data to create the new user.
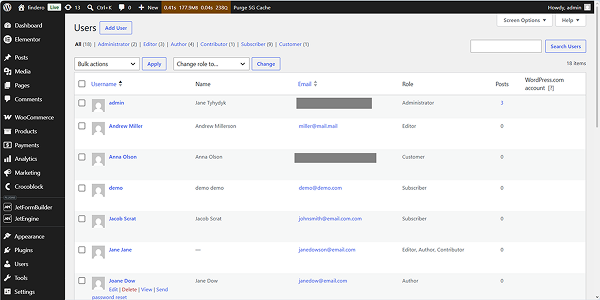
Once the data is entered, move to WordPress Dashboard > Users and check if the user was added
Finally, if you press the “RESET PASSWORD” button, you will be redirected to the page that contains the corresponding form.
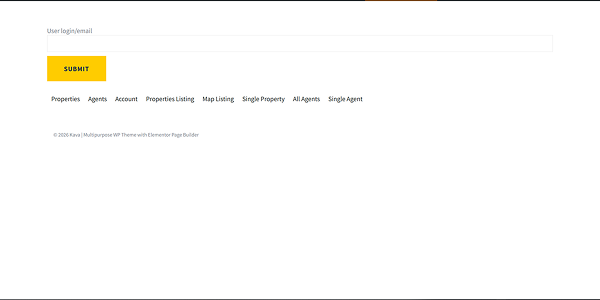
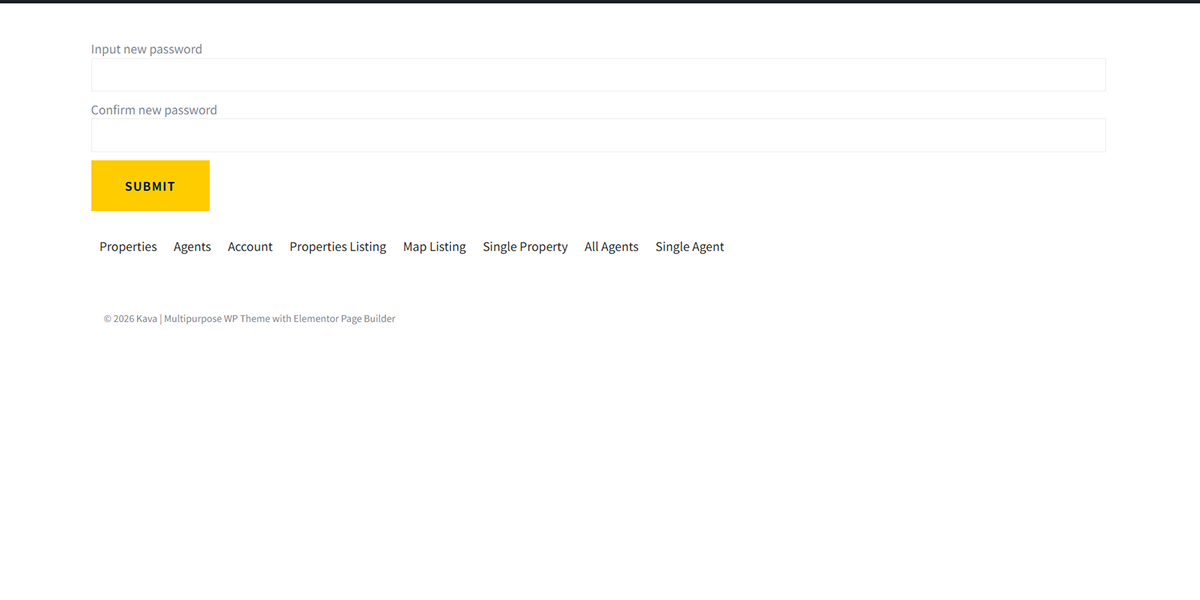
Here, after submitting your email address, check your inbox. Then, after pressing the link in the new email, you will be redirected to the page to insert new data. Finally, you will be redirected to your account.
FAQ
You can apply any template, for example, the pre-made Register Form Pattern, and modify it if needed.
Yes, you can design it as needed using the JetStyleManager plugin.
This number is not restricted.
No, but currently there are different Plans & Pricing and a 30-day money-back guarantee.
That’s it. Now you know how to configure and manage the complete user authentication provided by the JetFormBuilder plugin and the User Login Action add-on for WordPress, which together allow registration, verification, and login, changing user passwords, logging out, as well as combining some functionalities via the same form (e.g., a login and a register form or a login and a reset password form).