How to Create Calculator via Form
A website cost calculator allows users to estimate the price of developing a website based on their specific needs. This form is useful for freelancers, agencies, and businesses offering website development services. By selecting various options, users receive an estimated cost tailored to their project.
Contents
- Form Fields Structure
- Set Up Calculation
- Build the Form
- Other Field and Form Actions
- Check the Results
Form Fields Structure
The form consists of the following sections:
- Website type section that includes a Select Field block where users can choose the type of website: “Ecommerce,” “Blog,” “Portfolio”;
- Website basics section that includes a Range Field block which defines the number of pages (minimum “10,” maximum “25”) and a Checkbox Field block with additional features like:
- ”Responsive Design”;
- “Premium Theme”;
- “Premium Plugins”;
- “Image Gallery”;
- “Contact Form”;
- Website content section that includes a Checkbox Field block with the following options:
- “SEO Keyword Analysis”;
- “SEO Copywriting”;
- “Basic website copy”;
- “Creative website copy”;
- Testing and maintenance section that includes a Checkbox Field block with the following options:
- “Prelaunch support”;
- “Browser Testing”;
- When do you want the website to go live? section that includes a Radio Field block with the following options:
- “Any time soon”;
- “I don’t know”;
- “ASAP!”;
- and a Conditional Block that’s triggered if the “ASAP!” option is selected, revealing a Date Field block for users to specify the exact launch date.
- Total section that includes a Calculated Field block that summarizes the selection of website options using a calculation formula;
- Action Button block that will allow users to finalize and submit their cost estimation request.
Set Up Calculation
For each option in the form, we will assign a calculation value that is used in the final formula:
%website-type% + (%pages_counter% *20) + %basics% + %content% + %testing% + %release_date%Build the Form
Go to WordPress Dashboard > JetFormBuilder, click the “Add New Form” button to create a new form and name it Website Price Calculator.
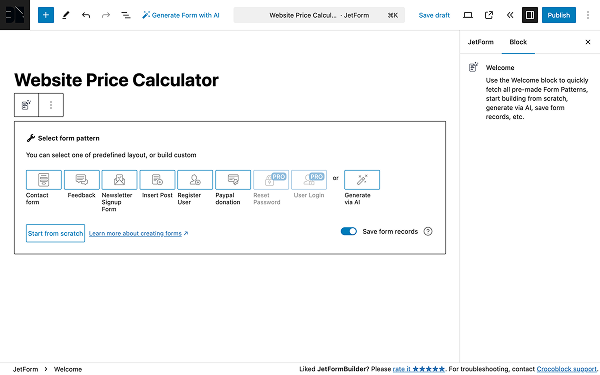
Upon default, the newly created form contains a Welcome Block; feel free to remove it.
Website type section
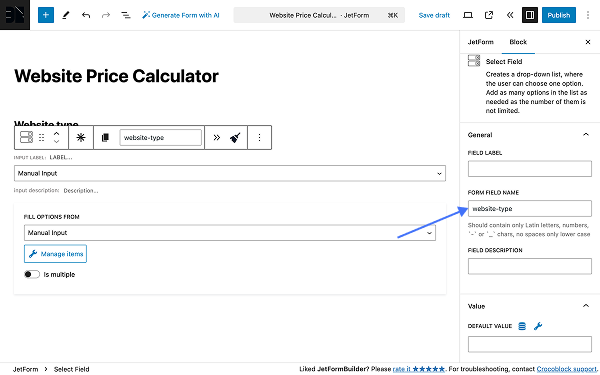
Click on the “+” to open the block inserter. In the search field, type “heading” to find the Heading block. Then, drag it onto the form editor. Finally, type “select” to find the Select Field block and drag it onto the form editor.
In the Select Field block settings, go to the General section and set the FORM FIELD NAME value to “website-type.” Then click on the “Manage items” button to open the Edit Manual Options pop-up to add website options.
As mentioned previously, this form field will contain three options: “E-commerce,” “Blog,” and “Portfolio.” For each value, we need to fill in the CALCULATE field. The amount will be calculated in the Total field at the end of this form.
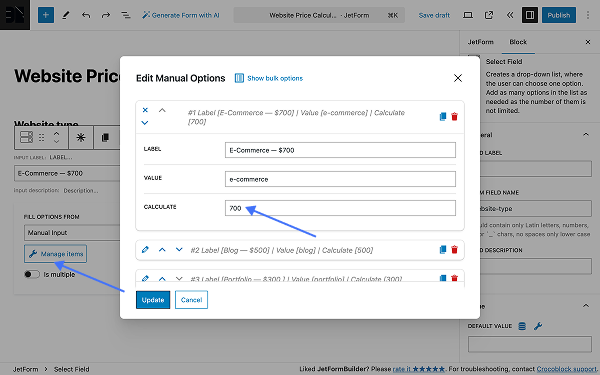
When done, click on the “Update” button. For more convenience, you can unite the Heading and Select Field blocks into a group.
Website basics section
Click on the “+” to open the block inserter. In the search field, type “heading” to find the Heading block. Then, drag it onto the form editor. Finally, type “range” to find the Range Field block and drag it onto the form editor.
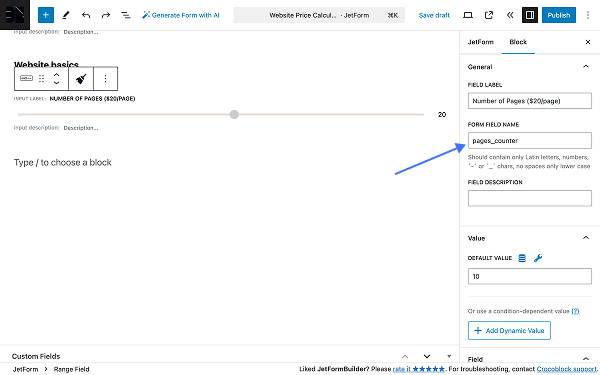
The Heading block will display the “Website basics” title. Now, go to the Range Field block settings to finetune it.
In the General section, fill in the FIELD LABEL field with a relevant name. We’ll use “Number of Pages ($20/page),” which will also notify the user of the price per page.
In the Value section, fill in the DEFAULT VALUE field, which will indicate that the default number of pages is “10.”
Scroll down to the Field section and fill in the next set of fields:
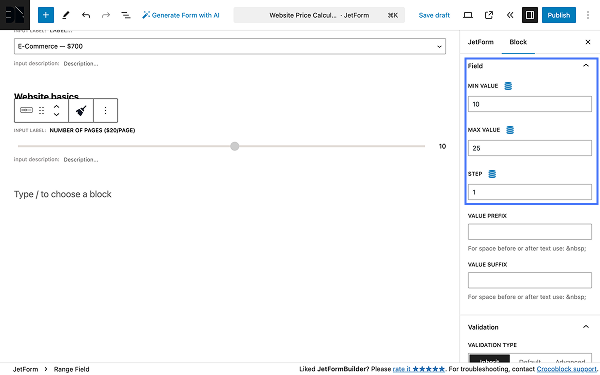
- MIN VALUE — this field corresponds to the DEFAULT VALUE field and is “10”;
- MAX VALUE — this field corresponds to the maximum number of pages the user may order. For instance, we will set it to “25”;
- STEP — this field corresponds to the exact number of pages the user may order. We will set it to “1.”
For more convenience, you can unite the Heading and Range Field blocks into a group.
Now, go back to the block inserter and add a Checkbox Field block. It will display functional website options, which the user may order. After adding the block to the editor, go to the block’s settings and enter a unique FORM FIELD NAME value. We’ll need it as well for the formula.
Then click on the “Manage items” button to open the Edit Manual Options pop-up, where we can add website options.
For each of your options, you need to fill in the CALCULATE field. The amount will be calculated in the Total field at the end of this form.
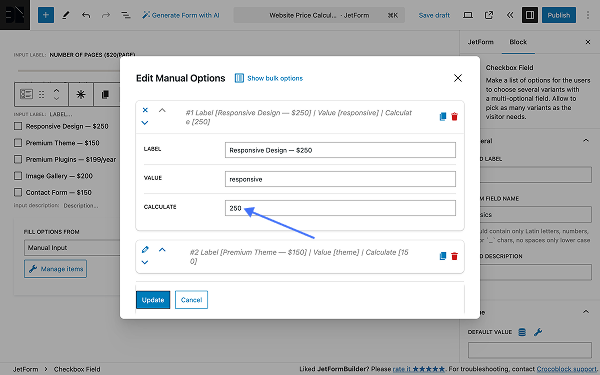
When done, click on the “Update” button to save the changes.
Website content section
To speed up the process, you can duplicate the previous section. The Heading block will display the “Website content” title, and the Checkbox Field block’s FORM FIELD NAME value is “content”.
In the Checkbox Field, click the “Manage items” button to open the Edit Manual Options pop-up, where you can add content options.
For each option, enter a value in the CALCULATE field. This amount will be included in the Total field at the end of the form.
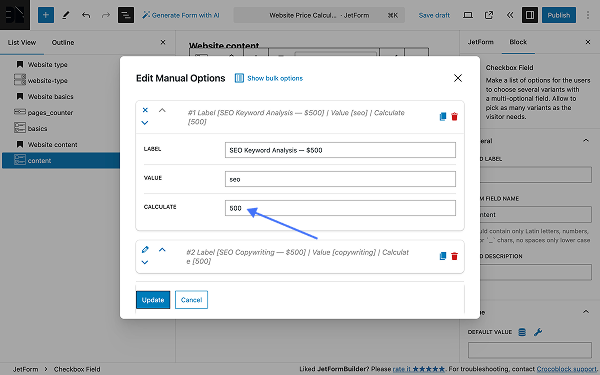
Once finished, click the “Update” button to save your changes.
Testing and maintenance section
For this section, you can also use two previous blocks. The Heading block will display the “Testing and maintenance” title, and the Checkbox Field block’s FORM FIELD NAME value is “testing.”
In the Checkbox Field, click the “Manage items” button to open the Edit Manual Options pop-up, where we can add testing and maintenance options.
Enter a value in the CALCULATE field for each option. This value will be added to the Total field at the end of the form.
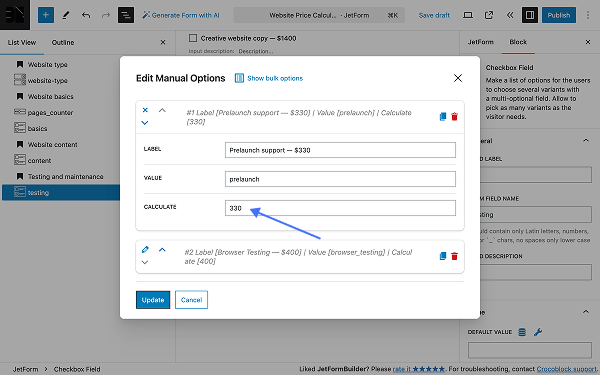
When you’re done, click the “Update” button to save progress.
When do you want the website to go live? section
For this section, we need to add a set of blocks, including:
- Heading block;
- Checkbox Field block;
- Conditional Block:
- Date Field block.
The Checkbox Field block will display options grading the degrees of urgency, starting from the least urgent to the most urgent (“ASAP!”). When the “ASAP!” option is selected, it will trigger the Conditional Block, revealing the Date Field block where users may select the exact date when they need a website to go live.
To display graded values, you can use other blocks, such as the Select Field, Radio Field, or Range Field block.
After adding the Checkbox Field block, go to the General block settings and set the FORM FIELD NAME value to “release_date”. Then click on the “Manual items” button to reveal the Edit Manual Options pop-up.
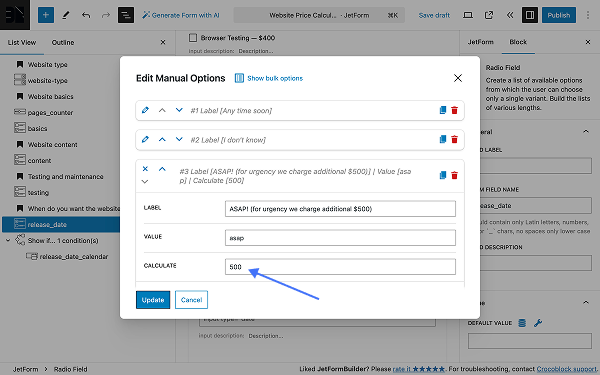
We will add three options, including: “Any time soon,” “I don’t know,” and “ASAP!”. For the “ASAP!” option, we need to fill in the:
- VALUE — it will be used in the next block (Conditional Block);
- CALCULATE — its value will be used in the final formula, since the urgency of website production requires additional spending.
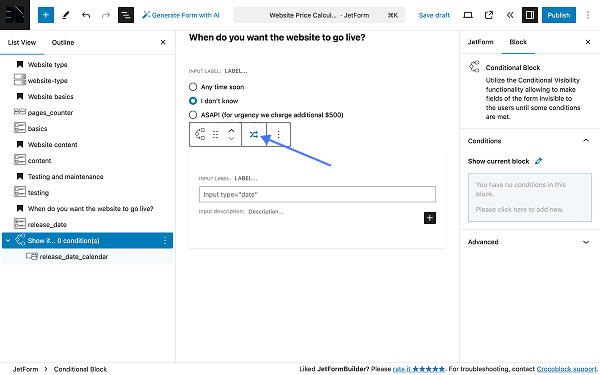
When you’re done, click the “Update” button to save your progress. Now, let’s fine-tune the Conditional Block. Click the “crossed arrows” buttons to open the Conditional Logic pop-up.
After that, feel free to apply the following set of settings:
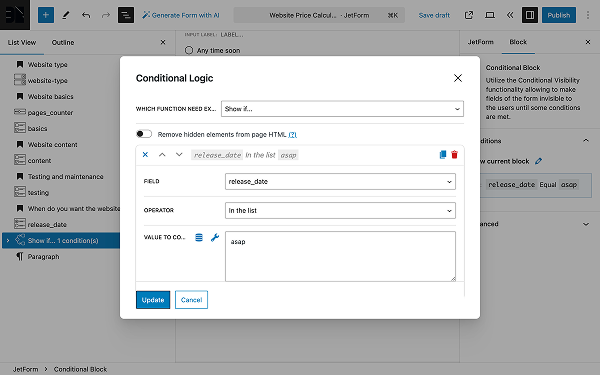
- WHICH FUNCTION NEED EXECUTE? — in this field, select the “Show if…” option;
- FIELD — in the dropdown, select the field that will trigger conditional logic. In our case, it’s the “release_date” field;
- OPERATOR — in the dropdown select the value “In the list”;
- VALUE TO COMPARE — in this field, we need to enter the Checkbox Field “ASAP!” option value, which is “asap”.
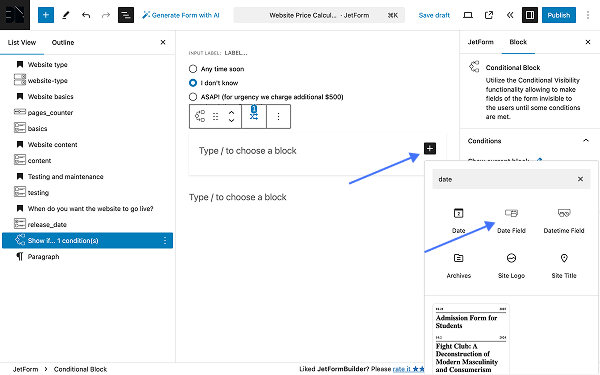
When done, click the “Update” button. Now we can add the Date Field block to the Conditional Block. Click on the “+” button, and then type date in the search field to add the Date Field block.
Total section
This is the last section of the form. Feel free to add the following blocks:
- Heading block;
- Calculated Field block.
The Calculated Field block will include the formula that counts the final price of the website creation. Let’s fine-tune the block. Click on the button with the “wrench” icon to add a set of fields to the block’s input.
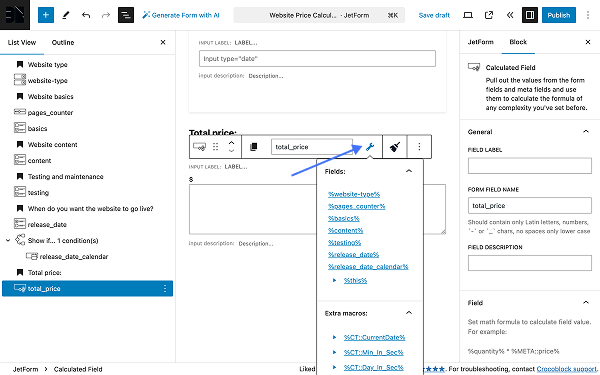
The final formula looks like this:
%website-type% + (%pages_counter% *20) + %basics% + %content% + %testing% + %release_date%Basically, we’re summing up all the values of the selected options in six fields. The %pages_counter% field is multiplied by twenty (20) because creating each additional page costs $20.
When done, click on the “Publish” button to publish your form.
Other Field and Form Actions
If you want this calculator to act as a request form, you can add an Action Button block to allow users to submit the results.
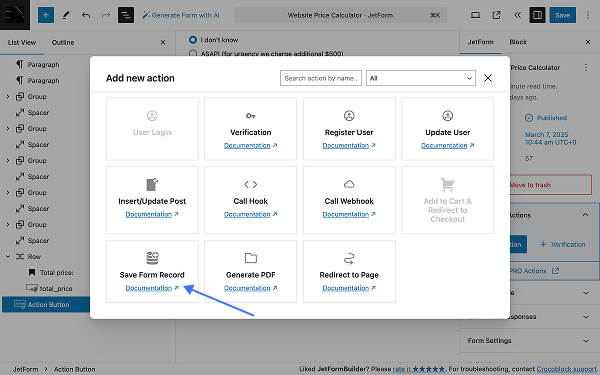
In order to save them in the Form Records section, which can be accessed via WordPress Dashboard > JetFormBuilder > Form Records path, you need to add the “Save Form Record” form action. To do so, go to the JetForm tab in the form settings, scroll down to Post Submit Actions, and click “+ New Action.” In the Add new action pop-up, find the “Save Form Record” form action and click on it.
On the next screen, click the “Update” button. After adding the form action, update the form to save your progress.
Check the Results
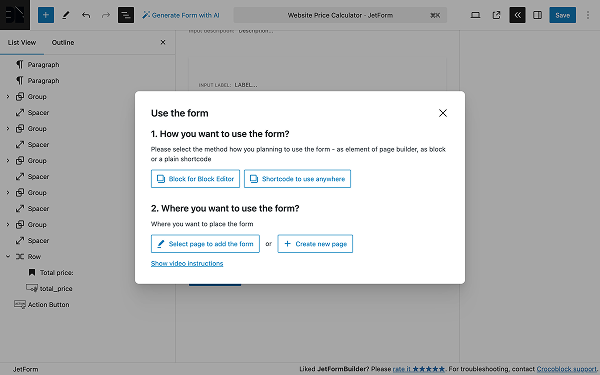
Before we check the form, we need to add it to the page. To do so, click on the “<<” button in the upper right corner. It will trigger the Use the form pop-up, where you can choose how to add a form to the final page.
Now let’s preview the form. In the form, we will select the following options:
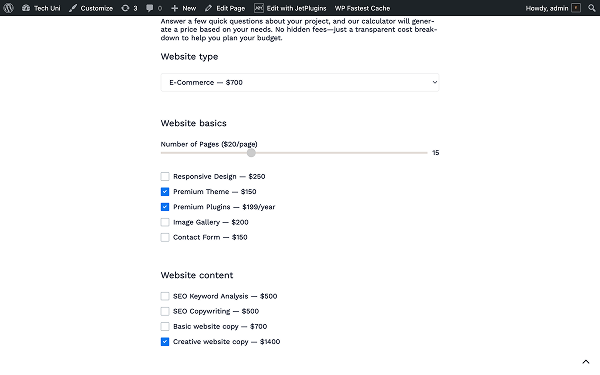
- Website type — “WooCommerce — $700”;
- Website basics:
- Number of Pages ($20/page) — “15”;
- “Premium Theme — $150”;
- “Premium Plugins — $199”;
Website content — “Creative website copy — $1400”.
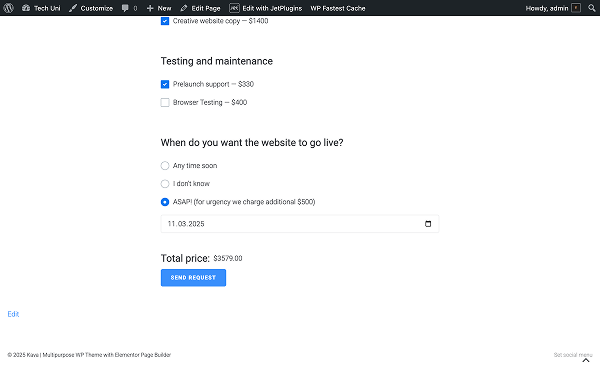
- Testing and maintenance — “Prelaunch support — $330”;
- When do you want the website to go live? — “ASAP!”:
- “11.03.2025.”
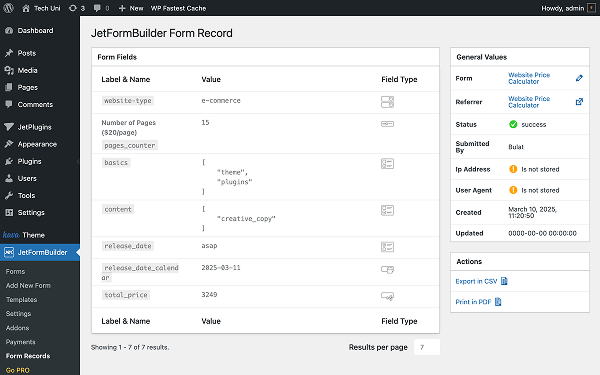
If we click on the “SEND REQUEST” button, we’ll receive a “Form successfully submitted.” notification, and we can go to WordPress Dashboard > JetFormBuilder > Form Records to see the form entry.
Hover the form entry over and click on the “View” link.

As you can see, all the form field options that we selected while filling out the form were fully stored.
Following these steps, you can successfully create a cost calculator WordPress form using JetFormBuilder. This form will provide a seamless and interactive experience for users estimating website development costs.