Lead-Capture Form
Build a lead-capture form that will gather information about the website users in exchange for great deals like some valuable information or discount offers.
Contents:
- Why You Need a WordPress Lead-Capture Form
- Top WordPress Lead-Capture Form Features
- WordPress Form Pattern Structure
- How to Create a WordPress Custom Lead-Capture Form
- WordPress Lead-Capture Form Pro Features
Why You Need a WordPress Lead-Capture Form
Lead-capture form is a versatile tool for gathering data on your WordPress website. Such forms can collect information through simple form fields or surveys. The data collected can be used for sending promotional offers and understanding your audience’s needs better.
Having a lead-capture form on the WordPress website will help you get needed responses and keep users engaged if they find the content in return valuable. For instance, after completing the form, the user will receive a unique discount code or access to useful educational materials.
The type of services you offer determines how you can use the lead-capture form on your WordPress site. For instance, let’s look through several possible cases:
- Web development agency. Create the marketing-qualified lead form with relevant questions. For example, ask about the budget allocated for website development to quickly identify whether a potential client meets your criteria.
- E-commerce. Build a “Limited Offer” form or one-click purchase form with no registration required.
- Small business. Adjust the multi-step questionnaire with the demo product bonus that serves as a lead qualification and reveals the user’s motivation thanks to clarifying questions.
Top WordPress Lead-Capture Form Features
- Add and customize necessary fields to make the form engaging;
- Create a user-friendly form with multiple steps;
- Decide which form fields you want to make Required;
- Implement conditional logic to dynamically display or hide form fields;
- Use reCAPTCHA v3 validation to protect the application form from spam;
- Adjust email notifications and fill them with tempting offers;
- Save the received form submissions into one convenient dashboard list;
- Create a desired design of the form in the Block Builder, Elementor, or Bricks;
- Integrate the form with email marketing services like Mailсhimp, GetResponse, Active Campaign, Zapier, Make, etc.
WordPress Form Pattern Structure
Step 1 — User information
- Progress Bar. A field to begin a multi-step form creation process;
- First Name and Last Name. Required Text fields to find out the user’s name;
- E-mail. A Text field with the “Email” FIELD TYPE to get the email where the offer will be sent;
- Phone Number. A Text field with the “Tel” FIELD TYPE in case you need the user’s phone number. For instance, to set the SMS marketing;
- “Next” button. A Form Page Break field that will serve as the “Next” button. It also lets changing the first step of the progress bar.
Step 2 — Introductory questions
- Progress Bar. One more Progress Bar for the second part of the form;
- Radio Field with a question. A field with the “Have you already used our services?” question and “Yes” and “No” answers to implement the Conditional Logic based on the given answer;
- Conditional Logic. A block for the “Yes” answer given in the previously added Radio Field, which contains the Textarea Field with the corresponding question;
- Conditional Logic. A block for the “No” answer with the corresponding Textarea Field inside;
- “Next” button. A button to move to the next part of the form.
Step 3 — Final part of the questionnaire
- Progress Bar. A step indicator of the last part of the form;
- Questions Part. Any desired fields like Radio, Checkbox, Textarea, etc., to get the needed information;
- “Terms and Conditions” Field. A Checkbox Field with the link to the “Terms and Conditions” page, which is vital in order to provide a personal data consent agreement;
- “Submit” button. A button that will send the submitted form;
- Final Form Page Break. The last step is the name of the Progress Bar.
How to Create a Custom WordPress Lead-Capture Form
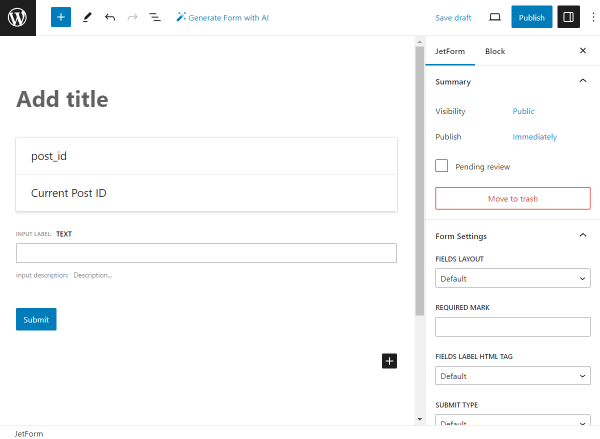
Head to WordPress Dashboard > JetFormBuilder > Add New.
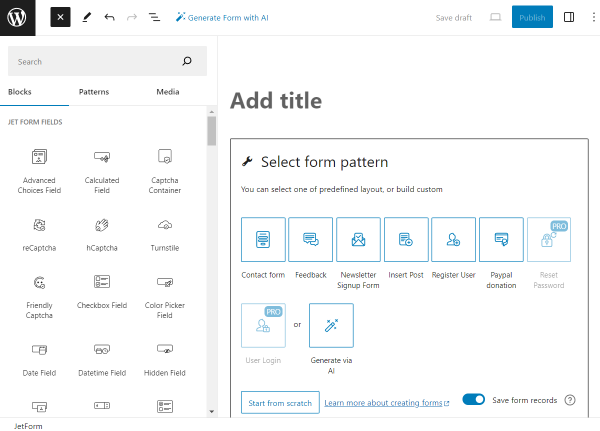
Initially, the form includes the Welcome Block with form patterns. As we don’t need them now, we press the “Start from scratch” button to build our own form.

Here, you will see that some blocks are added to the form by default. These are the Hidden Field, Text Field, and Action Button blocks, which can be deleted if you don’t need them to be in the current form.
To add another content to the lead-capture form, you can use Gutenberg blocks. Open their list by pressing the plus-shaped button and type in the needed block name to find it easily.
The form we give in this tutorial is an example of the lead-capture form that you can recreate on your website or build your own form that will be more suitable for your needs.
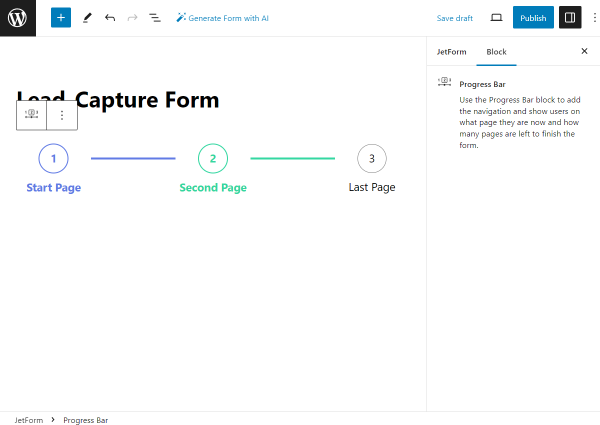
We begin with the Progress Bar block that will make a start to our multi-step lead-capture form. It will give users an understanding of how quickly this form can be completed.
It doesn’t have any settings, so we move on to the next field.
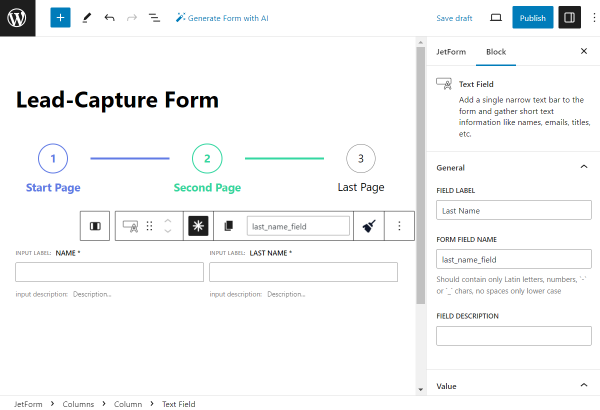
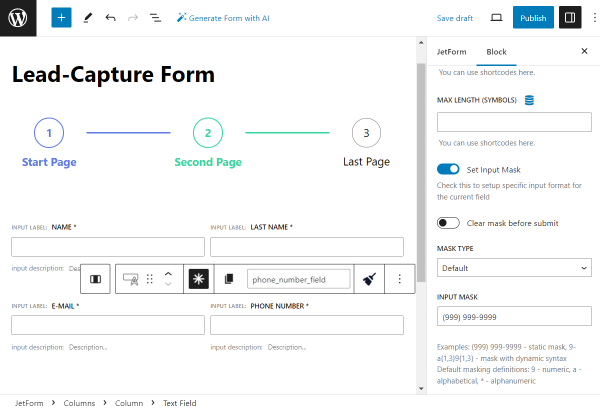
We begin building our form with the Columns block to make the two columns layout with fields inside.
There, we place two Text Fields indicating the “First Name” and “Last Name” fields.
One more row of two columns containing two fields will represent the “E-mail” and “Phone Number” fields.
For the “E-mail” field, we set the “Email” FIELD TYPE, and for the “Phone Number” field, we set the “Tel” FIELD TYPE accordingly.
For the phone number field, we also set the INPUT MASK.
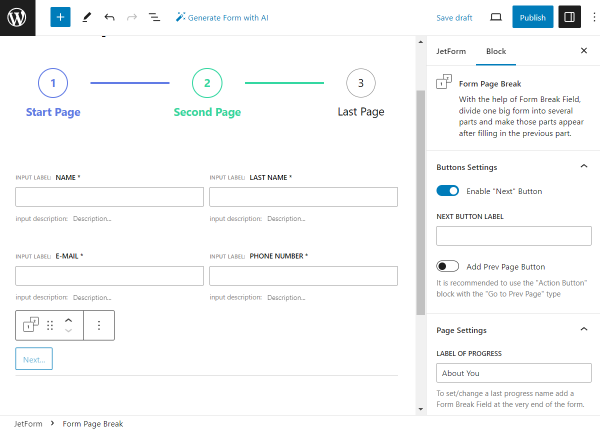
To finalize the first form page, we add the Form Page Break block.
Also, we change the LABEL OF PROGRESS that will be displayed as the first step of the Progress bar.
In the second part of the form, we begin with the Progress Bar block as well.

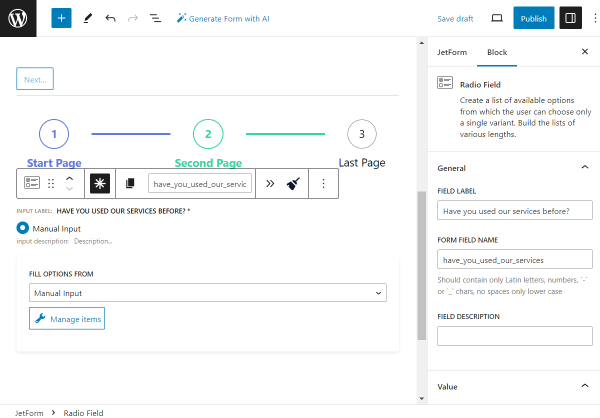
The first form field we add to the second part is the Radio Field with the “Have you used our services before?” FIELD LABEL.
This field is also set to be obligatory.
In the FILL OPTIONS FROM selector, we pick the “Manual Input” option and click the “Manage items” button.
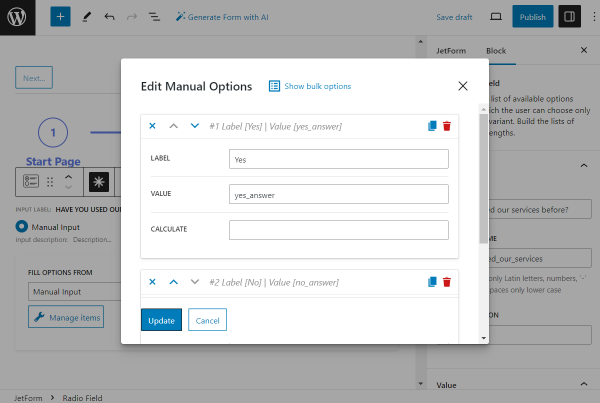
Once the editing pop-up opens, we push the “Add new Option” button to create radio options manually.
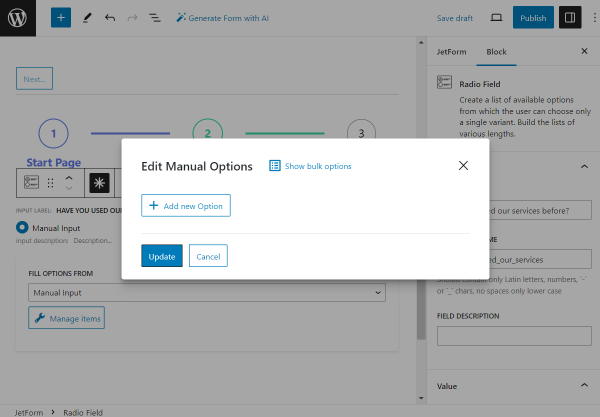
We build two options: one has the “Yes” LABEL and the “yes_answer” VALUE, and the other has the “No” LABEL and the “no_answer” VALUE correspondingly.
To save the options, we press the “Update” button.
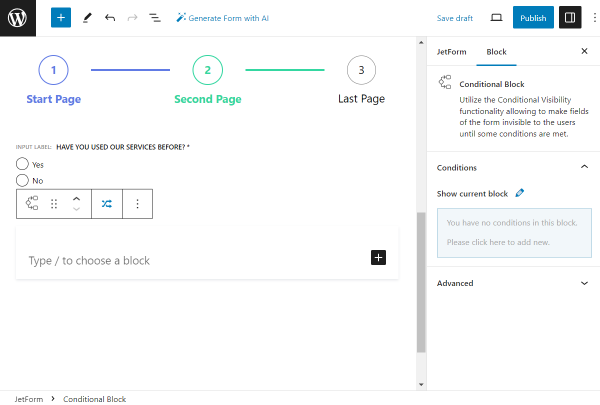
The following logic we want to implement is different Textarea Fields displayed depending on the selected option in the previous “Have you used our services before?” Radio Field.
It can be done with the help of the Conditional Block, so we add it to the page.
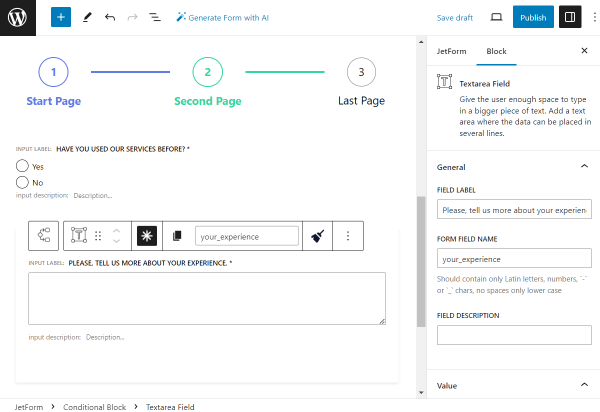
Right in the Conditional Block, we place the Textarea Field block named “Please, tell us more about your experience.” and set this field to be required.
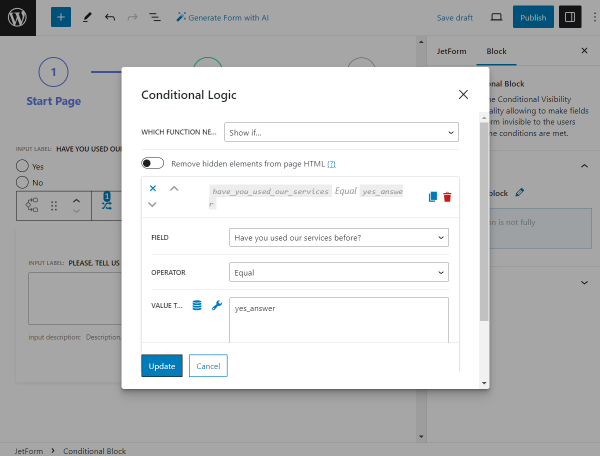
Then, we return to the Conditional Block customization. In the Conditions tab, we click the “Add new” button in the corresponding window.
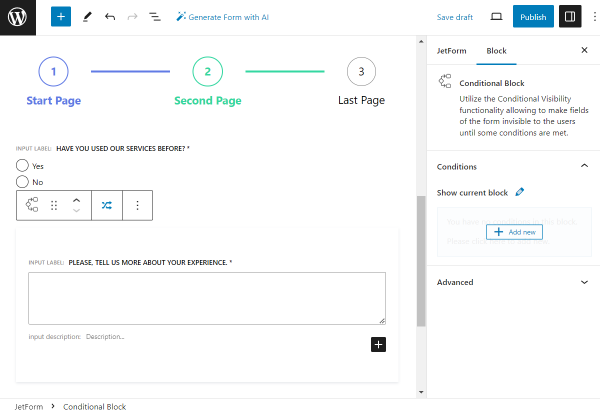
In the first WHICH FUNCTION NEED EXECUTE? selector, we pick the “Show if…” option.
As the FIELD value, we set the “Have you used our services before?” Radio Field we built previously.
The OPERATOR should be set to “Equal” and VALUE TO COMPARE to “yes_answer.”
That’s it with adjusting this Conditional Block, so we press the “Update” button.
Then, we add one more Conditional Block, this time for the “No” option of the “Have you used our services before?” Radio Field.
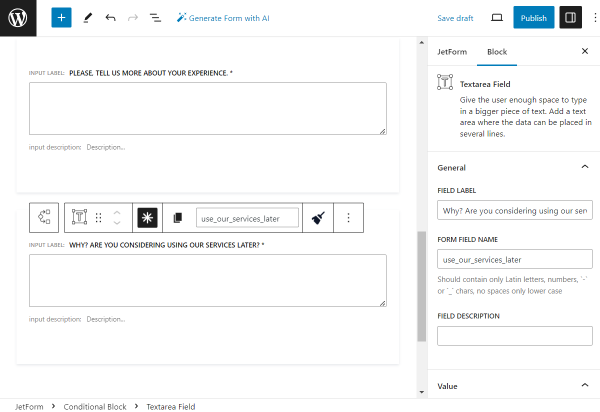
Once added, we also put the Textarea Field inside the Conditional Block.
Its LABEL is set as “Why? Are you considering using our services later?” and the field itself is set to be required.
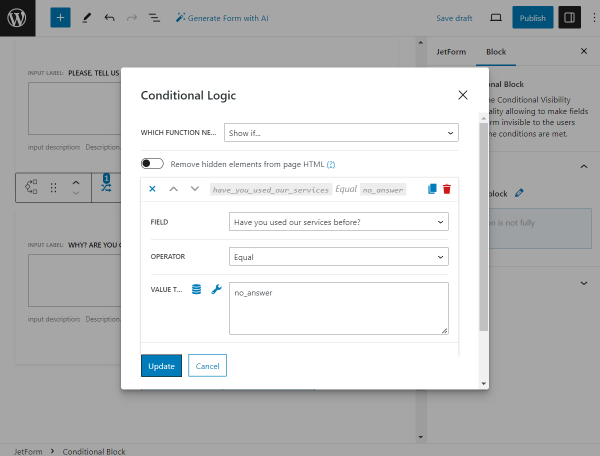
Now, we return to the Conditional Block settings to adjust conditions, as in the previous case, in the conditions pop-up.
In the WHICH FUNCTION NEED EXECUTE? selector, we pick the “Show if…” option.
Here, as the FIELD value, we also set the “Have you used our services before?” Radio Field.
Then, we pick the “Equal” OPERATOR and “no_answer” as VALUE TO COMPARE.
To save the conditions, we push the “Update” button.
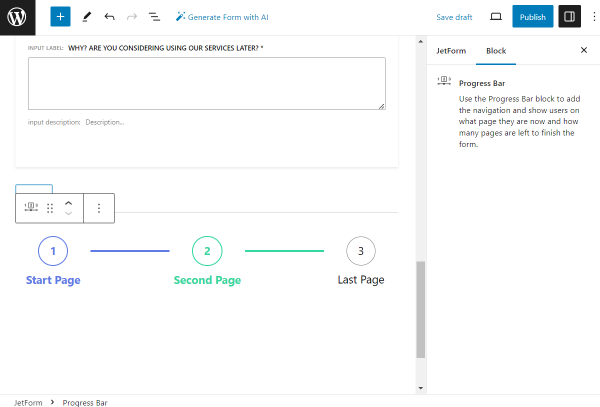
To finalize the form page, we add the Form Page Break field and set its LABEL OF PROGRESS to “Travel Experience.”

The final part of the form will also begin with the Progress Bar block.
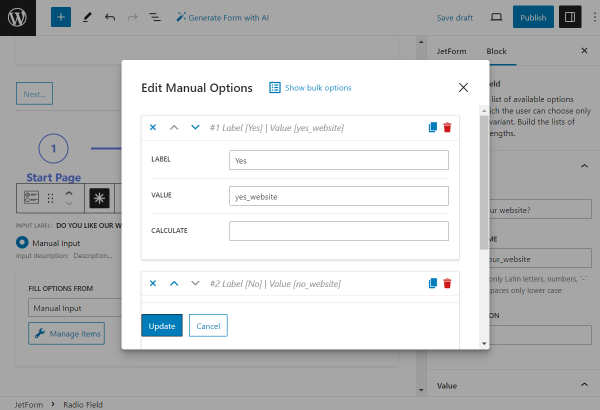
Now, we add one more Radio Field block to the form called “Do you like our website?”, set it to be required, and pick the “Manual input” option as FILL OPTIONS FROM.
To edit radio options, we press the “Manage options” button.
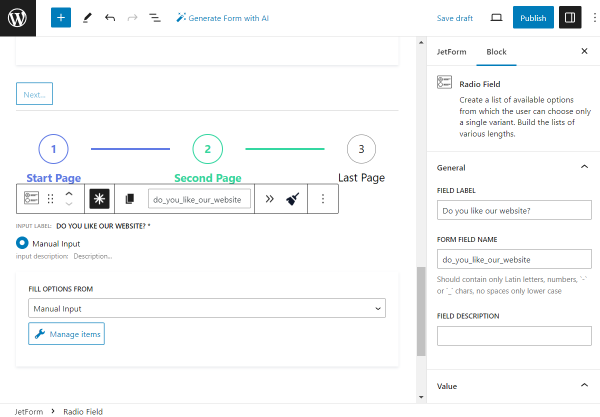
We add two options, with “Yes” and “No” LABELS, but this time, VALUES will be set to “yes_website” and “no_website” accordingly (as the VALUE field should include only unique identifiers and we already have “yes_answer” and “no_answer” VALUES used.)
Don’t forget to click “Update” so the changes are saved.
Now, we will implement one more conditional logic depending on the selected option in the “Do you like our website?” Radio Field.
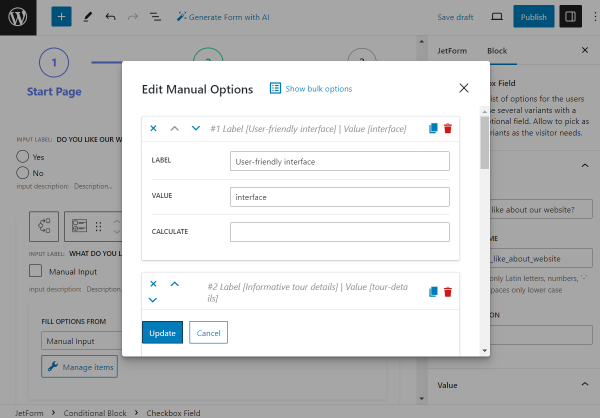
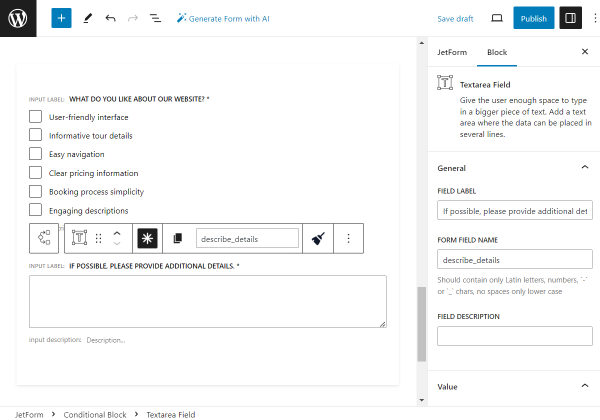
So, we add a Conditional Block to the page and place the Checkbox Field inside it.
This field is obligatory; it is called “What do you like about our website?” and has the “Manual Input” FILL OPTIONS FROM option selected.
To edit the checkbox options, we push the “Manage options” button.

In the Edit Manual Options pop-up window, we complete the needed options and press the “Update” button.
Inside the current Conditional Block field, we also place the “If possible, please provide additional details.” Textarea Field.
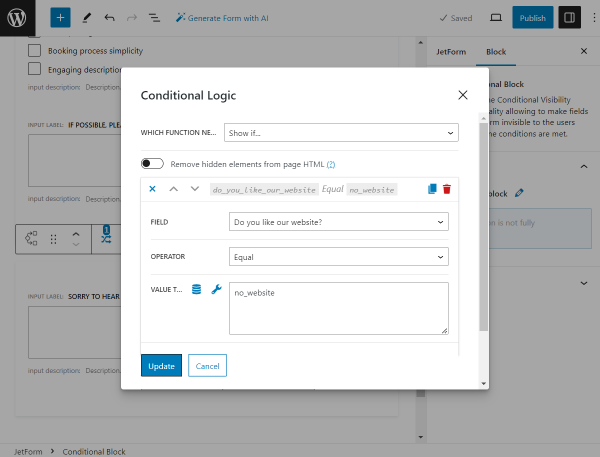
Then, we return to the Conditional Block field settings to adjust the conditions.
The WHICH FUNCTION NEED EXECUTE? field is completed with the “Show if…” option.
The FIELD is now set to the “Do you like our website?” option, which is the LABEL of our Checkbox Field block.
The OPERATOR is “Equal,” and the VALUE TO COMPARE is “yes_website,” which was attached earlier to the “Yes” option VALUE of the Checkbox Field block.
The conditions should then be activated with the “Update” button.

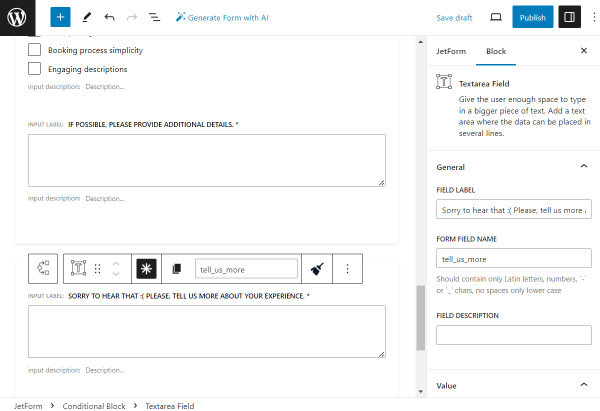
Now, we add one more Conditional Block to our form for the “No” option of the Checkbox Field.
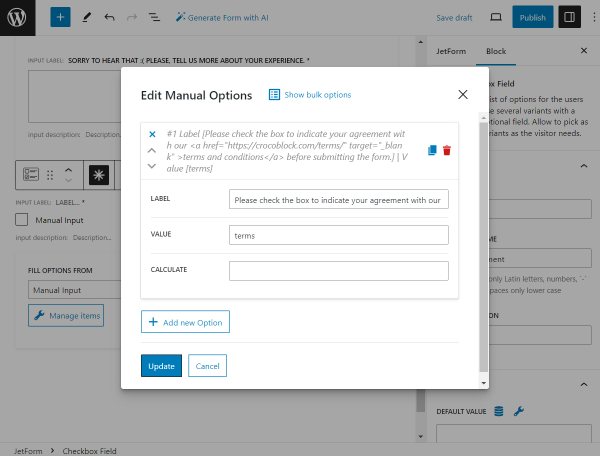
Inside, we place the Textarea Field block, which is obligatory for the completion and is called “Sorry to hear that 🙁 Please, tell us more about your experience.”
In the conditions settings of this Conditional Block, we set almost the same options as in the previous Conditional Block field: “Show if…” in the WHICH FUNCTION NEED EXECUTE? field, “Equal” in the OPERATOR field, and the “no_website” VALUE TO COMPARE as it is the VALUE of the “No” option Checkbox Field block.
Now, we click the “Update” button.
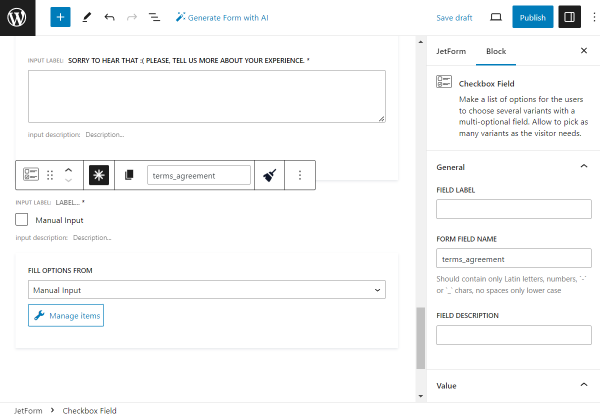
The following Checkbox Field block will be put outside the Conditional Block.
This field will aim to provide the “Terms and Conditions” document to the users who complete the form so they can read the information and agree if applied.
So, the “Manual Input” should be picked in the FILL OPTIONS FROM field. Once done, click the “Manage options” button to open the pop-up with editing fields.
The LABEL of the only option in our case will be set to “Please check the box to indicate your agreement with our <a href=”https://crocoblock.com/terms/” target=”_blank” >terms and conditions</a> before submitting the form. ”
So, in the middle of the label, we put the following piece of code that will turn the needed part of the text into the link:
<a href=”https://crocoblock.com/terms/”>terms and conditions</a>
Here, “https://crocoblock.com/terms/” is the website page with the terms of use, and “terms and conditions” is the text that will contain the link.
We also set the VALUE to a shorter version of the field LABEL and hit the “Update” option.
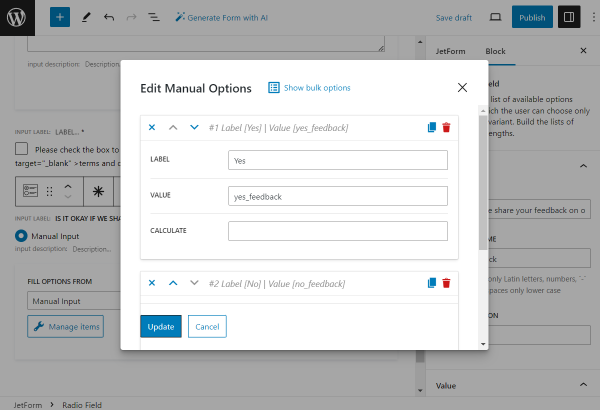
The following “Is it okay if we share your feedback on our website?” RADIO FIELD with the “Manual Input” source (the FILL OPTIONS FROM field) will be required.
After the “Manage items” button is clicked, we create two options with the “Yes” and “No” options with the “yes_feedback” and “no_feedback” VALUES correspondingly.
After completing the needed options, we push the “Update” button.
The next block is the Action Button, the one that will end the form completion.
In the button settings, we change the FIELD LABEL to “Get Discount.”

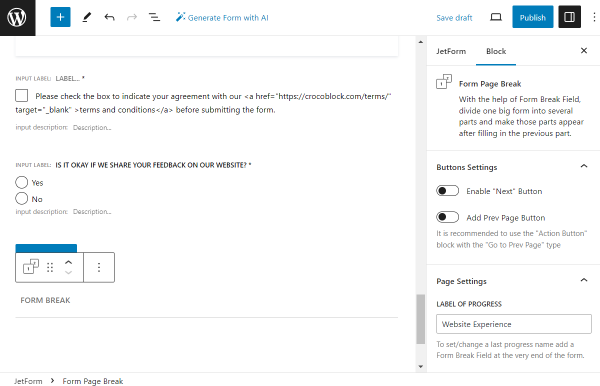
The final block of the form is another Form Page Break field that is added to change the last page of the form Progress Bar.
So, we deactivate the Enable “Next” Button toggle and type in the “Website Experience” in the LABEL OF PROGRESS field.
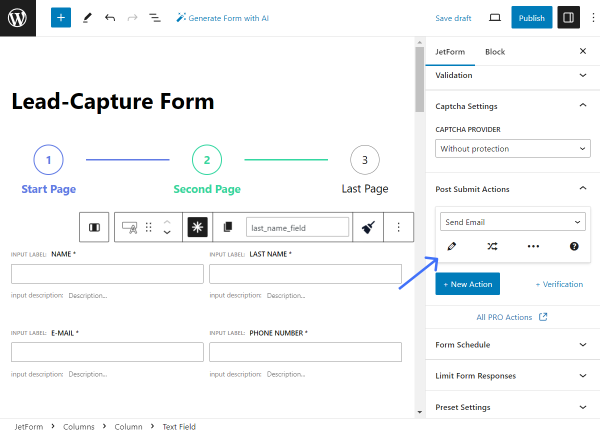
That’s all with the form fields. Now, we move to the Post Submit Actions tab to adjust the action once the form is submitted.
The first action we set is “Send Email.” We click the pencil-shaped button to edit the settings.
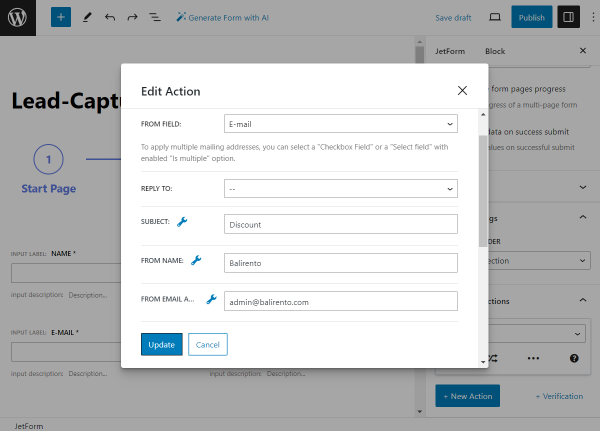
In the pop-up, we select the “Email from submitted form field” MAIL TO option and pick the “Email” field as the FROM FIELD source.
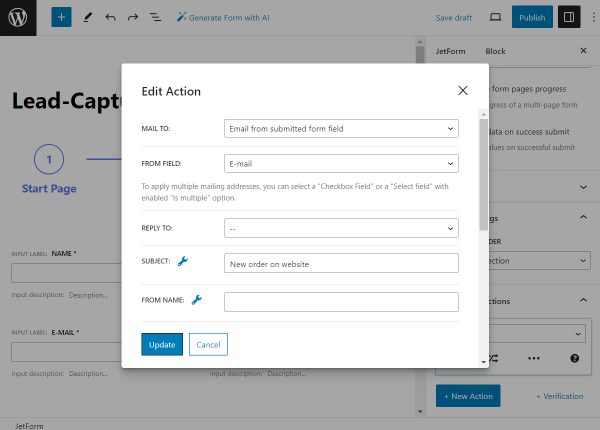
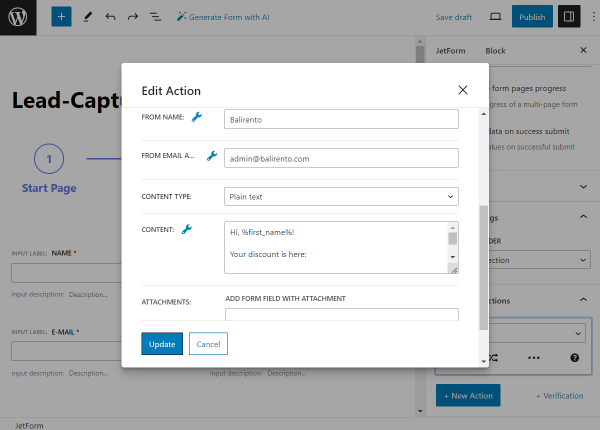
We also specify the SUBJECT, FROM NAME, and FROM EMAIL ADDRESS values.
The CONTENT TYPE is set to “Plain Text,” and CONTENT is filled in with the following text:
“Hi, %first_name%!
Your discount is here:
DISCOUNT10
Balirento.”
To save the action settings, we push the “Update” button.
The following action is going to be “Save Form Record,” which will save the data about the completed fields in the Form Records directory of JetFormBuilder.
We will not alter settings in the pop-up; the default ones are okay in the described case.

Now, move to the page you want to add the form to. For instance, it can be the landing page of your website.
So we can find it in the WordPress Dashboard > Pages directory and press the “Edit” button next to the needed option. Or, build a new page with the “Add New” button.
The page can be edited with Gutenberg, Elementor, or Bricks.
Once the editor is opened, find the JetForm block/widget/element in the search bar and add it to the page.
Open the JetForm settings. Initially, select the needed form in the CHOOSE FORM selector.
Work on the following settings depending on your needs, and when the page is ready, press the “Publish/Update” button.
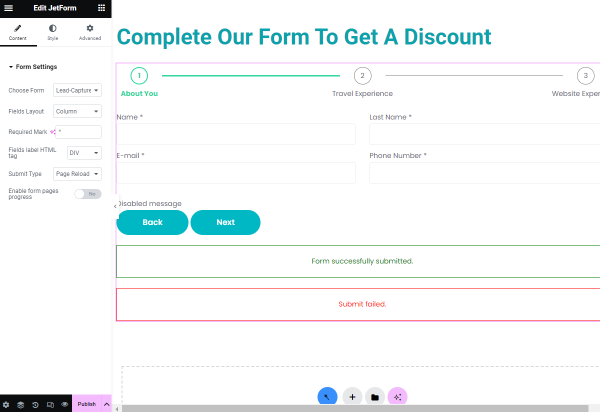
Proceed to the just edited page on the front end. Now, let’s complete the form to check if the form works correctly.
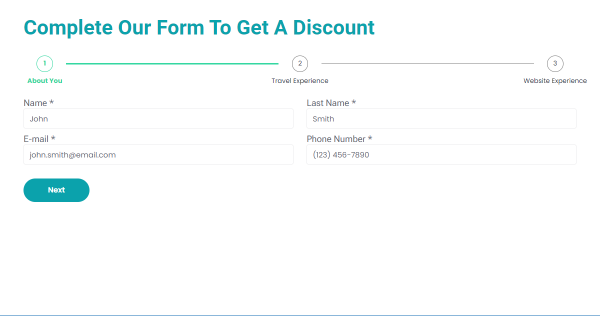
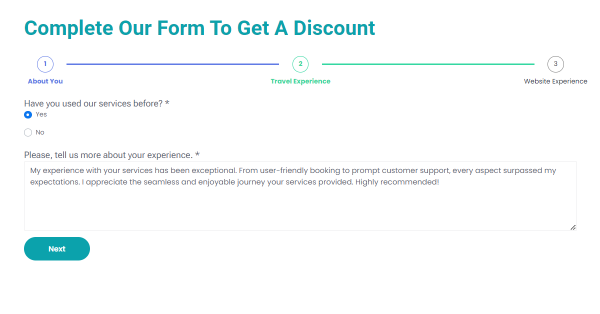
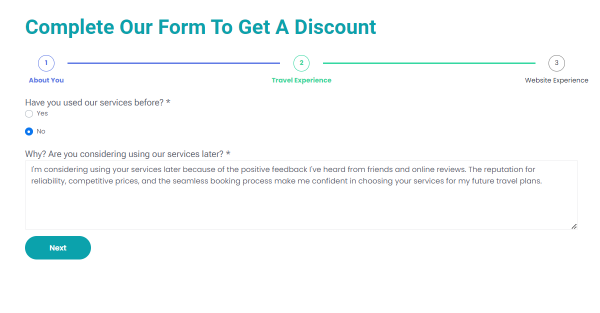
In the second part of the form, we see only one Radio Field. But, if we select one of the options, additional fields that we have put earlier in the Conditional Block will be shown.
If the “Yes” option is selected, the “Please, tell us more about your experience.” Textarea Field is displayed.
But if the “No” option is selected, the “Why? Are you considering using our services later?” Textarea Field is displayed.
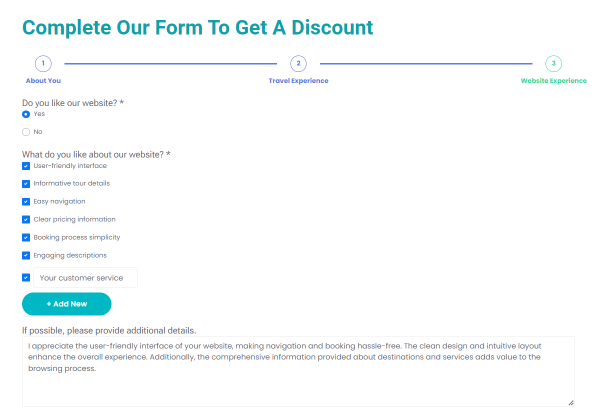
In the “Do you like our website?” Radio Field, there are also two options that can be selected to trigger the appropriate fields.
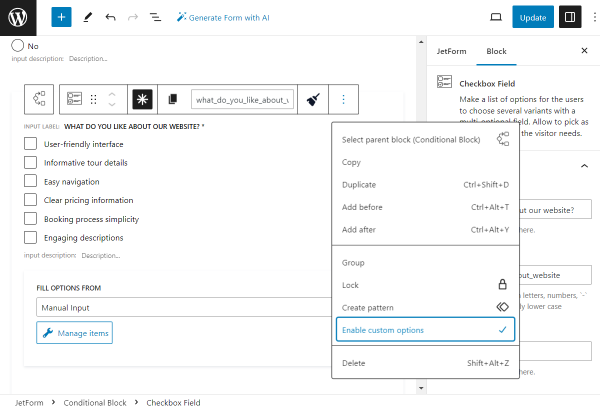
If the “Yes” option is selected, the “What do you like about our website?” Checkbox Field and “If possible, please provide additional details.” Textarea Field are displayed.
Also, in the “What do you like about our website?” Checkbox Field, users can add custom options if desired by pushing the “Add New” button.
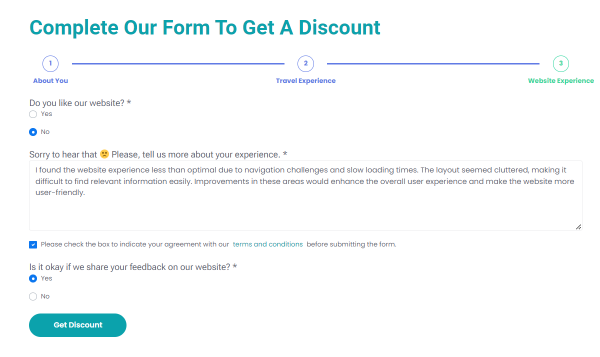
And if the “No” option is selected, the “Sorry to hear that 🙁 Please, tell us more about your experience.” Textarea Field is displayed.
The following Checkbox Field includes the terms and conditions link added.
The user will be redirected to the “Terms of Use” page if they click on the button. This page will be opened in a new tab.
Also, there is the last “Is it okay if we share your feedback on our website?” Radio Field and the “Get Discount” button.
So, once we click on the button, the form is submitted.
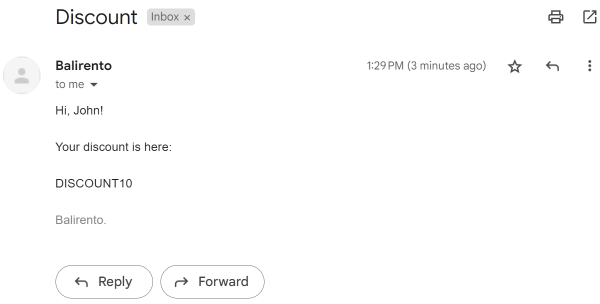
It’s time to check the email we have entered in the first part of the form. The letter with the discount has already been sent there.
As we can see, it says:
“Hi, John!
Your discount is here:
DISCOUNT10
Balirento.”
Here, instead of the %first_name% macro we put in the CONTENT field, there is actually the name displayed, the one that was completed earlier in the “First Name” Field.
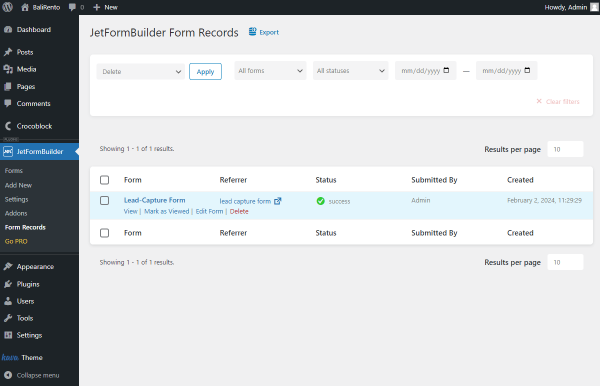
Now, let’s check if the second “Save Form Record” Post Submit Action has also worked.
Go to WordPress Dashboard > FormBuilder > Form Records.
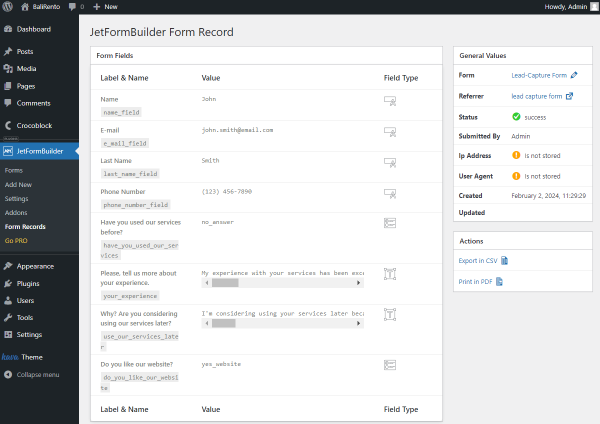
In the list of records, find the recently added record. Click the “View” button to check if all the needed information has been collected.
Here, we can see the data we recently entered in the form.
That’s all; now you know how to build a high-performance lead-capture form on your WordPress website with the JetFormBuilder plugin.