How to Build an Appointment Form
Here’s a step-by-step manual for building an appointment form using JetFormBuilder, JetAppointment, and JetEngine plugins.
Table of Contents
- Use Case Details
- Configure JetAppointment Plugin
- Create a Static Form with JetFormBuilder
- Create a Service and Team Appointment Form with JetFormBuilder
- Configure Form Actions
- Preview and Test
The combination of JetFormBuilder and JetAppointment allows users to create flexible appointment forms. This setup simplifies appointment scheduling for anyone running a service-based business, managing a clinic, or organizing events.
Follow these steps to create your form.
Use Case Details
This tutorial helps you create a booking system for spa procedure appointments. Following the same logic, one can create appointment forms for all kinds of use cases and websites like:
- personal training sessions where clients choose a trainer and service (“Strength training”, “Yoga”);
- beauty salon where customers select stylists and services (“Manicure”, “Haircut”);
- tutoring services where students can choose a tutor and subject (“Math”, “English”).
For our use case, we need two CPTs (Custom Post Types):
- Team — this CPT represents individual professionals (Provider Post Type);
- Services — this CPT represents services offered (Service Post Type).
You can create three types of appointment forms to suit different booking needs:
- Static Form — a form where users select both a service and a service provider, then book an appointment;
- Service Form — a form where users choose a service provider on a specific service page (usually located on the single service page);
- Team Form — a form where users select a service by a particular provider and book directly (usually located on the single provider page).
Further, we’re going to build the Static form, which provides flexibility and a smooth user experience and caters to varied booking preferences.
Configure JetAppointment Plugin
Go to WordPress Dashboard > JetAppointments > Settings to configure the plugin (alternative path: WordPress Dashboard > Crocoblock > JetPlugins Settings > JetAppointments).In the General Settings, you should select the post types that represent services and providers on your website:
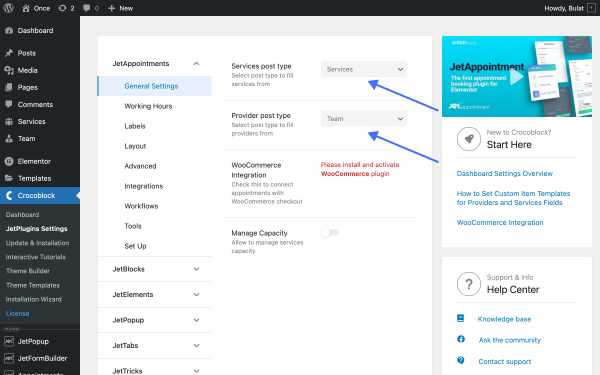
- Service post type — a dropdown field where one needs to choose the post type that will represent the services; in our case, it is “Services”;
- Provider post type — a dropdown field where one needs to choose the post type that will represent the providers; in our case, it is “Team.”
To fine-tune all features of the plugin (including the Booking Schedule and service price), you should run the Set Up wizard.
Set the relations between services and providers
With the JetAppointment plugin, one can set relationships between services and providers using dedicated screen elements:
- On Provider pages (in our use case, it’s the “Team” CPT) — one can add multiple services that the provider performs using the Related Services screen element;
On Service pages (in our use case, it’s the “Services” CPT) — one can add multiple providers who execute the service using the Related Team screen element.
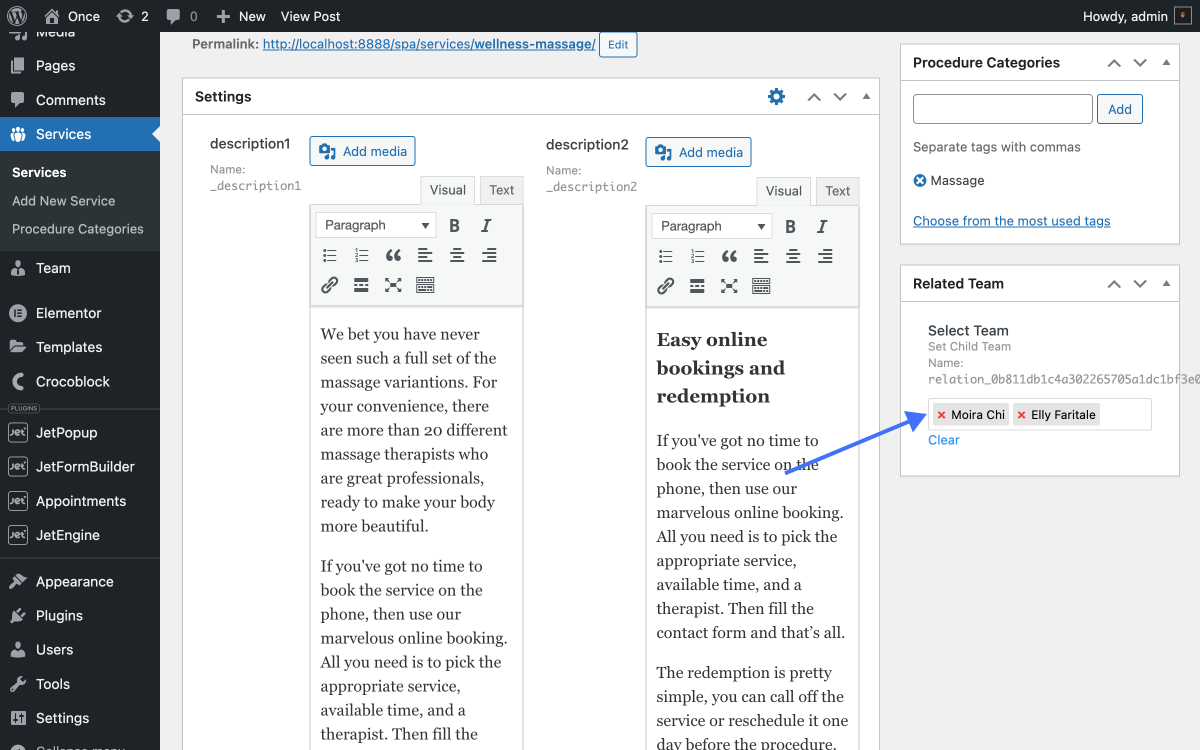
This setup ensures dynamic filtering on the front end.
When a user selects a service through the booking form, the service providers field displays only those providers associated with the chosen service.
Create a Static Form with JetFormBuilder
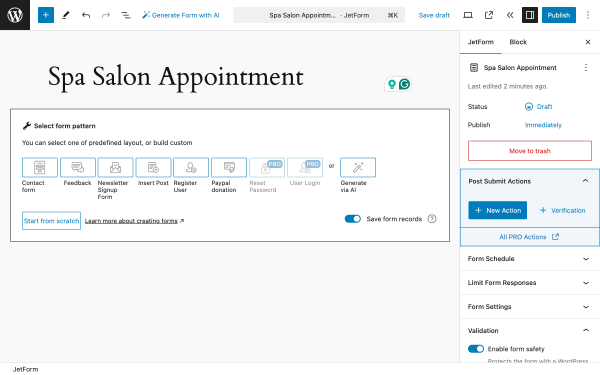
Go to WordPress Dashboard > JetFormBuilder > Add New Form.
Name your form (e.g., “Spa Salon Appointment”). Upon default, the new form contains the Welcome block; we don’t need it, so we’ll remove it.
Add the form fields
For our use case, we’ll need the following fields:
- Radio Field — a block that will display a list of services;
- Appointment Provider — a block that will display a list of providers;
- Appointment Date — a JetAppointment plugin form field block that adds an appointment calendar;
- Text Field — a block that users will use to enter their name;
- Text Field — a block that users will use to enter their email address;
- Text Field — a block that users will use to enter their phone number;
- Action Button — a block that adds a button by clicking which users can submit the form.
All major steps in this form will be separated by the Form Page Break Field block and a Progress Bar block that adds the navigation and shows users on what page they are now and how many pages are left to finish the form.
Services and providers fields
Now, let’s add fields to display the services and providers. Click on the “+” button to add form blocks.
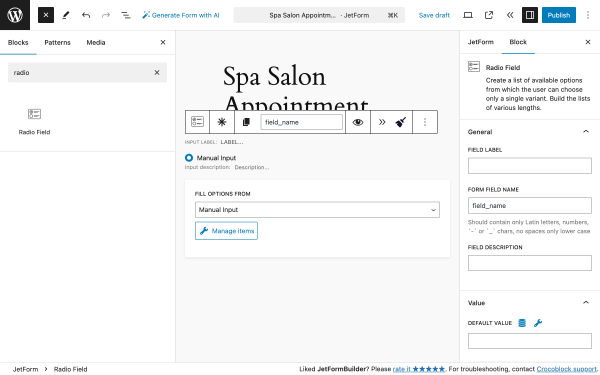
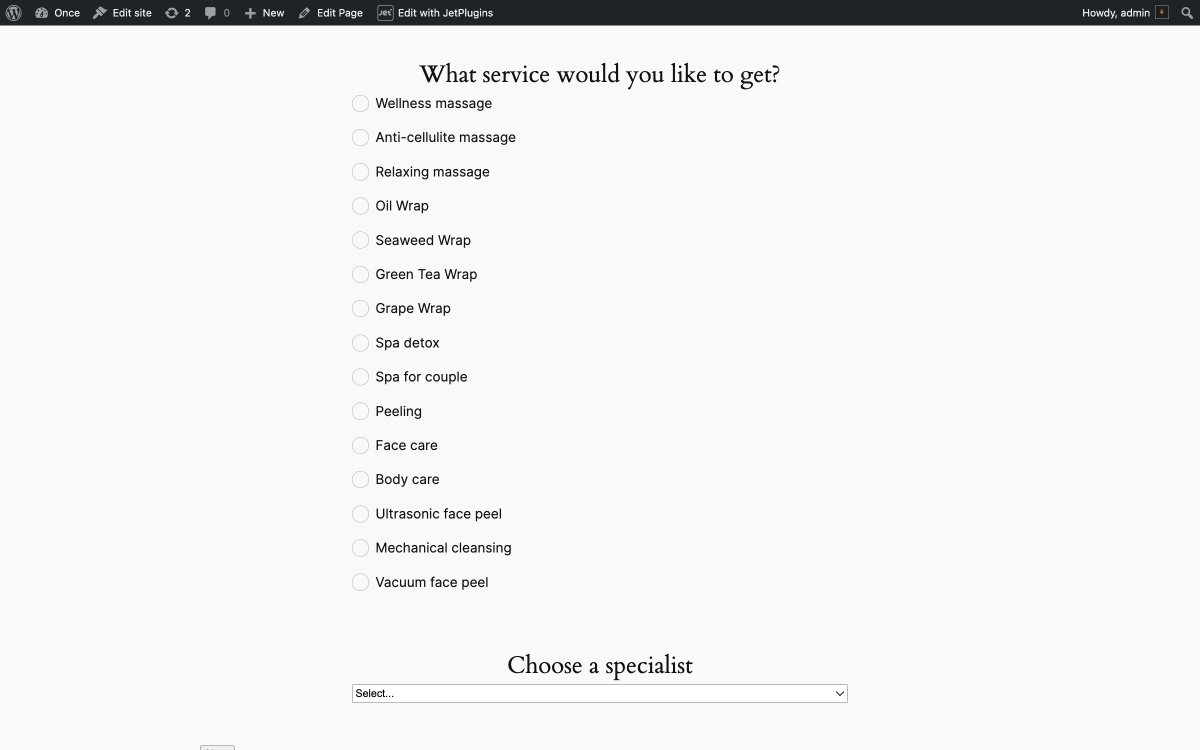
This block will display the list of available services. In the FILL OPTIONS FROM dropdown, we need to select “Posts.” Then, a new field, POST TYPE, will appear. There, we need to select “Services.”
In the block settings, we need to change the FROM FIELD NAME value to “service.”
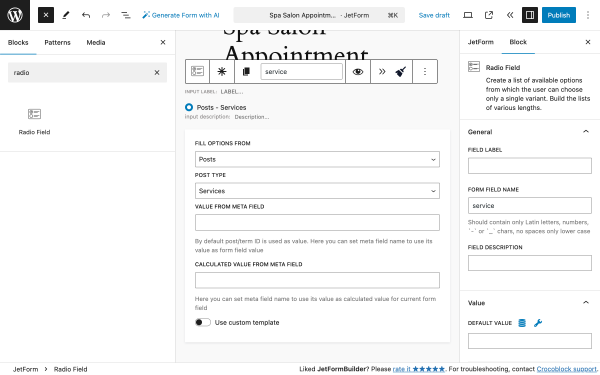
Since we have installed the JetAppointment plugin, it adds several additional fields to the JetFormBuilder’s array.
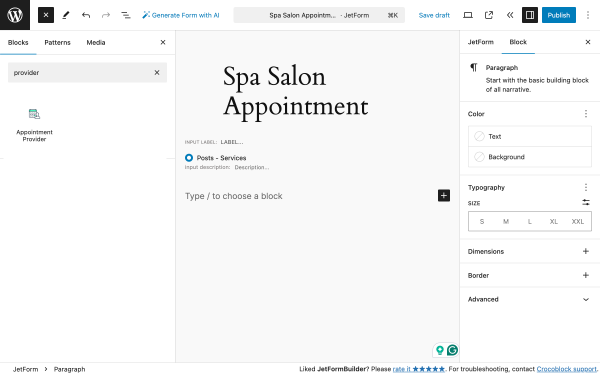
Type “provider” in the search field to find the Appointment Provider block. Then, click on it to add it to your form.
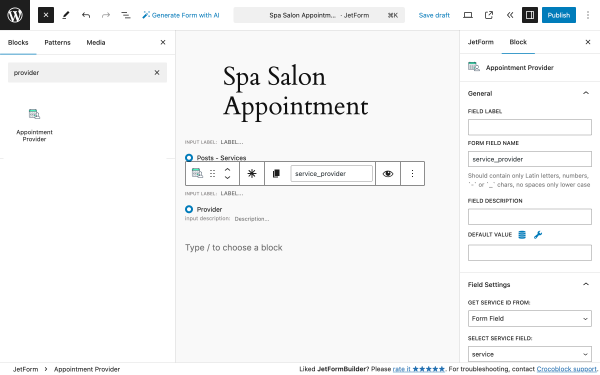
In the block settings, we need to change the FROM FIELD NAME value to “service_provider,” and in the Field Settings section in the GET SERVICE ID FROM, choose “Form Field” and select the previous field “service.”
Now, let’s add the Appointment Date block; type “calendar” in the search box and click on the block to add it to your form.
In the block settings, we need to change the FROM FIELD NAME value to “calendar.”In the Field Settings, we need to adjust a set of fields:
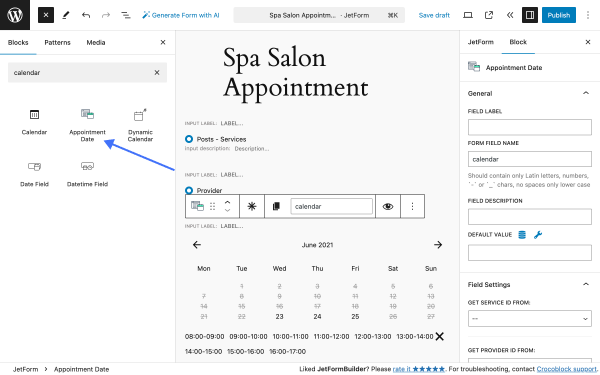
- GET SERVICE ID FROM — in this field, select the value “Form field.” When selected, a SELECT SERVICE FIELD field will appear:
- SELECT SERVICE FIELD — in this field, select the value “service,” which is the first field of this form that calls the list of services;
- GET PROVIDER ID FROM — in this field, select the value “Form field.” When selected, a SELECT PROVIDER FIELD field will appear:
- SELECT PROVIDER FIELD — in this field, select the value “service_provider,” which is the first field of this form that calls the list of services.
When added, both front-end fields allow users to select a service and its corresponding service provider.
User data fields
For this, we’ll need three Text Field blocks to collect basic user information, including “Name,” “Email,” and “Phone number.”
Use the search to find the Text Field block, type “text,” and add it three times.
Now, we’ll adjust the blocks accordingly:
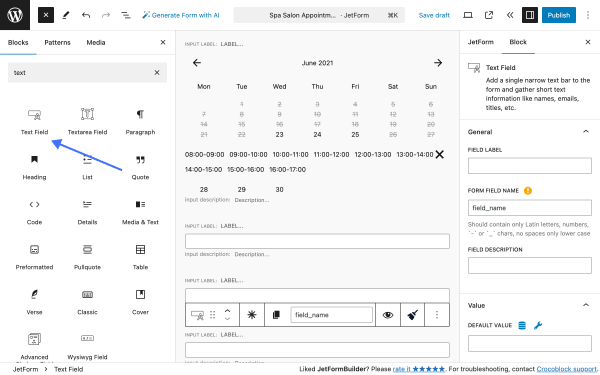
- Text Field — in the first block, change the FIELD LABEL to “User name”;
- Text Field — in the second block, change the FIELD LABEL to “User email,” scroll down to the Field section, and change the FIELD TYPE value to “email”;
- Text Field — in the second block, change the FIELD LABEL to “User phone,” scroll down to the Field section, and change the FIELD TYPE value to “tel.”
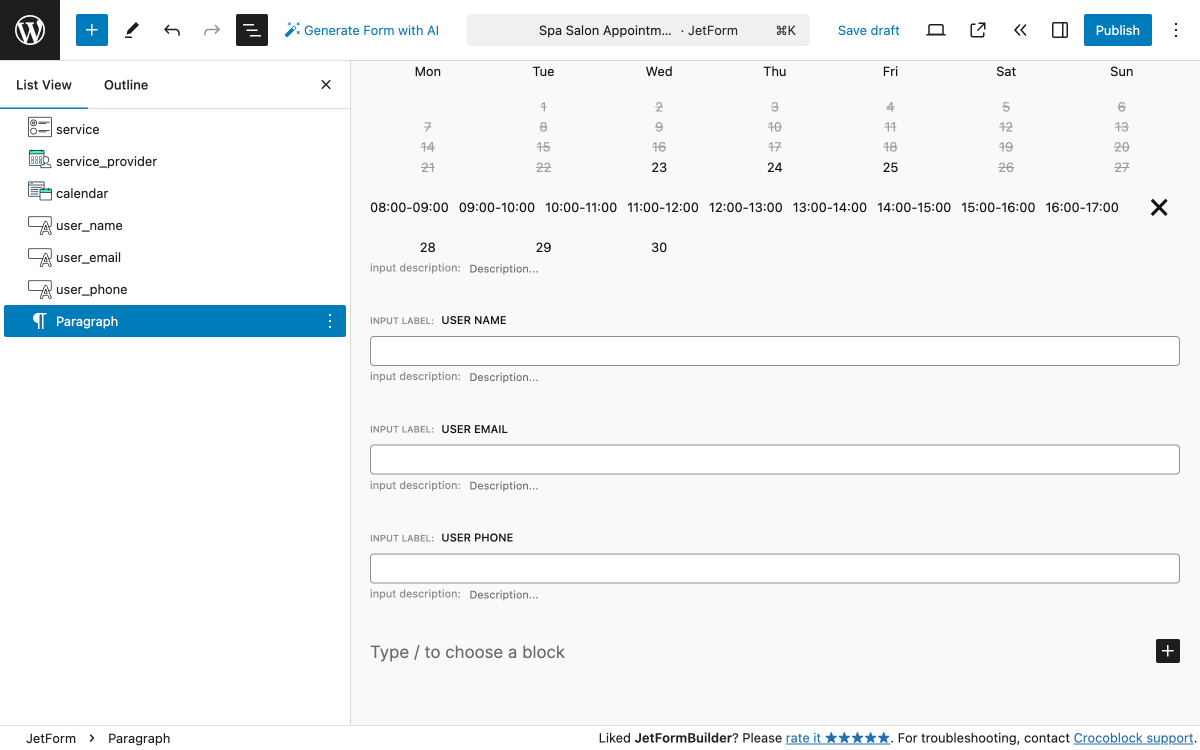
As a result, you will get a set of three Text Field blocks to collect basic user information.
Review and confirmation fields
The last group of blocks sums up the information gathered through the form. For this, we’ll need two CUSTOM HTML blocks and a Calculated Field block.
- The first CUSTOM HTML block will display the details of the selected service, its provider, and the date/time fetched from the “calendar” field; we’ll use the code:
<div><h5>Appoitment details:</h5><!-- JFB_FIELD::calendar --></div>- The second CUSTOM HTML block will display user details: “User name,” “User phone,” and “User email”; we’ll use the code:
<div><h5>Contact details:</h5><!-- JFB_FIELD::user_name --></div>

<div><!-- JFB_FIELD::user_phone --></div>

<div><!-- JFB_FIELD::user_email --></div>
The Calculated Field block will display the price of the service fetched from the “calendar” field.
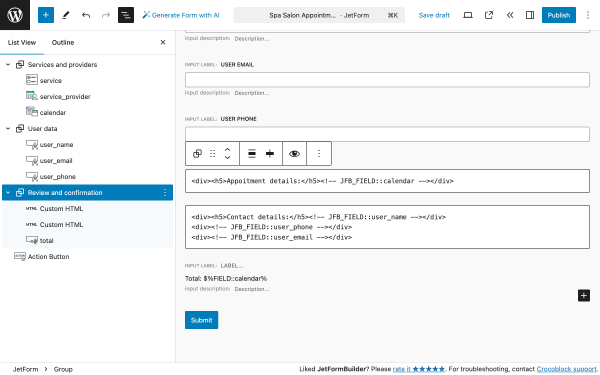
The final block in this form is the Action Button.
Additional blocks
For more convenience, you can group the form fields into meaningful steps by adding the Form Page Break block. This block divides one large form into several parts and makes each part appear after filling in the previous part.
With the help of Heading blocks, you can name those groups so users will immediately understand what they will have to do next.
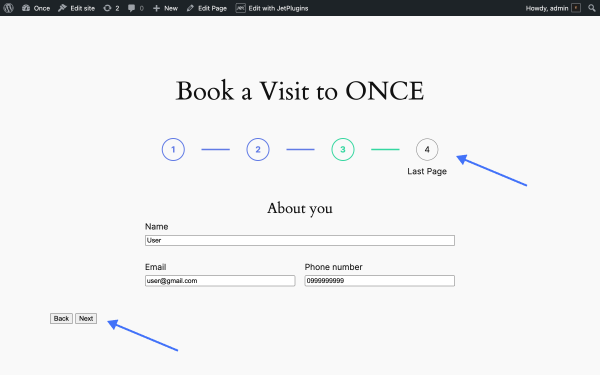
Alternatively, you can add the Progress Bar blocks. They will add navigation and show users what page they are on now and how many pages are left to finish the form.
Create a Service and Team Appointment Form with JetFormBuilder
The Service and Team forms have minor differences while having similar logic.
Each service or team member page may contain a booking form with a hidden field that obtains the ID of this page. Through the form, we’re going to get this page ID, and the Appointment Provider field and Appointment Date field will filter relevant entries.
Service page booking form
The first thing we need to do is to establish a “service-provider” relationship. To do so, go to the service custom post type page, find the section Related Team, and add all providers relevant to this service.

Similarly, you can add all relevant services by editing the provider’s CPT page.
Now, we can proceed to the JetFormBuilder form.
The Service form should have a Hidden Fields block that allows us to obtain the ID of a service page with the following options enabled:
- FIELD VALUE — is set to “Current Post ID”.
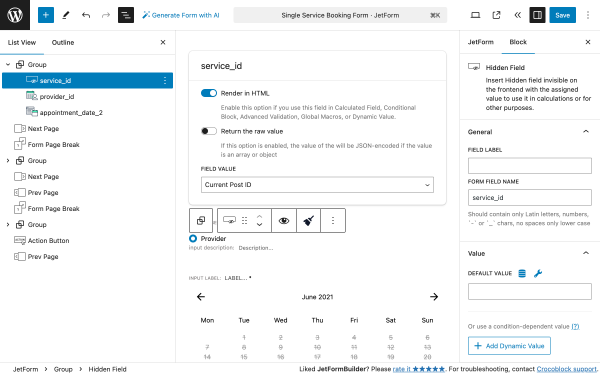
To select providers related to the service we’re interested in, we need to map the Appointment Provider block to the Hidden Field block.
Go to Appointment Provider block settings, Field Settings section, and apply the following settings:
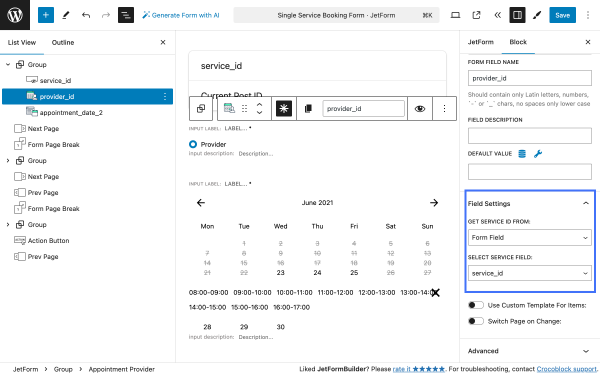
- GET SERVICE ID FROM — in the dropdown, select the “Form Field” option;
- SELECT SERVICE FIELD — in the dropdown, choose the Hidden Block.
We need to adjust the Appointment Date block accordingly so that the user can book a date during certain providers’ booking hours.
Go to Appointment Date block settings, Field Settings section, and apply the following settings:
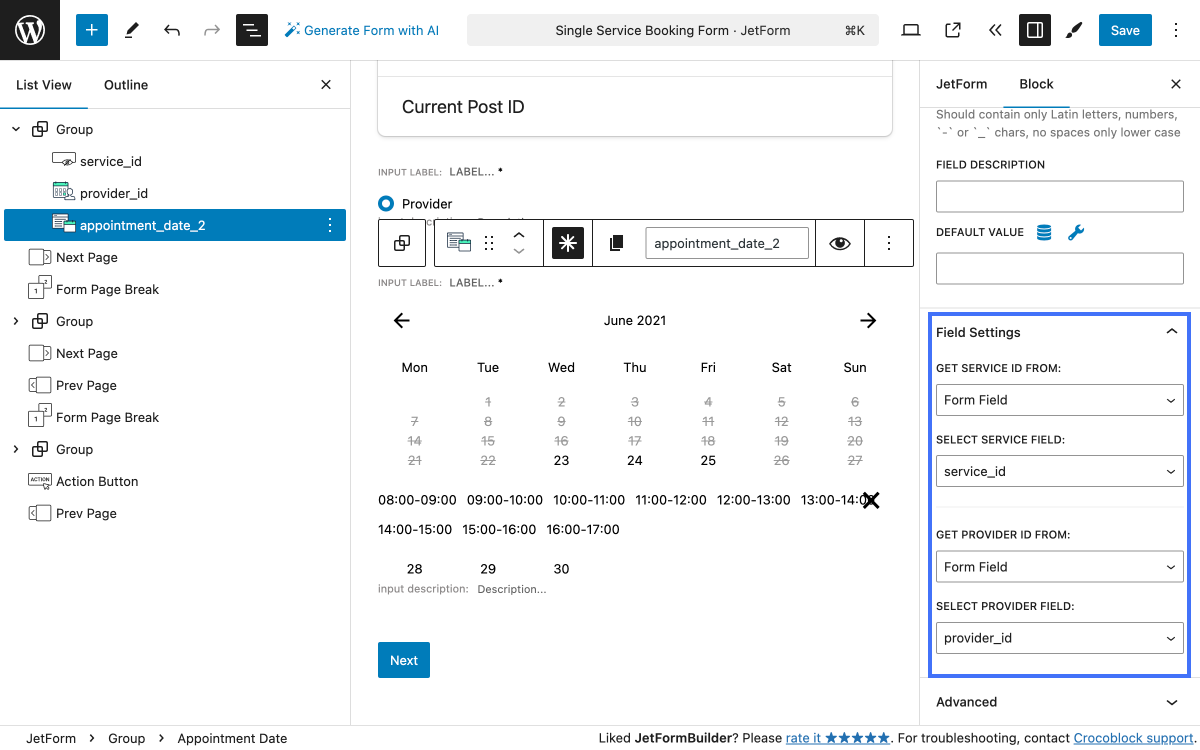
- GET SERVICE ID FROM — in the dropdown, select the “Form Field” option;
- SELECT SERVICE FIELD — in the dropdown, choose the Hidden Block;
- GET PROVIDER ID FROM — in the dropdown, select the “Form Field” option;
- SELECT SERVICE FIELD — in the dropdown, choose the Appointment Provider block.
This way, users will be able to choose providers related to the service and book specific dates.
Team page booking form
The first thing we need to do is to establish a “provider-service” relationship. To do so, go to the provider custom post type page, find the section Related Team, and add all providers relevant to this service.
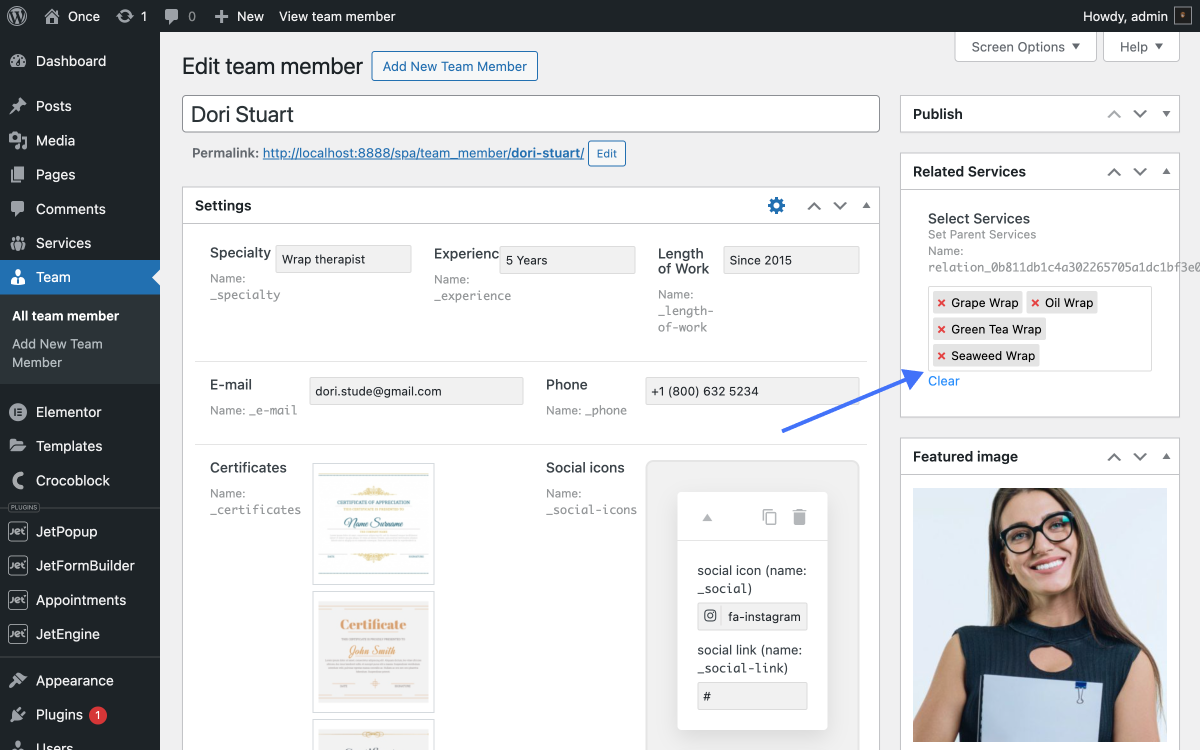
Now, we can proceed to the JetFormBuilder form.
The same form-building logic applies to this type of form. The only thing that differs is that on the provider page, we no longer need the Appointment Provider block.
Apply the following form block settings:
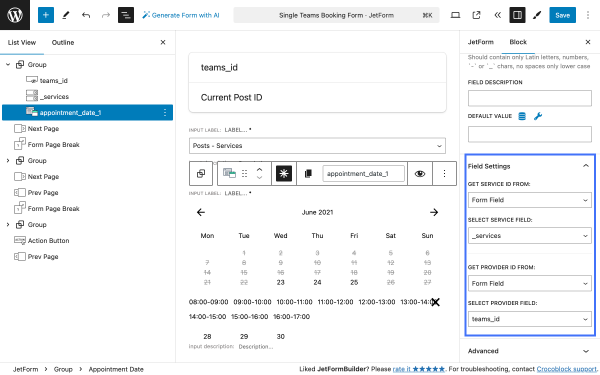
- Hidden Field — this field will obtain the ID of the provider page, FIELD VALUE set to “Current Post ID”;
- Select Field — this field will display the services related to the provider:
- Fill Options From — select “Posts”;
- Post Type — set to “Services” (which is the “Services” CPT);
- Appointment Date Field — this field will display the booking dates when a certain provider is available; go to block settings, Field Settings section, and apply the following settings:
- GET SERVICE ID FROM — in the dropdown, select the “Form Field” option;
- SELECT SERVICE FIELD — in the dropdown, choose Select Field block;
- GET PROVIDER ID FROM — in the dropdown, select the “Form Field” option;
- SELECT SERVICE FIELD — in the dropdown, choose the Hidden Block.
This way, your users will be able to choose services related to the provider and book specific dates.
Configure Form Actions
Go to JetForm in the right menu, under Post Submit Actions, and click the “+ New Action” button to add three form submit actions:
We’ll add them all at once and fine-tune them one by one.
Save Form Record
The “Save Form Record” form action does not require fine-tuning. The action pop-up contains two switchers, both disabled by default. To edit the form submit action, hover it over and click the “pencil” icon.
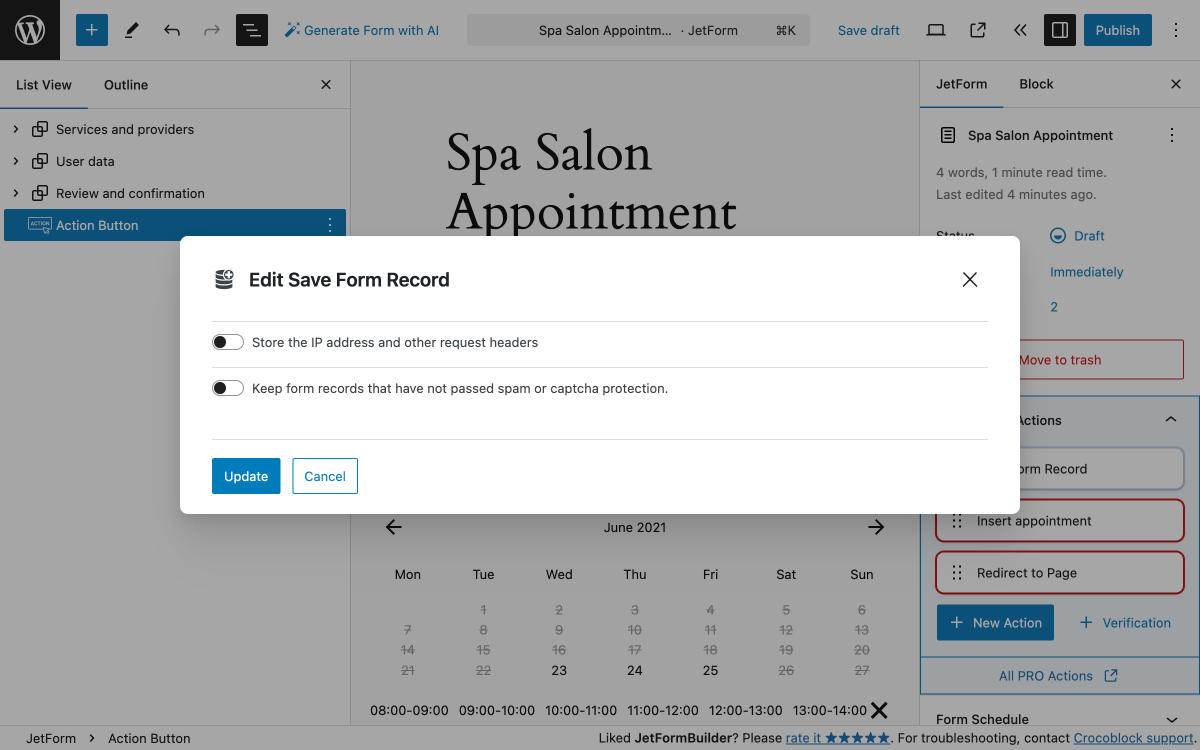
The first switcher allows storing the IP address and other request headers.
The second switcher allows the keeping form records that have not passed spam or captcha protection.
When done, click “Update” to save or “Cancel” to discard settings.
Insert appointment
The “Insert appointment” form submit action allows one to create an appointment entry in the corresponding section: WordPress Dashboard > Appointments > Appointments.
To edit the form submit action, hover it over and click the “pencil” icon.
In the Edit Insert appointment pop-up, you need to map the fields that correspond to your form.
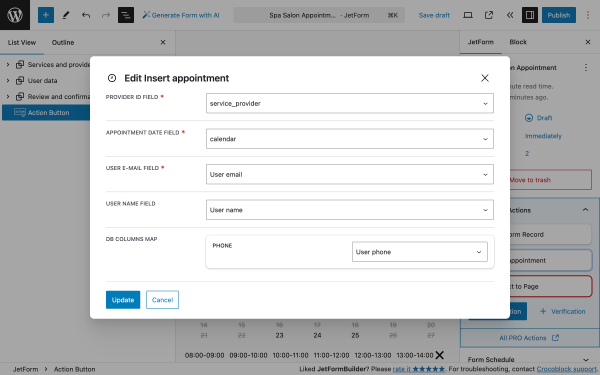
When done, click “Update” to save or “Cancel” to discard settings.
Redirect to Page
The “Redirect to Page” form submit action redirects the user to a “Thank you” or “Success” page upon completing the form. For this, you should create a separate page if you don’t have it.
For our use case, we’ve created a “Thank you” page that users will see after clicking on the “Submit” button.
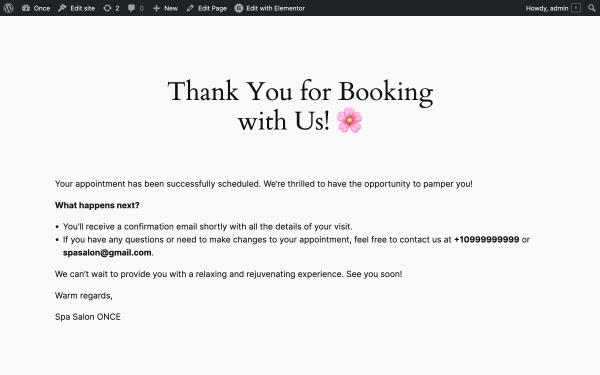
To edit the “Redirect to Page” form submit action, hover over it and click the “pencil” icon.
The Edit Redirect to Page pop-up contains the following fields:
- REDIRECT TO — in this drop-down menu, you can choose the type of page you would like to send the user to. We will choose the “Static page” value. When selected, the SELECT PAGE field will appear:
- SELECT PAGE — this drop-down contains all the pages you’ve created so far. In our case, it’s the “Thank You for Booking with Us!” page;
- URL QUERY ARGUMENTS — in this field, you can see the list of the fields added to the form. When you tick the checkbox near one of the fields, its value is used as the query argument and added to the URL. In our case, we leave this field empty;
- URL HASH — in this field, you can set the subject of the letter that the user will receive. In our case, we leave this field empty.
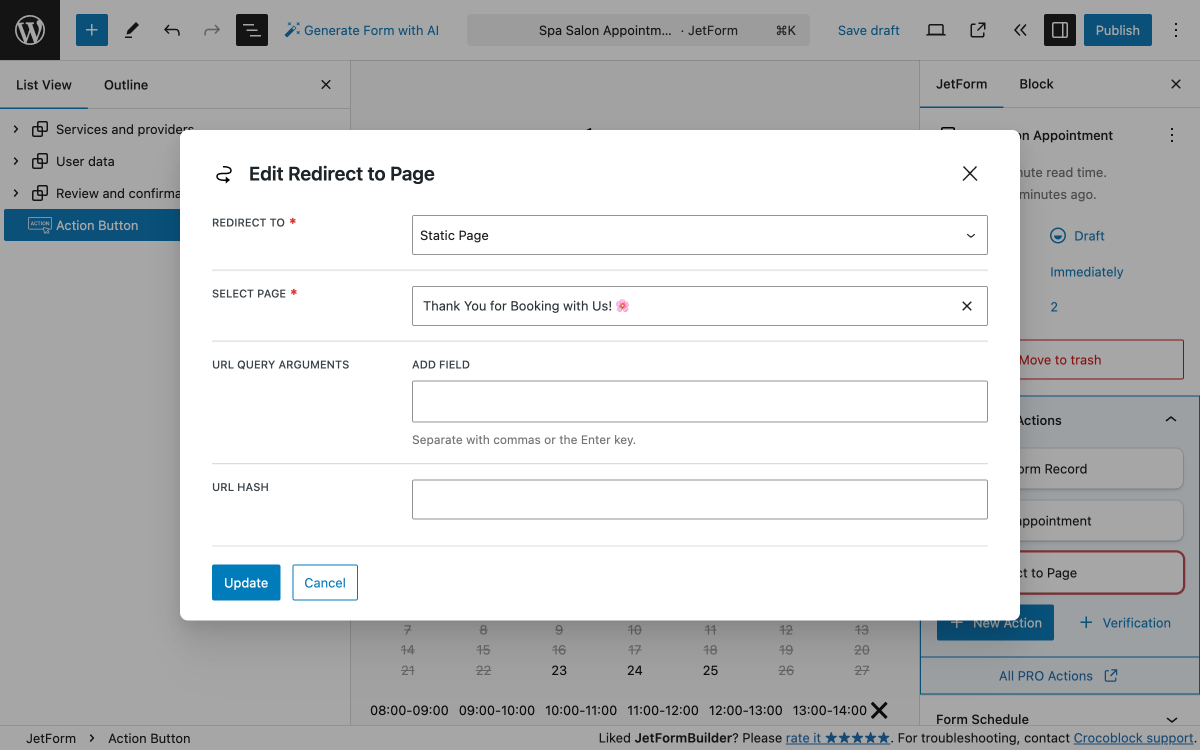
When done, click “Update” to save or “Cancel” to discard settings.
Preview and Test
Preview the page and test the form to ensure all fields and integrations work correctly.
To check if the “Save Form Record” and “Insert appointment” form submit actions fired successfully, go to WordPress Dashboard > JetFormBuilder > Form Records.
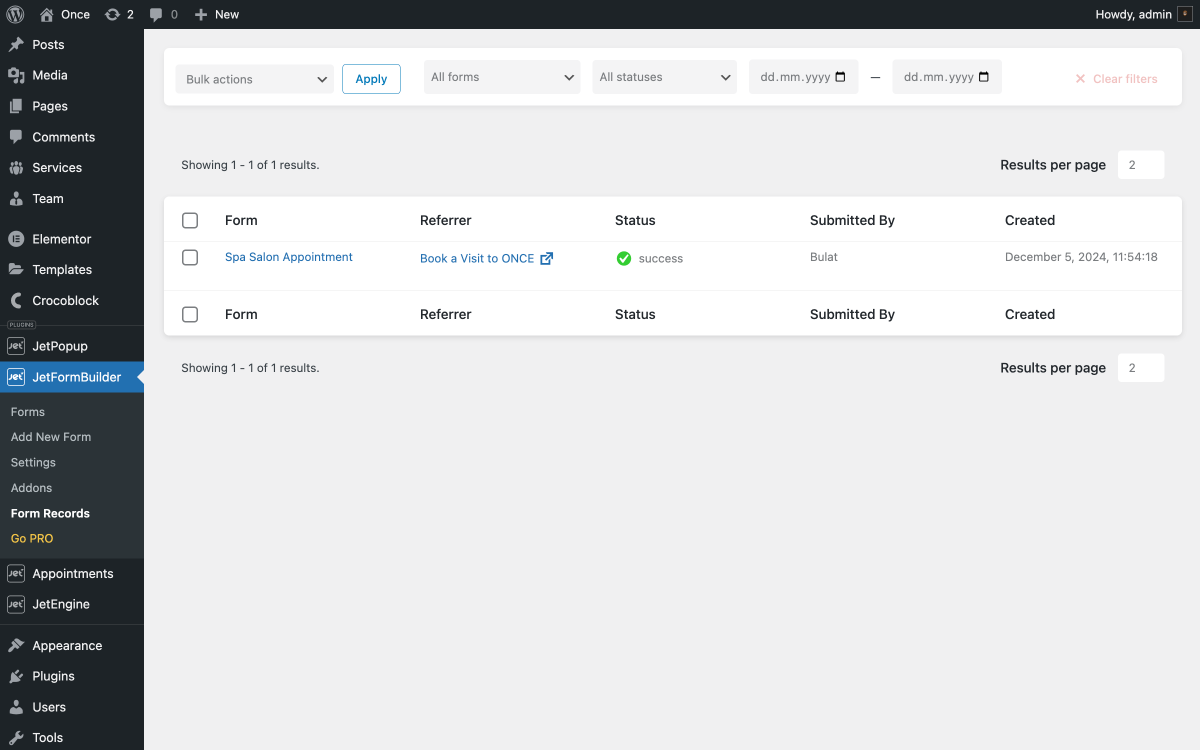
There, you will see a new form record and its status. In our case, it’s “Success,” meaning that all form submit actions are working, and the appointment data has been saved.
To check the status of a newly created appointment, go to WordPress Dashboard > Appointments > Appointments.
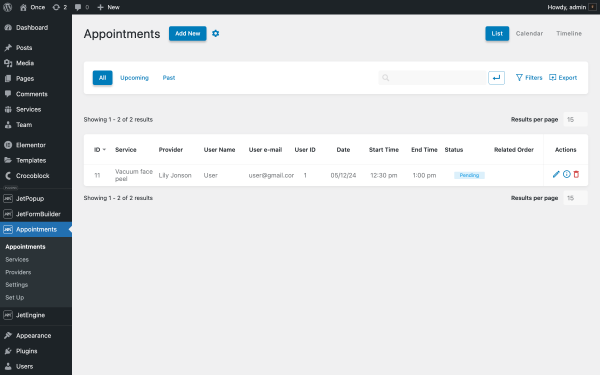
You will see a new appointment and its status there. All columns contain the data submitted on the front-end form, which means that the form is working and ready to accept booking appointments.
By following these steps, you can create a fully functional appointment form on your WordPress website using JetFormBuilder and JetAppointment.