How to Configure the Address Autocomplete Field in the Form
This tutorial explains how to set up and configure the Address Autocomplete Field in the JetFormBuilder WordPress plugin. The field helps users enter addresses more quickly and accurately by displaying real-time suggestions from Google Maps as they type. You will learn how to enable the feature, connect the Google Maps API key, and customize the field settings to improve user experience in your WordPress forms.
Table of Contents:
- Install and set up the Address Autocomplete Add-on
- Create and Set the Google API
- Set the JetFormBuilder
- Adjust the Form
- Check the Result on the Front
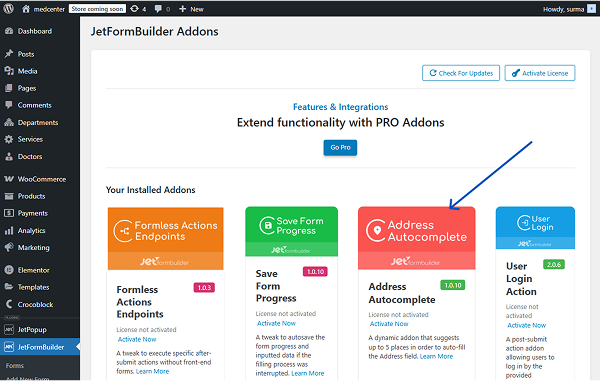
Install and set up the Address Autocomplete Add-on
To install the add-on:
- Go to WordPress Dashboard > JetFormBuilder > Addons tab and find the Address Autocomplete addon in the All Available Addons section.
- Press the “Install Addon” button, and once installed, it will appear in the Your Installed Addons section.
- Click the “Activate Addon” button.
Create and Set the Google API
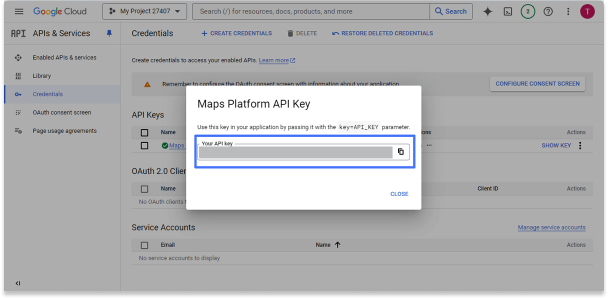
Follow the Getting started with Google Maps tutorial and click the “Get Started” button. Then, complete all the steps required. To locate your Google Maps API key, click on “Credentials” in the left-side menu of the Google Cloud Platform. The so-called Maps API Key from the API Keys section is what you need. Copy that key and keep it for now.
Additionally, you can check the Creating Google Maps API key video guide.
Set the JetFormBuilder
Proceed to WordPress Dashboard > JetFormBuilder > Settings > Address Autocomplete API and paste the key you copied earlier into the Google Place API key bar.
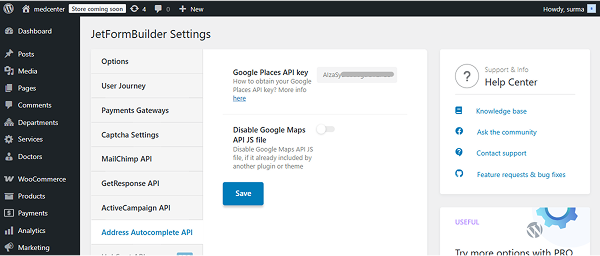
Click the “Save” button once you are ready.
Adjust the Form
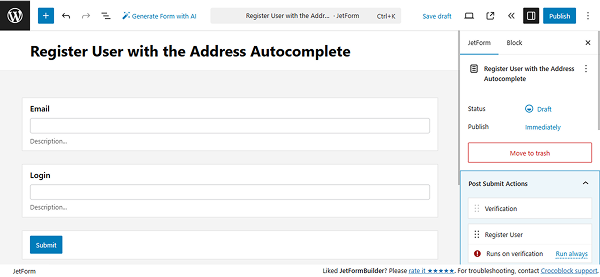
Now, let’s proceed to creating a form. To build a WordPress form, we navigate to WordPress Dashboard > JetFormBuilder > Add New Form.
Enter the form’s title — in this case, “Register User with the Address Autocomplete.”
The Welcome block appears by default. From here, you can select a form pattern or generate a form with OpenAI. Otherwise, you can hit the “Start from scratch” button and use the three fields added by default; otherwise, you can delete them to begin anew.
In this case, we select the “Register User” pattern.
Additionally, we add Text Fields to get the user’s name and phone number.
Then, we add the Address Autocomplete Field. In the right-side settings tab, just like with other JetFormBuilder fields, you can set the FIELD LABEL, FIELD NAME, FIELD DESCRIPTION, and DEFAULT VALUE. Let’s proceed to the Field Settings section.

In the COUNTRIES ALLOWED text area, you can select those countries whose search results will be shown in the Address Autocomplete Field. To select multiple countries, hold down Ctrl and left-click the countries you wish to exclude (Command + left-click for Mac). In this case, we keep it empty, as we do not need to limit the countries.
In the PLACE TYPES input, you can restrict results to a certain place type. The type parameter indicates which place type results will be returned and which will not. If you select nothing in this text area, all types’ results will be returned. Please note that you are allowed to select only one type here. The PLACE TYPES input supports geocodes, addresses, establishments, regions, and cities.
On the Google Maps Platform, you can check the view types supported by autocomplete here.
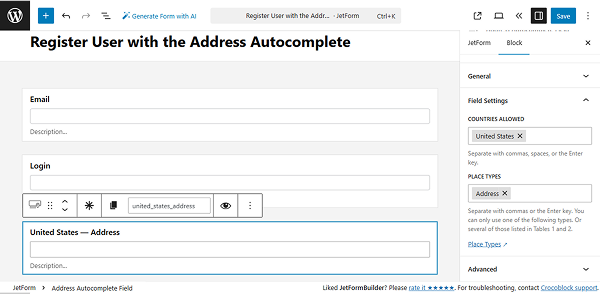
Let’s create a few Address Autocomplete Fields and test how various settings affect the output. For the first field, we select the “United States” for the COUNTRIES ALLOWED field. For the PLACE TYPES, we choose the “Address” option.
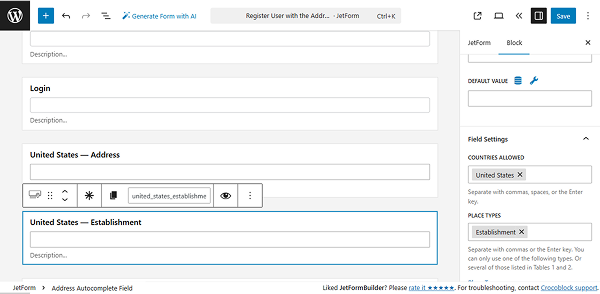
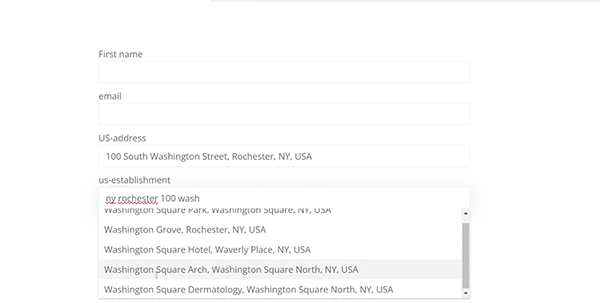
For another Address Autocomplete Field, we keep the “United States” for the COUNTRIES ALLOWED field. Choose the “Establishment” for the PLACE TYPES.
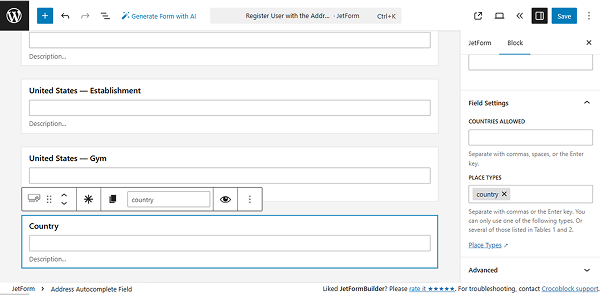
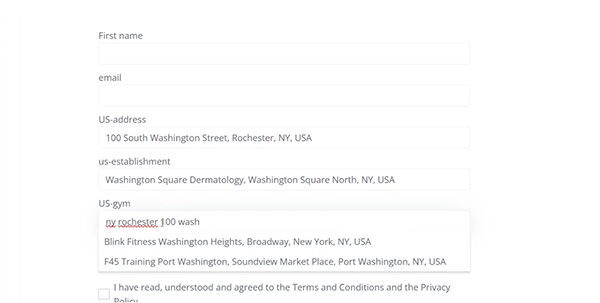
For the third Address Autocomplete Field, we keep the “United States” option as the allowed country. For the PLACE TYPES, we enter the “gym” custom option.

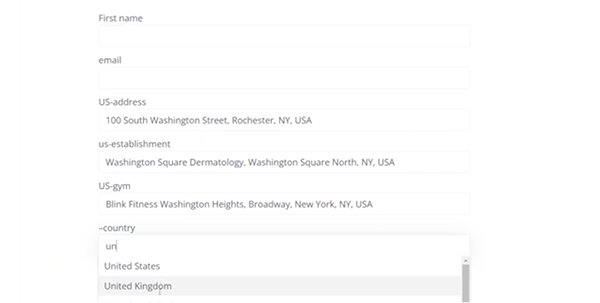
For the last Address Autocomplete Field, we keep the COUNTRIES ALLOWED field empty and select the “Country” option for the PLACE TYPES.
Click the “Publish” button once you are ready with the form.
Check the Result on the Front
Following the How to Display a Form on the Front End guide, add the created form to the needed page. Then, proceed to the front-end page and fill in the form fields.
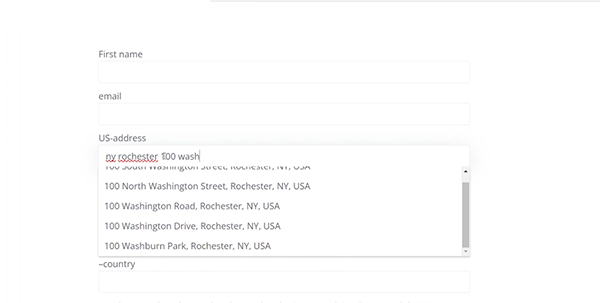
In the first Address Autocomplete Field, we are looking for the address. So while typing, we get autocomplete suggestions for formatted address options almost instantly, even if users make small typos.
The Establishment type outputs nearby businesses or public institutions.
The Gym filter shows only fitness-related results.
The Country type lists country names after just a few letters are entered.
That’s it. Now you know that the Address Autocomplete add-on for JetFormBuilder lets you integrate Google Maps-powered search directly into your WordPress forms.