How to Create a Subscription Registration Form
In this guide, we will describe two ways to build a subscription form that helps register users and immediately assign them the appropriate role using the JetFormBuilder plugin for WordPress.
Let’s assume we have a book-selling website that allows users to select their role in the form. We added three custom user roles using the User Role Editor plugin: “Basic Plan,” “Silver Plan,” and “Gold Plan.” In this tutorial, we will show how to build a subscription registration form.
- Create a Form with the “Register User” Conditions
- Create a Form with the “Call Hook Action” Condition
Create a Form with the “Register User” Conditions
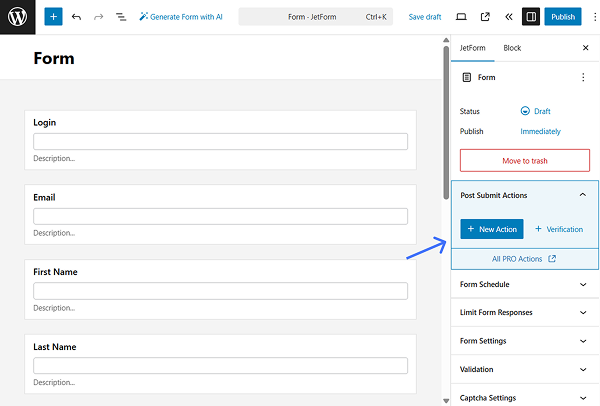
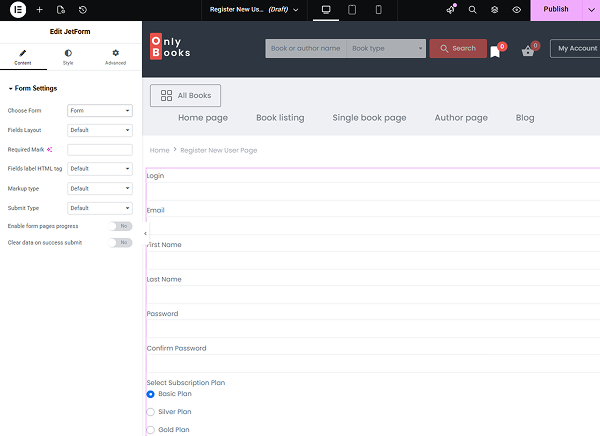
Go to WordPress Dashboard > JetFormBuilder > Add New Form to build a new form.
Build a form
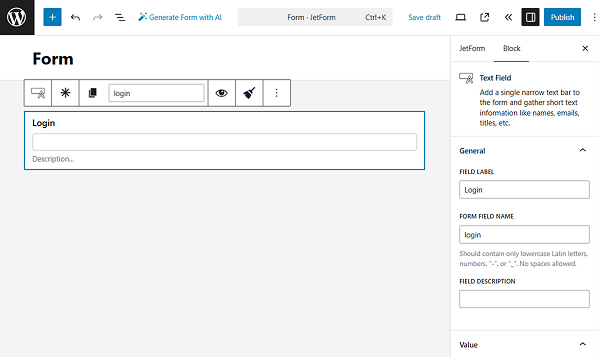
We complete the name of the form and add the Text Field with the “Login” FIELD LABEL.
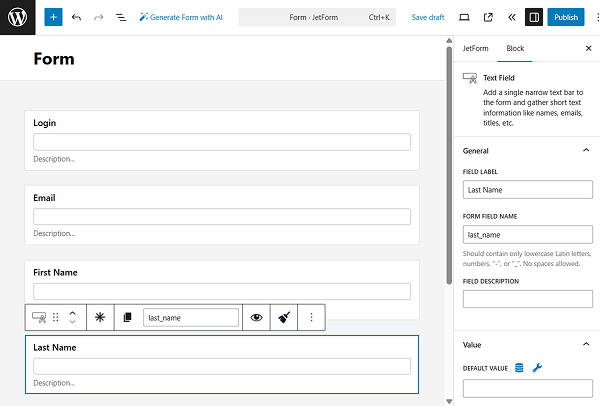
Then, we add one more Text Field with the “Email” FIELD LABEL.
Also, we set the FIELD TYPE to “Email” to ensure only emails can be entered in the field.

Next, we add two more Text Fields, one for the “First Name” and the second for the “Last Name.”
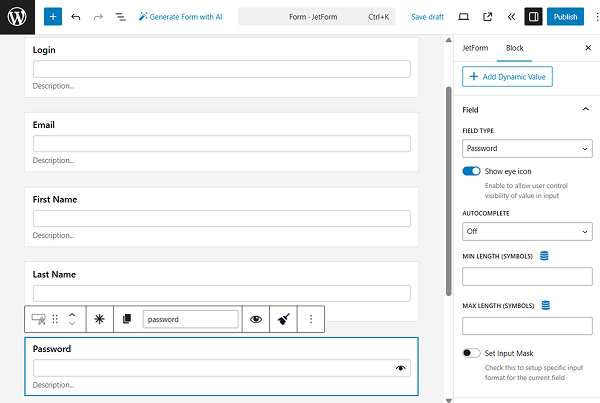
The following field is also a Text Field, but this time indicating the “Password”, with the “Password” FIELD TYPE set accordingly.
We also activate the Show eye icon toggle.
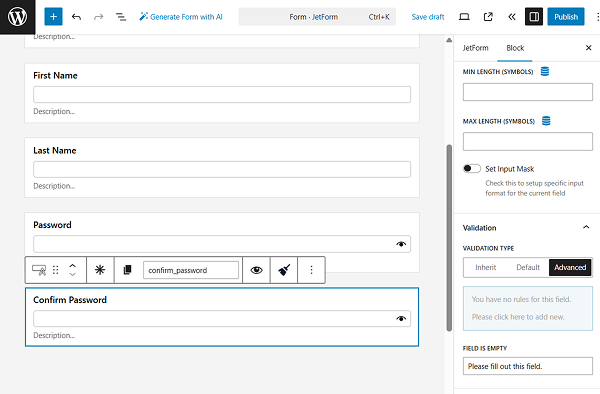
We also add a “Confirm Password” Text Field with the “Password” FIELD TYPE set.
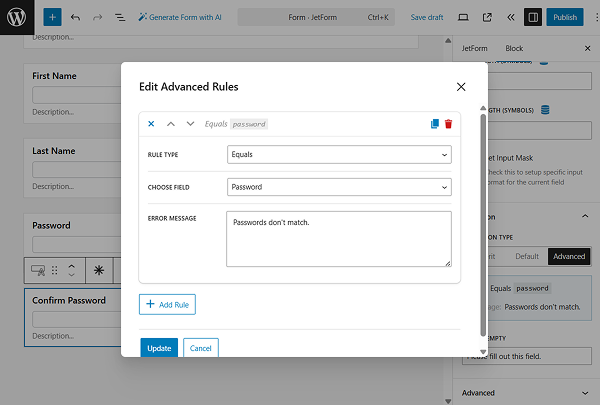
To fully adjust it, we go to the Validation section and select the “Advanced” VALIDATION TYPE.
Click the area below to adjust the validation type in the pop-up.
In the pop-up, pick the “Equals” RULE TYPE, select the “Password” field in the CHOOSE FIELD dropdown, and set the ERROR MESSAGE. For example, “Passwords don’t match.”
Click the “Update” button to save the changes.
Now, the “Confirm Password” field checks if the completed value matches the “Password” field. If the values don’t match, the form won’t be submitted.
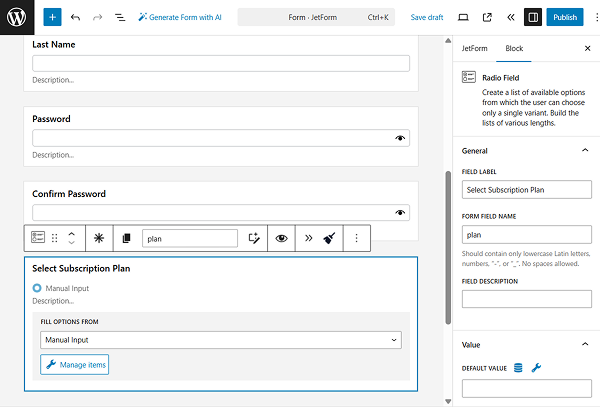
Next, we add a Radio Field to let users select a subscription plan. We set the “Select Subscription Plan” FIELD LABEL and press the “Manage items” button to define the radio options.
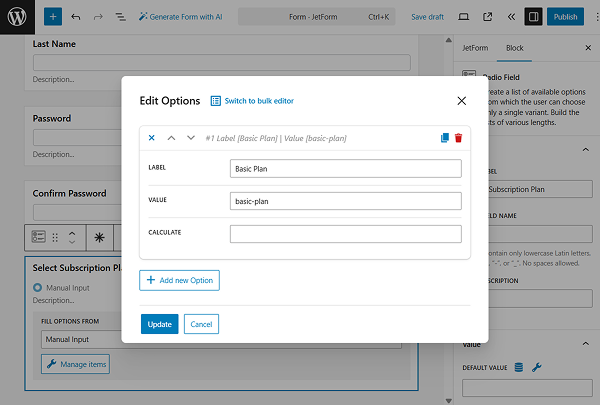
We add three values with the “Basic Plan,” “Silver Plan,” and “Gold Plan” LABELS and corresponding VALUES: “basic-plan”, “silver-plan”, and “gold-plan”.
To save the options, press the “Update” button.
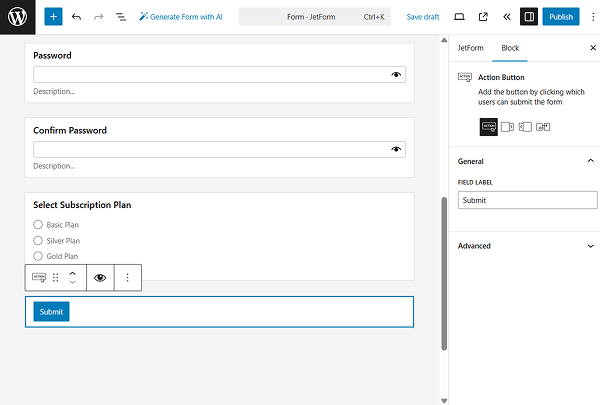
To finalize the form, add the Action Button block. We don’t alter the settings and leave the default “Submit” FIELD LABEL.
Set up post submit actions
It’s time to adjust the post submit actions. The corresponding section is located in the JetForm tab.
Click the “New Action” button to add the first action.
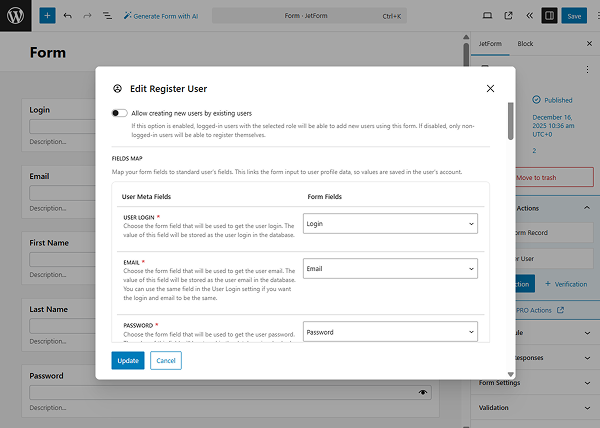
In the pop-up, select the “Register User” option and click it to open the action settings.
Initially, we activate the Allow creating new users by existing users toggle and specify the “Administrator” role in the WHO CAN ADD NEW USER? dropdown. This is not mandatory, but it allows an administrator to check whether the user will be registered using this form.
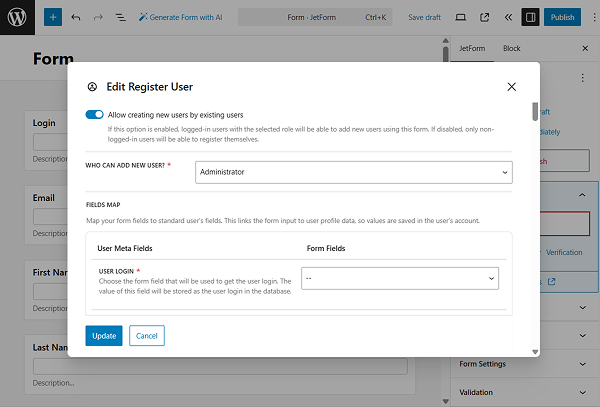
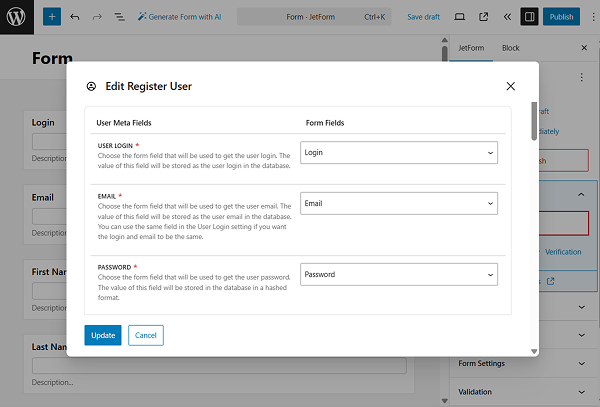
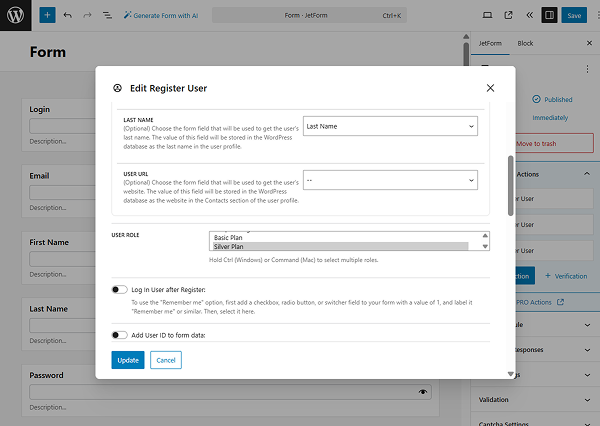
Scrolling down to the FIELDS MAP, we should map our form fields to the standard user’s fields.
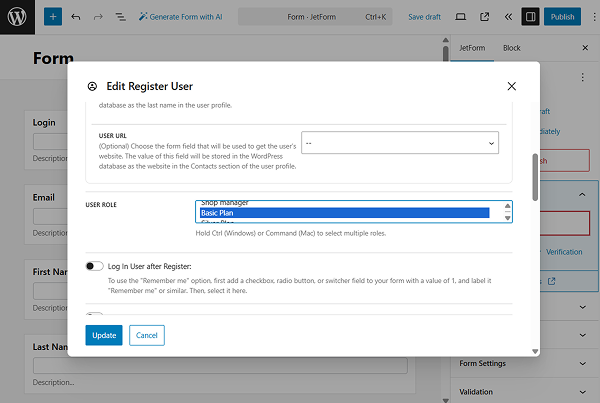
After mapping, select the USER ROLE to be assigned to the new user registered via the form. In our case, we select the “Basic Plan” first.
You can also work on other fields in the pop-up if needed, and whenever ready, press the “Update” button.
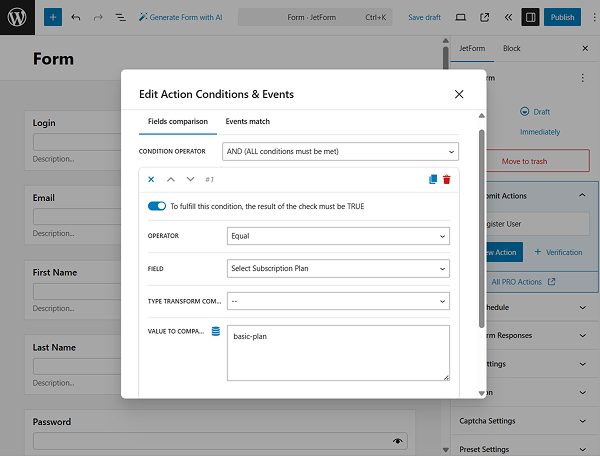
Hover over the added “Register User” action and press the “crossed arrows” icon to edit the conditions under which the action will be performed.

Another pop-up with the settings opens. Here, add a new condition and adjust it: pick the “Equal” OPERATOR, select the field with the subscription plans in the FIELD dropdown field, and set the needed value in the VALUE TO COMPARE field. In our case, we complete it with the “basic-plan” value as this is the option’s VALUE we specified in the “Select Subscription Plan” Radio Field’s settings.
When the condition is set, press the “Update” button to save it.
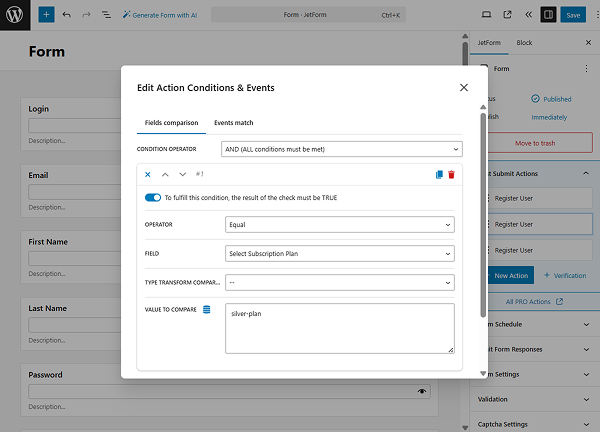
Add two more “Register User” Post Submit Actions. In one of them, select the “Silver Plan” USER ROLE, and in another, the “Gold Plan” USER ROLE.
Also, set the corresponding conditions for each post submit action.
When the form is ready, press the “Publish/Save” button.
Add the form to the page
Now, let’s add the form to the page. It can be any desired page; in our case, we built a new page in the WordPress Dashboard > Pages directory.
Find and add a JetForm widget/block/element to the page. Select the needed form in the corresponding field.

When the page is ready, save it.
Check the result
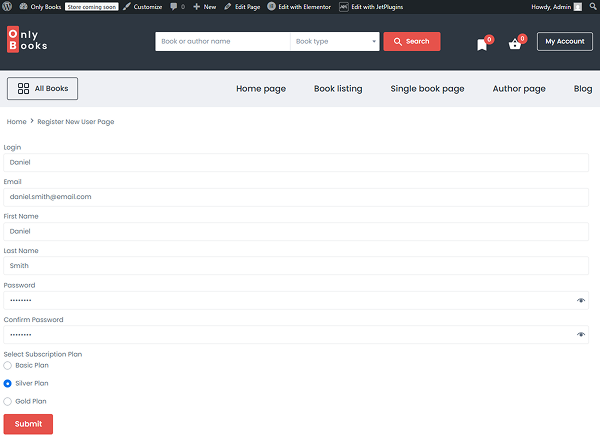
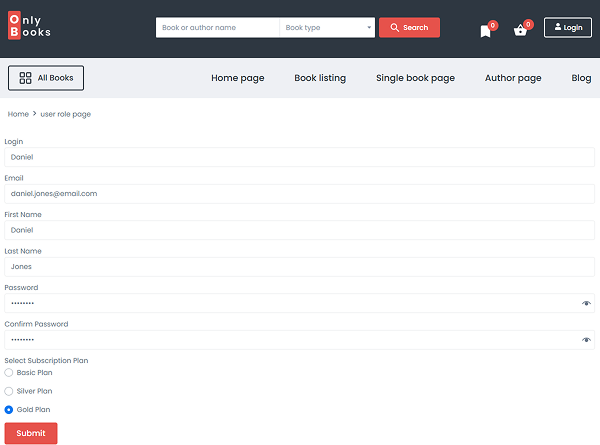
Open the edited page on the front end. The form is now available for completion.
Let’s complete and submit the form to check if it works.
For example, we select the “Silver Plan” option to assign it as a user role.
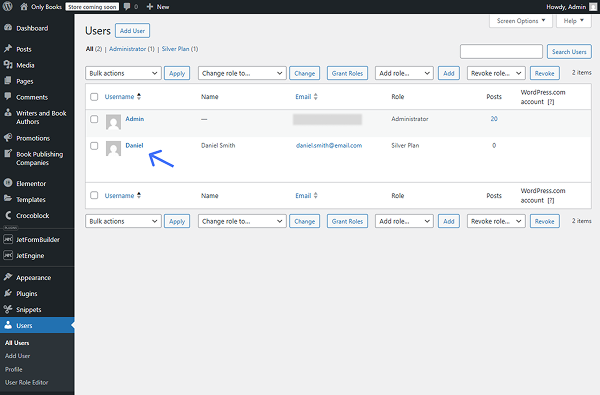
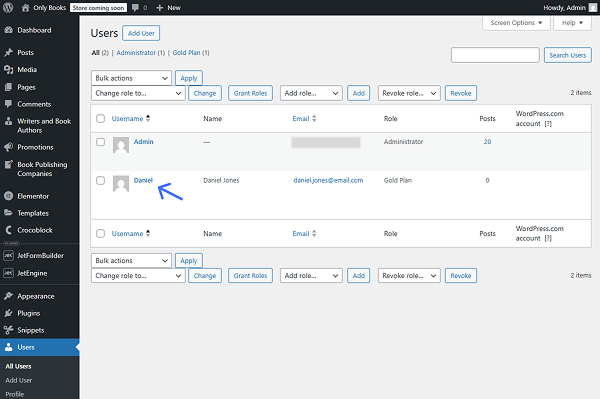
Once the message about the form succession is shown, we can proceed to the WordPress Dashboard > Users page and check the new user.
We can now see that the new user is created and their user role is set to “Silver Plan.”
Create a Form with the “Call Hook Action” Condition
Let’s discover another way of creating a subscription registration form.
Build a form
We duplicate the form we’ve built before in the Build a form chapter to make changes to post submit actions.
Set up post submit actions
Right away, we proceed to the Post Submit Actions tab and leave only one “Register User” action by deleting the other two.
Click the “pencil” icon next to the “Register User” action to open the action editing pop-up.
This time, we deactivate the Allow creating new users by existing users toggle so only non-logged-in users can register.
We adjust the action as we did in the previous form (Set up post submit actions chapter) and also activate the Add User ID to form data toggle so that the registered user ID will be added to the form data.
Press the “Update” button when done.

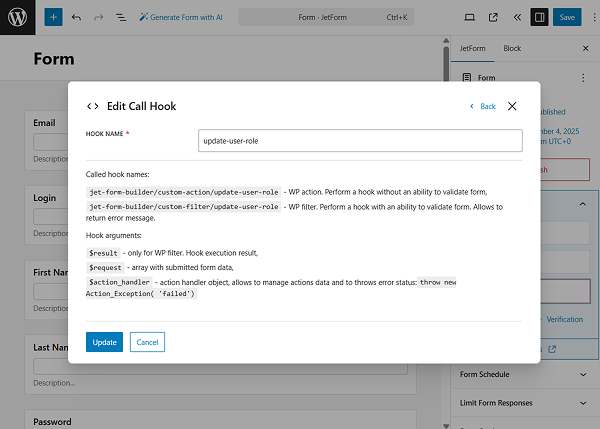
Now, let’s add another post submit action. This time, “Call Hook.”
In the editing pop-up, complete the HOOK NAME field with the preferred name. In our case, it’s the “update-user-role” value.
Click the “Update” button to save the action.
If the form is ready, press the “Save/Publish” button.
Add a hook
Now, let’s add a hook that will be called after the form is submitted. We will add it with the Code Snippets plugin. So, we proceed to the WordPress Dashboard > Snippets dashboard and add a new snippet.
We name it “Set user role” and paste the following code into the corresponding area:
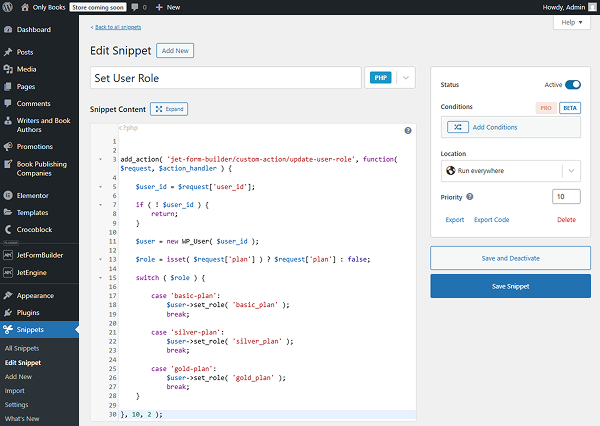
add_action( 'jet-form-builder/custom-action/update-user-role', function( $request, $action_handler ) {

	$user_id = $request['user_id'];

	if ( ! $user_id ) {
		return;
	}

	$user = new WP_User( $user_id );

	$role = isset( $request['plan'] ) ? $request['plan'] : false;

	switch ( $role ) {

		case 'basic-plan':
			$user->set_role( 'basic_plan' );
			break;

		case 'silver-plan':
			$user->set_role( 'silver_plan' );
			break;

		case 'gold-plan':
			$user->set_role( 'gold_plan' );
			break;
	}

}, 10, 2 );
Where:
- “Update-user-role” is a HOOK NAME we set in the “Call Hook” post submit action;
- “plan” is the FORM FIELD NAME of the Radio Field that contains options that should be connected to user subscription plans;
- “basic-plan”, “silver-plan”, and “gold-plan” are the Radio Field option’s VALUES;
- “basic_plan”, “silver_plan”, and “gold_plan” are the Role names set in the User Role Editor plugin during role creation.
Save and activate the snippet when ready.
Add the form to the page
Now, add the form to the page. We will add the form to the page in the WordPress Dashboard > Pages directory.
Add the JetForm widget/block/element to the page and pick the just-built form in the Choose Form selector.
Adjust other settings if needed and publish the page.
Check the result
Now, check the form from the perspective of a non-logged-in user. This form cannot be used by an already existing logged-in user.
Complete the form to register the new user. For instance, this time we chose the “Gold Plan” subscription.
Check the WordPress Dashboard > Users > All Users page. Here, you will observe that the new user is added, with the “Gold Plan” Role assigned.
That’s all about creating a subscription registration form with the JetFormBuilder plugin on your WordPress website.