How to Redirect WordPress Form to Thank You Page in WooCommerce
Tutorial requirements:
- Elementor (Free version) or WordPress Block editor (Gutenberg);
- WooCommerce plugin installed and activated;
- JetFormBuilder plugin installed and activated.
In this tutorial, we’ll figure out how to redirect our form to the Thank you page with the help of the JetFormBuilder plugin and the WooCommerce Cart & Checkout Action addon.
- Install and Activate Add to Cart & Redirect to Checkout Addon
- Create a WooCommerce Product
- Create an Order Submission Form
- WooCommerce Cart & Checkout Action Settings
- Add the Form to the Landing Page
- Redirect to Thank you Page
Install and Activate Add to Cart & Redirect to Checkout Addon
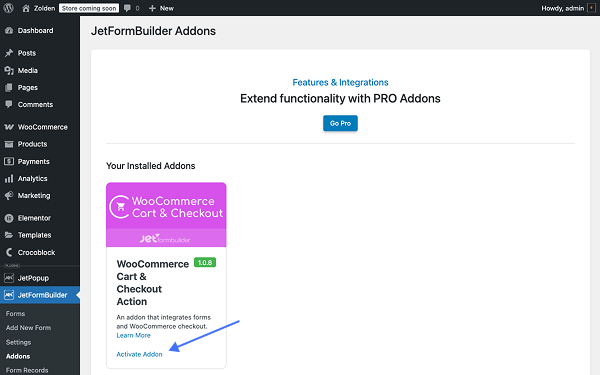
So the first step will be the installation and activation of the addon.
For this, navigate to WordPress Dashboard > JetFormBuilder > Addons and find the “WooCommerce Cart & Checkout Action” addon in the All Available Addons section. Click on the “Install Addon” and don’t forget to press the “Activate Addon” button.
Create a WooCommerce Product
To fetch the products into the JetFormbuilder form, you need to create a set of WooCommerce products in the WordPress Dashboard > Products. Since we’re using a demo store, Zolden, we have a set of items that we can demo in this tutorial.
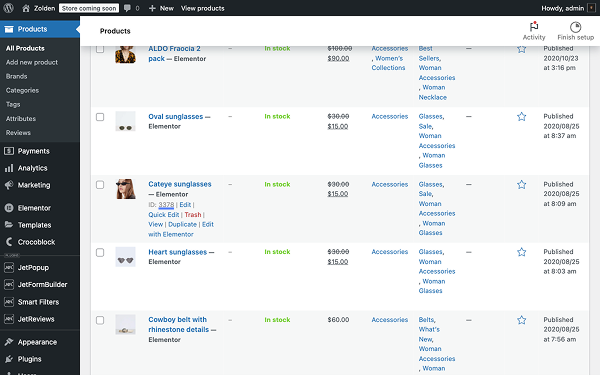
Copy the product ID(s) that you will include in the submit form; we will need it/them later.
Create an Order Submission Form
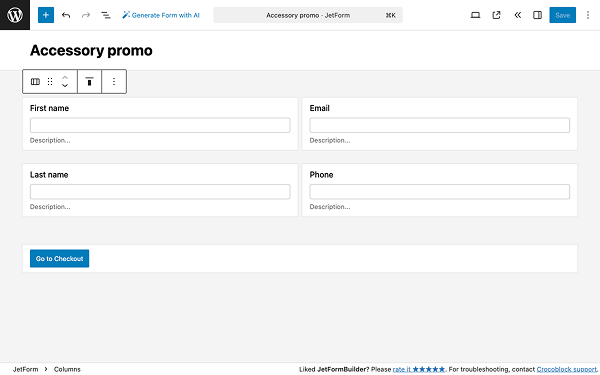
Once we complete the first step, let’s create a new form by moving to WordPress Dashboard > JetFormBuilder > Forms and pressing the “Add New Form” button.

Add as many fields as you need because later, we will display the submitted info on the Thank You page.
WooCommerce Cart & Checkout Action Settings
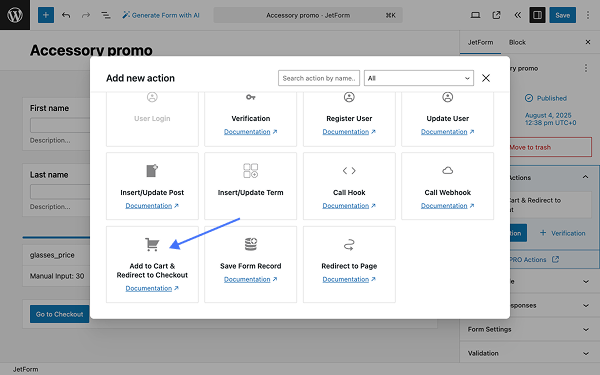
In the form settings, locate the Post Submit Actions section. Click the “+ New Action” button to open the Add new action pop-up window. In the pop-up, select the “Add to Cart & Redirect to Checkout” action to add it to your form.
In the action settings, we need to connect the WooCommerce checkout fields with the corresponding form fields. Let’s resume all action options.
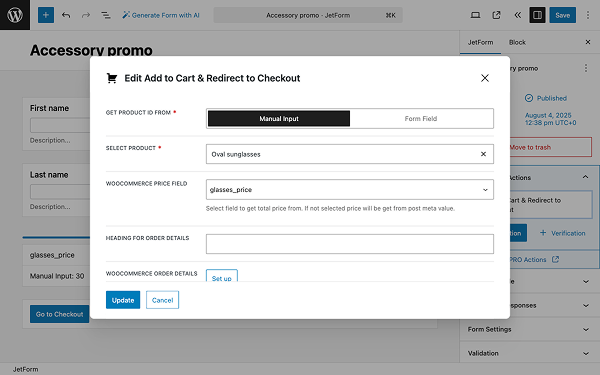
- GET PRODUCT ID FROM — a feature that contains two options (“Form Field” and “Manual Input”) to determine where the form will get the product ID from, allowing you to either pull the ID dynamically from a corresponding form field or specify it manually;
- SELECT PRODUCT — a feature that allows you to either select the corresponding Product ID field from your form or input the Product ID manually, depending on your previous selection;
- WOOCOMMERCE PRICE FIELD — a feature that provides a dropdown to select a field that stores the total price, with the price being received from the post meta value if the form field is left empty purposefully;
- HEADING FOR ORDER DETAILS — a feature that allows you to type in the title you want to show before the order data on the Checkout page;
- WOOCOMMERCE ORDER DETAILS — a “Set up” button to configure a list of custom fields displayed on the Thank You page and during order preview in the dashboard, allowing you to edit form metadata that applies to all Redirect to Checkout actions within one particular form;
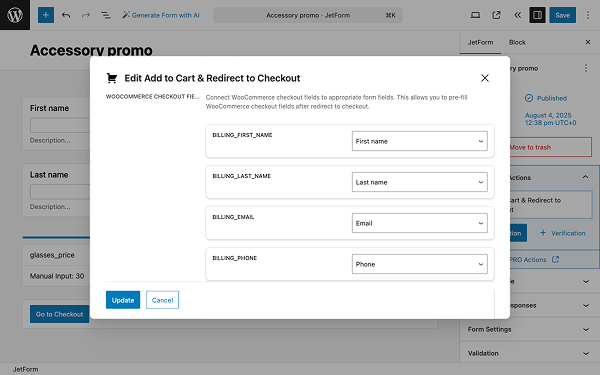
- WOOCOMMERCE CHECKOUT FIELDS MAP — a set of fields that allow one to connect WooCommerce checkout fields to corresponding form fields, enabling a partly pre-filled form when users are redirected to the Checkout page.
If we choose the “Manual Input” option, we can add only one product to the submission form. However, if we select the “Form Field” option, we can add as many items as needed, which requires adding another field to the form, such as a Select Field or a Radio Field, and then add all the necessary products.
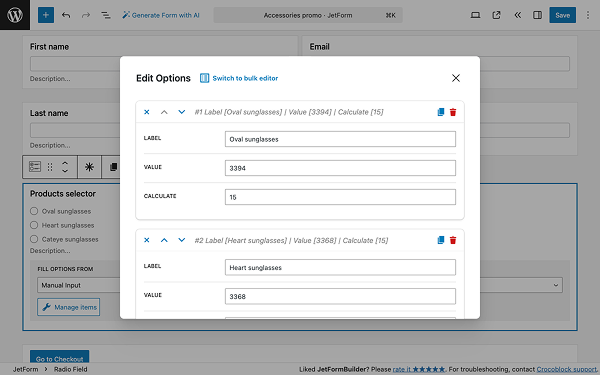
In the Edit Options pop-up, fill in a set of fields including:
- LABEL — in this field, add the name of the product;
- VALUE — in this field, add the product ID (that you have copied in the WordPress Dashboard > Products section) so the form would know which product to fetch
- CALCULATE — in this field, add the price.
Add the Form to the Landing Page
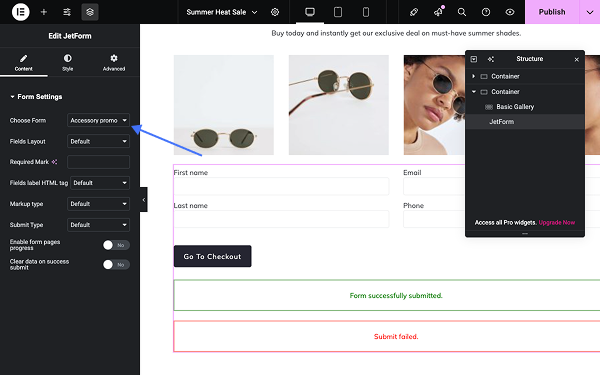
Once everything is set up, let’s add the form to our landing page and test it. To do so, create a new page or open an existing one in the Elementor editor (or any other editor you’re using), and add a JetForm widget to the page.
In the Choose Form field, select the form you created in the previous step; in our case, it’s the “Accessory promo” form.
As mentioned previously, the add-on allows you to display products via “Manual Input” or the “Form Field” option, which will affect the look of the form on the front-end.
Form Field type
The first type form (that features three products) will have the following look with a Radio Field block where the user can select one of the three products whose photos are featured in the Basic Gallery widget.

This page features a Basic Gallery widget displaying three product images of models wearing different sunglass styles. Below the gallery, a JetForm widget captures customer information (name, email, phone) and product selection through the Radio Field, with a “Go To Checkout” button that directs users to the WooCommerce checkout process.
Manual Input type
And the second type of form (that features one product) might have the following look.

This page features a Basic Gallery widget that displays four product images showcasing the Oval sunglasses from different angles and on models. The JetForm widget below collects basic customer information (first name, last name, email, phone) with a “Go To Checkout” button leading directly to WooCommerce checkout.
Redirect to Thank you Page
When users complete all required fields and click on the “Go To Checkout” button, they are redirected to the checkout to submit their billing and shipping information.
As we added all form fields to the WooCommerce order details, we can see them all on the Checkout page.

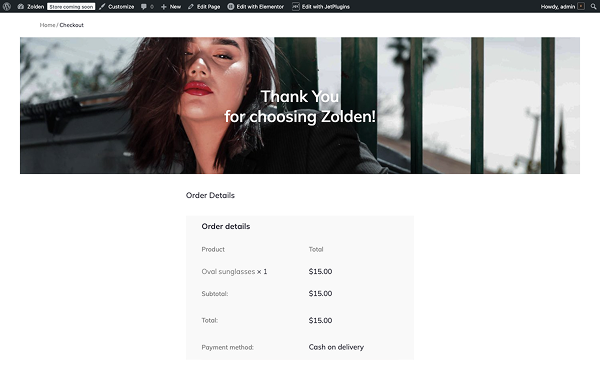
Right after clicking on the “Place Order” button, users will be redirected to the Thank You page that contains all the data submitted.
The first section of the page provides a summary of the order, including the product name, price, and payment method.
The second section of the page shows billing and shipping information.

Please note that you can output the created form in Elementor, Bricks, and Gutenberg using a dedicated widget, element, or block, as well as with any other builder via a shortcode.
That’s all; now you know how to redirect the JetFormBuilder form to the WooCommerce Thank You page on your WordPress website.