How to Set Up Front-end Submission and Approval System with Formless Actions Endpoints
This tutorial will guide you through creating a front-end patient card approval system for a healthcare environment using the JetFormBuilder plugin’s Formless Action Endpoint add-on.
Table of Contents
- Create a Custom Post Type (CPT) for Patient Cards
- Create Formless Action Endpoints
- Edit Listing Template
- Check the Result
This use case is particularly helpful for clinics or hospitals that need to manage patient records effectively, including automated submission and approval workflows for patient cards. This is best for clinics where patients can register themselves on the website, fill out medical records, and book an appointment.
The logic is following:
- Patient registers on a clinic website, goes to the patient card submission form, fills in the form fields, and submits the form;
- Clinic administrator checks the page that lists patient cards pending review, checks them, and either deletes or approves the cards:
- When the admin clicks on the “Delete” button, the corresponding formless action fires, and the card goes to the “Trash” folder;
- When the admin clicks on the “Approve” button, the corresponding formless action fires, and the card goes to the “Published” folder.
This approach can also be used to create a system for submitting and approving guest articles on a blog. The Formless Actions Endpoint can be used to create a front-end system for approving and categorizing all kinds of posts.
To create a patient card approval system using the Formless Action Endpoint addon of the JetFormBuilder plugin, follow these steps.
Create a Custom Post Type (CPT) for Patient Cards
Navigate to the WordPress Dashboard > JetEngine > Post Types section and create a new CPT (“Patient Cards”) by clicking on the “Add New” button. Since the patient card may contain lots of fields, we’re going to add a basic set for demonstration purposes.
Our CPT will have 14 meta fields so patients can submit personal and health-related information. Most of these are “Text” Field types apart from the “Gender,” “Smoking Status,” “Blood Type,” and “Consent Form Signed,” which are “Radio” Field types.
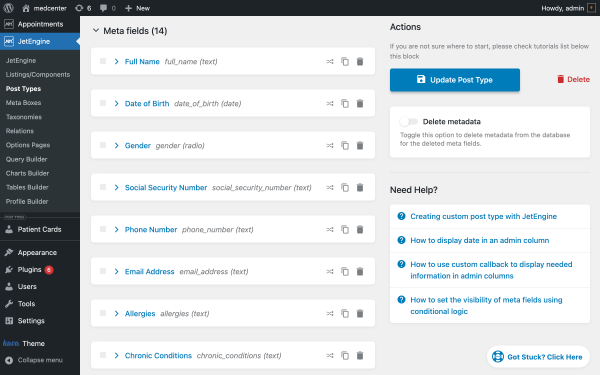
For patients who might have an existing doctor in this clinic, we could add another field with a dropdown where they can select the doctor. To enable the doctor selection, you need to create a “Post Query” in Query Builder to pull in the list of doctors from the existing “Doctors” Custom Post Type.
For categorization, you may set up a taxonomy for the “Patient Cards” to categorize the patients by activity, age group, or whatever.
Create a set of pages/page templates
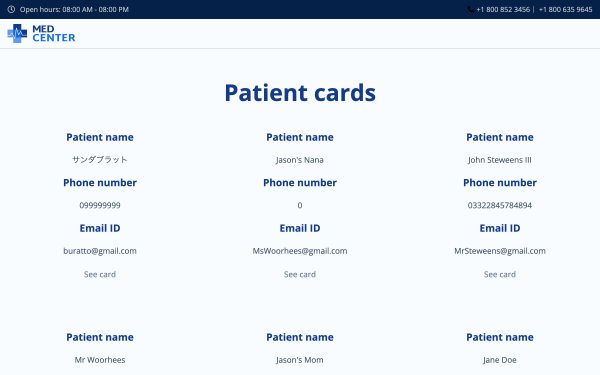
So we can display all patient cards on one page, we need to create and customize:
- a dynamic listing for our CPT; we’ll do it in JetEngine (you can refer to this video tutorial to learn more about creating dynamic listing grids);
- a CPT Single for an individual “Patient Card”;
- a Patient Cards Archive template via Theme Builder, where we’ll place the dynamic listing using the Listing Grid Elementor widget (this will display all approved patient cards);
- and a single page with Listing Grid Elementor widget (this will display all pending review patient cards).
Create a submission form
Go to WordPress Dashboard > JetFormBuilder and click the “Add New” button to create a front-end form to allow users to submit new patient cards.
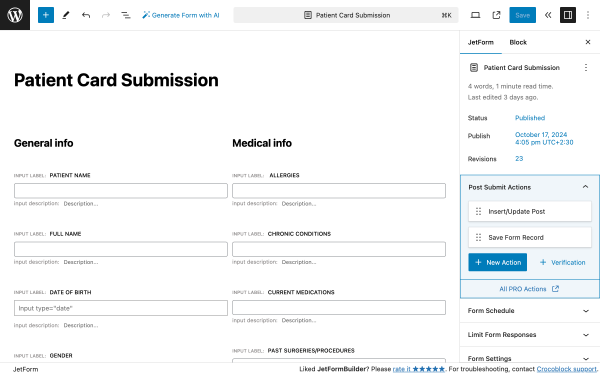
This form will contain a range of fields that will correspond to the meta fields from the custom post we’ve discussed above. To do that, we need to click on the JetForm tab, go to Post Submit Actions, and add an “Insert-Update Post” form action by pressing the “+ Add New” button. This action allows us to map the form fields with corresponding meta fields of the CPT.
If you want your users to be redirected to some Thank You page after they submit the form, you can add another form action, “Redirect to page.” Check this tutorial to learn how to fine-tune this form action.
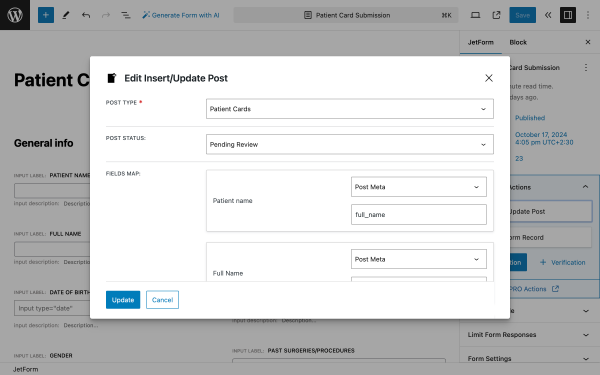
We’ll use the following settings for the “Insert/Update Post” action:
- POST TYPE — the dropdown field contains all post types available on the website; in this field, we’ll select the CPT created previously, “Patient Cards”;
- POST STATUS — the dropdown field contains all WordPress post statuses that can be assigned, and we’ll select the “Pending Review” one since the newly submitted patient card needs to be checked and approved by the clinic administrator;
- FIELDS MAP — this section contains the list of fields from which we can assign the corresponding meta field of the CPT. Upon default, the dropdown doesn’t have any selected properties, and for our case, we need to choose “Post meta” and, in the newly appeared field, add the field value “full_name”. You need to go through the whole list and map all the fields.
When you’re done building the submit form, the first part of the job is done.
Create Formless Action Endpoints
Now, it’s time to utilize the Formless Action Endpoint extension of JetFormBuilder to set up the patient card approval workflow. For our system, we need two Endpoints that will fire different actions: publishing and deleting a card.
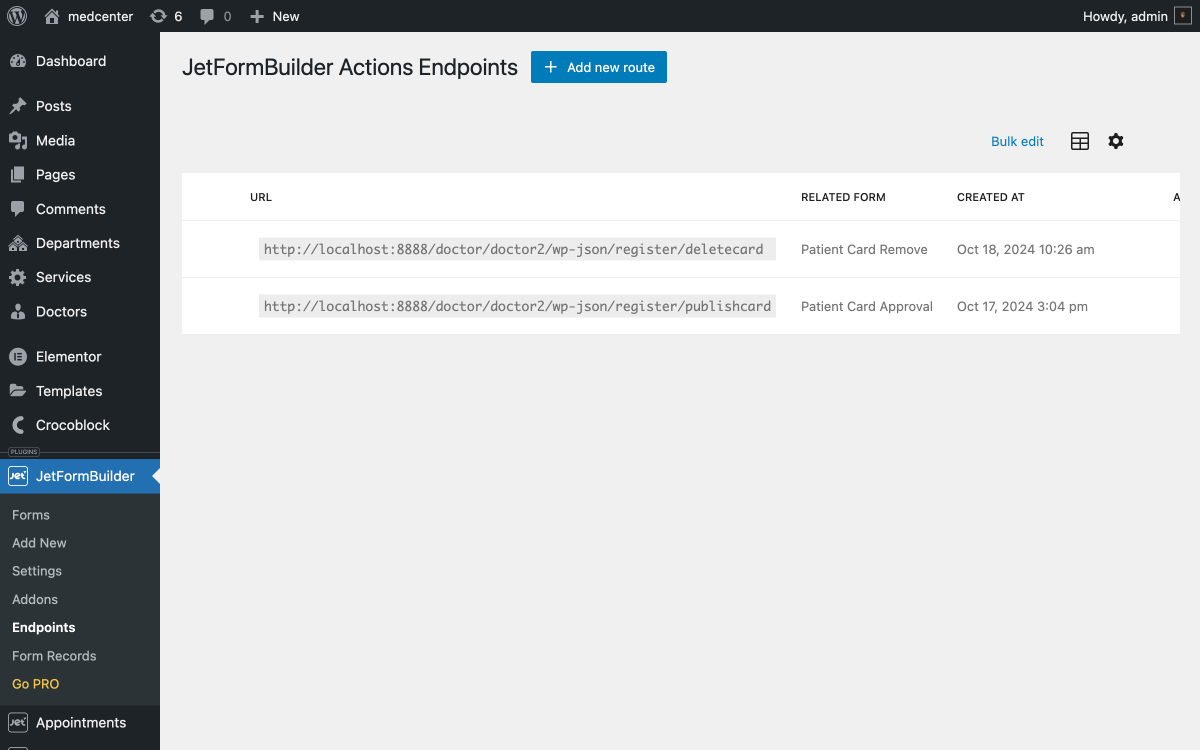
But first of all, we need to create two JetFormBuilder forms where we can assign these actions endpoints.
Create an approval formless form
Go to WordPress Dashboard > JetFormBuilder and click “Add new.”
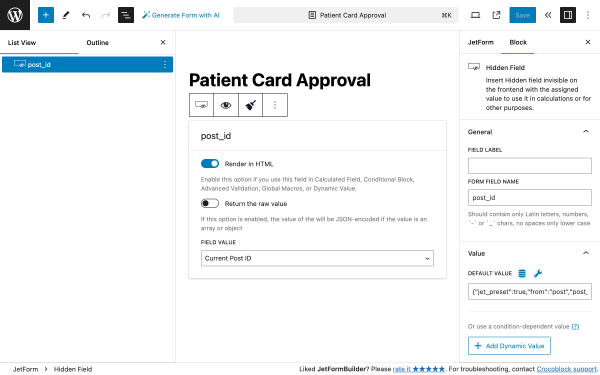
Add a Hidden Field block to the form. In the Field Value dropdown, you can leave the “Current post ID” default value.
In the sidebar, open Block settings and go to:
- General settings tab, and in the FORM FIELD NAME field, type “post_id”;
- in the Value tab, click on the “database” icon (next to the “wrench”) to edit the preset.
In the Edit Preset pop-up, we need to make the following edits:
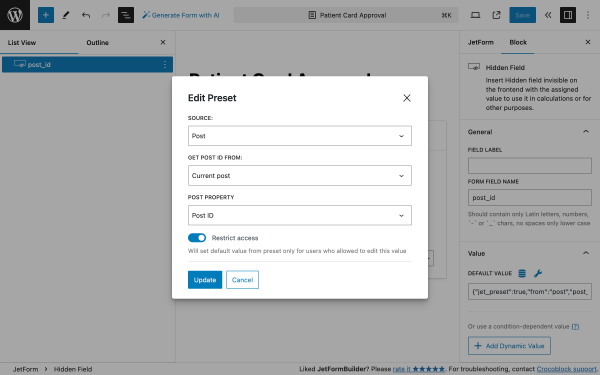
- SOURCE — this field should be set to “Post”;
- GET POST ID FROM — this field should be set to “Current post”;
- POST PROPERTY — this field should be set to “Post ID”;
- Press the “Update” button.
When you save the preset, the Default Value field will get a property that you need to save for further use.
Add Post-Submit Actions
Now, it’s time to add post-submit actions to this form.
Go to the JetForm settings tab and unroll the Post Submit Actions.
Press the “+ New Action” button under the default “Save Form Record” action to add a new one. Select the “Insert/Update Post” option from the pop-up.
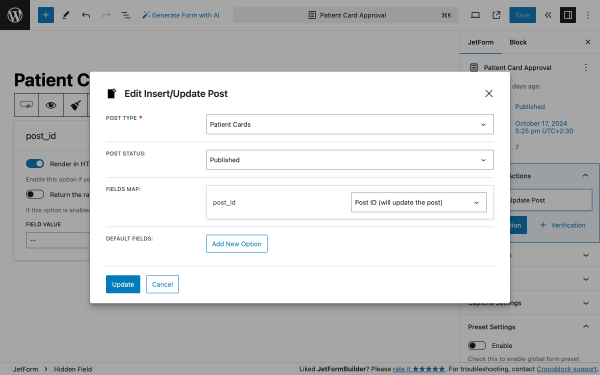
- POST TYPE — in this dropdown, you need to select a corresponding post type that will be updated. In the given case, we need the “Patient Cards” CPT;
- POST STATUS — in this dropdown, you need to select the required post status. In the given case, we need the “Published” option;
- Fields Map — in this dropdown, you need to select the “Post ID (will update the post)” option;
- Press the “Update” button and publish the form.
Now, let’s go back to the Endpoints section to create an Endpoint for this form.
Go to WordPress Dashboard > JetFormBuilder > Endpoints and click the “+ Add new route” button.
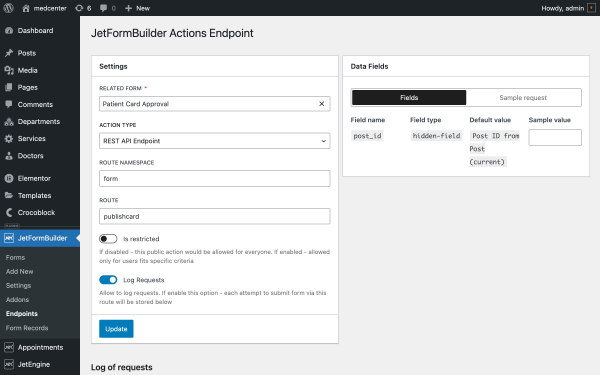
- RELATED FORM — in this field, you should pick the form that will fire the action. In our case, it’s the “Patient Card Approval” form;
- ACTION TYPE — in this field, you should pick an option from the dropdown list:
- “WordPress AJAX” — works through a standard WordPress AJAX request;
- “Rest API Endpoint” — is triggered by a request to the Rest API;
- “URL Query String” — works when switching to a URL with certain parameters.
In the given case, we selected the “Rest API Endpoint” option from the ACTION TYPE dropdown list. This option activates the ROUTE NAMESPACE and ROUTE text fields, where we typed the first and second parts of the Rest API URL (the “register” and “publishcard” texts, respectively).
- Is Restricted — this feature is deactivated by default. When disabled, the action is publicly accessible to anyone. When enabled, access is limited to users who meet specific criteria, ensuring controlled and secure access;
- Log Requests — this feature is deactivated by default. When enabled, every form submission attempt through this route will be recorded, providing a detailed log of all form interactions for auditing and analysis.
The last thing we need to do is copy the sample request data.
Go to the Data Fields section on the JetFormBuilder Actions Endpoints page and click the “Sample request” tab.
The requested data will appear in the textarea field below. To copy this data, click the “Copy data for the request” button and save it; we’ll need it in one of the next steps.
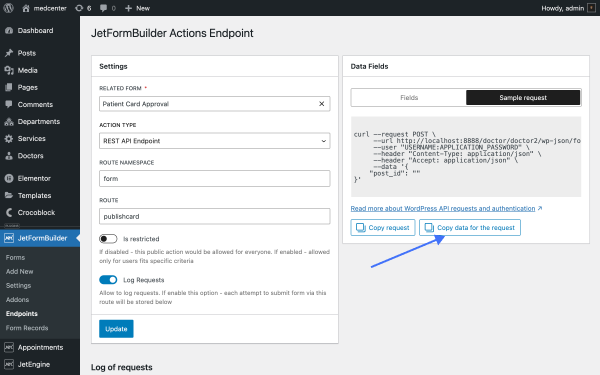
Finally, click on the “Update” button.
Create a removal formless form
You can duplicate the previous form since most settings are basically the same.
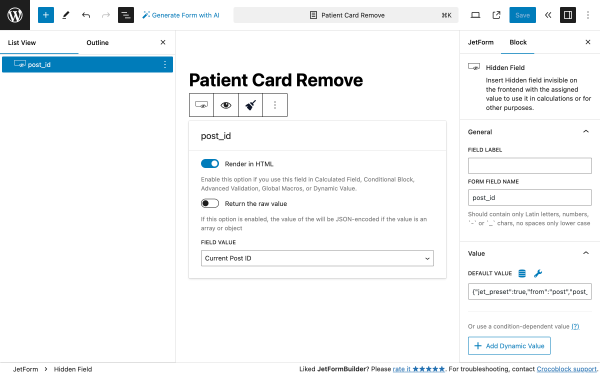
For the Hidden Field, you don’t have to change anything.
Set the Post-Submit Actions
In the “Insert/Update Post” action, most settings are the same apart from the POST STATUS field, where you need to select the “Move to Trash” option.
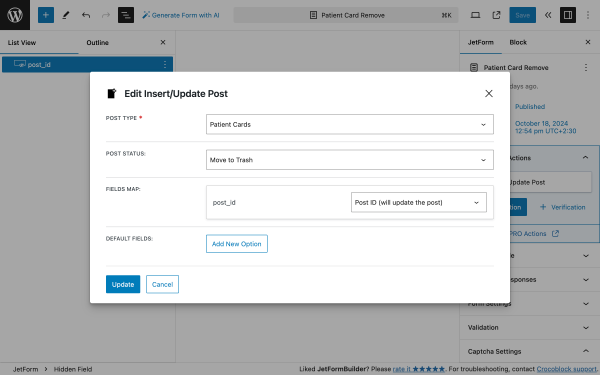
Press the “Update” button and publish the form when you’re done.
Now, let’s go back to WordPress Dashboard > JetFormBuilder > Endpoints and click the “+ Add new route” button.
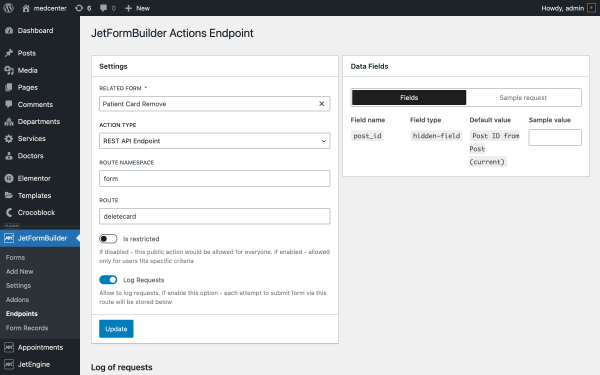
To create this endpoint, you need to complete the following steps:
- RELATED FORM — in this field, you should pick the form that will fire the action. In our case, it’s the “Patient Card Remove” form;
- ACTION TYPE — in this field, you should pick an option from the dropdown list:
- “WordPress AJAX” — works through a standard WordPress AJAX request;
- “Rest API Endpoint” — is triggered by a request to the REST API;
- “URL Query String” — works when switching to a URL with certain parameters.
For the ROUTE NAMESPACE and ROUTE text fields, we’ll type the “form” and “deletecard” texts, respectively.
Go to the Data Fields section on the JetFormBuilder Actions Endpoints page and open the “Sample request” tab.
The requested data will appear in the textarea field below. To copy this data, click the “Copy data for the request” button and save it; we’ll need it in one of the next steps.
Edit Listing Template
At the beginning of this tutorial, we’ve mentioned a set of pages that we’ll use for this system. Now it’s time to edit the pages that list patient cards with “Pending” status.
Since this displays a dynamic listing, we need to go to WordPress Dashboard > JetEngine > Listing Items/Components and edit the corresponding listing.
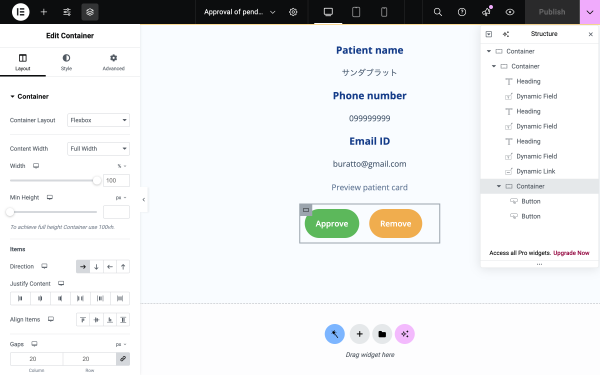
The listing contains a set of Dynamic Fields to display:
- patient name;
- phone number;
- email ID;
- block with two buttons that say “Approve” or “Remove” the card.
When we were creating action endpoints, we asked you to save sample request data; we’ll need it right now for the “Approve” and “Remove” buttons. You can set them using the Button (by Elementor) or Button (by the JetElements plugin) widgets.
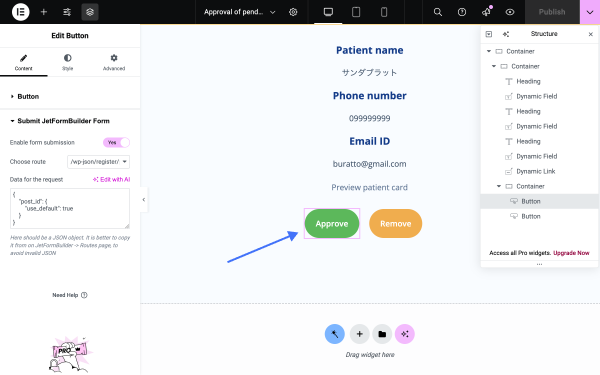
Click on the Button widget to open the settings panel. Go to the Submit JetFormBuilder Form section:
- Enable form submission — activate this switcher (upon default, it’s deactivated) to enable Choose route and Data for request fields:
- Choose route — in the dropdown, you need to select the added route. In our case, it’s the approval form endpoint (the “/wp-json/register/publishcard” route);
- Data for request fields — into this field, you need to paste the code received from the Data fields section;
- Click on the “Publish” button to save the changes.
Check the Result
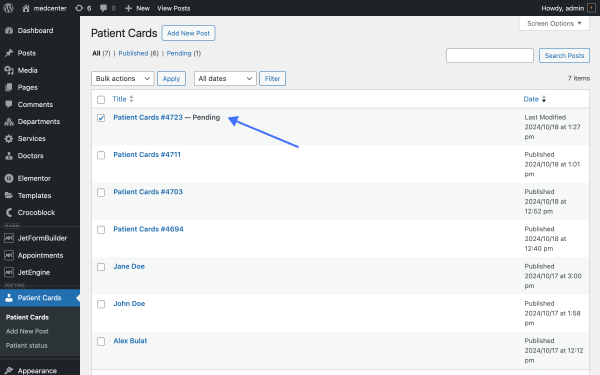
Let’s preview the system.When a new patient card is submitted, we can see it on the backend with the “Pending” status.
On the front end, it will render with two buttons on a corresponding page:
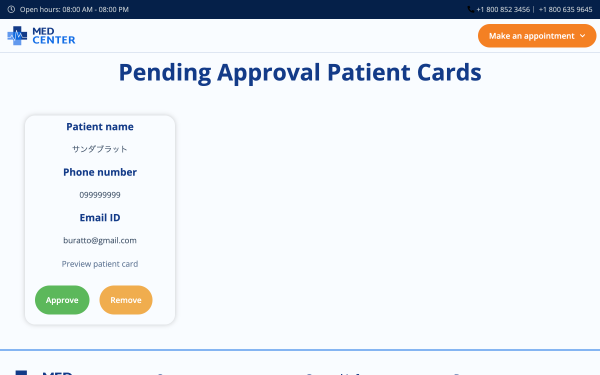
- Сlicking on the “Approve” button — the newly submitted card will change its status from “Pending” to “Published”;
- Сlicking on the “Remove” button — will send the freshly submitted card to the “Trash” folder.
So when you click on the “Approve” button, you will see a small “Form successfully submitted.” sign.
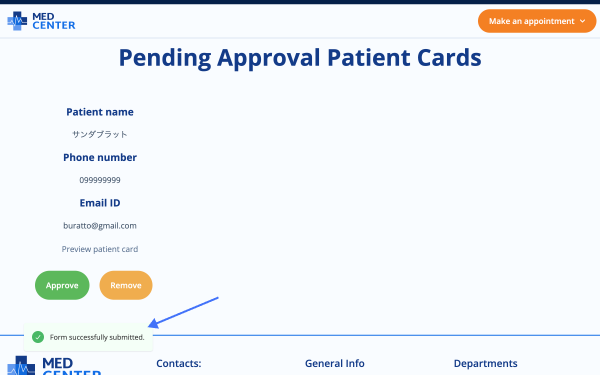
“Form successfully submitted.” is a default message that can be changed in the form’s General Message Settings.
This means that the action endpoint was fine-tuned successfully, and the system works.
The same card now has the status “Published” on the backend.
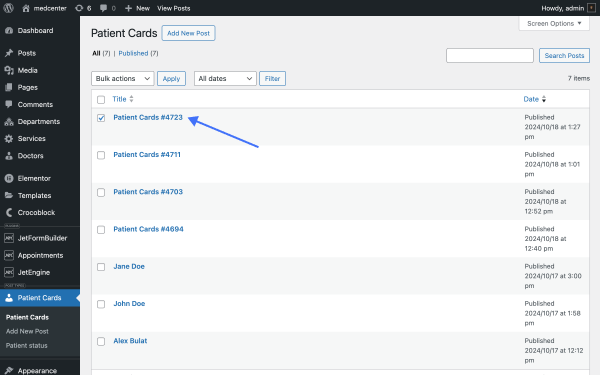
That’s it. Now you know how to fine-tune the Formless Action Endpoint addon and set up a front-end system to approve/delete posts on a WordPress website.