Insert and Update Term
In this tutorial, the “Insert/Update Term” Post Submit Action is explained, which is intended to add or update terms (including the parent/child terms) of a selected taxonomy. Here, except for the JetFormBuilder plugin, the JetEngine plugin (for creating queries) and the JetThemeCore plugin (for displaying on specific pages) should be installed and activated.
- Creation of a Custom Post Type, Taxonomy, and Terms
- Inserting Terms
- Attaching Child Terms to Parent Ones
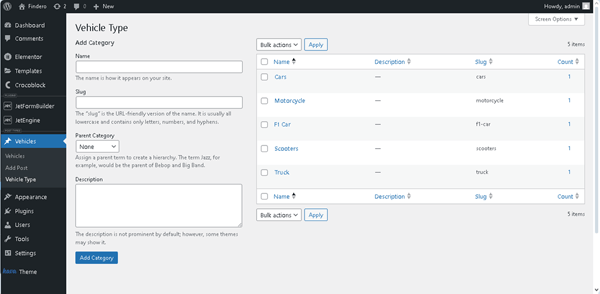
Creation of a Custom Post Type, Taxonomy, and Terms
Since a new term should be added to an existing taxonomy, a Custom Post Type (CPT) and a taxonomy should be created.
Read the How to Create Custom Post Types in WordPress and How to Create Custom Taxonomy tutorials for more details.
In this case, we create the “Vehicle Type” taxonomy for the “Vehicle” CPT and add the “Media” meta field to the taxonomy.
Then, we add terms such as “Cars,” “Trucks,” and more.
Inserting Terms
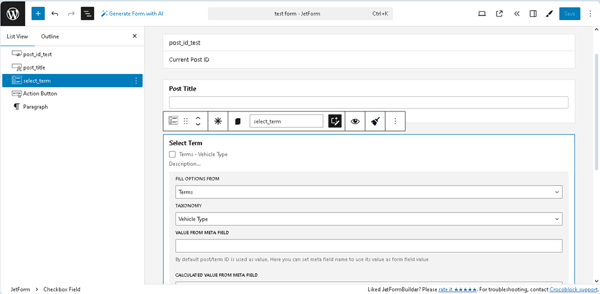
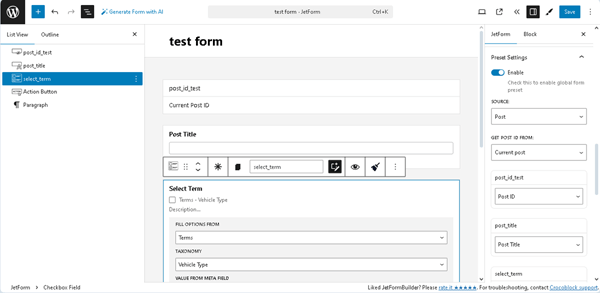
This action does not require additional work (e.g., usage of a query) except for creating a form with the fields that cover the data needed to insert terms. Here, we add a Hidden Field with the default “Current Post ID” FIELD VALUE set; Text Field for entering the term’s name. Additionally, you can add other fields to include CPT posts’ data (e.g., slug, metadata).
For improved usability, we insert a Checkbox Field to display all previously added terms and an Action Button to submit the form.
Then, we navigate to the JetForm settings tab and open the Post Submit Actions tab. Here, we add the “Insert/Update Post” Post Submit Action and set the following option in the newly appeared Edit Insert/Update Post pop-up: specify the POST TYPE (the “Vehicle”, in this case); set the required POST STATUS (the “Published” post), and move to the FIELD MAP fields.
Here, select the “Post ID (will update this post)” option in the field that refers to the form’s Hidden Field.
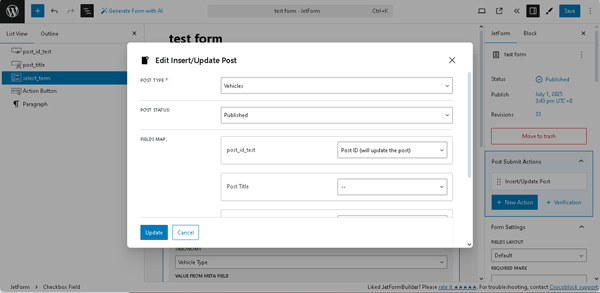
Since we added only the Text Field to display the post title, only this data will be shown.
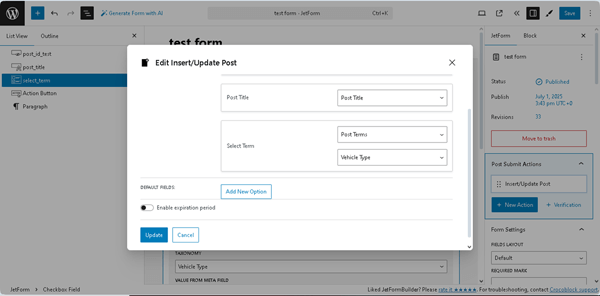
After that, scroll down the pop-up to the Select Term drop-down list, which refers to the Checkbox Field added in the form. Here, select the “Post Terms” option and the required taxonomy (in this case, “Vehicle Type”). Press the “Update” button and the pop-up will be closed.
In the next step, move to the JetForm settings and scroll down to the Preset Settings section. Here, activate the Enable toggle, which enables the SOURCE, GET TERM FROM, and other fields. Here, set the “Post” SOURCE, “Current post” GET TERM FROM. In the next fields, select options that refer to the form’s field: the “Post ID” option in the field that refers to the form’s Hidden Field; the Post Title in the corresponding drop-down list, etc.
Finally, publish the form. Add it to a single page of the CPT posts (we add it to the “My Vehicle” CPT post) using the JetForm widget or block (depending on the editor you prefer) and move to the front-end to view the post.
Read the Displaying a JetFormBuilder Form in Any Page Builder tutorial for more details.
Here, we press the “+ADD NEW” button and type the “Bus” text in the opened field.
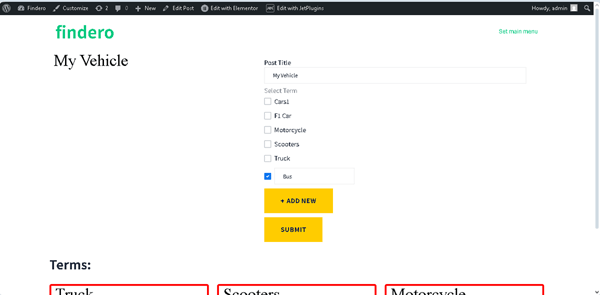
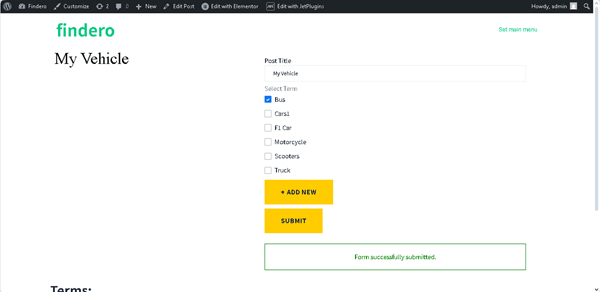
Then, we click the “Submit” button, and the form is submitted successfully, with the inserted term added to the list.
After that, we return to the term tab and observe that the “Bus” term appears in the list.
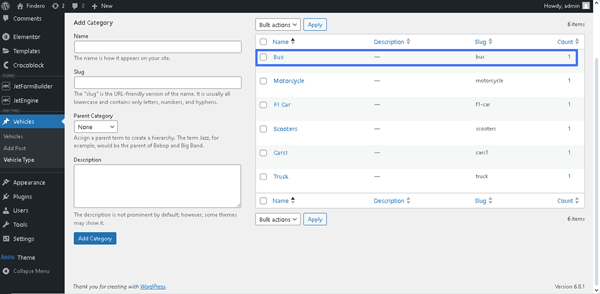
Also, this term is shown in the corresponding post settings.

Attaching Child Terms to Parent Ones
In this case, a query for terms should be built first to allow selection of the needed parent term, for which the child term users intend to add via the Checkbox Field.
Here, we move to the WordPress Dashboard > JetEngine > Query Builder tab and press the “Add New” button to create a query with the following options.
First, type the query’s Name (we type the “Insert New Term” text) and select the “Terms Query” Query Type.
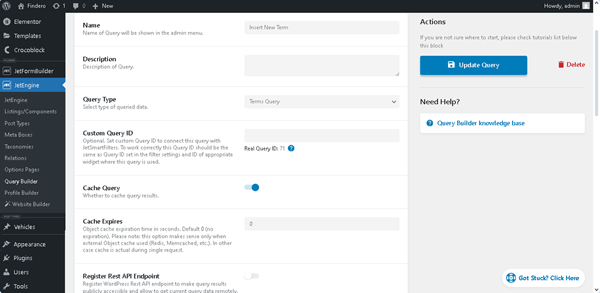
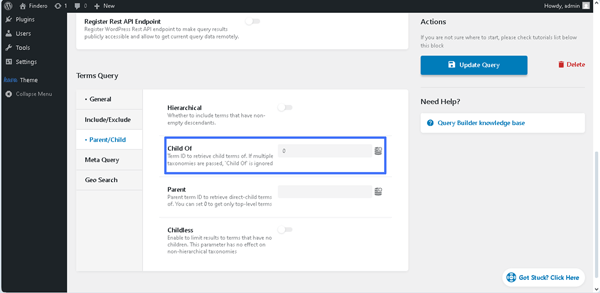
Then, move to the General tab and select the required Taxonomy (in this case, “Vehicle Type”). Next, unroll the Parent/Child tab and add the “0” number in the Child Of field. Finally, move to the top of the page and save the query by pressing the “Add/Update Query” button.
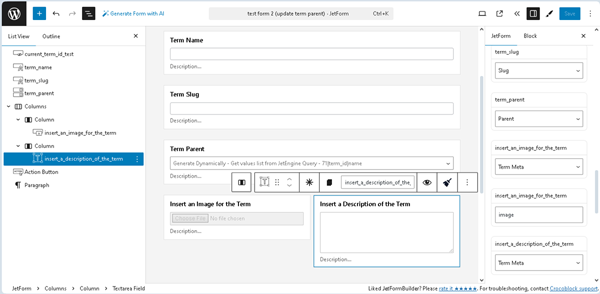
In the next step, create another form and insert the needed fields. In the Hidden Field, set the “Current Term ID” FIELD VALUE.
Also, insert the Text Fields needed to enter the term’s data (we insert the Text Fields to insert the term’s name and slug).
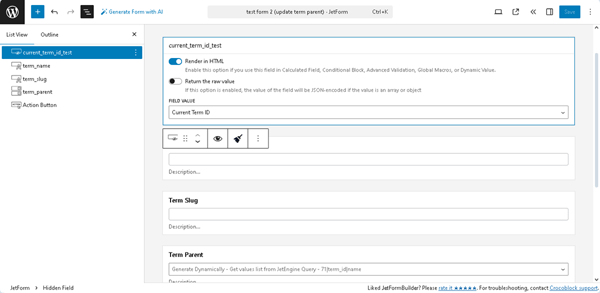
Then, to specify the needed parent term, for which the child term users intend to add, place the Checkbox Field and set the following options: “Generate Dynamically” FILL OPTIONS FROM, “Get values list from JetEngine Query” GENERATOR FUNCTION, and insert the FIELD NAME (here, we insert the “71|term_id|name”, which means the “71” 一 ID of the query (set in the Custom Query ID field of the query settings).

Then, we insert a Media Field for entering an image associated with the term and a Textarea Field for entering the term’s description.
Then, add the Action Button.
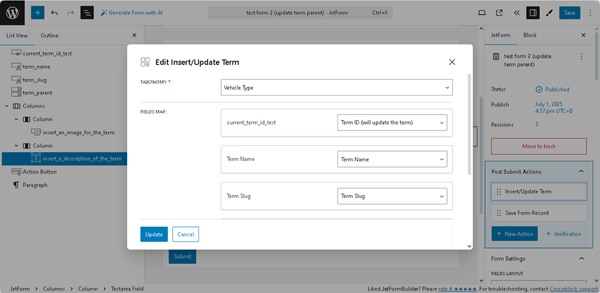
In the next step, insert the “Insert/Update Term” Post Submit Action. Here, in the appeared Edit Insert/Update Term pop-up, select the needed TAXONOMY (we select the “Vehicle Type”) and navigate to the FIELDS MAP section to assign the pop-up field that refers to the form’s field: set the “Term ID (will update the term)” option in the field that refers to the form’s Hidden Field and select the Term Name, Term Slug, etc. in the corresponding drop-down lists.
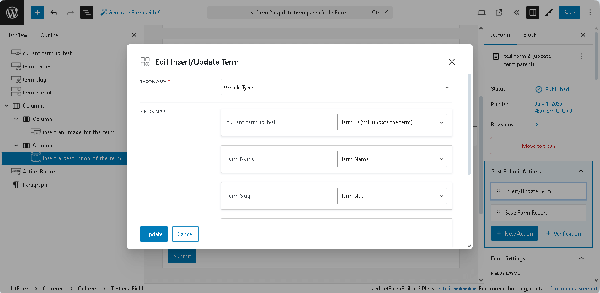
Then, scroll the pop-up down and choose the “Term Parent ID” option in the Term Parent drop-down list. Then, press the “Update” button.
In the final step, navigate to the JetForm settings and scroll down to the Preset Settings section.
Here, activate the Enable toggle. Then, set the “Term” SOURCE and the “Current term” option in the GET TERM FROM field. In the next fields, select options that refer to the form’s field: the “Term ID (will update the term)” option in the field that refers to the form’s Hidden Field and the “Term Name,” “Term Slug,” and “Term Parent” in the corresponding drop-down lists.
After that, scroll the Preset Settings down and assign the form’s field to the corresponding taxonomy meta fields, e.g., the “insert_an_image_for_the_term” form’s field to the “image” taxonomy meta field.
Publish the form.
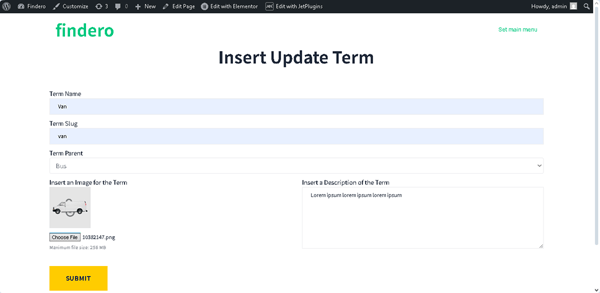
Then, add the form to an archive page using the JetForm widget or block. For example, we use the page built with Elementor and place the JetForm widget there.
Then, move to the term list and view the required term. In this case, we open the “Bus” term and change the “Bus” text to “Van” in the Term Name field. Additionally, we correct the slug, select the parent term in the Term Parent drop-down list, and submit the form.
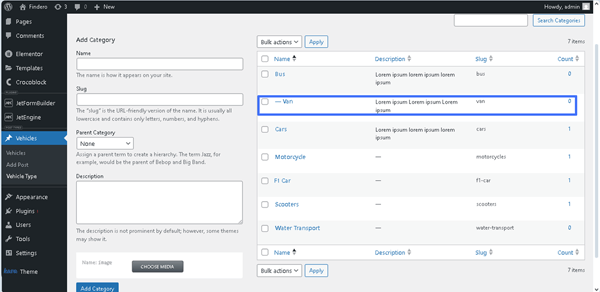
Next, the updated term appears in the term list as a child term of the “Bus” taxonomy.
That’s it about the usage of the “Insert/Update Term” Post Submit Action to add or update terms (including the parent/child terms) of a selected taxonomy using the JetEngine plugin for WordPress.