Form Submission Errors & Troubleshooting Guide
JetFormBuilder users may encounter technical issues that impact form rendering, submission processing, or data handling. This troubleshooting guide outlines the most common errors, their underlying causes, and validated solutions, enabling you to efficiently diagnose and resolve problems while maintaining stable form functionality.
Table of Contents:
- Cannot Style Forms
- Cannot Download PRO Add-ons
- ‘nonce_failed’ Error with LiteSpeed Cache Plugin
- Captcha Validation Failed
- reCAPTCHA Error
- Images Submitted by Guests Cannot Be Found in the Media Library
- Guests Cannot Update Posts
- Invalid Token Error
- Incorrect File Type Error
- PCLZIP_ERR_BAD_FORMAT
- Invalid Resource Error
- Multi-Step Form Doesn’t Show the Progress
- Form Doesn’t Create/Update Post/User Fields
- Having Troubles with Login Form
- Other Tips
Cannot Style Forms
A brief reminder: forms can be inserted in Elementor, Gutenberg, and Bricks with the JetForm widget/block/element that can be styled in the corresponding editors. Also, when you’re creating forms in Gutenberg, you can use a free Crocoblock JetStyleManager plugin to style colors, fonts, margins, paddings, and more.
Cannot Download PRO Add-ons with Crocoblock Subscription
If you’re unable to access JetFormBuilder PRO add-ons even with an active Crocoblock subscription, this is a recognized issue. To resolve it, follow the step-by-step instructions in our How to Download JetFormBuilder PRO Addons for Free in Crocoblock Subscription guide.
‘nonce_failed’ Error with LiteSpeed Cache Plugin
The ‘nonce_failed’ error in JetFormBuilder happens when using LiteSpeed Cache because security tokens expire while cached forms keep using outdated validation data. Here are two effective ways to fix this issue.
Configure caching settings specifically for your forms to avoid token conflicts. Open your form in the WordPress Dashboard > JetFormBuilder > Forms tab, go to JetForm > Validation section, and disable Enable form safety to bypass nonce validation completely.
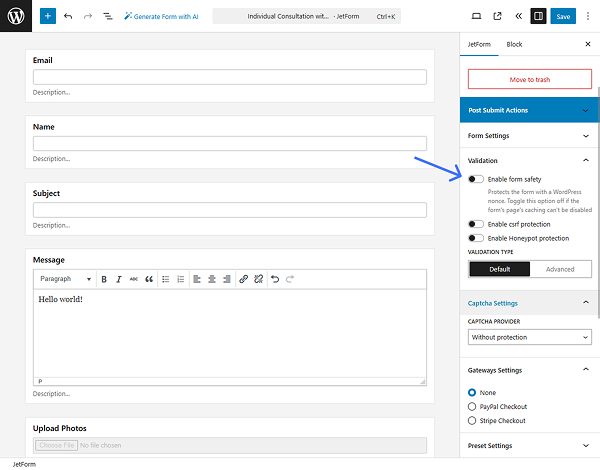
Additionally, scroll down to the JetForm > LiteSpeed tab and turn on the Disable Cache toggle.
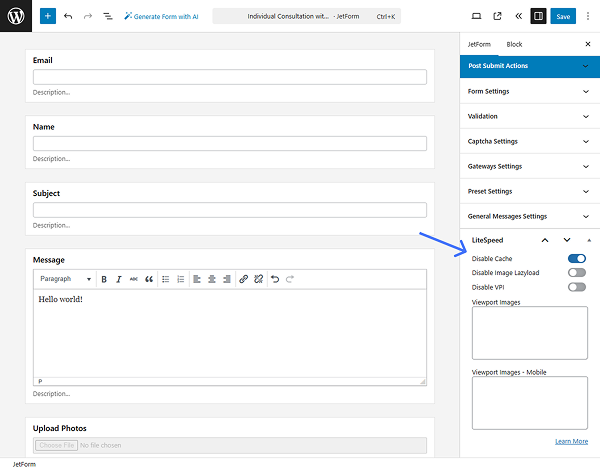
This targeted approach preserves site performance while addressing the security token issue for individual forms.
Alternative solution
Invalidate all caching layers (plugin, server-side, CDN, and browser) to eliminate stale nonce values, then temporarily disable caching plugins to verify whether cached responses are causing nonce expiration.
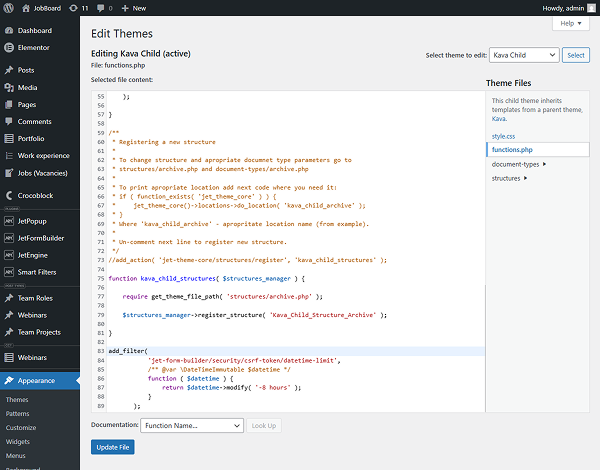
For a long-term solution, configure your caching system to exclude form pages or reduce the cache lifetime to under twelve hours, as WordPress nonces expire within this timeframe. You can also extend token validity by adding a custom filter to your functions.php file to adjust the CSRF token expiration period, allowing more time before tokens expire while still maintaining security:
add_filter(
           'jet-form-builder/security/csrf-token/datetime-limit',
           /** @var \DateTimeImmutable $datetime */
           function ( $datetime ) {
               return $datetime->modify( '-8 hours' );
           }
       );
Also, this filter can be added in WordPress Dashboard > Appearance > Theme File Editor > functions.php.
Captcha Validation Failed
The “Captcha validation failed” error usually happens when reCAPTCHA is turned on in your form but isn’t correctly set up with the required API keys and configurations.
To fix this, you have two options: either complete the reCAPTCHA setup by following the How to Set ReCaptcha Anti-Spam Protection in a Form tutorial to obtain and configure Google reCAPTCHA keys, or remove the reCAPTCHA field from your form if anti-spam protection isn’t needed.
This error prevents form submission because the system cannot verify the CAPTCHA without valid API credentials, so correcting the configuration is essential for proper form functionality.
reCAPTCHA Error in JetFormBuilder
When encountering reCAPTCHA validation issues in JetFormBuilder, follow this troubleshooting checklist to identify and resolve the problem.
Adjust Score Threshold
Check your reCAPTCHA Score Threshold settings in WordPress Dashboard > JetFormBuilder > Settings > Captcha Settings, which control how strictly the system assesses user interactions. The score ranges from “0” (considered a bot) to “1” (confirmed as human), with the default at “0.5”.
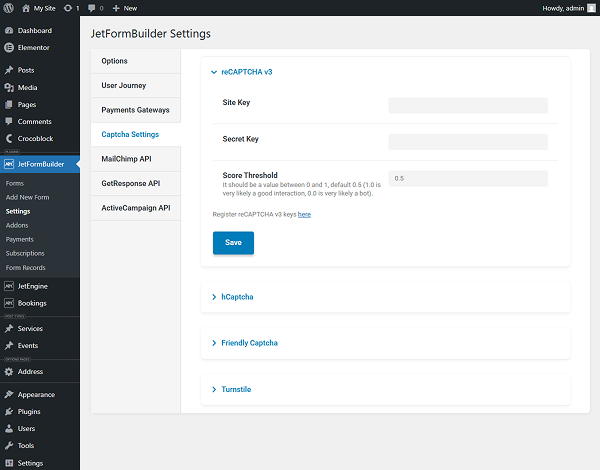
If legitimate users are being blocked, try lowering the score threshold to make it more permissive. Conversely, raise the threshold if you’re experiencing spam submissions. Finding the right balance is crucial, as any requests scoring below the threshold will be automatically blocked, preventing the form from submitting.
Validate API Keys
Ensure your reCAPTCHA API keys are properly configured and valid. Invalid, expired, or mismatched keys will cause validation to fail regardless of user input. Double-check that you’re using the correct site key and secret key pair from the Google reCAPTCHA admin console, and confirm they correspond to the domain where the form is deployed.
Images Submitted by Guests Cannot Be Found in the Media Library
By default, WordPress restricts file uploads to authenticated users for security reasons. However, JetFormBuilder can be configured to allow guest users to upload images to the Media Library. This requires a three-step setup process and should be implemented with proper security considerations in place.
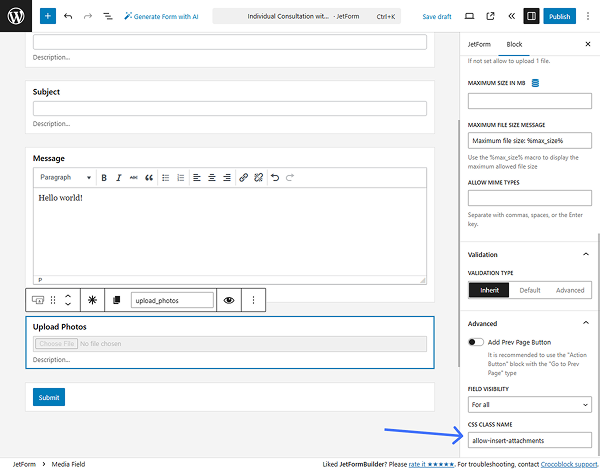
First, open a required form in the WordPress Dashboard > JetFormBuilder > Forms tab and configure the Media Field by adding a custom CSS class in the CSS CLASS NAME field in the Advanced settings tab to enable attachment insertion. Use ‘allow-insert-attachments’ as the base class.
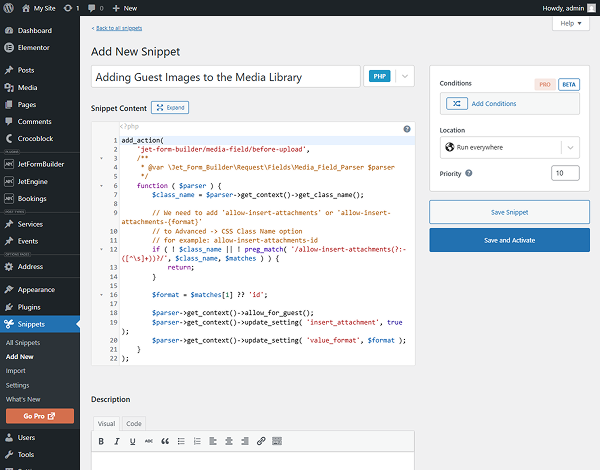
Next, copy the required custom code from the GitHub repository and add it to the Code Snippets plugin or your theme’s functions.php file. This code (compatible with JetFormBuilder 3.0.4 and later) sets up the necessary permissions and handling logic to enable guest uploads. It effectively extends WordPress’s default security model to allow controlled file uploads via the form.
To enter the code, go to WordPress Dashboard > Snippets > Add New tab, type the snippet title (“Adding Guest Images to the Media Library” as the example), paste the copied code into the textarea, and press the “Save and Activate” button.
Finally, return to the form and, in the Media Field settings, locate the USER ACCESS field in the Field settings tab and select the “Any user (incl. Guest)” option.
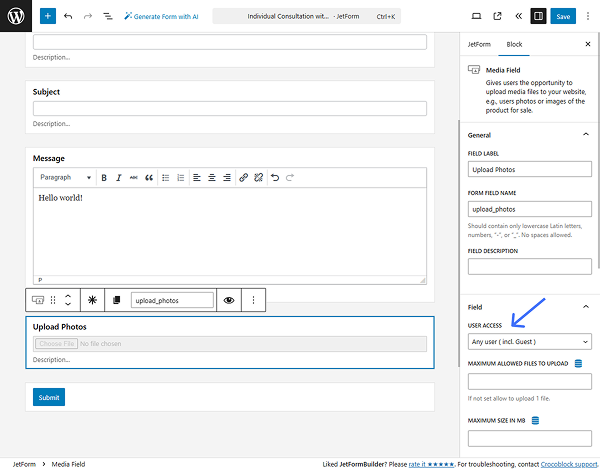
Now, the form can save images submitted by guests to the Media Library.
While this approach enables guest uploads, it also bypasses WordPress’s default security restrictions and may introduce risks. To mitigate them, implement additional safeguards such as strict file type validation, size limits, sanitization, and regular monitoring of uploaded content to ensure your site remains secure.
Guests Cannot Update Posts
Guest users cannot update posts because of WordPress’s built-in security restrictions. By default, only certain user roles—such as administrators and editors—are allowed to modify existing content. This limitation is a fundamental part of WordPress’s permissions system and cannot be overridden through standard form actions. For more details, see the Roles and Capabilities article.
Alternative solution using custom hooks
Because the standard “Insert/Update Post” action doesn’t work for guest users, you’ll need to use a custom hook solution. This method lets you implement controlled post-update functionality while preserving WordPress’s security standards.
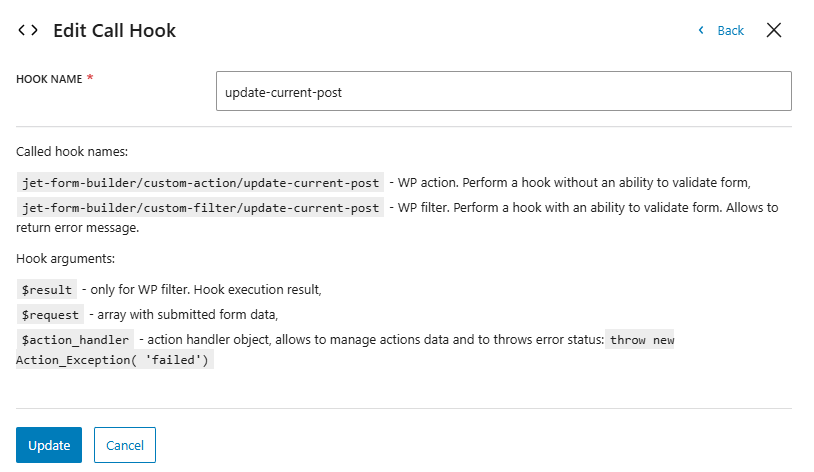
Open the JetFormBuilder form and replace the “Insert/Update Post” action with a “Call Hook.” This method uses custom PHP code to handle post updates when the form is submitted.
For example, here’s a hook using ‘update-current-post’ as the HOOK NAME, and you can insert your own based on the tips below the form’s field.
Add the following code to your active theme’s functions.php file (exclude the opening <?php tag if it already exists):
use Jet_Form_Builder\Exceptions\Action_Exception;
add_action( 'jet-form-builder/custom-action/update-current-post', function ( $request, $handler ) {
	$post_id = $request['post_id'];
	$rooms_new_number = $request['_form_field_1'];
	update_post_meta( $post_id, "_rooms", $rooms_new_number );
}, 10, 2 );
This code can also be added in WordPress Dashboard > Appearance > Theme File Editor > functions.php.
Please note that this code was originally written for a hotel website to update the number of available rooms for a specific post when a booking form is submitted. It listens to a custom JetFormBuilder action and updates a post meta field (“_rooms”) based on the submitted form data. Depending on the website type and form purpose, the code should be adjusted accordingly.
Let’s say you have a car rental site. You could use this to store the number of rental days, the selected car model, or the pickup location. Adjust the meta key accordingly (“_rental_days”, “_car_model”) and point the $request to the correct form field.
So basically, two values need to be updated:
- the name of the form field you’re retrieving data from the FORM FIELD NAME (”_form_field_1”);
- and the name of the meta field you want to store data in (”_rooms” in the original code).
This solution requires custom PHP development and should be implemented carefully. Always test on a staging site first, and consider the security implications of allowing guest users to modify post data. You may want to add additional validation to the form.
For detailed developer documentation and advanced hook implementations, refer to the JetFormBuilder GitHub documentation.
Invalid Token Error
The “Invalid token error” usually occurs when CSRF protection is enabled in your form settings and your website’s caching system interferes with the security tokens. To verify if it’s enabled, go to the JetForm > Validation section, and turn off the Enable csrf protection switch.
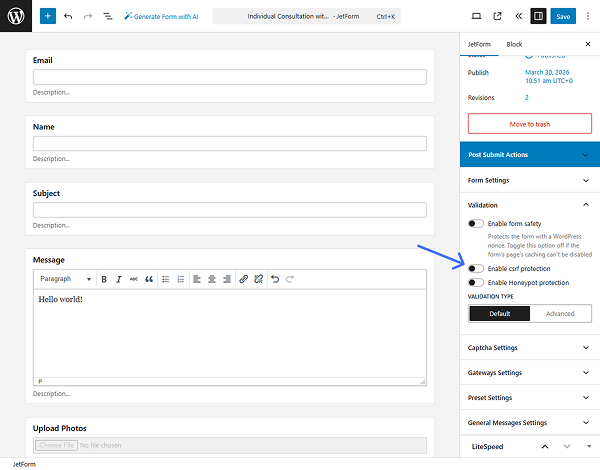
You can also exclude the specific pages containing your forms from your caching system. This ensures that each visitor receives a fresh, valid security token when the form loads, preventing the “Invalid token error” from occurring during form submission.
Incorrect File Type Error / File not Found in Request Error
These errors commonly occur when importing forms into JetFormBuilder, typically because WordPress does not recognize the application/json MIME type required for form import files. To resolve this, enable support for the JSON MIME type in your WordPress configuration.
Install the WP Add Mime Types plugin to expand your site’s file type recognition. After activation, go to your WordPress Dashboard > Settings > Mime Type Settings to access the MIME type configuration panel.
Check if “application/json” is in your current MIME types list.
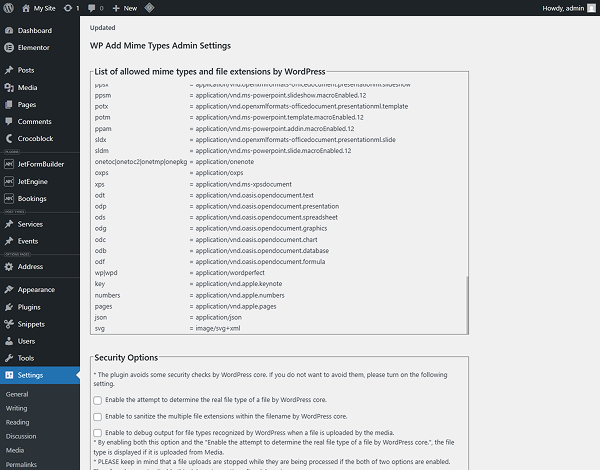
If this type is missing, you need to add it manually by entering the MIME type information “json = application/json” in the Add Values field. This addition allows WordPress to accurately recognize and process JSON files used for form imports.
Alternative troubleshooting
If your site doesn’t use the mentioned plugins, begin by clearing all website caches and temporarily disabling third-party plugins to identify the issue. This helps determine whether the problem is caused by plugin conflicts or other caching mechanisms that might interfere with form security tokens.
The key is to make sure that form pages generate new nonce tokens for each visitor instead of serving cached versions that have already expired.
PCLZIP_ERR_BAD_FORMAT
This error typically occurs during plugin updates and is caused by issues with license verification or corrupted plugin files.
For detailed troubleshooting steps and solutions, please consult our guide on fixing Crocoblock plugin update and license errors.
Invalid Resource Error
This issue frequently occurs when using caching plugins (e.g., WP Super Cache) or security plugins (e.g., Wordfence). To resolve it, exclude pages containing the JetFormBuilder forms from caching to prevent nonce tokens from expiring. For step-by-step instructions on setting cache exclusions and fixing nonce failures, refer to the How to Fix “nonce_failure” Error in WordPress guide.
Multi-Step Form Doesn’t Show the Progress
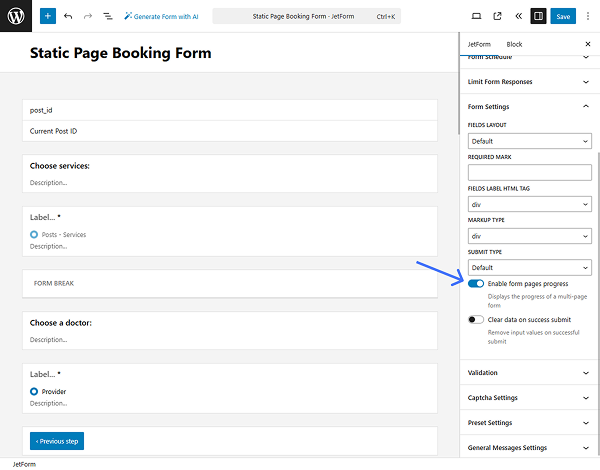
If you want to create a multi-step form and display the progress, you should not forget to activate the Enable form page progress toggle. On the left-side panel, go to JetForm > Form Settings and activate the toggle.
Form Doesn’t Create/Update Post/User Fields
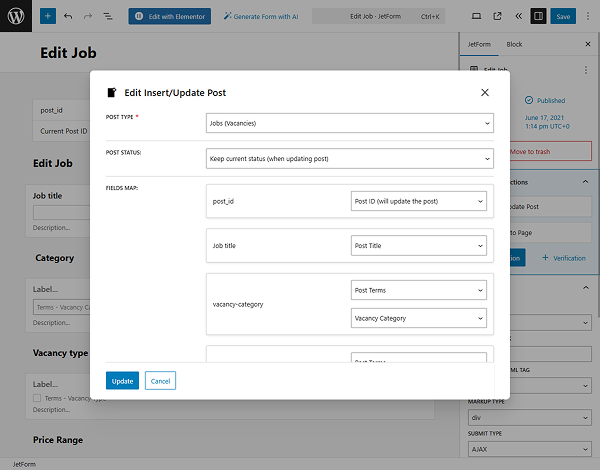
When you adjust “Insert/Update Post” or “Register User”, “Update User” post-submit actions, don’t forget to map fields that should be updated from the front end. In other words, you need to connect the form field with the corresponding meta fields of the post or user that should be updated.
After configuring the form fields and ensuring their formats match the data structure of the post you want to create or update, go to JetForm > Post Submit Actions and add the “Insert/Update Post” action.
If you’re working with users instead, select “Register User” or “Update User”—the field mapping process remains the same.
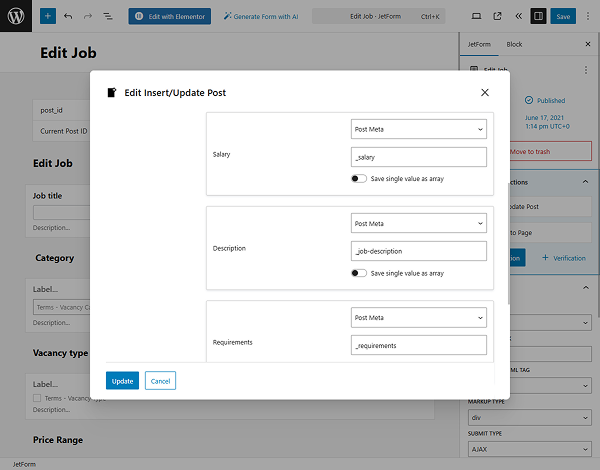
Configure all settings and field mappings in the pop-up. Use the dropdowns to map standard post fields such as “Post Title” or “Post ID.”
To link a form field to a custom field, select “Post Meta” and enter the meta key (e.g., “_salary”). You can copy this key from the corresponding post type in WordPress Dashboard > JetEngine > Post Types to ensure accuracy.
Also, if you have many items to be inserted using forms, consider using CCT; it’s the unique Crocoblock entity to optimize the database and store data a bit differently. Read more in the Custom Content Type: CPT’s Alternative for Better WordPress Performance article. The advantage of using them is that form creation and mapping are automatic and take one click — you will see the “Create Form” button in the Add/Edit CCT dashboard.
Mixing up creating and updating post settings when mapping
If you need to update an existing post, add a Hidden Field to your form and set its FIELD VALUE to “Current Post ID.” Then, in the “Insert/Update Post” action settings, map this field to “Post ID (will update the post)” to ensure the correct post is modified.
For creating new posts, this field is not required. If you choose to keep it in the form, simply leave it unmapped in the action settings to avoid conflicts.
Having Trouble Creating a Login Form
Please check out this video with a detailed explanation of how to create a login form with a password reset. You can do it with the “Change Render State” action.
Other Tips
- JetFormBuilder is built for the Gutenberg editor and is not compatible with the Classic Editor, so using Gutenberg is required.
- Do not attempt to embed other forms, such as Contact Form 7, inside a JetFormBuilder form. Doing so will cause errors and break form functionality.
- There are two submit types: page reload and AJAX. So, if you selected AJAX while building a form in Gutenberg, you should also select AJAX in the JetForm widget when adding the form to the page.
- If you want to generate options dynamically and use JetEngine, check the Save as array toggle when creating a “Checkbox” or “Radio” field that you will further use in the forms.
- If you want to add a form in a JetEngine listing template, it’s better to use a button with a pop-up (that has that form) instead to avoid errors and improve performance.
That’s it. These solutions cover the most common JetFormBuilder errors, but complex WordPress websites with multiple plugins or custom setups may need additional troubleshooting. Always test fixes in a staging environment first and consider security implications when changing file upload or validation settings.