How to Add Social Login to JetFormBuilder Forms Using Nextend Social Login
JetFormBuilder allows you to create dynamic login, registration, and multi-step forms using custom fields and flexible layout options. If you would like users to sign in or register using their Google, Facebook, or other social accounts, the Nextend Social Login plugin offers a simple and effective solution.
In this tutorial, you will learn how to integrate social login buttons into JetFormBuilder WordPress plugin forms using the free version of Nextend Social Login. We will demonstrate how to connect the login options to your form and display them on the frontend, allowing users to authenticate with a single click.
Table of Contents:
- Install and Set Up the Nextend Social Login Plugin
- Create the Form with the Integrated Button
- Add the Form to the Page
- Check the Result
Install and Set Up the Nextend Social Login Plugin
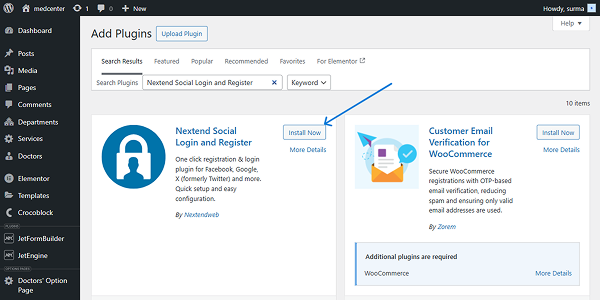
To install the plugin, proceed to the WordPress Dashboard > Plugins > Add Plugin tab and search for the Nextend Social Login plugin. Click the “Install Now” button next to the Nextend Social Login and Register plugin.
When the plugin is installed, click the “Activate” button.
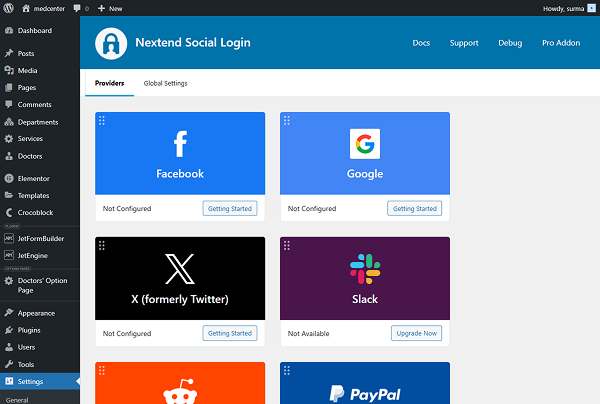
To set up the integration in the Nextend Social Login plugin, proceed to the WordPress Dashboard > Settings > Nextend Social Login. The page with all the providers will be opened. Choose the needed provider and click the “Getting Started” button next to it. In this tutorial, we will use Google as a provider.
After clicking the button, you are redirected to a guide page with clear steps on setting up the provider.

Pay attention to step #24 — ensure to copy and save the “Client ID” and “Client Secret” values, as they are required for further settings.
Click the “I am done setting up my Google App” button once you are ready with the settings.
You are now redirected to the page where the saved values should be added to the “Client ID” and “Client Secret” fields.
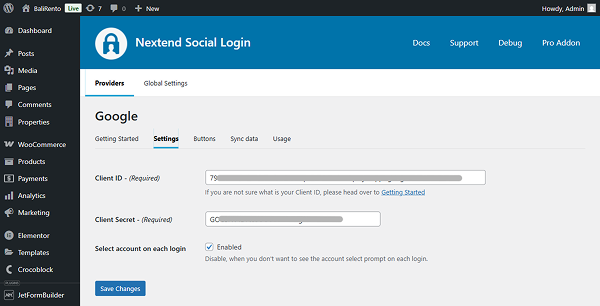
Click the “Save Changes” button when you are done.
Once the settings are saved, a pop-up will appear, allowing you to verify the settings and test the integration to ensure it works correctly. For that, you will need to log in to your Google account. Once everything goes well, you get another pop-up confirming that the integration works fine.

Create the Form with the Integrated Button
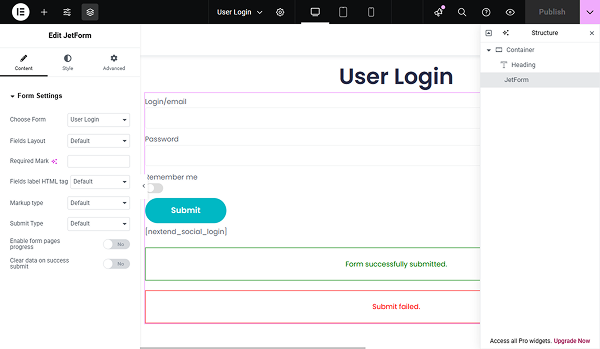
Following our How to Build a WordPress Login Form tutorial, we created a simple form for users to log in.
Now, we need to connect our form with the Social Login. For that, add the Shortcode widget and insert the following shortcode into it:
[nextend_social_login]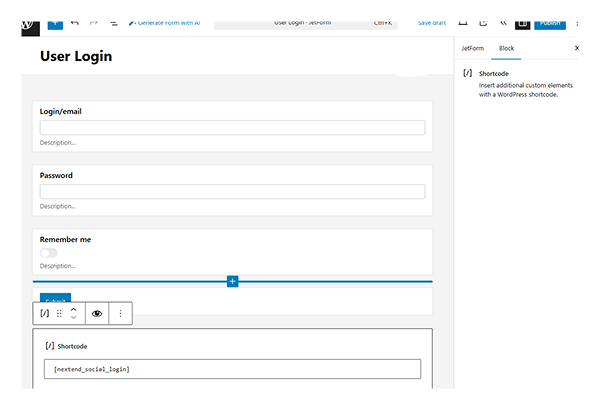
Click the “Publish” button once you have completed the form settings.
Add the Form to the Page
Now, we can add the form to the needed page. Check our How to Display a Form on the Front End tutorial if you’re unsure about the settings.
Click the “Publish” button once you are ready.
Before we finish, proceed to the WordPress Dashboard > Settings > General and ensure that the “Anyone can register” option is checked for the Membership field.
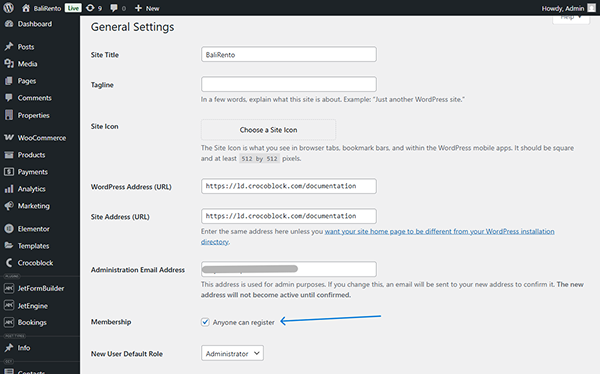
Click the “Save Changes” button.
Check the Result
Now, let’s proceed to the frontend page to see how it works.
Ensure that you are checking the form from which you are logged out of the site; otherwise, the social login button will not be displayed.

That’s it. Now you know how to integrate social login buttons into JetFormBuilder WordPress plugin forms using the free version of Nextend Social Login.