Update User
Learn how to update a user’s data (including assigning multiple roles) by confirming the previously set password using the “Update User” Post Submit Action and “Advanced” Validation methods. The “Update User” Post Submit Action allows server-side validation, but the “Advanced” Validation with an Advanced Rule set is a more user-friendly way.
- Create a User
- Create a Form
- Set a New Password Using the “Update User” Post-Submit Action
- Set the Advanced Validation with the Server-Side Callback
Create a User
Initially, you have to create a new user and insert the corresponding data. Read the How to Create a New User via WordPress Dashboard tutorial for more details. Also, if needed, you can add the required settings by managing the User Profile feature of JetEngine.
Also, to configure some roles assigned to a user, the User Role Editor plugin should be installed and activated.
Create a Form
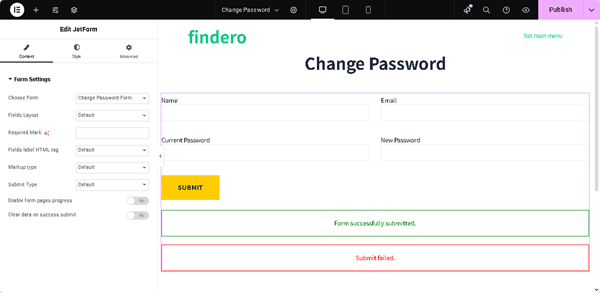
To update user data via forms, create or edit a form with the necessary blocks or use premade patterns.
Read the Creating a Form tutorial to learn the main features of this process. In this case, we intend to build a form with the following fields: a Hidden Field and Text Fields for contact data and passwords.
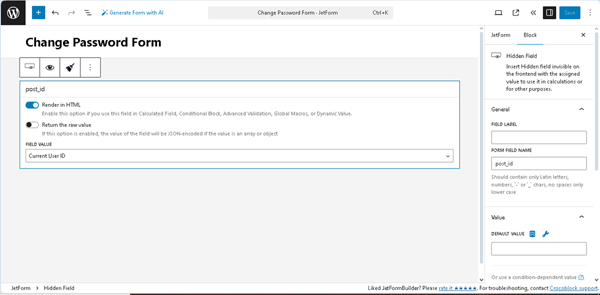
First, we insert the Hidden Field and set the “Current User ID” option in the FIELD VALUE drop-down menu.
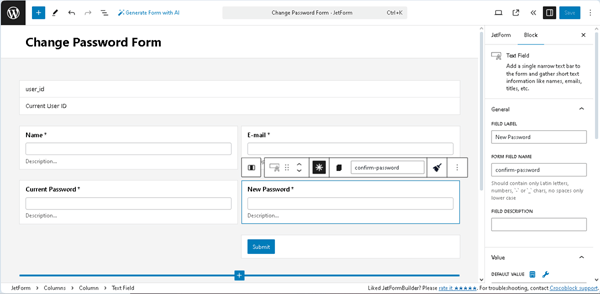
After that, we add the Text Fields and set their FIELD TYPES (e.g., the “Password” FIELD TYPE for the Text Field to enter a password). Next, insert the Action Button and move to the Post Submit Actions.
Set a New Password Using the “Update User” Post-Submit Action
Configure the Post-Submit Actions
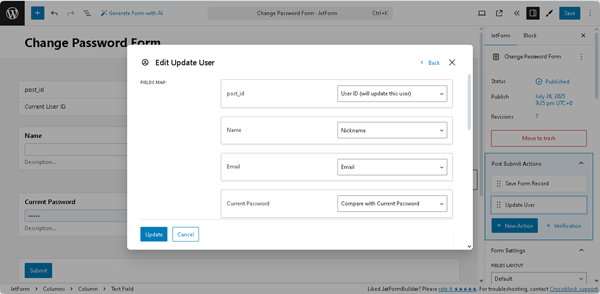
First, set the “Save Form Record” Post Submit Action. After that, insert the “Update User” Post Submit Action. In the newly appeared Edit Update User pop-up, specify the fields to be updated for users of certain user roles.
The FIELDS MAP group shows all fields of the current form and includes fields displayed on the WordPress Dashboard > Users tab. Here, match the needed form fields with the corresponding option from the drop-down lists.
In particular, we set the “User ID (will update this user)” option for the user_id form’s field, “Nickname” option for the Name form’s field, “Compare with the Current Password” option for the Current Password form’s field, “Email” option for the Email form’s field, and “Password” option for the New Password form’s field.
In particular, we set the “User ID (will update this user)” option for the user_id form’s field, “Nickname” option for the Name form’s field, “Email” option for the Email form’s field, “Compare with the Current Password” option for the Current Password field, and the “Password” option for the New Password field.
These fields correspond to the names of the columns in which the user’s data is displayed via the WordPress Dashboard.
After assigning the fields, scroll the pop-up down and select the required USER ROLE or assign some roles.
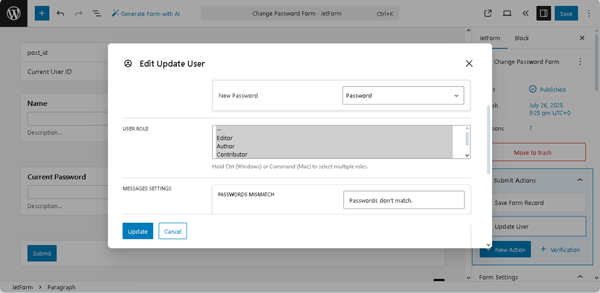
In this case, we allow adding some roles and select the “Editor,” “Author,” and “Contributor” roles, holding the “Ctrl” (Windows) or “Command” (Mac) key to select multiple roles.
In the last step, insert the required messages into the MESSAGE SETTINGS fields. Here, we keep the default data.
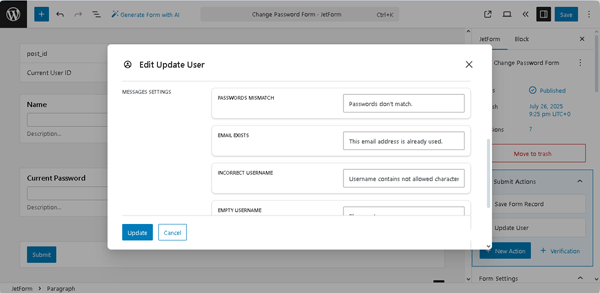
Once completed, press the “Update” button at the bottom of the pop-up. Finally, save the form.
In the second step, open a page or create a new one in your preferred editor. Next, add the form to the page using the JetForm widget/block/element. In this case, we use Elementor.
To learn how to add your form on pages using Elementor, Block Editor, or the Bricks theme, read the Displaying a JetFormBuilder Form in Any Page Builder tutorial.
Watch the video to learn How to Add WordPress Form to any Page Builder using the JetFormBuilder plugin.
Test the flow
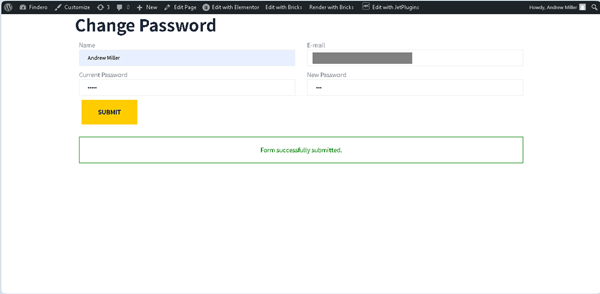
Move to the front end and fill out the form fields.
If the form is built correctly, the “Form successfully submitted.” text will appear.
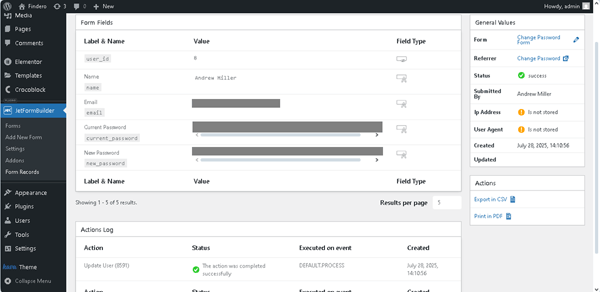
To check the update, proceed to the WordPress Dashboard > JetFormBuilder > Form Records tab and observe that the new roles have been added to the needed user.

Next, move to the WordPress Dashboard > JetFormBuilder > Form Records tab and observe that the user data has changed by opening the needed Form Record page.
Set the Advanced Validation with the Server-Side Callback
Modify the form
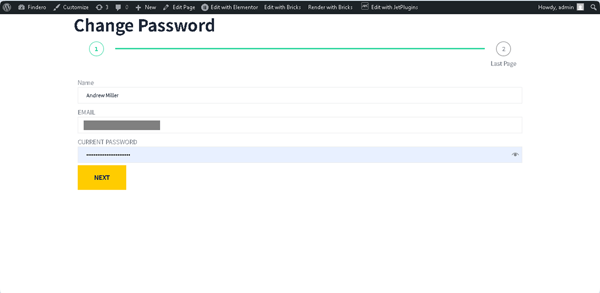
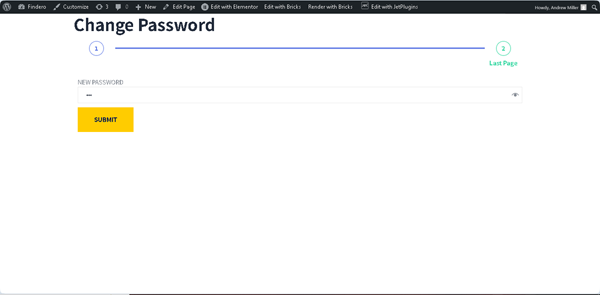
We recommend dividing the previously created form into two parts using the Form Page Break Field. This way, the modified form contains the “CURRENT PASSWORD” Text Field on the first page and the “NEW PASSWORD” Text field on the second page. The current password verification will be done on the first page of the form, and users will not be allowed to go to the next page until they enter the correct current password.
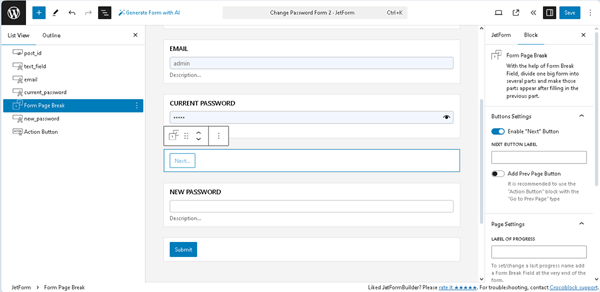
Read the Building a WordPress Multi-Step Form for more details.
Next, delete the previously added “Update User” Post Submit Action.
Set the Advanced Validation Rules
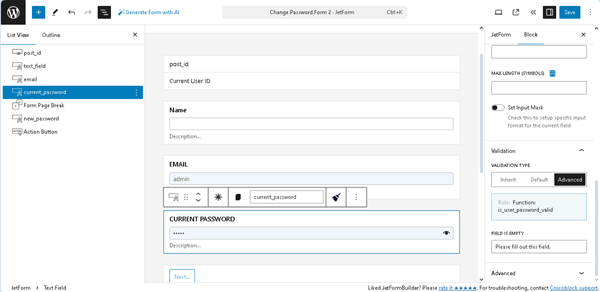
Select the Text Field assigned to enter the current password (the “CURRENT PASSWORD” Text Field, in this case). Next, scroll the field’s settings down to the Validation section and select the “Advanced” VALIDATION TYPE.

After that, click the blue block under the VALIDATION TYPE options to open the Edit Advanced Rules pop-up. In this pop-up, select the “Server-Side callback” RULE TYPE and “Compare with Current User Password” CHOOSE CALLBACK options in the corresponding drop-down lists.
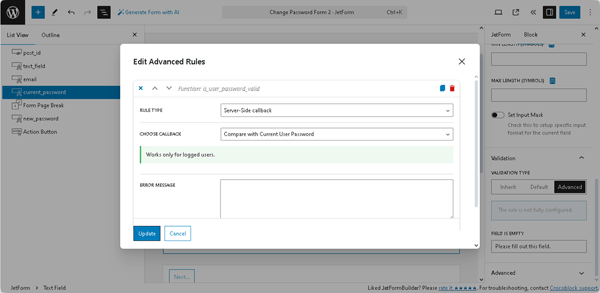
Next, press the “Update” button. Then, the “Rule: Function: Is_user_password_valid” text will appear in the blue block under the VALIDATION TYPE.
Finally, save the form and, after that, add it to the page using the JetForm widget/block/element.
Test the flow
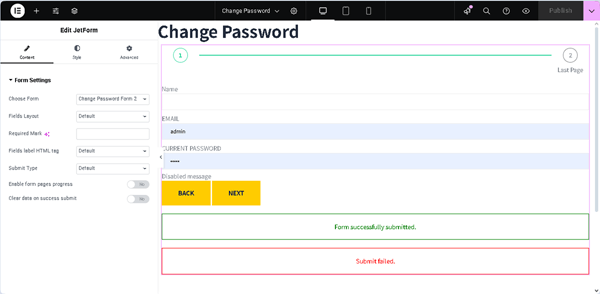
Move to the front end and fill out the form fields. First, fill out the CURRENT PASSWORD field on the first page. If the entered password is correct, you will be redirected to the next page.
On the second page, enter a new password and submit the form.
After that, if the form is built correctly, the “Form successfully submitted.” text will appear.
To check the update, proceed to the WordPress Dashboard > JetFormBuilder > Form Records tab and open the needed one.
That’s it. Now you know how to update a user’s data by confirming the previously set password using the “Update User” Post Submit Action and “Advanced” Validation methods.