Front-End Post Submission Form
Create a WordPress form for front-end post submission and set the needed post-submit actions with the help of JetFormBuilder.
- Why You Need a WordPress Front-End Post Submission Form
- Top WordPress Front-End Post Submission Form Features
- How to Create a WordPress Front-End Post Submission Form
Why You Need a WordPress Front-End Post Submission Form
Allowing users to submit posts right from the front end makes the work with the WordPress website even more efficient than it was before. Engage users to add more and more exciting posts.
Using this feature, you can allow users to submit their products and ads to the marketplace website, enter a competition, submit art gallery work, and, certainly, post guest articles on your blog.
Create a WordPress form and select needed post-submit actions to freshen your website. Use the JetFormBuilder plugin to simplify the process.
Top WordPress Front-End Post Submission Form Features
- Create two forms, one for posts submitting and the other for their editing;
- Add the only fields you need and connect them with the created meta fields, terms, and other vital post elements;
- Style up the form to meet your requirements;
- Set the post-submit actions to update the post, redirect to the page, and send an email about the form submission right to the admin’s email;
- Use Conditional Logic to show or hide certain fields under the set conditions;
- Adjust JetFormBuilder presets so that users do not fill in fields that they have already completed before.
How to Create a WordPress Custom Front-End Form
Before we start, make sure you have the following plugins installed and activated:
- JetFormBuilder — build a form, edit the post submit actions, and add a captcha if needed;
- JetEngine — create a CPT, add custom meta fields and taxonomies;
- JetEngine Profile Builder module — make an account page, add posts, and edit post templates;
- Elementor — add the created form into the editor to finalize the customization, style up the page, and publish it right away. Or use Gutenberg block editor, as it is fully compatible with the JetFormBuilder plugin; it’s up to you.
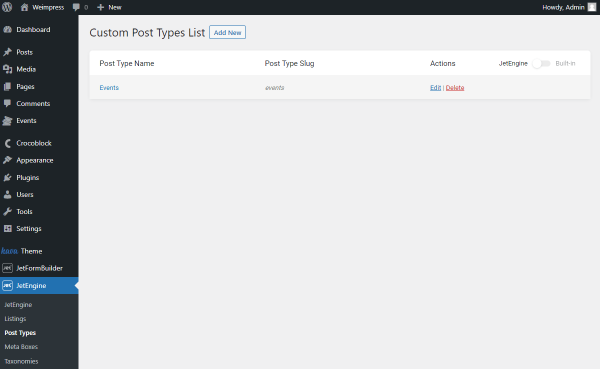
Create custom post type
Proceed to the WordPress Dashboard > JetEngine > Post Types. Add a new custom post type by pushing the “Add New” button, or open the one that you have created earlier.
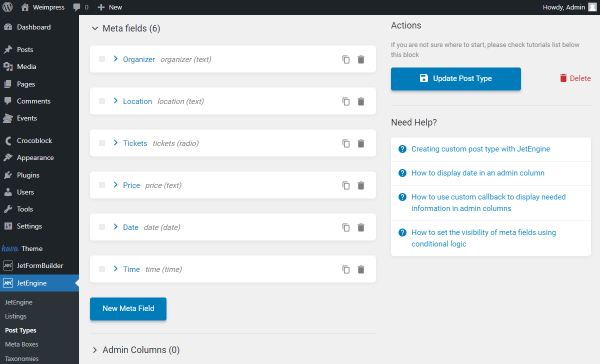
Once the custom post type editor is opened and General Settings are adjusted, scroll down to the Meta Fields tab.
As your form will include fields for completing, some of them will repeat the CPT meta fields you edit here. That’s why you need to set up the needed fields.
Let’s take a look at the example fields.

After implementing the changes, press the “Add/Update Post Type” button.
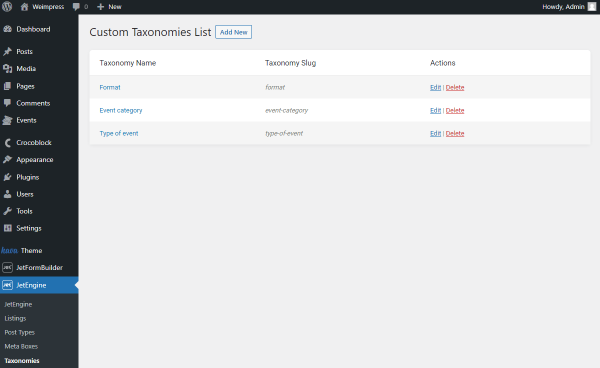
Add taxonomies to custom post type
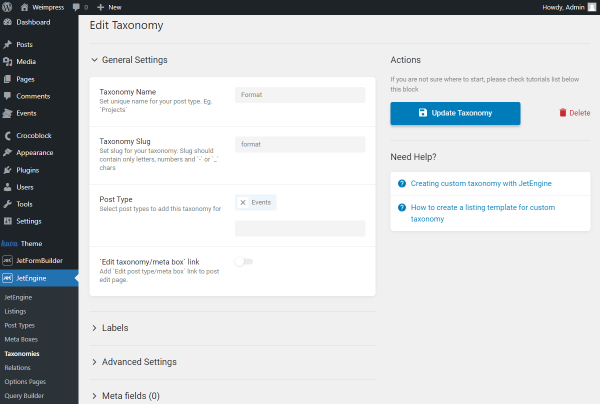
Now let’s build some categories for the CPT posts. Move to the WordPress Dashboard > JetEngine > Taxonomies. Open the taxonomy you have already created, or click on the “Add New” button to build a new one.
Take into consideration that the taxonomies you build should be connected with the previously mentioned post type. To do so, choose the needed option in the Post Type field.
Don’t forget to press the “Add/Update Taxonomy” button after all the settings have been adjusted.
Create profile page with JetEngine Profile Builder
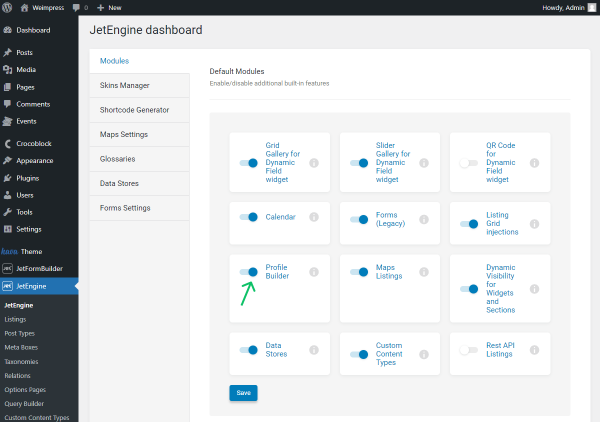
The next step is enabling the Profile Builder. Navigate to the WordPress Dashboard > JetEngine > JetEngine, toggle the Profile Builder and press the “Save” button. Now the feature is activated.
Set the Profile Builder according to your needs, or import the premade configurations. Head to the Skins Manager and unfold the Presets. They add pages and templates automatically.
Select the desired preset and hit the “Import” button.
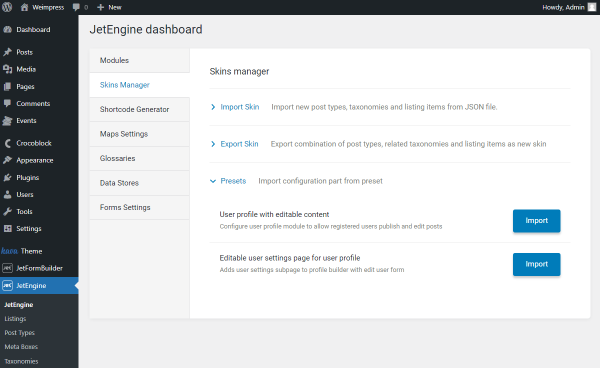
- User profile with editable content — allows registered users to publish and edit forms. We import this preset as we work with the posts only;
- Editable user settings page for user profile — adds user settings subpage to Profile Builder.
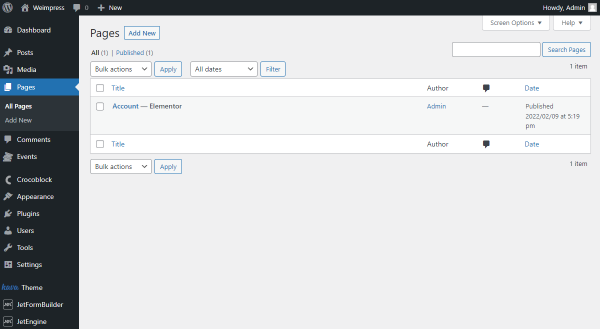
So we select the first option. Move to the WordPress Dashboard > Pages to check if the new page was created. The “Account” page is now displayed here.
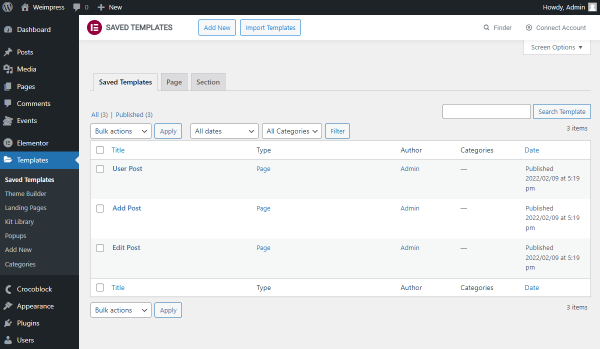
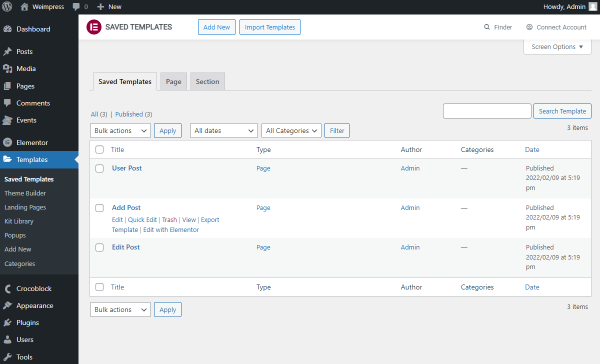
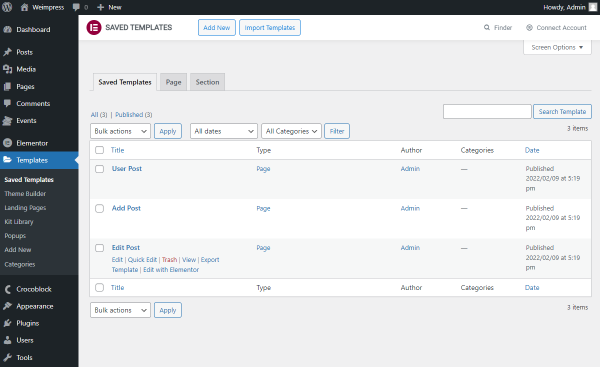
Besides, you can check the WordPress Dashboard > Templates > Saved Templates. Here, if the Preset was imported, the new templates would appear.
Also, you can see one added listing if you proceed to the WordPress Dashboard > JetEngine > Listings.
Go to WordPress Dashboard > JetEngine > Profile Builder to adjust the settings.
Check that the “Account” option is selected as the Account Page; enable the Users page, and Single user page if desired.
You can also adjust the following fields, but it’s unnecessary in the described case.
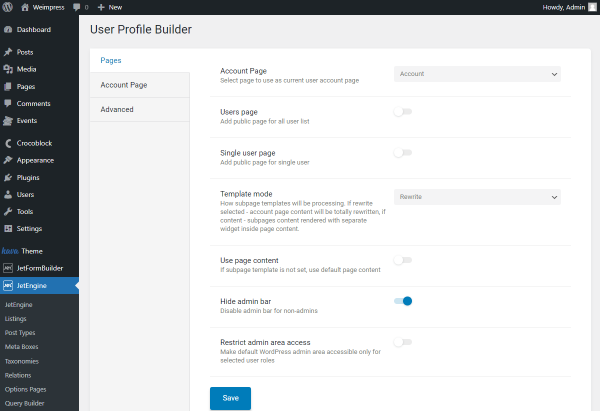
Open the Account Page tab.
Work on the initial fields and add some subpages to the account page. Check the following video to learn how to do it without any effort.
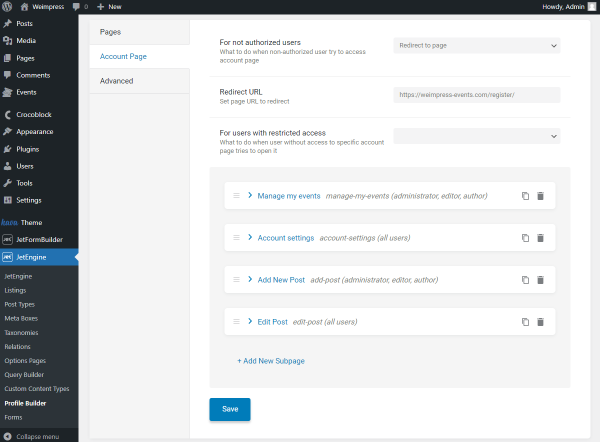
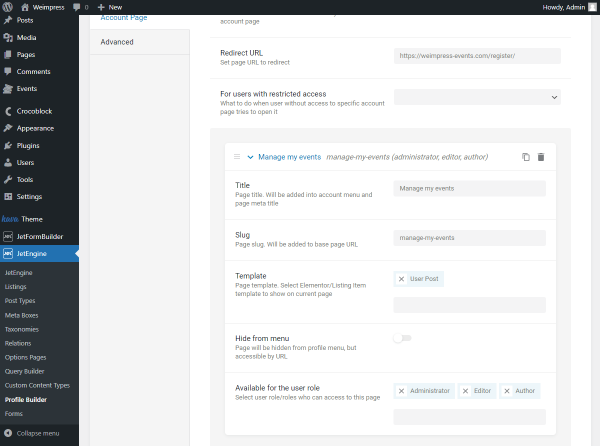
Take a look at the example subpage settings. We fill in a Title and Slug.
Select a Template by typing its name in the particular field and move to the following Hide from menu toggle. It should be left disabled if you want to display the current subpage as a menu item in the Profile Menu widget.
Moreover, you can select user roles for which the page will be available in the Available for the user role field.
After building all the required subpages, push the “Save” button.
Add new form for submitting posts
Go to WordPress Dashboard > JetFormBuilder > Add New.
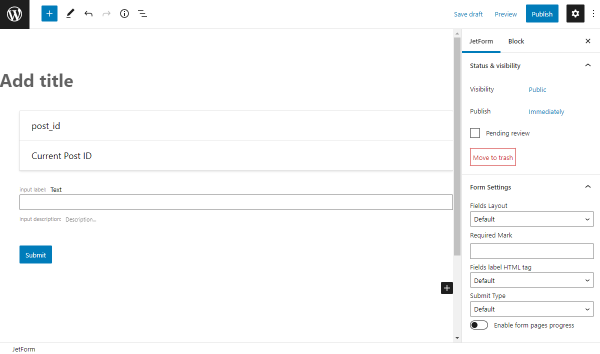
Give a title to the form and delete the default fields, except for the Hidden one.
Make sure that its Form field name is set to ‘post_id’ in the General tab and the “Current Post ID” is selected as a Field Value in the Field Settings; we’ll need it later.

Hit the plus-shaped button to add a new block. Add all the needed fields to the form.
Firstly, we add a Heading Field. This one will serve as a section title.
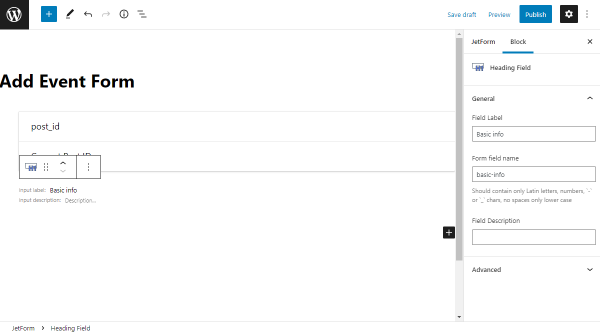
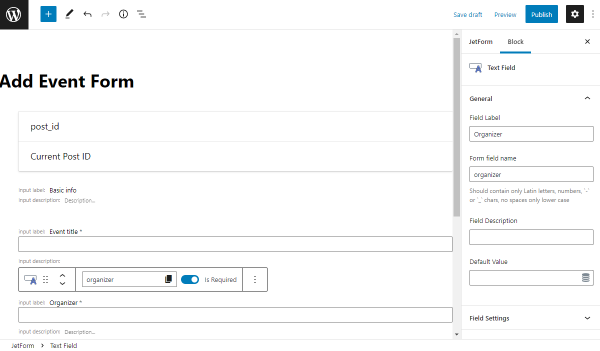
We begin the section with a couple of Text Fields. We suggest you fill in the Form field name with the same meta field values you have added to the CPT meta fields. This way, you will not get confused when connecting fields.
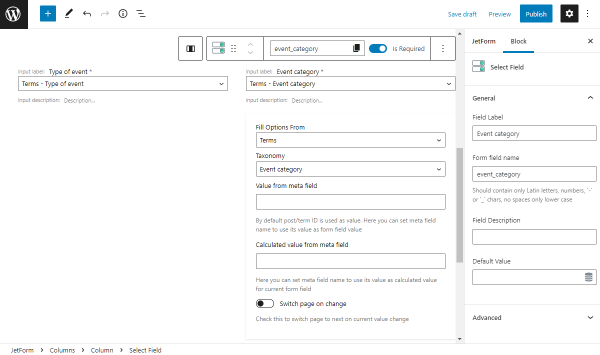
The following fields we place in the form are Select Fields. We choose the “Terms” option in the Fill Options From field and define the needed Taxonomy as a source.
Thus the user will select between categories and attach a post right to the needed one.
We add one more Heading Field and add one more Select Field. This time we set the “Manual Input” source in the Fill Options From field.
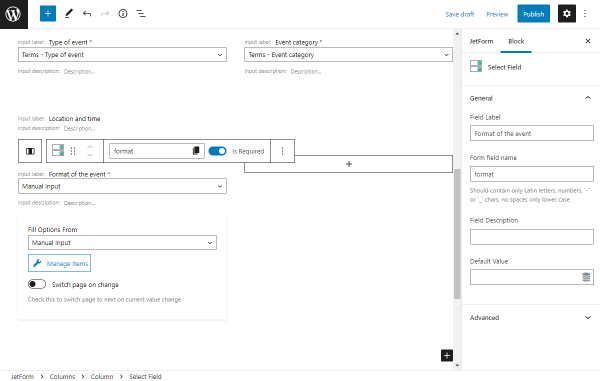
Fill in the Label and Value fields for all the options you want to add in the selector.
Hit the “Update” button to save the result.
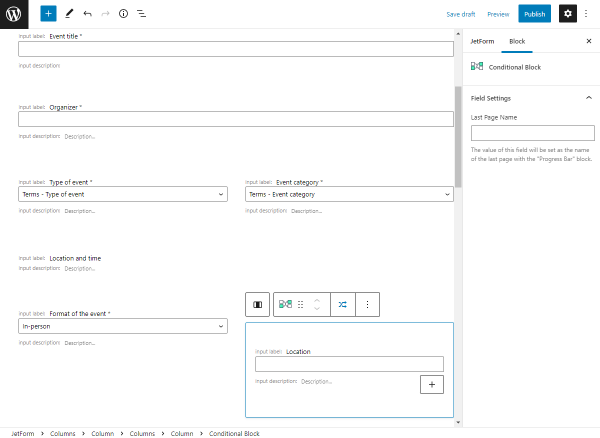
Another feature we will use in the current form is the Conditional Block. We continue building the form with the Text Field displayed under the set conditions.
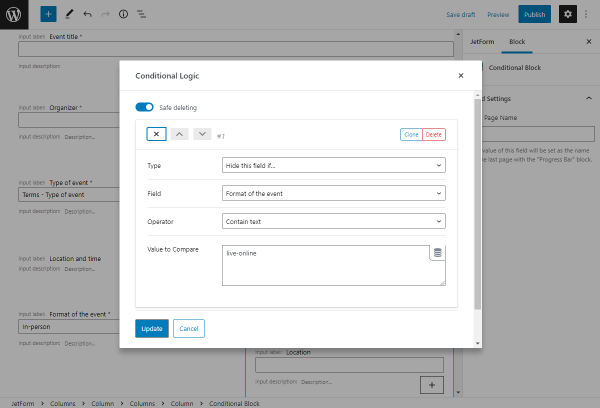
Let’s press the arrow-shaped button to proceed to the editor and hide the block when the “Live online” option is selected.
In the first, Type field select the “Hide the field if…” option and move to the Field. Here you should choose the compared field.
Pick the “Contain text” Operator and define the needed Meta Field Name as the Value to Compare.
To find out more info about the conditional logic in JetFormBuilder form fields, watch our video with the detailed use case.
Mind pushing the “Update” button after implementing the changes.
We add two more Text Fields and move to the next section. It will be separated from the previous one by another Heading Field.
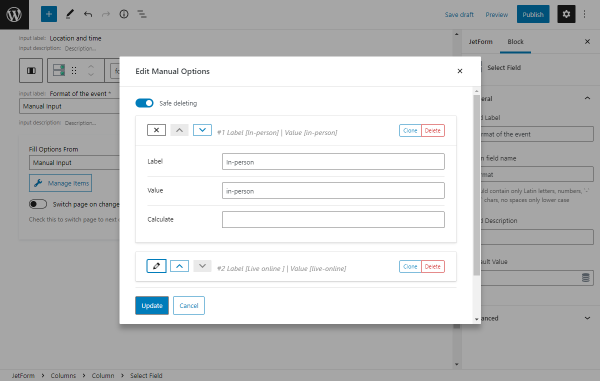
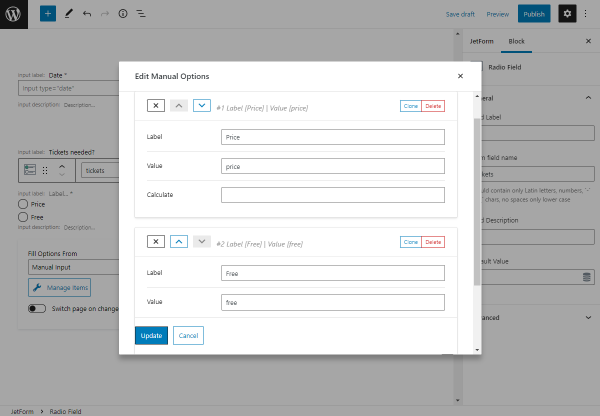
Place the Radio Field in the form editor. In the Fill Options From drop-down menu, we choose the “Manual Input” and push the “Manage Items” button.
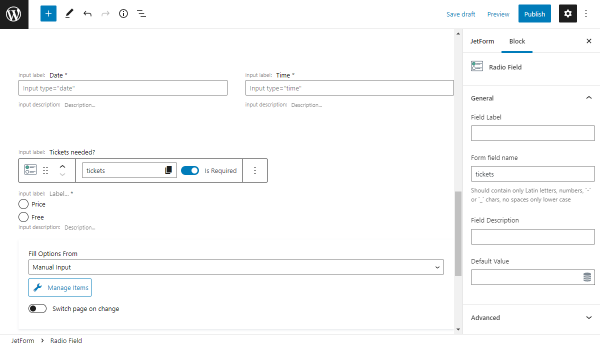
As the new window is displayed, press the “Add New Option” button and fill in the Label and Value fields.
For example, we will adjust two such fields; one is for the “price,” and the other is for the “free” option. However, you can add other options you need as your form may differ from the one described in the tutorial.
Mind clicking the “Update” button after making the changes.
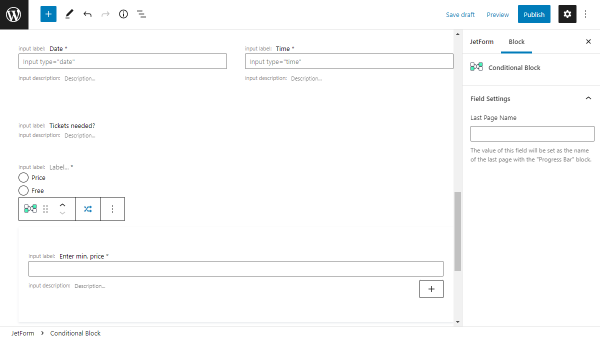
The following field we add is another Conditional Block with the Text Field inside it.
The main goal now is to hide the Text Field we have added once the “Free” option in the previous field is picked. So select the Conditional Block and click on the arrows-shaped icon to open the settings window.
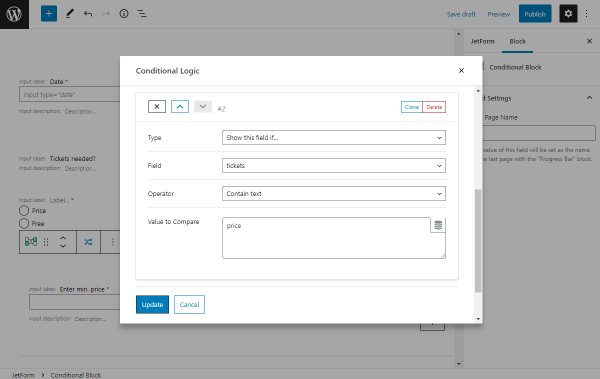
Push the “New Condition” button to work on the first condition. Select the “Hide this field if…” as a Type and select the field you want to hide in the Field drop-down list.
Also, set the “Contain text” option in the Operator field and define the Value to Compare.
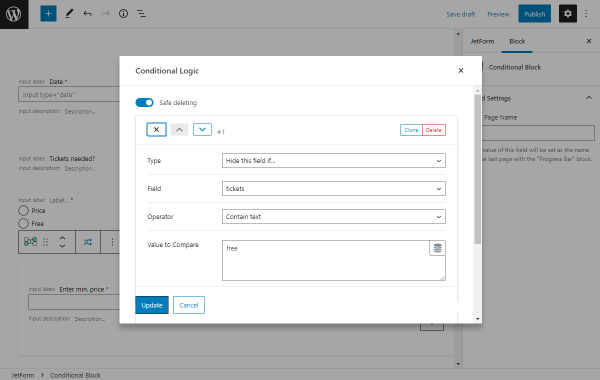
One more condition we need to set is displaying the following field if the “price” option is picked. So, push the “New Condition” button one more time.
Choose the “Show this field if…” Type and select the needed option as the Field.
The Operator should be picked as “Contain text,” and Value to Compare is “price” now.
Save the changes by clicking on the “Update” button and continue to add new fields if needed.
We add one more Heading Field for the next logical part of the form.
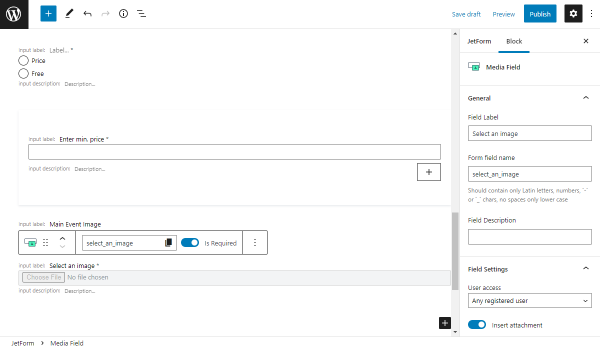
We also place the Media Field for users to upload the desired images to the post. Don’t forget to work on its Field Settings in case of need.
The last part of the form will include another Heading Field, Textarea Field, and a WYSIWIG Field representing the excerpt and the content of the future posts.
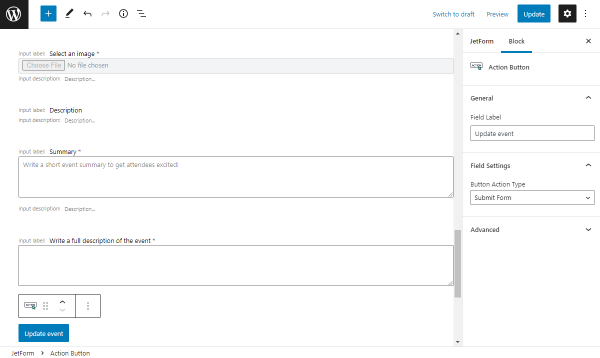
Don’t forget to finalize the form with an Action Button and adjust it as desired.

However, the form is not ready yet. To adjust it thoroughly, head to the JetForm tab.
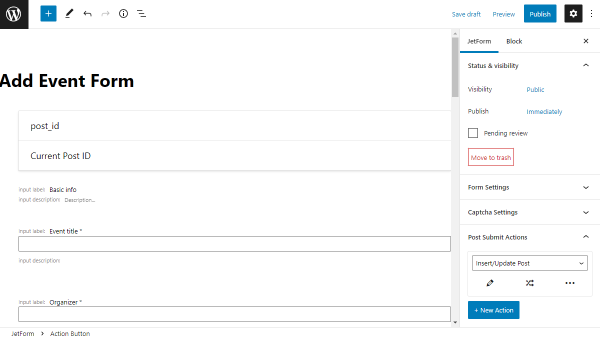
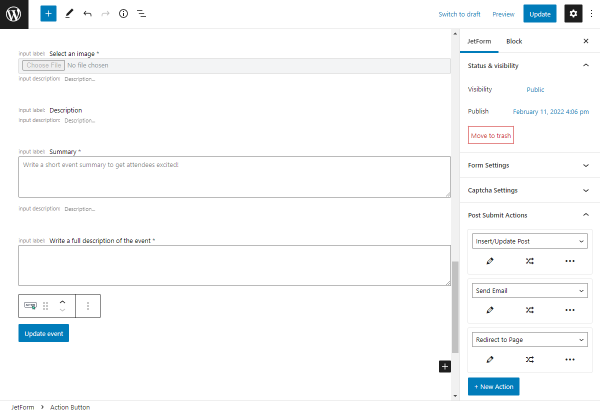
Work on the Form Settings and Captcha Settings if needed and proceed to the Post Submit Actions tab.
Customize post submit actions
The first action we will adjust is “Insert/Update Post”, you can pick it from the drop-down menu. It is essential in the current form, so mind adjusting it correctly.
Press the pencil-shaped button to edit the action.
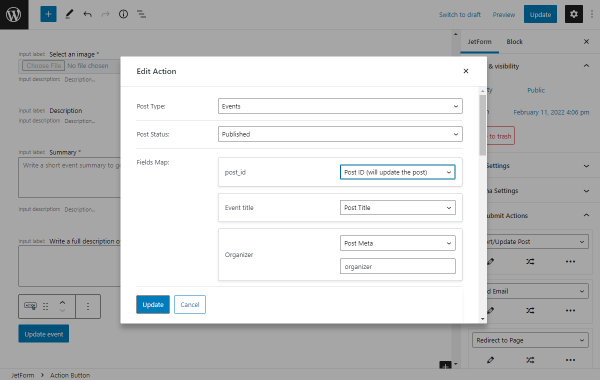
Select the needed Post Type in the appeared pop-up and set the Post Status to “Published.”
In the Fields Map, there are the fields you have added to the form. It will link the form fields with the specific meta fields.
Leave the “post_id” field empty and work with the following fields.
We select the “Post Title” as the Event title and move to the Organizer field. This field should be connected with the matching meta fields you have created earlier during the post type editing.
To connect them, choose the “Post Meta” option in the first selector and complete the second field with the needed Meta Field Name.
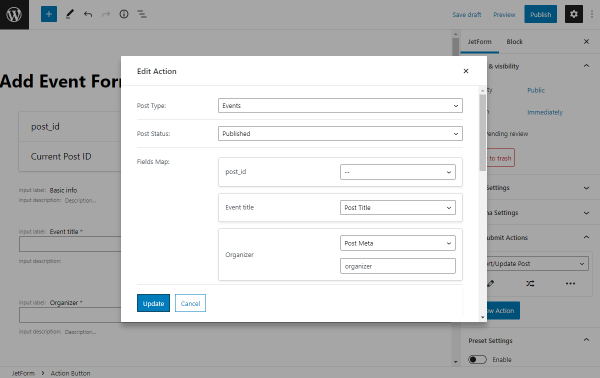
As you remember, the next Type of event, Event category, and Format of the event fields represent taxonomies. That is why we pick “Post Terms” and specify the taxonomy in the following drop-down menus.
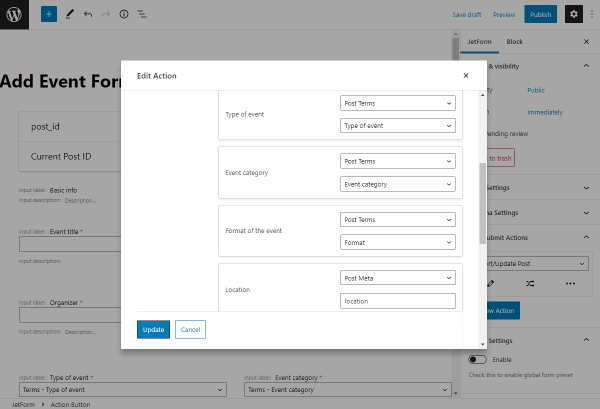
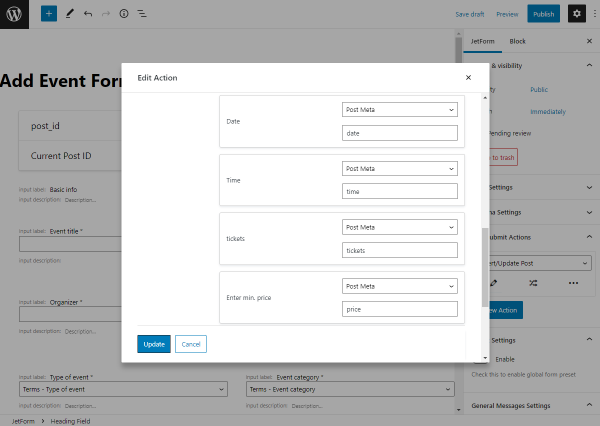
Complete the following fields with the corresponding source values.
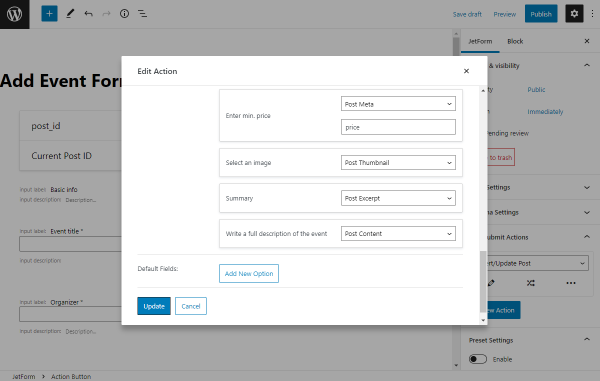
When you get to the Media Field, you should select the “Post Thumbnail” option as a source. We choose the “Post Excerpt” and “Post Content” options in the following Textarea and WYSIWYG fields.
That’s it with the “Insert/Update” Post Submit Action, so hit the “Update” button.
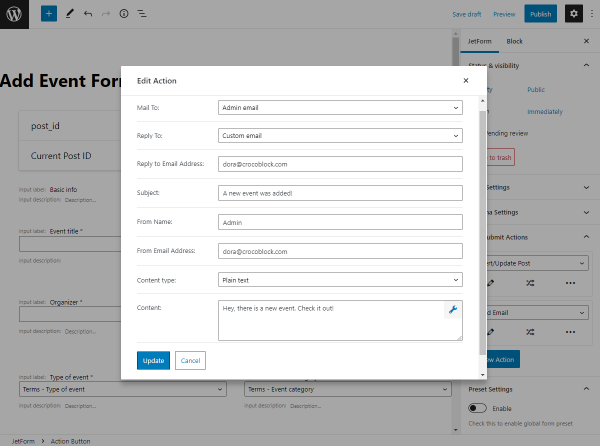
Then click on the “+ New Action” button to add another Post Submit Action, “Send Email.” Whether you want to adjust it to get a notification once the user has added the new post is entirely up to you.
Complete the fields with the required data and press the “Update” button.
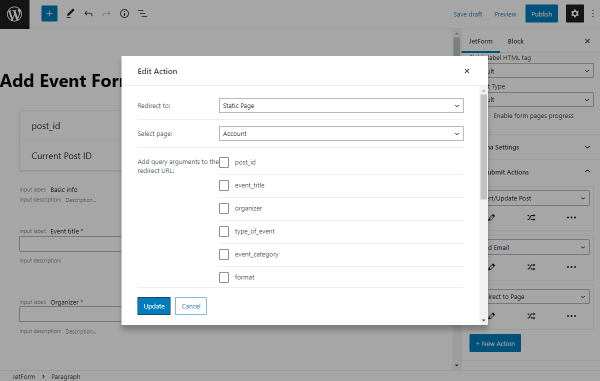
The last post submit action is “Redirect to Page.” If desired, you can create one by pushing the “+ New Action” one more time.
Complete the Redirect to field. The new field may appear depending on the source you choose. For instance, we select the “Static page” option, so we complete the Select page field with the desired page.
Moreover, you can work on the Add query arguments to the redirect URL and Add hash to the redirect URL fields.
Don’t forget to press the “Update” button once all the adjustments have been made.
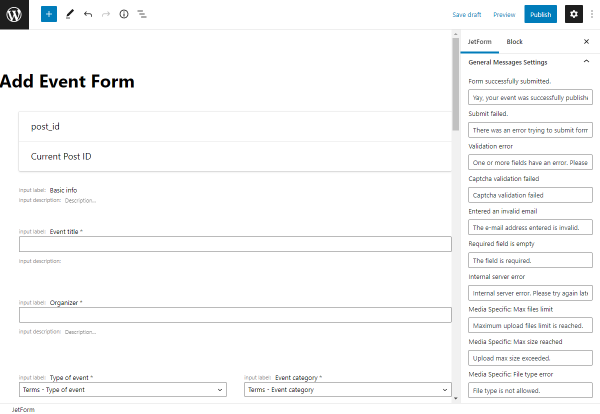
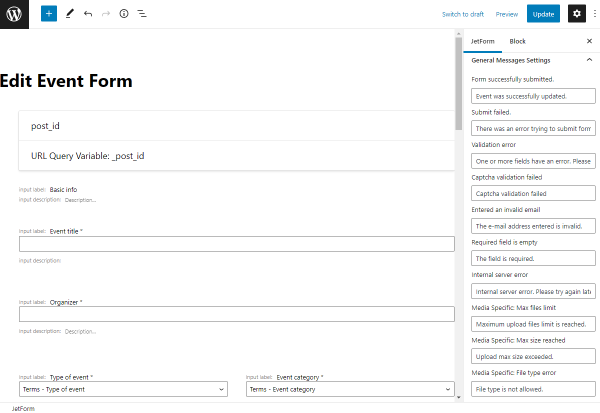
Navigate to the General Messages Settings, where you can change the default notifications or leave them “as is.”
Finally, click on the “Publish” button to save the form.
Create form for posts editing
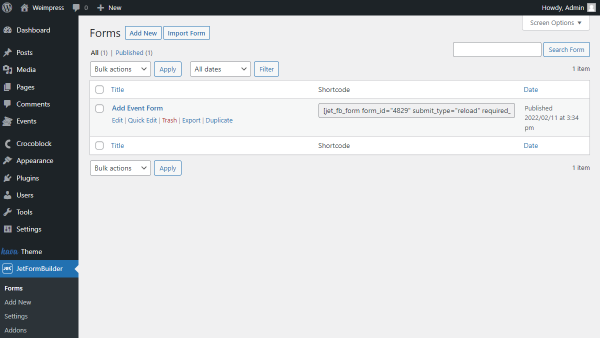
There is no need to create one more similar form that will edit posts, as we can duplicate the one for post submitting we have just built.
Head to the WordPress Dashboard > JetFormBuilder > Forms and hover on the newly created form. As the “Duplicate” button appears, click on it, and the copy will be added to the list.
Now you can press the “Edit” button displayed once you hover over the copy.

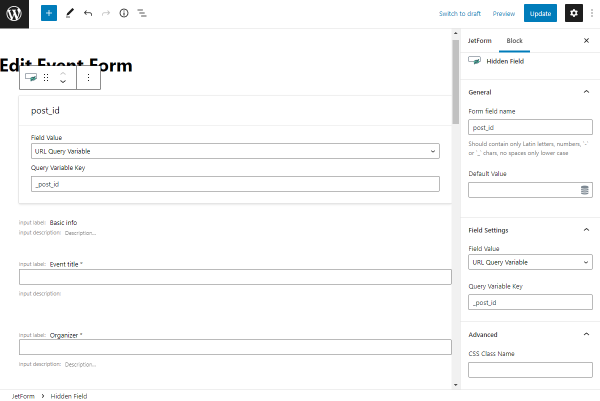
Change the title of the form and proceed to the Hidden Field.
Leave the General tab of the block settings and move to the Field Settings.
Select the “URL Query Variable” option in the Field Value drop-down menu and paste the “_post_id” value in the Query Variable Key field.
Besides, work on the Advanced tab to add the CSS Class Name.
If you work with Gutenberg only, you can also install and activate the JetStyleManager plugin to style up the form according to your wishes. However, we consider the case with Elementor so that we will adjust the style settings a little bit later, right in the Elementor editor.
Also, remember to change the Field Label of the Action Button.
Go to the JetForm tab to work on the general form settings. Customize the Form Settings and Captcha Settings if needed and move to the Post Submit Actions.
Configure post submit actions
We also need to adjust the “Insert/Update Post” action, so press the pencil-shaped icon to open the editing window.
This time choose the “Post ID (will update the post)” option in the post_id field of the Fields Map.
All the other fields should be left without changes. Click on the “Update” button to save the changes.
The following post-submit actions can also be left or deleted as they are not necessary for the correct work of the form.
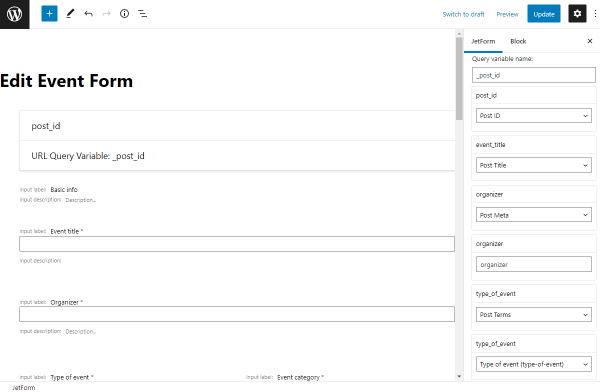
Go to the Preset Settings and activate the Enable toggle. We do it to save the data that was already completed in the fields. So, there is no need to retype the info once the user gets to the editing.
Set the “Post” as Source as we are working with CPT, and select the “URL Query Variable” option in the Get post ID from list.
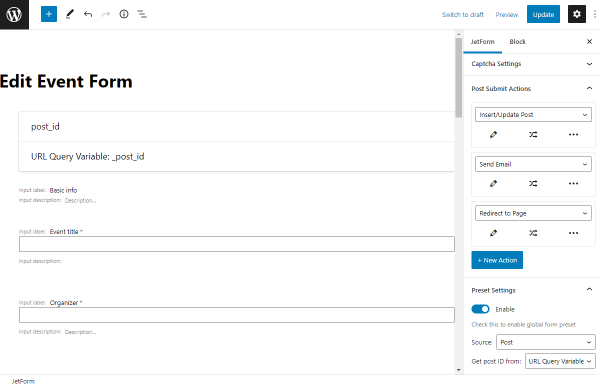
We need to paste the ‘_post_id’ value into the Query variable name to get the information from this particular post.
The following selectors are the same form fields we have added before. So now we build a connection between form fields and default/custom meta fields.
Select the “Post ID” option for the ‘post_id’ field, set “Post Title” as ‘event_title,’ and pay attention to the following ‘organizer’ field.
This one refers to the custom post type meta field. That’s why we need to pick the “Post Meta” option and define the required Meta Field Name in the appeared field.
The following ‘type_of_event’ source in the form was selected as the taxonomy, so set the “Post Terms” option in this field. Then define the needed taxonomy in the selector.
Repeat the same steps for similar fields.
Besides, pay attention to the ‘select_an_image,’ ‘summary,’ and ‘event_description’ fields of ours.
The first field is connected to the “Post Thumbnail,” the second to the “Post Excerpt,” and the third one to the “Post Content.”

Mind changing the General Messages Settings default values and save the form by pressing the “Update” button.
Add forms to templates
Go to the WordPress Dashboard > Templates > Saved Templates and open the “Add Post” template editor.
The Profile Menu is already added to the page. These subpages are taken from the Account Page settings we have edited in the Profile Builder.
If you remember, we have added four subpages; however, the “Add New Post” and “Edit Post” are set to be hidden from the menu, so there are only two subpages.
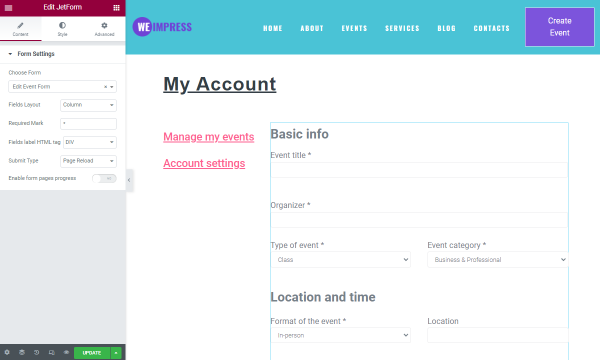
Drag the JetForm widget to the page. Select the form for the post submitting in the Choose Form drop-down menu.
You can also adjust other features in the Form Settings and work on the Style tab settings if needed.
Mind pushing the “Update” button once all the adjustments have been made.

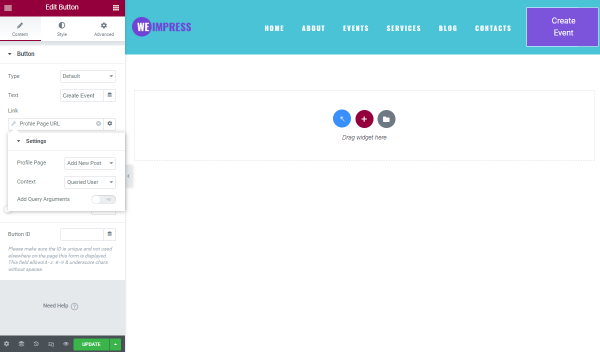
Let’s check the result on the front end. To do so, we have added a special Button in the header that links to the Profile page.
By pressing the “Dynamic Tags” button next to the Link field, you can select the “Profile Page URL” option under the JetEngine title.
Pick “Add New Post” as Profile Page in the appeared tab and leave the default “Queried User” Context.
Hit the “Update” button to save the changes.
Return to the WordPress Dashboard > Templates > Saved Templates and select the “Edit Post” template for editing now.
Now the same steps should be taken. Add the JetForm to the page and pick the second form we created, responsible for post editing.
Proceed to customize Form Settings and the Style tab to get the desired form appearance. You can copy and paste the style of the “Add Post” form to receive a similar page appearance.
Press the “Update” button to save the template.
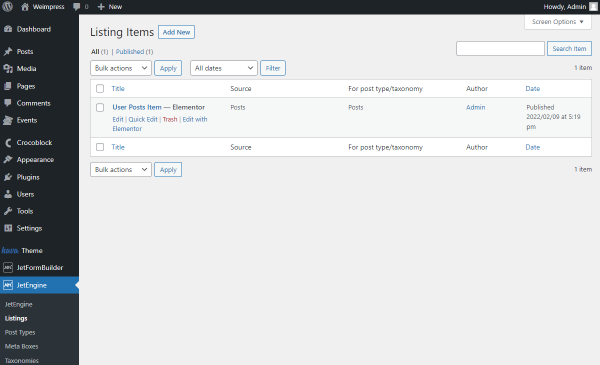
To see the data you have put in the form on the front end, head to the WordPress Dashboard > JetEngine > Listings.
Find the User Posts Item listing created after we have imported the preset. Now we push the “Edit with Elementor” button to open the editor.
Begin with the Listing Item Settings. Press the arrow on the Elementor Dashboard and open the Listing Settings tab.
Ensure that the Listing source is set correctly and the needed option is selected in the From post type selector.
For instance, we select the “Posts” as the Listing source and specify it in the following drop-down menu.
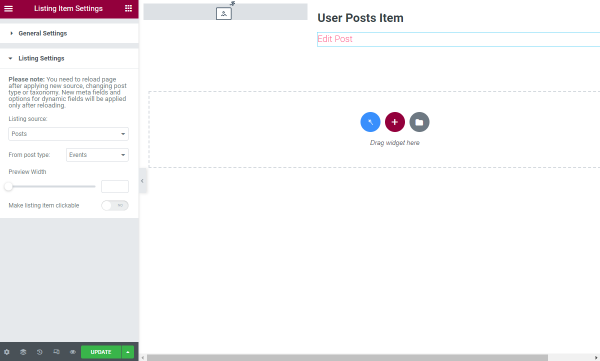
Now you can push the “Update” button and refresh the page to pull the example post from the source.
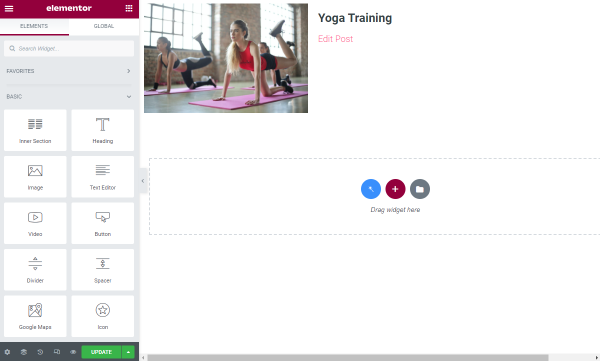
As it is preset, the listing already includes Dynamic Image, Dynamic Field, and Dynamic Link widgets.
Leave the default widgets or add more items according to your wishes.
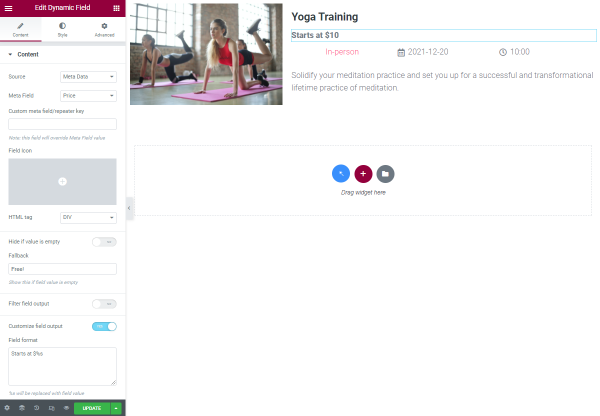
Currently, we will delete the “Edit Post” Dynamic Link button. To meet our needs, we add the Dynamic Terms widget to pull out the event’s format, the Dynamic Field widget to display the date and time, price, and a summary of the event.
Don’t hesitate to add the widgets you need at the moment. The data will be pulled out automatically and show the required post information if you are using dynamic widgets.
We also set the Fallback for the ‘price’ field if the event is defined as free. Besides that, we have enabled the Customized Field Output to complete the Field format with the default value displayed before the price number.
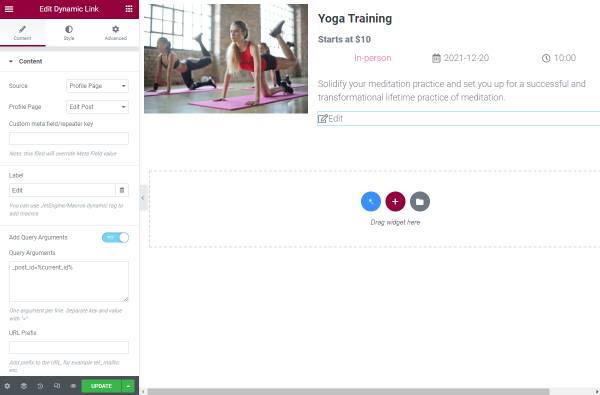
As we have deleted the “Edit Post” button, let’s add one more Dynamic Link. Begin with finding and selecting the “Profile Page” from the Source menu.
The Profile Page field should also be completed; this time, pick the “Edit Post” option.
Besides, don’t forget to change the Label.
The ‘_post_id’ is the same key we have entered during the form customization, and the ‘current_id’ is the macro that returns the current post ID.
Proceed to other settings and style up the listing according to your preferences.
Once everything is ready, don’t forget to update the listing item by pushing the same name button.
Return to the WordPress Dashboard > Templates> Saved Templates and open the “User Post” template editor.
Make certain that this template looks precisely like the rest of the templates you are working with.
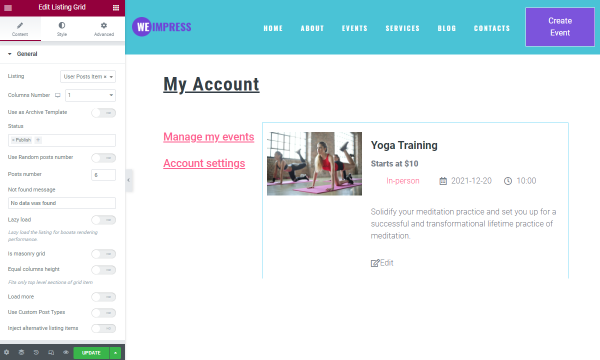
Though this time, instead of the form, we add the Listing Grid widget and pick the “User Posts Item” in the Listing field.
Then you can also change the Column Number and Posts number and work on the gaps in the Style tabs.
That’s it; push the “Update” button.
Proceed to your website and click on the button to open the form.

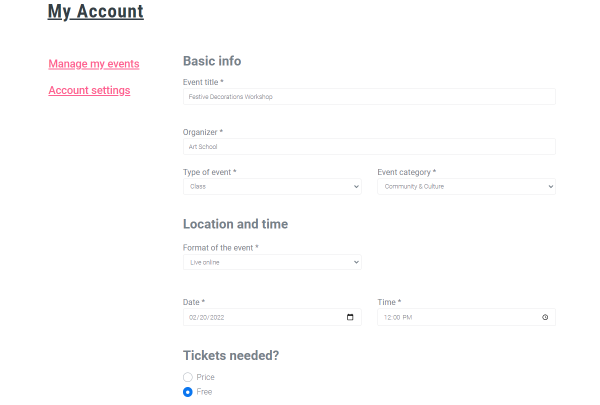
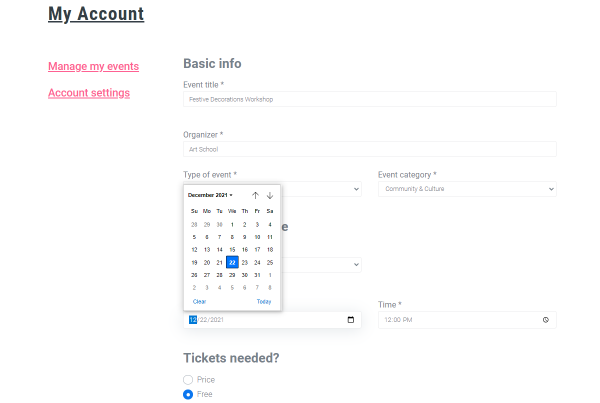
Now you can complete all the fields and submit a new event. Pay attention that we create an online event, so the location becomes hidden once we select the “Live online” option.
The same situation is with the price of the tickets. If we choose the “Price” option in the radio field, the “Enter min. price” field appears. And once the “Free” option is selected, there are no additional fields for completing.
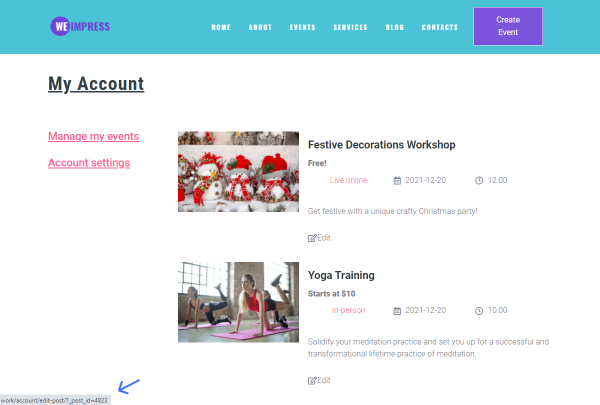
Once you push the button, the post becomes live. The redirection also works fine, as we are on the Account page now.
Let’s press the “Edit” button and work on the post we have created.
You may also notice a post URL at the bottom of your screen on hover. The post ID is displayed as a slug.
All the information is already completed in the editor as we used Presets. That’s why you don’t need to enter the data again; you can just change the desired fields.
So, as you can see, after the form submission, the information has been changed.

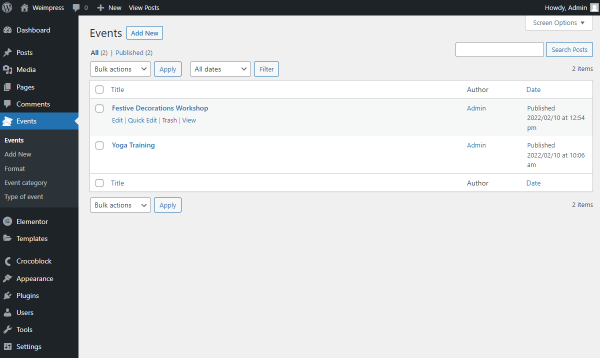
Now let’s check the entered information in the CPT you are currently working with. So, we head to the WordPress Dashboard > Events and open the editor of the post we have just added and edited.
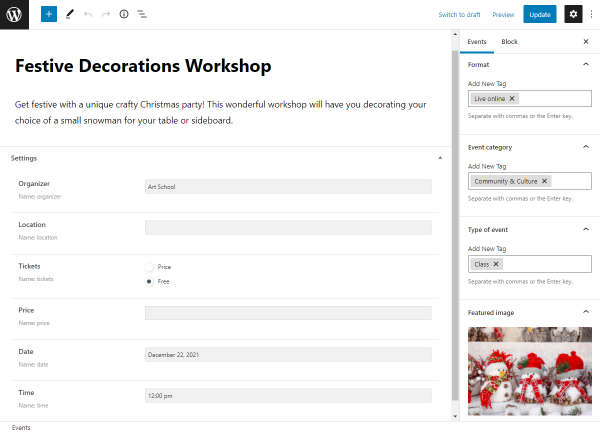
You can see that the fields are completed with up-to-date information. We nailed it; not only the meta fields are completed with data, but also the taxonomy tags, featured image, excerpt, and the content of the post.
That’s it; the form has been completely set, and now you know how to create a WordPress post submission and editing form.