To use the Map field block, install and activate the JetEngine (v3.0.3 or higher) plugin, enable its Map Listing Module, and set the Maps Settings options (i.e., select the “Google Maps” option from the Map Provider drop-down menu and paste an API Key).
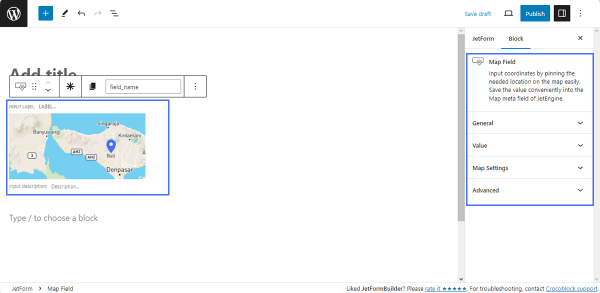
This field block has the following groups of settings: General, Value, Map Settings, and Advanced.
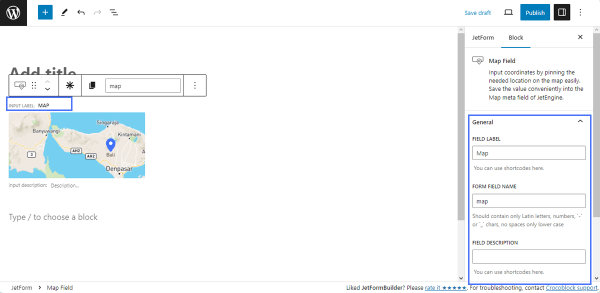
The General settings include the FIELD LABEL, FORM FIELD NAME, and FIELD DESCRIPTION fields. The FIELD LABEL and FIELD DESCRIPTION fields allow the usage of shortcodes.
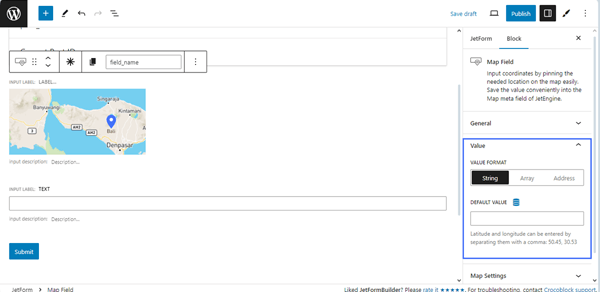
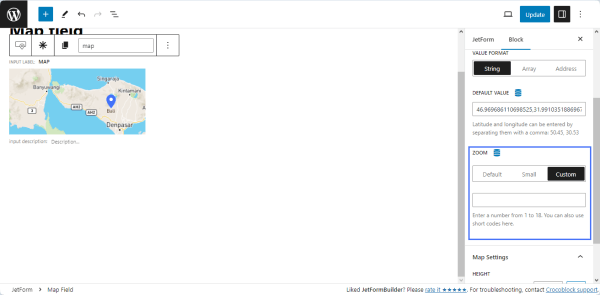
The Value settings allow specifying the location center using coordinates and setting the map zoom. Use the VALUE FORMAT field is intended to choose how to store the location by clicking the appropriate button (“String,” “Array,” or “Address”) and enter the latitude and longitude coordinates in the DEFAULT VALUE field:
String – the coordinates will be stored as a string with location latitude and longitude separated by a comma. For example: 46.969686110698525,31.991035188696703;
Array – the location will be stored as an array of latitude and longitude. Example: {“lat”:46.969686110698525,”lng”:31.991035188696703};
Address – the coordinates will have the format of a physical address, like this: 6 Walnut Road, Manchester SW1A 1AA, UK.
NOTE
While the location can be stored in three different formats, manual input in the DEFAULT VALUE field is available only in the String format, i.e., 50.45,30.53. This format works regardless of the options set in the VALUE FORMAT field.
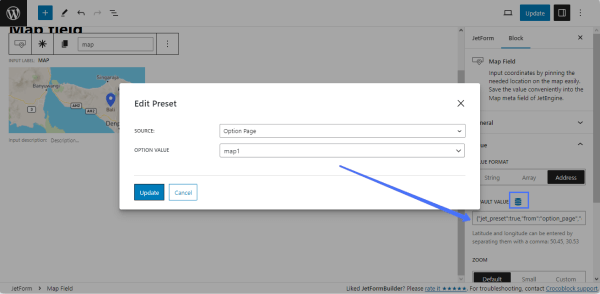
The DEFAULT VALUE field allows usage of the dynamical data by pressing the Dynamic Tag sign. It opens the Edit Preset pop-up for selecting a data source from options like “Post,” “User,” “URL Query Variable,” and “Option Page.” The preset can be a Map field type created with JetEngine or a text field (the Text, Select, or Radio fields) with coordinates in the String format (46.96,31.99).
The ZOOM field of the Value settings has three buttons to set the Default, Small, and Custom zoom. Clicking the “Custom” button enables a field to type a zoom value ranging from 1 to 18.
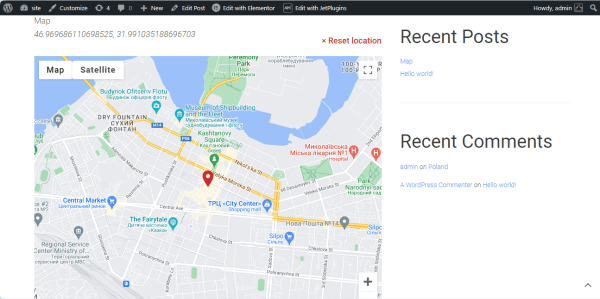
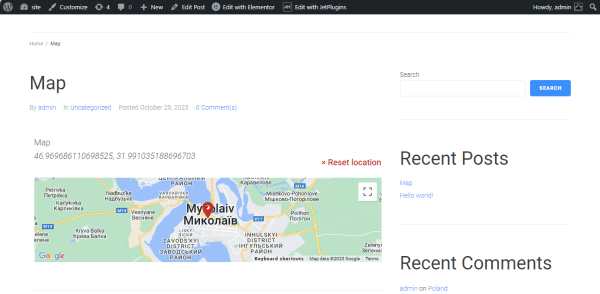
The Map field block on the front end looks as follows:
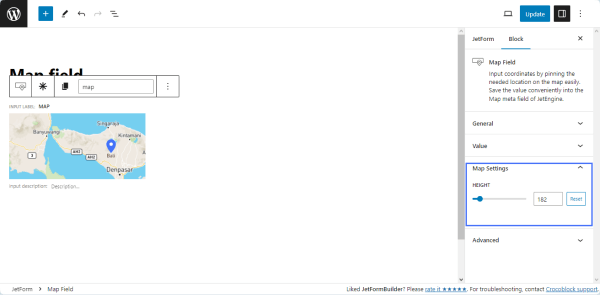
The Map Settings has the HEIGHT slider to set the map dimensions. The map height can be adjusted between 50 and 1000 pixels. Pressing the “Reset” button sets a 300-pixel height.
Setting a small map height doesn’t impact the map width on the front end.
JetPopup plugin installed and activated (optional, compatible with Elementor only).
After the successful subscription payment in PayPal with the JetFormBuilder form, a user gets the content during the paid period. However, when the subscription expires, the user still will have access to the content. The easiest way to avoid it is to apply Dynamic Visibility rules to the content according to the user role condition and fine-tune the logic with the action events.
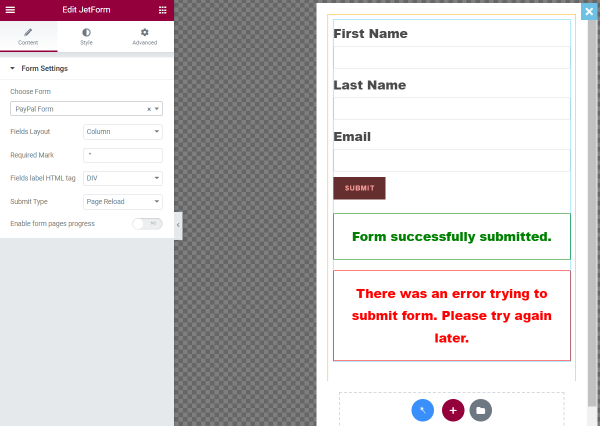
Proceed to the JetFormBuilder > Formstab on the WordPress Dashboard and click to edit the form that you have customized for the recurring PayPal payments.
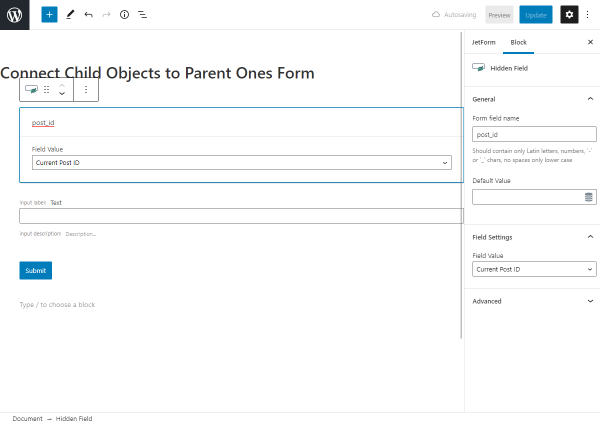
Add the Hidden Fieldto the form and select the “Current User ID” option as the Field Value.
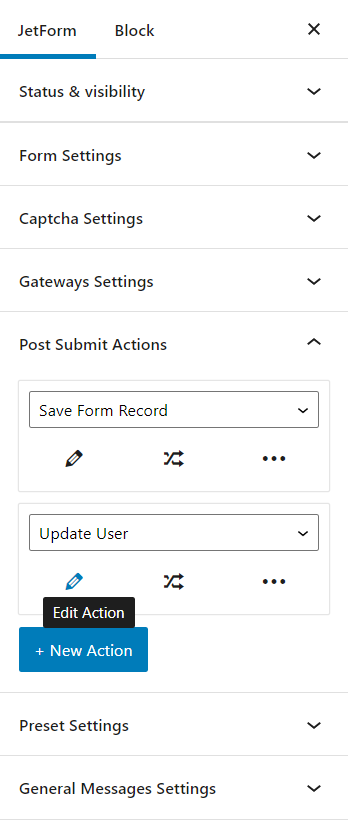
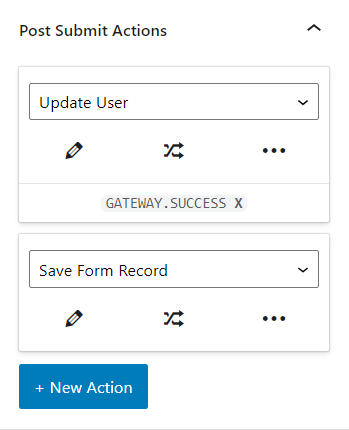
Head to the Post Submit Actions tab in the JetForm section and push the “+ New Action” button. Select the “Update User” option in the drop-down menu, and hit the pencil-shaped button.
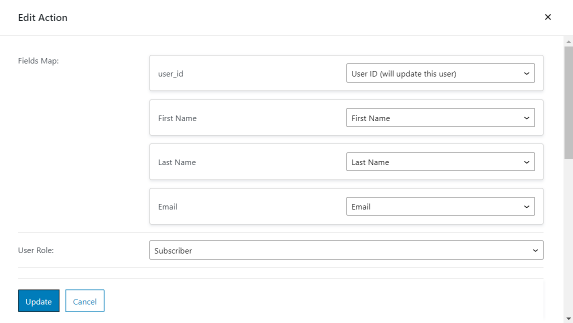
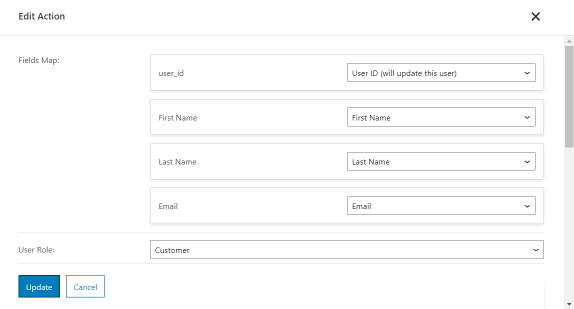
For the Hidden Field with the “Current User ID” value (named as the user_id in our case), select the “User ID (will update this user)” option in the Fields Map. Set other fields so that they’re assigned to the appropriate user fields.
In the User Role,we select the “Subscriber” option so that all users with the Customer role who submit the form and buy the subscription also upgrade their role to Subscriber.
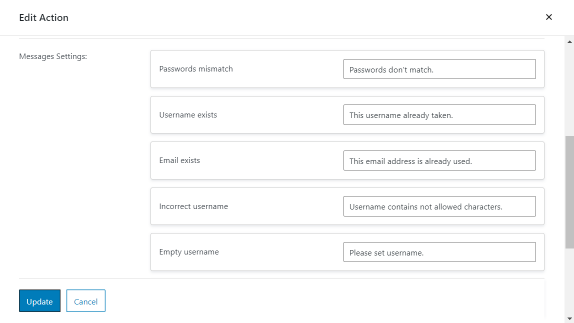
You can also pay attention to the Messages Settings and change the text that appears when users submit the form.
After you finish customizing the action, don’t forget to press the “Update” button.
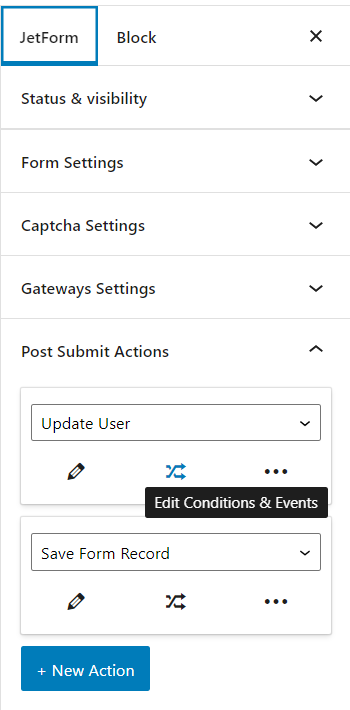
Push the “Edit Conditions & Events” button under the “Update User” action.
Move to the Events match tab and select the GATEWAY.SUCCESS event. With this event, the action will be executed only after a user passes the checkout page on the side of the payment system. So the user will change the status to the subscriber after the successful payment.
Press the “Update” button. The event in the submit action will look like that:
To change the user role back to customer when the subscription expired, add another the “Update User” action. The Field Map settings are the same as in the previous action, but set the “Customer” User Role and hit the “Update” button.
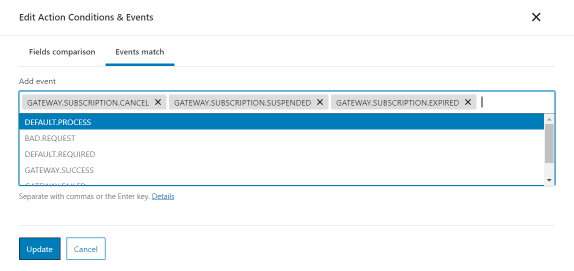
Push the “Edit Conditions & Events” button under the newly created “Update User” action, move to the Events match tab and select the GATEWAY.SUBSCRIPTION.CANCEL, GATEWAY.SUBSCRIPTION.EXPIRED, and GATEWAY.SUBSCRIPTION.SUSPENDEDevents. Press the “Update” button.
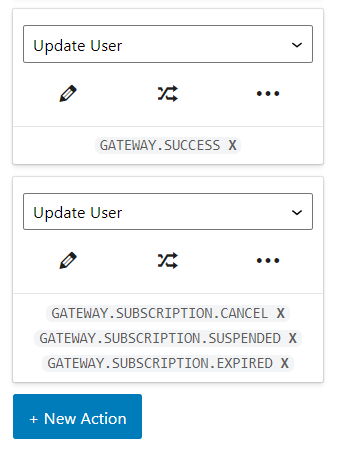
At the end, two “Update User” submit actions will look like that:
Finally, click the “Update” button to update the form settings.
Step 2. Set the page with content
How to set the page with the Elementor editor
Set a pop-up (optional)
You can place the form right on the page or can set a pop-up with it. If you have the JetPopup plugin installed and activated, proceed to the JetPopup > Create New Popuptab, enter the title, and hit the “Publish,” and then “Edit with Elementor” buttons.
Drag-n-drop the JetForm widget to the pop-up and select the recently updated form. When you finish, press the “Update” button.
Set Dynamic Visibility
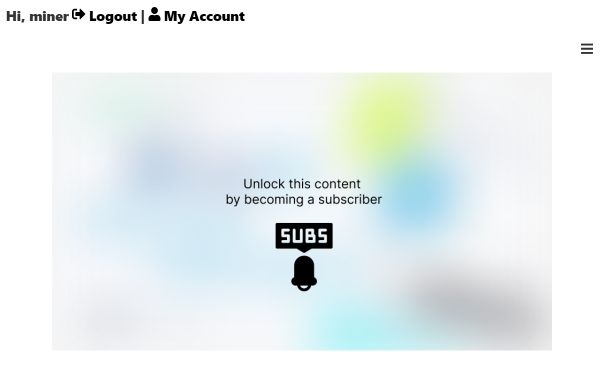
Proceed to the page with the content that you want to show only to subscribers.
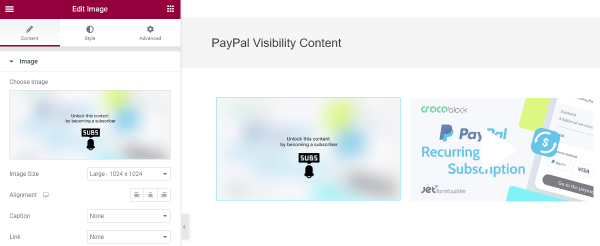
Place a new section with two columns in the editor. In the first column, add some Image or Button widget that will show the message that the content is locked and users have to subscribe to see it. In the second column, place the content (e.g., video, image) that will be shown to subscribers.
You can also place widgets above each other and align them in the center.
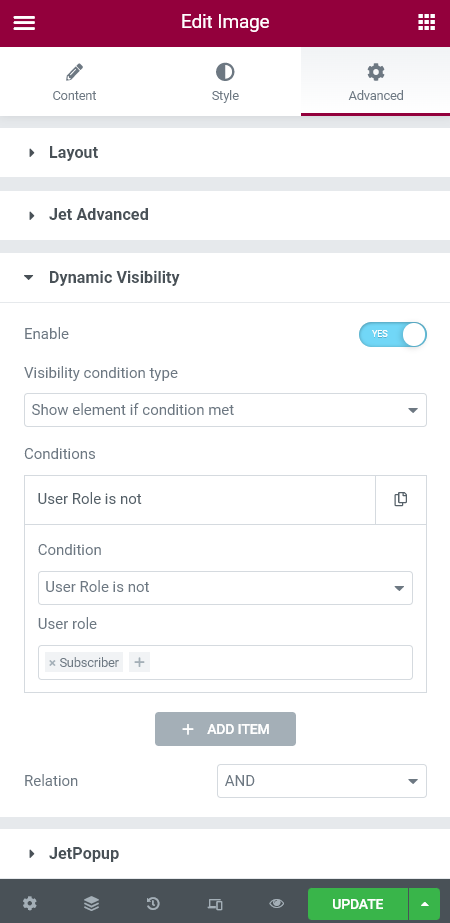
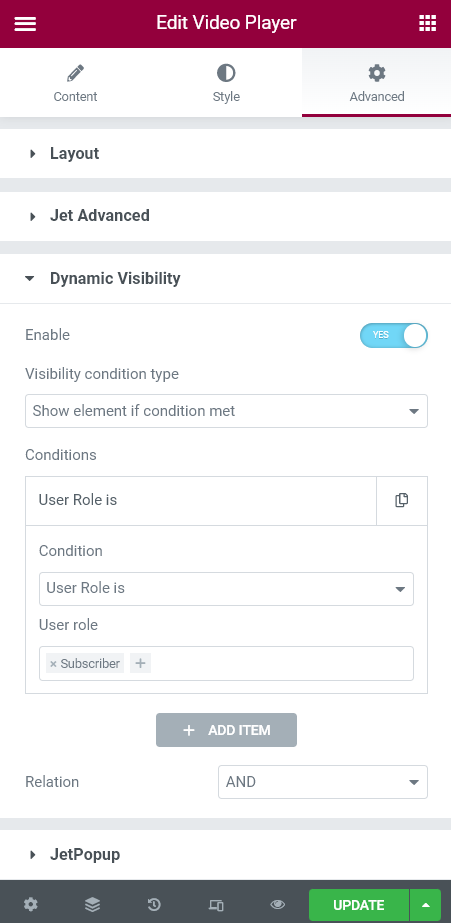
Click on the first column and navigate to the Advanced section. Go to the Dynamic Visibility tab, open it and enable the toggle.
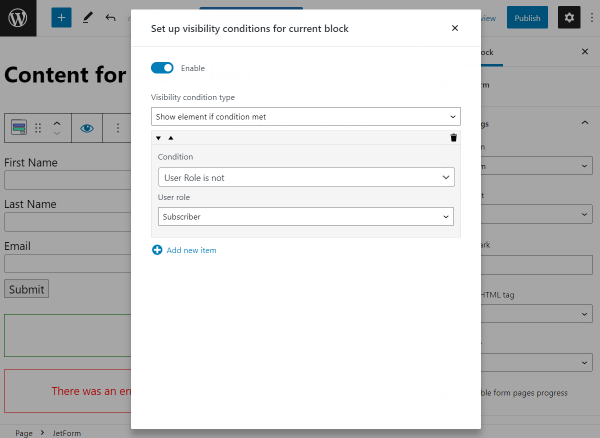
Select the “Show element if condition met” Visibility condition type, “User Role is not” Condition and “Subscriber” User role.
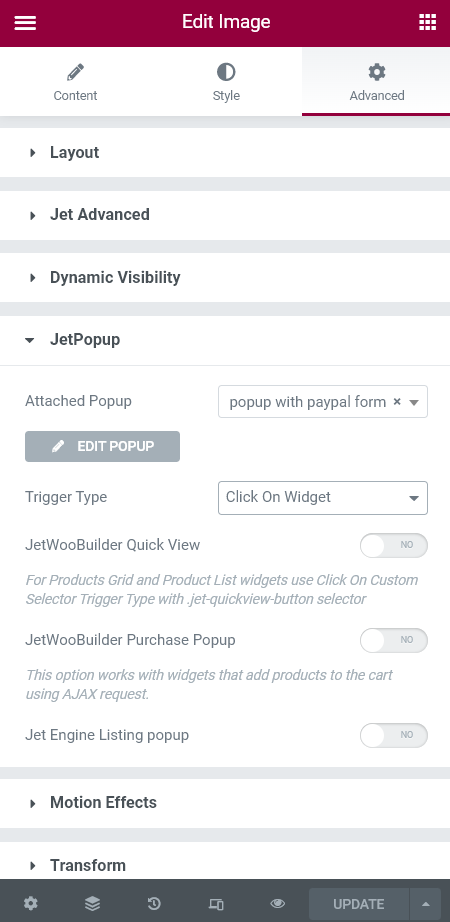
Move to the JetPopup tab on the same widget and attach the recently created pop-up. Select the Trigger Type you need. For example, if you want to attach the pop-up to the Button widget, select the “Click on Button” option. We’re good with the “Click on Widget” type.
If you haven’t created a pop-up, you can place the JetForm widget in the column and apply the Dynamic Visibility condition to it.
Click on the second column and proceed to the Advanced section. Go to the Dynamic Visibility tab, open it and enable the toggle for the second time.
Select the “Show element if condition met” Visibility condition type, “User Role is” Condition and “Subscriber” User role.It may seem that the conditions for the two columns are the same, but be attentive.
At the end of customizing, hit the “Publish/Update” button.
How to set the page content with Dynamic Visibility in the WordPress block editor
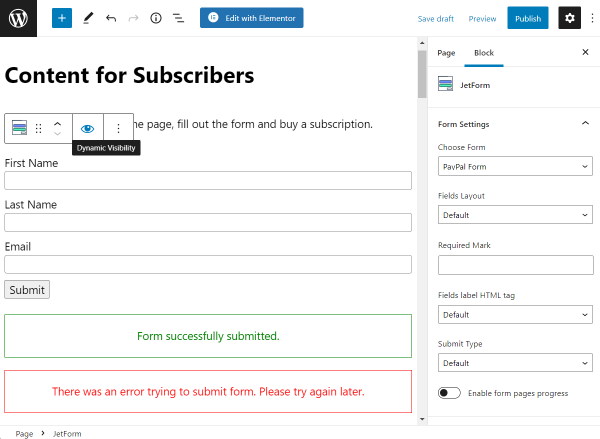
Create a new page or click to edit the existed one. We place the JetForm block on the page and select the form for the PayPal payments. If we click on the form, we will see the Dynamic Visibilityicon.
Click on the icon and enable the toggle. Leave the “Show element if condition met” Visibility condition type, hit the “Add new item” button, and select the“User Role is not” Condition and “Subscriber” User role.
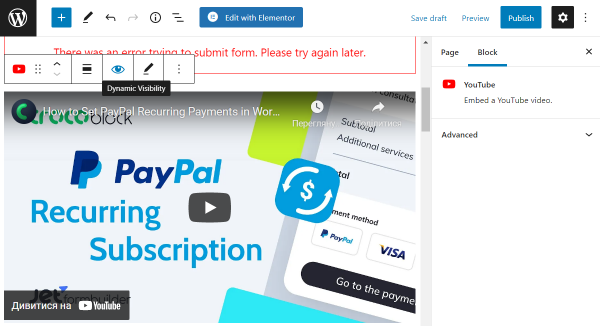
Close the pop-up and proceed to the content for subscribers (to the Video or Image block, for example).
Press on the “Dynamic Visibility” icon and enable the toggle. Leave the “Show element if condition met” Visibility condition type, hit the “Add new item” button, and select the“User Role is” Condition and “Subscriber” User role. It may seem that the conditions for the form and content are the same, but be attentive.
When you finish customizing the page, push the “Publish/Update” button.
Condition is set so a user can see form or content on the page, according to the user role.
Step 3. Check the Results
NOTE
Be aware of logging into the second account with the customer role to test the form. If you submit the form from the main account, your administrator role can be changed to the subscriber.
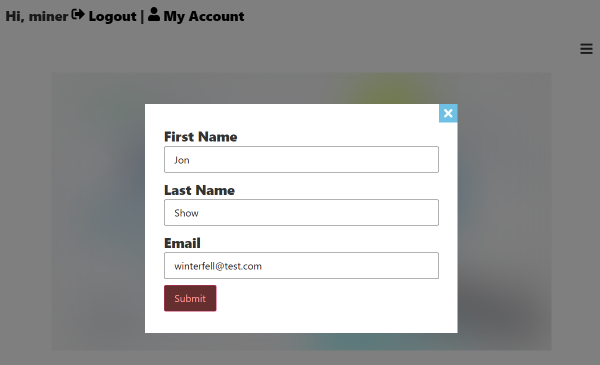
Open the page with the form and content on the front end. Since the user role on our current account is the customer, we can see only the image with the pop-up yet.
We click on the image, fill out the form in the pop-up, and hit the “Submit” button.
Log in to the PayPal account and buy a subscription. After that, you will return to the page where the Dynamic Visibility will show the paid content. That means that the user role was successfully changed.
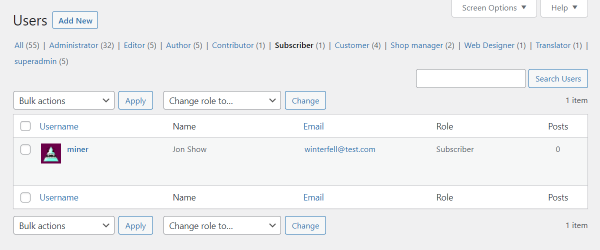
To ensure that the role was changed, we log into the administrator account and move to the Users tab on the WordPress Dashboard.
As we can see, the user truly gets the subscriber role after the PayPal payment.
That’s all. Now you know how to set the logic so that the user role changes after a successful subscription payment in PayPal with the JetFormBuilder plugin and the JetEngine Dynamic Visibility to show content only to subscribers.
Created relations. We have a dedicated tutorial about doing this on the example of CPT posts.
The JetEngine’srelations feature allows you to connect, create, and edit related items just on the editing page of posts, CCT items, users, and taxonomies.
But if you want to connect related items on the front end, you can do this via the form with the help of the JetFormBuilder plugin and the Gutenberg block editor.
Connect Child Objects to Parent Ones
Go to JetFormBuilder > Add New. Give the new form a title and leave the default settings of the Hidden Fieldblock.
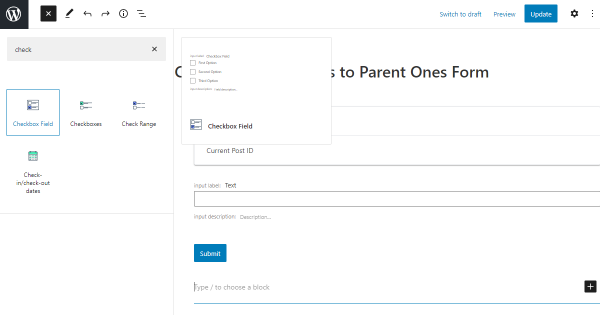
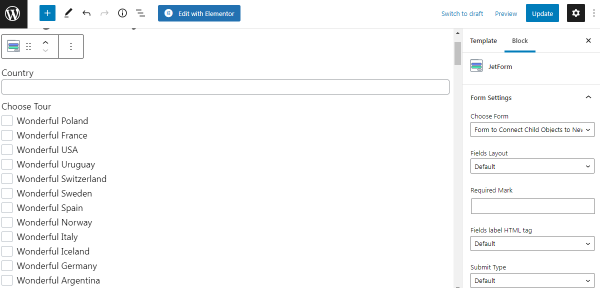
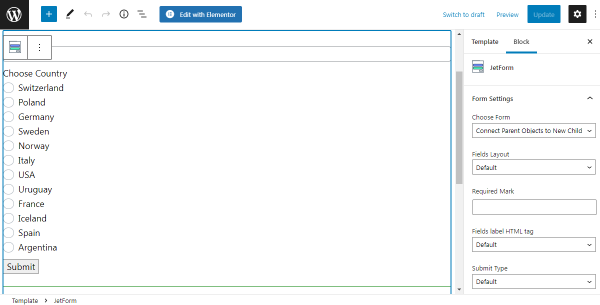
Click on the Toggle block inserter button and place the Select, Radio, or Checkbox fields to display the child items in the form. Be informed that the Radio and Select allow choosing one option and it suits the “One to Many” relation type, and the Checkbox allows selecting one and more options and it matches the “Many to Many” relation type, so we decided to drag-and-drop such Checkbox Field block to our form.
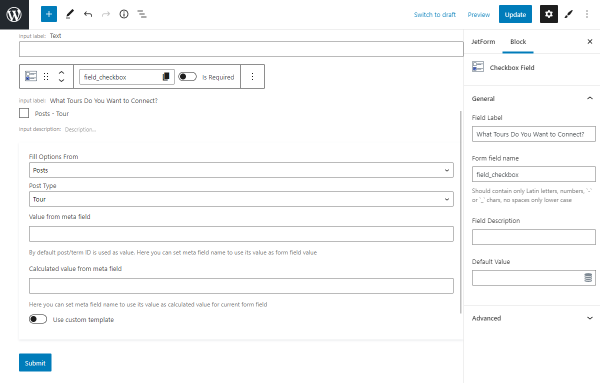
Select the “Posts” as the source in the Fill Options From field and define the needed Post Type. As we want to choose the related children for the relationship “Country > Tours,” we have selected the “Tour” Post Type.
In the Block General settings, type the Field Label and change the Form field name.
NOTE
Be aware that all field names inside one form must be unique, and field names must contain a value with only lowercase letters in Latin, no spaces. If you want to split words, this can be done by using the “-” and “_” characters.
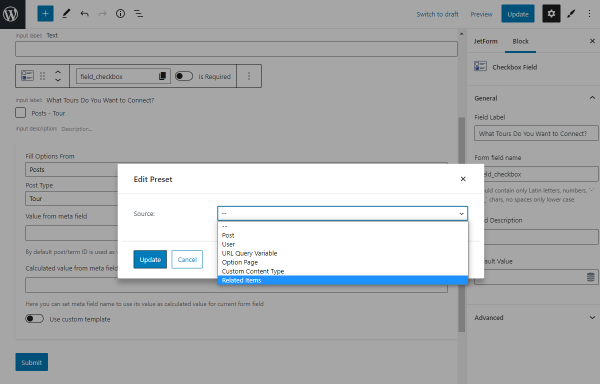
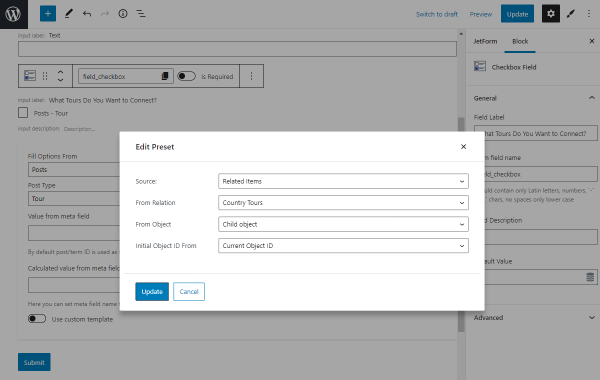
Press the “Dynamic tags” button in the Default Value field to open the pop-up.
Pick the “Related Items” option in the Source field.
After that, you get the new additional settings:
From Relation. Define the relationship you want to use as the source;
From Object. Specify if you want to display children (Child object option) or parent (Parent object option) items;
Initial Object ID From. Indicate where the query will get the object ID from to display its related items in the form:
Current Object ID. Shows the related items of the current post, of the current active listing item, and so on;
Current User ID. Shows the related items of the currently logged-in user;
Queried User ID. Shows the related items of the selected user, e.g., on the User Page in the Profile Builder;
Query Variable. Shows the related items from the global request or WordPress request variables. If you select this option, the fourth Variable Name will appear;
Current Object Variable. Shows the related items from the object defined as current by JetEngine. If you select this option, the fourth Variable Name will appear;
Default WordPress Object (for current page). Always shows the related items of a current global object for the current page defined by WordPress, as opposed to the “From Relation” option.
Variable Name. This field appears if you select the “Query Variable” or “Current Object Variable” options. This option allows setting the variable’s name, which the plugin will search for in the query or current object.
In this case, we have picked the “Current Object ID” option in the Initial Object ID From field because we want to display the Tours child posts in the form on the Country parent post.
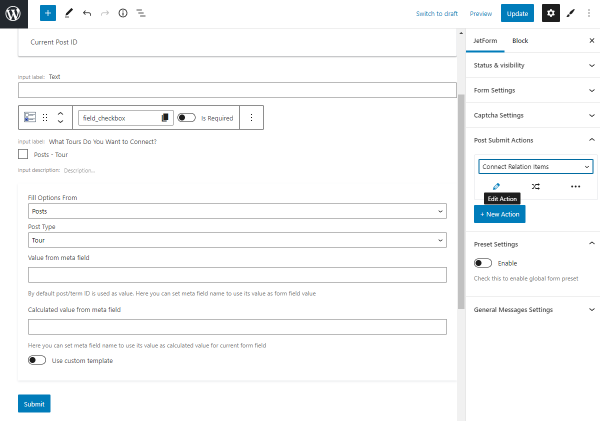
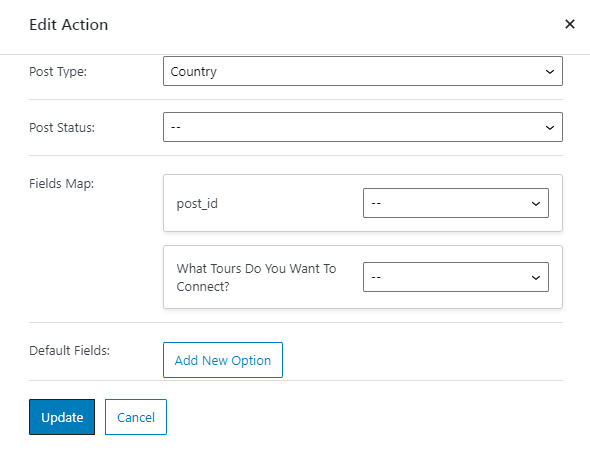
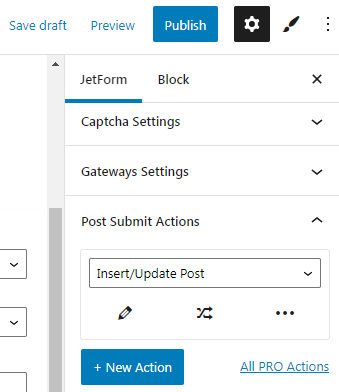
Press the “Update” button and move to the JetForm settings and the Post Submit Actions tab. Select the “Connect Relation Items” option and click on the pencil-shaped icon to edit the action.
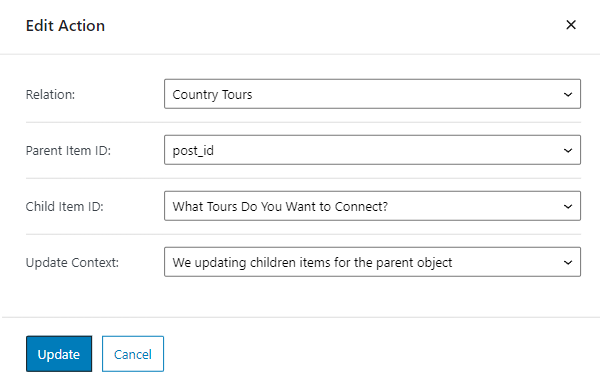
In the new pop-up window, select the needed Relation. Pick the name of the Hidden Field (with the default “Current Post ID” option) as the Parent Item ID. As the Child Item ID, select the label of the created field for the related items (the Checkbox in our case). Since it’s needed to display the children objects in the form, choose the “We updating children items for the parent object” option in the Update Context field.
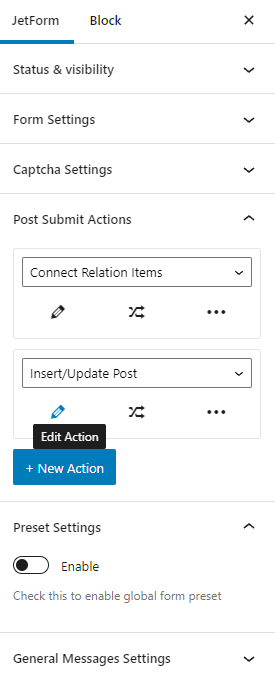
Push the “Update” button to save this action and click on the “+ New Action” button to create a new one. Select the “Insert/Update Post” option and hit the pencil-shaped icon under this action.
Select the parent post type that you want to update via the form in the Post Type field.
Select the needed Post Status or leave it empty. Also, leave the default Fields Map values.
NOTE
Be aware that if you fill the Fields Map, the new related items replace the old ones instead of just being added to them.
Hit the “Update” button and publish or updatethe form to save the changes when you finish editing fields and actions.
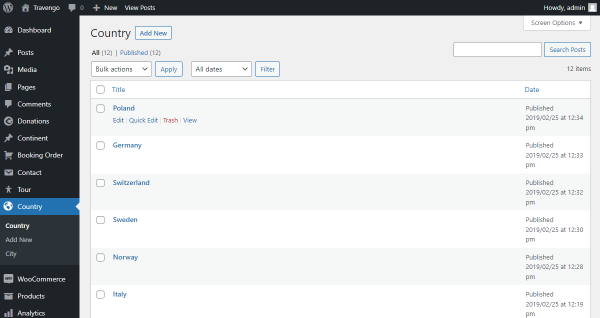
To place the form on the parent object, proceed to the parent Post Type on the WordPress Dashboardand Edit the needed post.
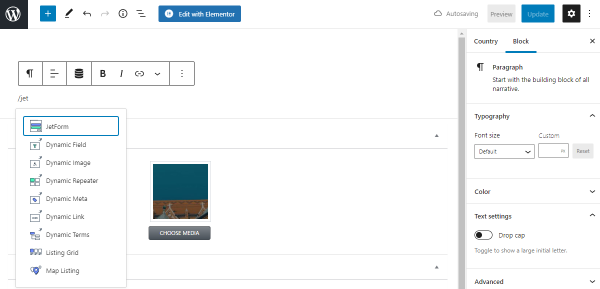
Place the JetForm block in the post.
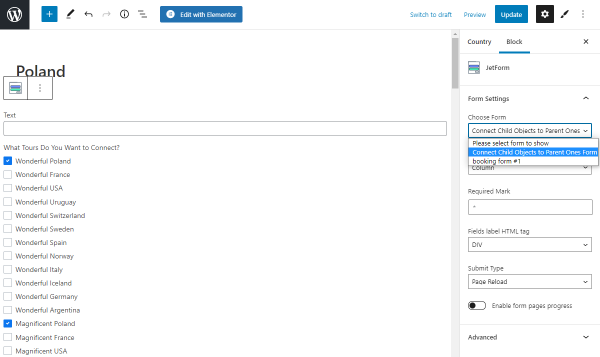
Choose the needed Form to display in the Form Settings and push the “Update” button.
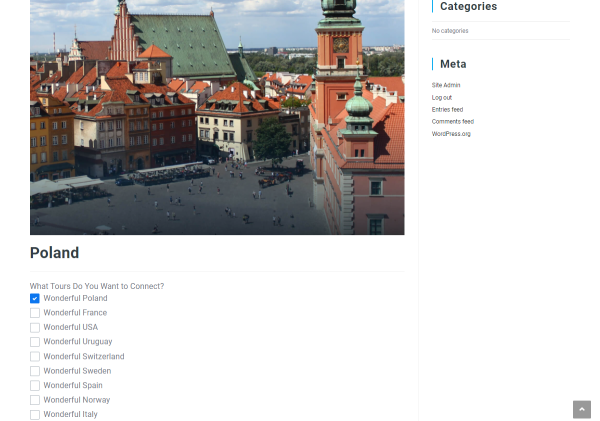
To reach the post on the front end, return to the post type and click on the “View” button of the parent post.
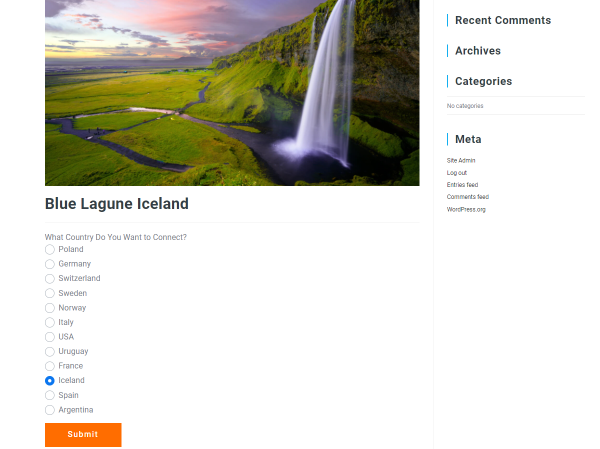
The form is now displayed in the post. Since we have added the Checkboxes field as the selector for the posts, you can select as many posts as you need. When you finish, press the “Submit” button.
NOTE
If some child posts are already related to the parent post, they will be ticked in the form placed on the parent post page. So, if you untick them, they will be disconnected from the parent post.
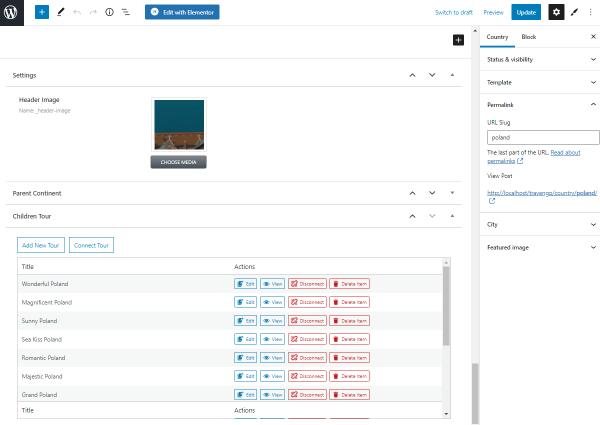
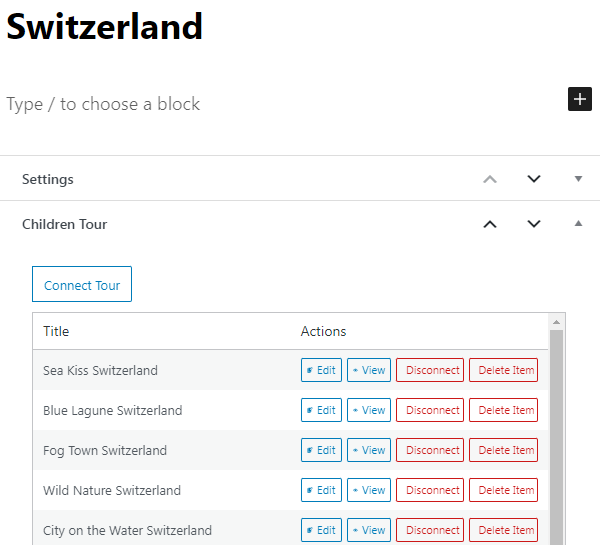
Return to the parent post editing page and scroll down to the Children tab. The options you have checked in the form will be added to the related posts list.
Now you can add the form to all desired parent posts.
Connect Child Objects to New Parent Post
Now let’s find out how to build a form that will make a new parent post and connect child objects to it.
Go to JetFormBuilder > Add New. Give the new form a title and delete the Hidden Field.
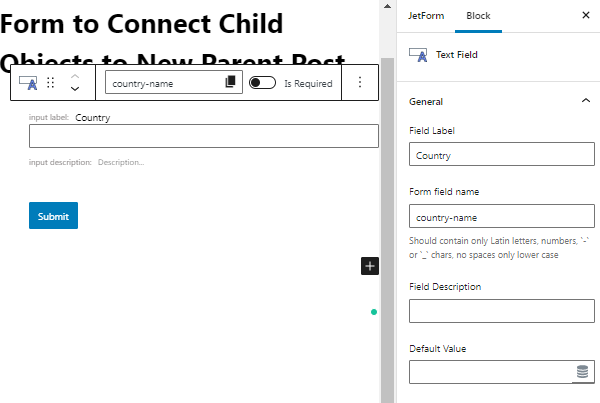
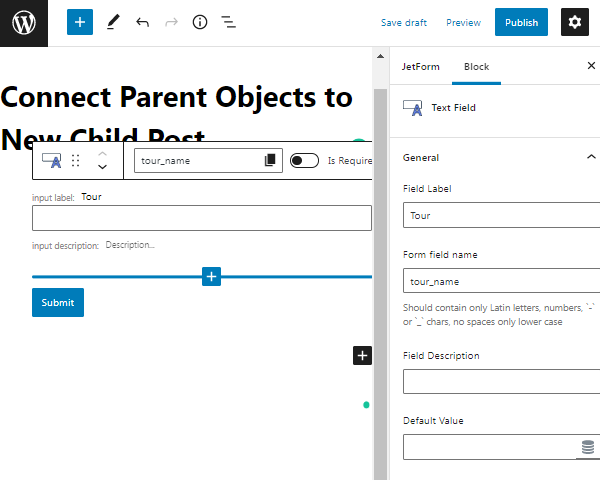
Click to edit the Text Field, it will befor the parent object name. Fill in the needed fields and remember to fill in the Name field appropriately, separate words with the “-” and “_” symbols, and use only lowercase Latin letters.
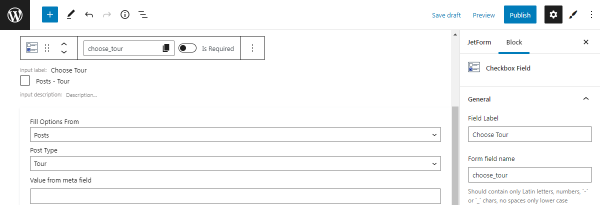
The following field will serve as a selector for child items, so we add a Checkbox Field. During the field adjusting, focus on the Fill Options From and Post Type fields. Here you should select the correct source, the child post type.
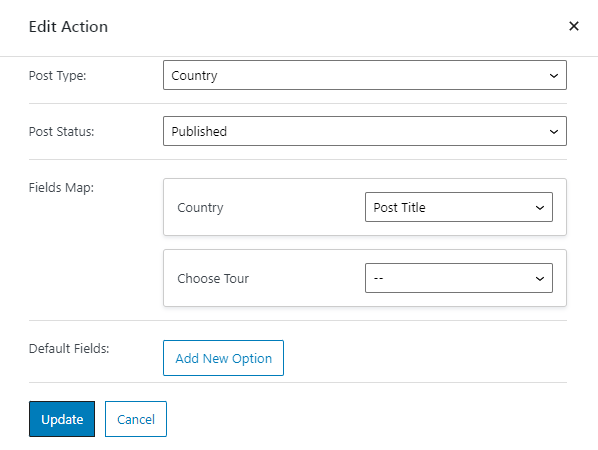
Moving to the Post-submit Actions tab, select the “Insert/Update Post” option and click on the pencil-shaped icon to edit the action.
In the appeared pop-up define the parent post type as the Post Type. Set the Post Status to “Published” and head to the Fields Map.
The displayed fields refer to those fields you have added to the form. The Text Field of yours should be connected to the “Post Title” and the following Checkbox Field left with the default option.
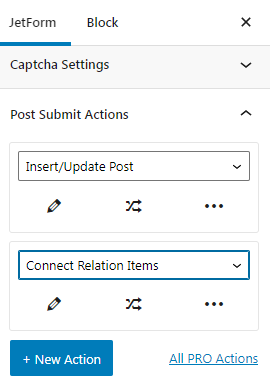
Hit the “Update” button to save the result, and let’s add one more action by pressing the “+ New Action” button.
This time we select the “Connect Relation Items” post submit action.
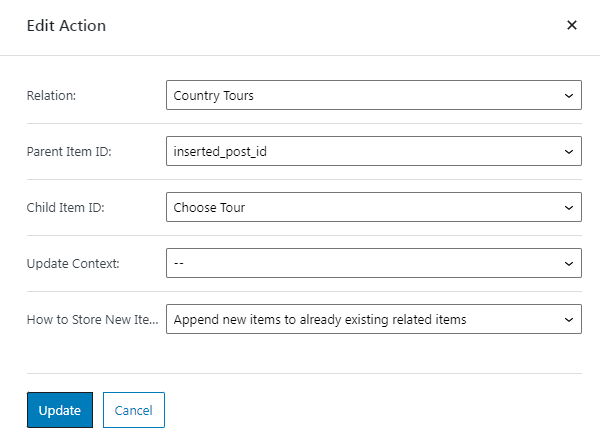
Set the needed Relation, choose the “inserted-post-id” option as the Parent Item ID, choose the name of the Checkbox Field as the Child Item ID, and leave the Update Context field empty. In the How to Store the New Item field, you can select the most appropriate choice for you. When you finish, press the “Update” button.
Feel free to add as many additional fields, as you need, for instance, the Media Field to add a picture to a new post.
The final step here is to save the form, so push the “Publish” or “Update” button and head to the page where the form will be located.
Place a JetForm block on the editing page, and fill in the Choose Form field with the form’s name.
Set up the fields and form styles, and press the “Update/Publish” button to save the page.
Check the front-end result. You can fill in the form with a title and relate some items to it. Finally, press the “Submit” button.
Head to the parent post type (“Country”, in our case) and search for the newly created post. Open it in the editor by pressing the “Edit” button next to the post title and check the attached children posts.
Connect Parent Objects to Child Ones
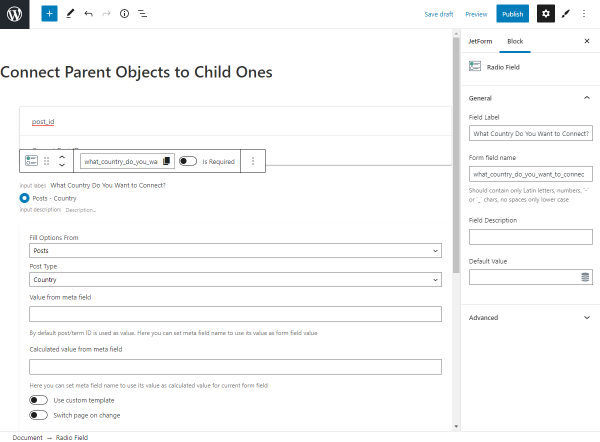
Navigate to the WordPress Dashboard > JetFormBuilder > Add New. Give a title to the form. Leave the default Hidden Field block settings and create the field for the parent object items list.
For example, we have added the Radio Field block to have the ability to pick only one option in the form.
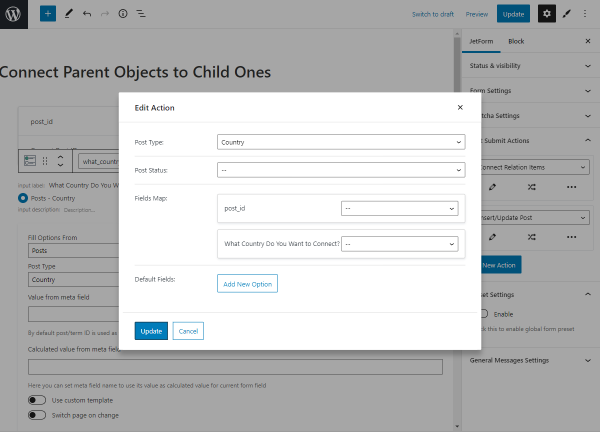
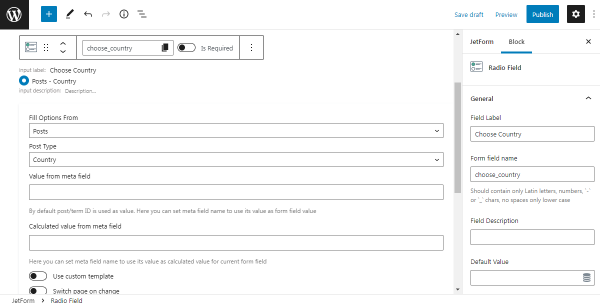
Select the “Posts” as the source in the Fill Options From field and define the needed Post Type. As we want to select the related parent for the relationship “Country > Tours,” we have chosen the “Country” Post Type.
In the Block General settings, type the Field Label and change the Form field name.
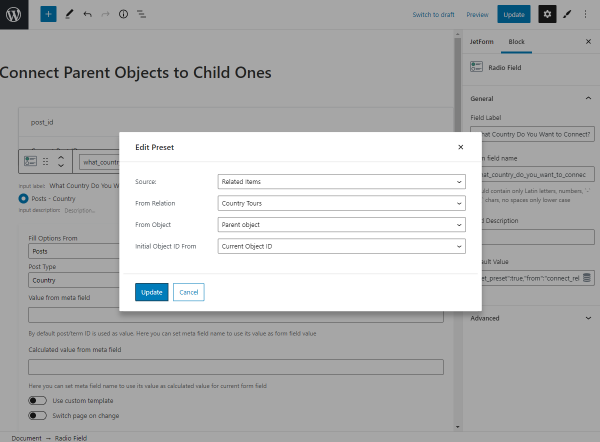
Press the “Dynamic tags” button in the Default Value field to open the pop-up.
Preset in this form has the same settings and options as in the previous form, but in this case, you need to select the “Parent object” option in the From Object field and click on the “Update” button.
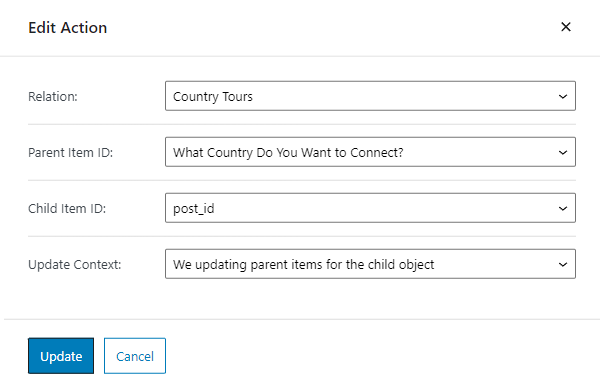
Move to the JetForm settings and the Post Submit Actions tab. Select the “Connect Relation Items” option and click on the pencil-shaped icon to edit the action.
In the new pop-up window, select the needed Relation. As the Parent Item ID, choose the label of the created field for the related items (the Radio Field in our case). Pick the name of the Hidden Field (with the default “Current Post ID” option) as the Child Item ID. Since it’s needed to display the parent object in the form, choose the “We updating parent items for the child object” option in the Update Context field.
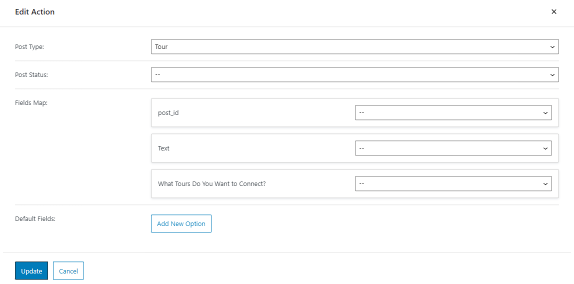
Push the “Update” button to save this action and click on the “+ New Action” button to create a new one. Select the “Insert/Update Post” option and hit the pencil-shaped icon under this action.
Select only the Post Type of the parent items in the new pop-up and nothing more. Otherwise, the new related items replace the old ones instead of just being added to them.
Hit the “Update” button and publish or updatethe form to save the changes when you finish editing fields and actions.
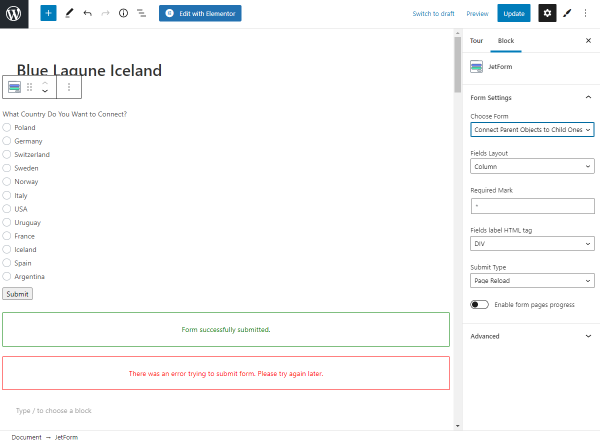
To place the form on the child object, proceed to the child Post Type on the WordPress Dashboard, click to edit the needed post, and put the JetForm block in the post. Choose the needed Form to display in the Form Settings and push the “Update” button.
To reach the post on the front end, return to the post type and click on the “View” button of the child post.
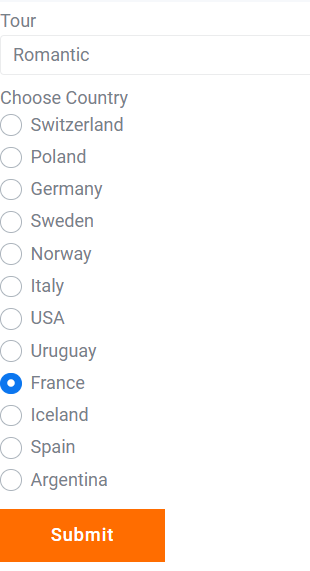
The form is now displayed in the post. Select the needed parent object and press the “Submit” button.
Connect Parent Objects to New Child Post
You can also build a form that will add a new child post and connect it to the parent at once.
Navigate to the WordPress Dashboard > JetFormBuilder > Add New.
Now you can delete all the Hidden and Text fields to avoid getting confused during editing.
We start with adding a Text Field for a new post name. Feel free to adjust this field as desired. Remember that the Name field shouldn’t include capital letters, spaces, and other special characters.
The following field is for choosing a parent, so we select Radio Field to let users pick one option.
Select the “Posts” as the source in the Fill Options From field and define the needed Post Type. As we want to select the related parent for the relationship “Country > Tours,” we chose the “Country” Post Type.
In the Block General settings, type the Field Label and Form field name.
Move to the JetForm settings and the Post Submit Actions tab. Select the “Insert/Update Post” option and click on the pencil-shaped icon to edit the action.
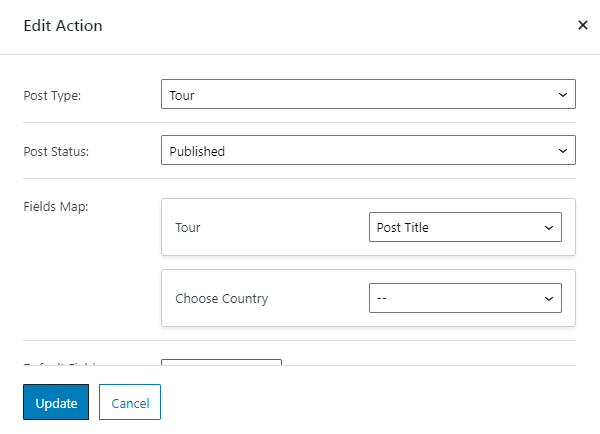
Pick the child post type in the Post Type menu and select the “Published” Post Status.
In the Fields Map, we define the ‘tour-name’ Text Field as a “Post Title” and leave the default “Select post property” in the ‘choose-country’ field.
Click on the “Update” button to save the result.
Click on the “+ New Action” button to add a new one. Select the “Connect Relation Items” option and hit the pencil-shaped icon under this action.
Set the needed Relation, select the name of the Radio Field as the Parent Item ID, choose the “inserted-post-id” option as the Child Item ID, and leave the Update Context field empty. In the How to Store the New Item field, you can select the most appropriate choice for you. When you finish, press the “Update” button.
Feel free to add as many additional fields, as you need, for instance, the Media Field to add a picture to a new post.
The form is ready, so press the “Publish” or “Update” button.
Go to the page you want to place the form. For instance, it can be a standard WordPress page.
Place the JetForm block onto the page editor, and pick a new form name in the Choose Form field.
Work on the other fields if you wish. Ultimately, press the “Update/Publish” button and go to the front end to check the final result.
Now you can complete the form with the title and related parent. Click the “Submit” button to save the post and add a related item to it.
Let’s check if the new tour was added to the child post type. Head to the child post type and search for the new post. For instance, you can type in a post title in the search bar.
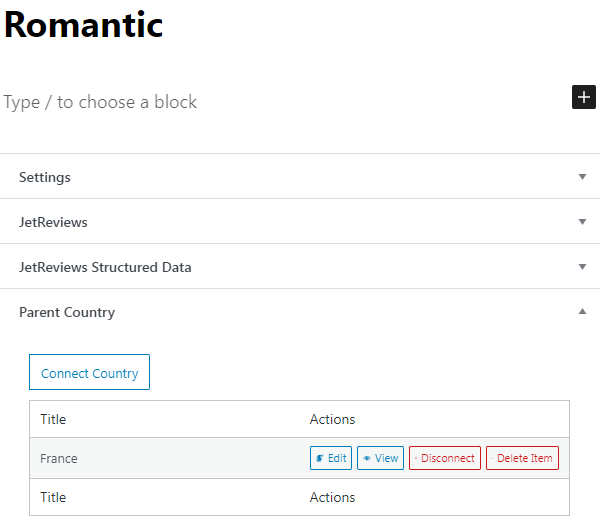
Once the post is opened, scroll down to the Related… tab. The parent post is now successfully connected.
That’s it. You know now how to connect the JetEngine relation items via the JetFormBuilder forms.
Referer URL is aJetFormBuilder feature that allows you to get a hidden field with the user’s address to the current page with the WordPress form, created via the Gutenberg block editor. This feature can help you to collect SEO statistics.
Proceed to JetFormBuilder > Forms and click on to “Edit” or “Add New” form, according to your needs.
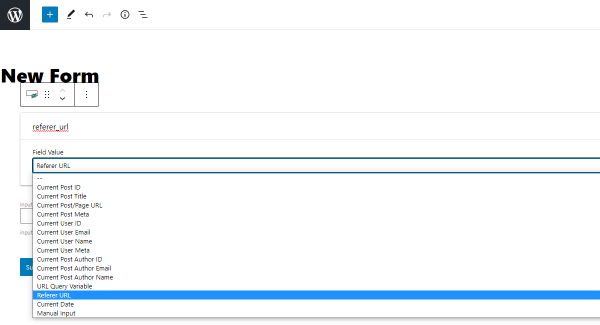
Open the Field Value drop-down menu in the Hidden Field block and select the Referer URL option.
Add the form to any post or page, if you haven’t done it yet, hit the “Publish” or “Update” button and proceed to the front end. You can do this by pushing the “View Post” or “View Page” buttons.
Submit the form and open the DevTools page. Here you can see the user’s referer URL.
That’s it. You know now how to get the user referer URL from the JetForm Hidden Field block.
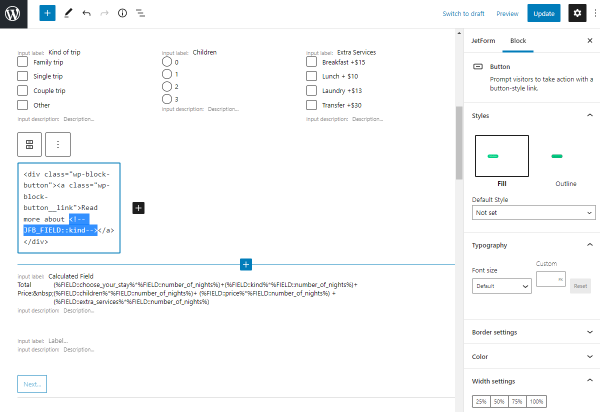
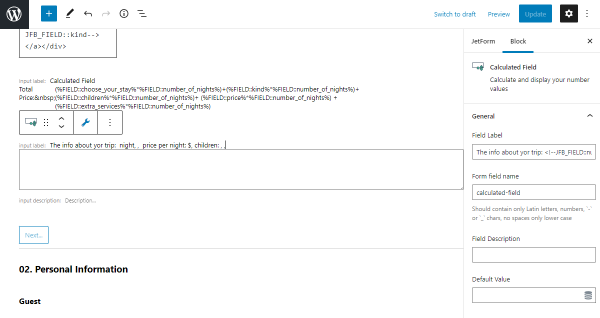
For instance, if you want to add the form macros to the Buttons block, it’s better to do it via the “Edit as HTML” button.
Paste the <!--JFB_FIELD::field_name--> macro into HTML before closing </a> tag. Change the field_name to the actual name of the field from where you want to get the value.
For example, we have entered the name of the checkbox field “kind,” where the user can check the kind of trip.
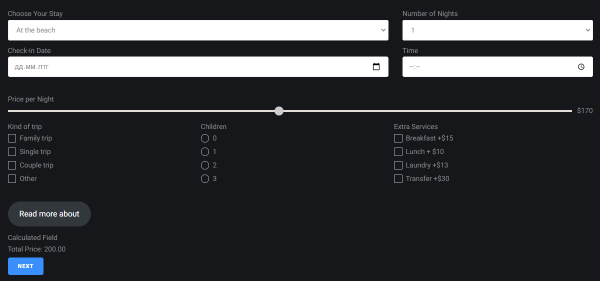
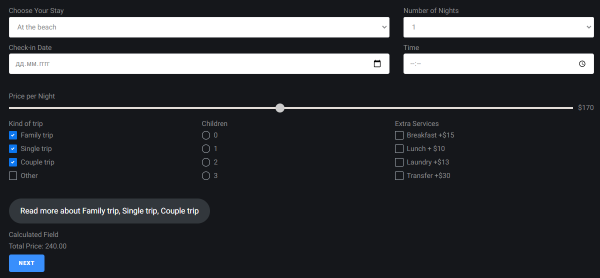
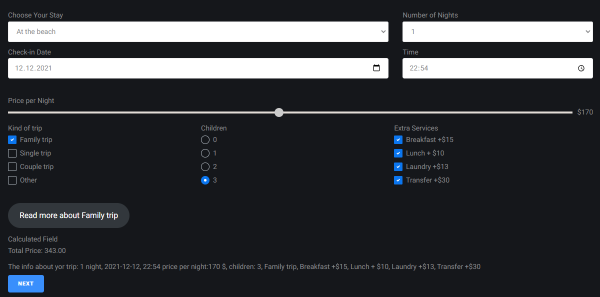
Proceeding to the front end, we can see the button in the form with the “Read more about” text.
If you check an option from the checkbox, it will be shown in the button. If you choose several options, they will be separated by commas. You can add the page link to the button with the information about all trips so that the users can find out about the needed trip.
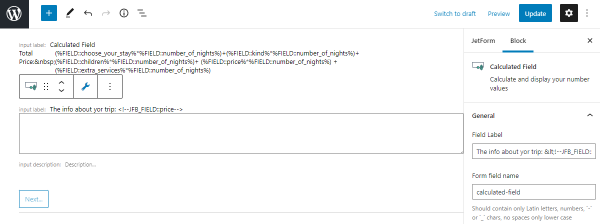
How to Add the Form Macros to the Label of the JetForm Fields
If you need to place form macros into the label or description of some JetForm fields, we do not recommend you add it via inline editing because the symbols will be transformed, and you’ll get the invalid macro on the front end.
So, it’s better to enter the form macro in the Field Label. Feel free to enter as many form macros with the field names as you need. You can also mix form macros with the plain text like that: price per night: <!--JFB_FIELD::price--> $. It will look on the front end like that: price per night: 170 $.
With these settings, users can see the values at the end of the form they have chosen. Such settings can also be applied to the multi-step form so that users can see all their choices at the last step before submitting the form.
Such a way also works with the Action Button block since it cannot be edited as HTML. We have added the macro of the Text Fieldin the Field Label of the Action Button.
When users enter the text into the Text Field, the same text is shown in the Action Button on the front end.
That’s it. You know now how to add value from the JetForm field by using the global form macros.
Integromat is a free platform that allows you to connect apps (e.g., Gmail) and automate workflows using a no-code visual builder. Let’s find out how to connect a WordPress form to Integromat.
Set Up Integromat and Add Webhook
Sign in or sign up to the Integromat platform. After getting to the My Lab page, go to the Scenarios tabin the left-side menu and click on the “Create a new scenario” button in the upper right corner.
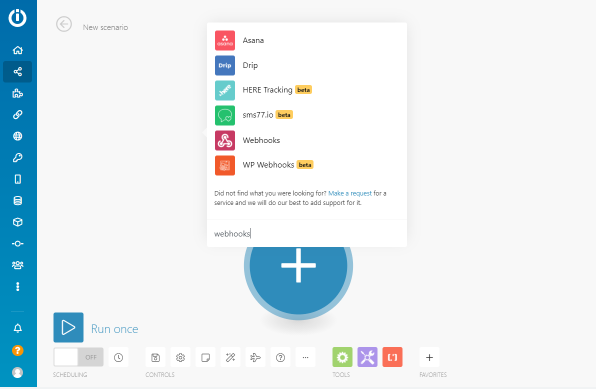
Hit the big plus button and choose the Webhooks module from the list of tools. A Webhook in web development is a method of augmenting or altering the behavior of a web page or web application with custom callbacks. More about the Custom Webhook you can find out in this Integromat tutorial.
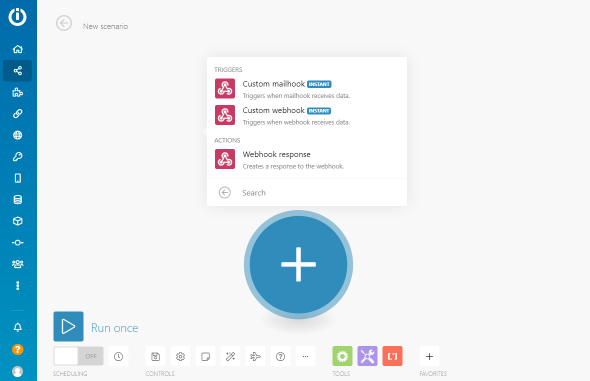
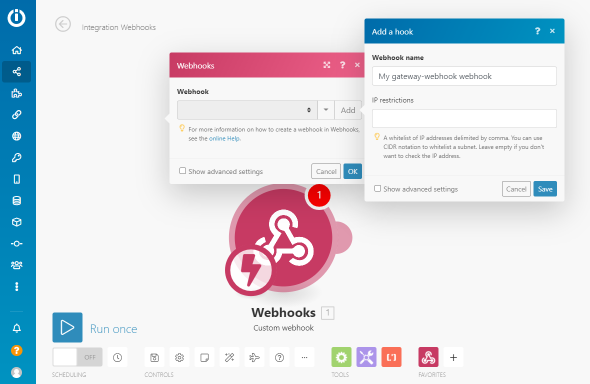
Then you’ll see the list of triggers and actions. You need to choose the Custom webhook option.
Click on the new Webhooks module. Hit the “Add” and “Save” buttons to enter the name for the Webhook.
After that, you will see the generated link, which you should copy to the clipboard. Then proceed to your WordPress website without closing the Integromat window.
Set Up the JetFormBuilder Form
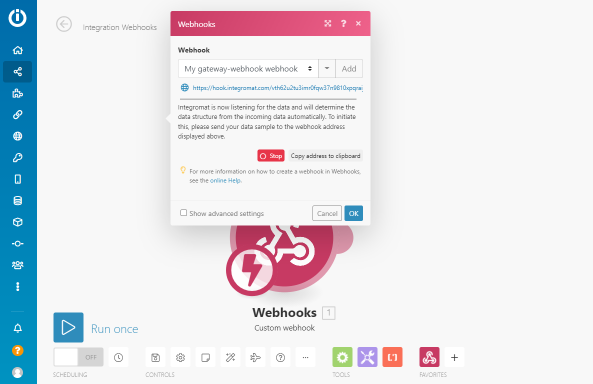
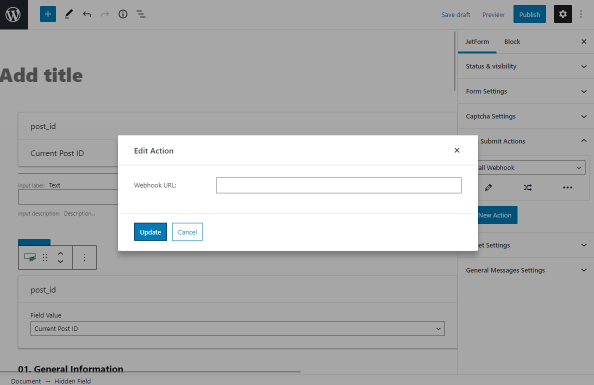
Navigate to WP Dashboard > JetFormBuilder > Forms, find the form you want to connect with Integromat, and change a default “Send Email” Post Type Action to “Call a Webhook.” Click on the “Edit” button and paste the URL address to the field. Update the Post Submit Actions and WordPress form by clicking on the similarly named buttons.
Navigate to the front-end page with that form and submit it. After that, you should see the green note – “Successfully determinated” – in the Webhook. Hit the “OK” button.
Adding Another Module
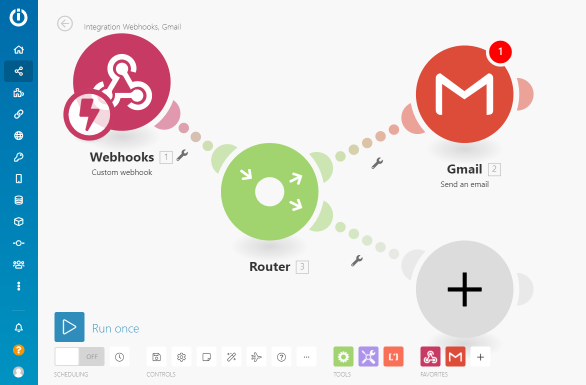
With the Webhook in the Integromat,you could connect any app to the WordPress form. For example, let’s attach the Gmail app. Hit the “Add anoter module” button, add the Gmail module and then pick the Send an email action.
Click the “Add” button near the Connection bar and connect Integromat to your Gmail account. You also need to define the email address for the letters to be sent To, their Subject, Content,and Attachments. To fill the bars, you can use the data users will put into the form fields; just choose the ID of a particular field. Push the “OK” button.
If you need to connect two or more modules to the Webhook, use theRouter. Click on the wrench icon between the Webhook and Gmail modules and unlink the connection. In the Tools panel, click on the “Flow Control” button. Drag and drop the Router module and connect it with other modules. Now you can add more apps to the Scenario.
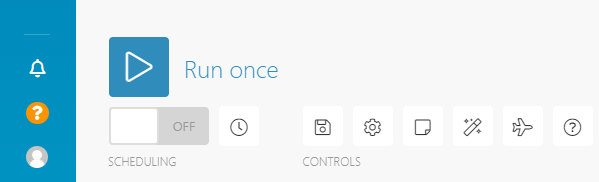
To run the activated scenario, you could set up the schedule. Enable the Scheduling toggle at the bottom left corner and push the “Schedule setting” icon. You can read more about it in the Integromat article and choose the most appropriate option.
That’s it. With Integromat, you can add as many apps as you want to the WordPress form.
We use cookies to assist you with navigation and analyze site traffic. If you continue to use this site, you consent to our use of cookies.