How to Add a Signature Field to PDF Files
In this tutorial, you will learn how to add a Signature Field to PDF files. We will describe how to build a form for signing, which will further generate a PDF file with an online signature.
You can add this functionality alongside other Post Submit Actions, such as the “Register User” Post Submit Action to register users who signed the contract.
To provide this functionality, the Signature and PDF Attachment PRO Addons for the JetFormBuilder plugin.
- Create a Form and Insert the Form Fields
- Set the Post Submit Actions
- Add the Form to a Page
- Test the Flow
Create a Form and Insert the Form Fields
Navigate to the WordPress Dashboard > JetFormBuilder > Add New tab to create a new form. The form will be opened in the Block editor, and the Welcome block, which allows the application of pre-created or AI-generated forms, will be displayed.
Learn how to build forms from the form creation tutorial.
In this case, we deleted the Welcome block.
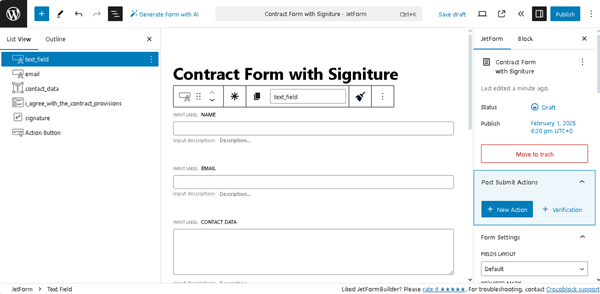
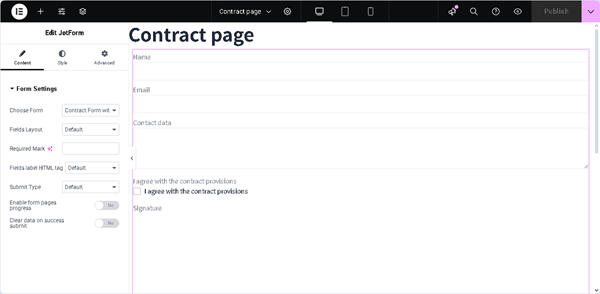
Type the form’s name instead of the “Add title” placeholder (the “Contract Form with Signature,” in this case).
In this tutorial, we add the Text Fields to enter the user’s name and email, respectively, the Texarea Field to enter the user’s contact data, and the Checkbox Field to tick the agreement with the contract provisions.
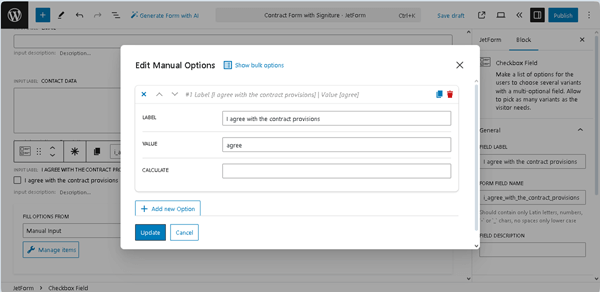
Next, we press the “Manage Items” button and specify the following options in the Edit Manual Options pop-up: insert the “I agree with the contract provisions” text into the LABEL field and the “agree” text in the VALUE field. After that, press the “Update” button.
In the last step, we insert the Signature Field so the user can sign the contract.
Next, configure the Signature Field.
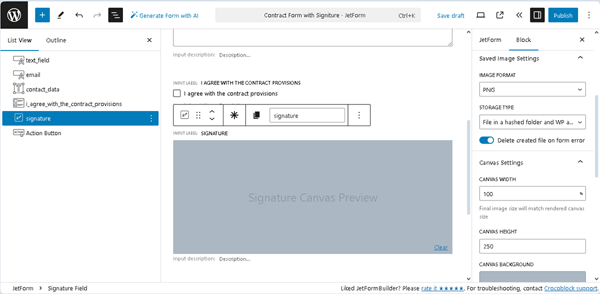
First, insert the block field’s name in the FIELD NAME field (in this case, “Signature”), and then the FORM FIELD NAME will be filled out automatically.
Second, select the IMAGE FORMAT to specify the format to generate the final image (in this case, we set the “PNG” option).
After that, configure the STORAGE TYPE settings to specify how to save the generated image (in this tutorial, we select the “File in a hashed folder and WP attachment” option and activate the newly-appeared Delete created file on form error toggle to allow storage of successfully submitted form data).
Third, adjust the Canvas Settings. Here, we leave the default values in the CANVAS WIDTHCANVAS HEIGHT, PEN COLOR, and CLEAR BUTTON LABEL settings but select the “Cyan bluish gray” CANVAS BACKGROUND. In this case, we do not intend to save the signature with the color background, but we apply the background color for usability reasons.
Watch the How to Setup WordPress Signature Addon video to learn how to manage the Signature Field settings.
In this case, we intend to allow signing only after the contract has been fully read. Therefore, the Action Button will not be visible until users tick the Checkbox Field and draw their signatures on the Signature Field. To achieve this, we add the Conditional Block to the form and insert the Action Button onto it.
Then, we open the Conditional Block settings window and press the button with the “crossed arrows” icon (located on the top tool panel, to the left of the “Options” button).
After that, in the newly-appeared Conditional Logic pop-up, we select the “Show if …” option in the Which Function Need Execute? drop-down list. Next, we enable the Remove hidden elements from page HTML toggle and press the “+ Add Condition” button to observe all settings.
Here, we set two conditions. First, we unroll the FIELD drop-down list in the Conditional Logic pop-up and select the form’s FIELD LABEL of the Checkbox Field (the “I agree with the contract provisions” in this case). After that, we select the “In the list” OPERATOR and type the “agree” VALUE TO COMPARE. Then, press the “+ ADD CONDITION” button in the Conditional Logic pop-up.
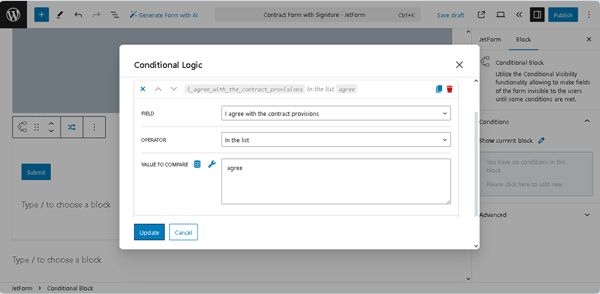
Next, we select the FORM FIELD NAME of the Signature Field (the “Signature,” in this case) and choose the “Not empty” OPERATOR. After that, we click the “Update” button to save the condition.
Set the Post Submit Actions
Navigate to the JetForm settings tab and open the Post Submit Actions tab. Since we deleted the Welcome block, the “Save Form Record” Post Submit Action was not set by default. We press the “+ New Action” button and add this action to collect and manage data via the JetFormBuilder dashboard. In particular, it allows uploading the generated PDF file as an attachment to the Media Library and displays the appropriate link on the Form Records Page.
Set the “Generate PDF” Post Submit Action
After that, we add the “Generate PDF” Post Submit Action. Next, we click the “pencil” icon to open the Edit Action pop-up and configure the action’s settings. Then, press the “Add new template” button.
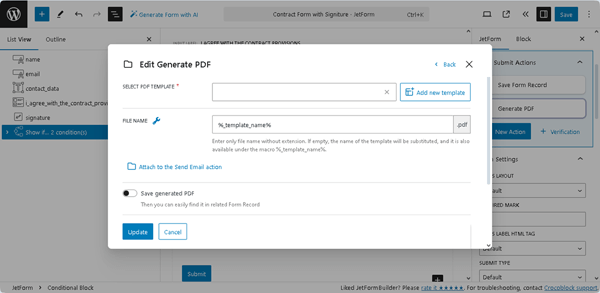
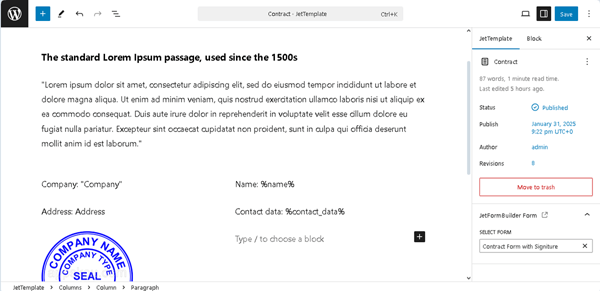
Once done, you will be redirected to a new template. Type the template’s name instead of the “Sample template [locale time]” default text. Customize the template content according to your needs.
In this tutorial, we insert the “Contract” text instead of the default template’s title. Next, we divide the layout into two Columns and add the needed fields and the “%field name%” macro to the template.
Read the How to Generate PDF on Form Submission tutorial to learn how to use macros and convert a submitted form to a PDF file with a predefined design.
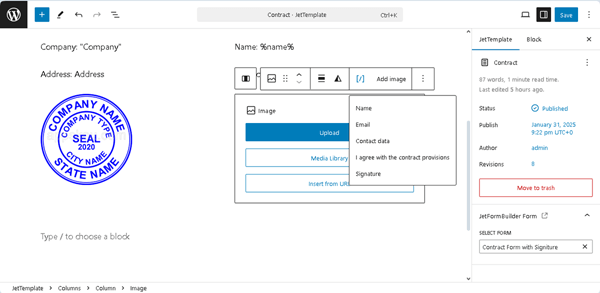
In the next stage, we add the Image block to the second Column below the %contact_data% macro. We also hit the “[/]” button in the block toolbar to select the needed form field from the drop-down list (here, the “Signature” field).
Finally, press the “Save” button and return to the form.
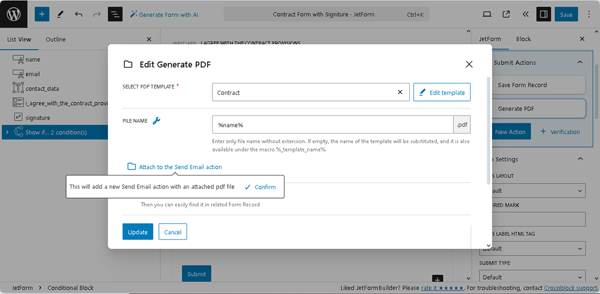
The last step in setting the “Generate PDF” Post Submit Action is selecting the previously built template in the SELECT PDF TEMPLATE drop-down list (the “Contract” in this case) and adding the FILE NAME. Type the required FILE NAME or press the “wrench” icon to select the form field, the name of which will be used as the file name of the submitted form (in this case, we chose the data from the “Name” Text Field to name the PDF file according to the user’s name, e.g., “John-Smith.pdf”).
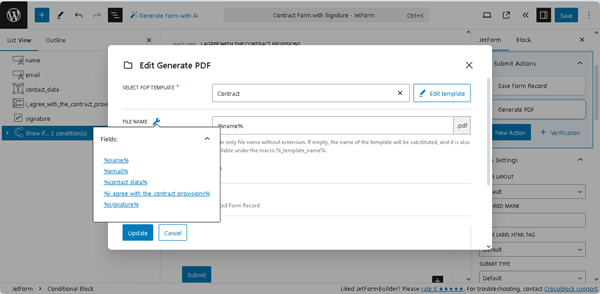
Also, enable the Save generated PDF toggle. Finally, scroll down the pop-up and type the texts of the ERROR CREATING FILE and ERROR CREATING ATTACHMENT messages.
Set the “Send Email” Post Submit Action
To attach the generated PDF file with the submitted data to the email, click the “Attach to the Send Email action“ button in the Edit Action pop-up. Once pressed, this button opens a tooltip with a “Confirm” button. Clicking the “Confirm” button adds the “Send Email” action after the “Generate PDF” Post Submit Action is created.
The tooltip will display the text that your file path is added to the attachments option of the next “Send Email,” and the “Go to the action” link.
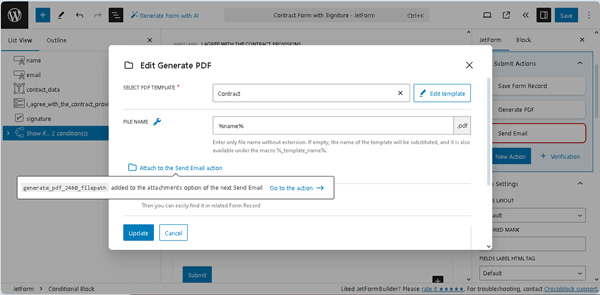
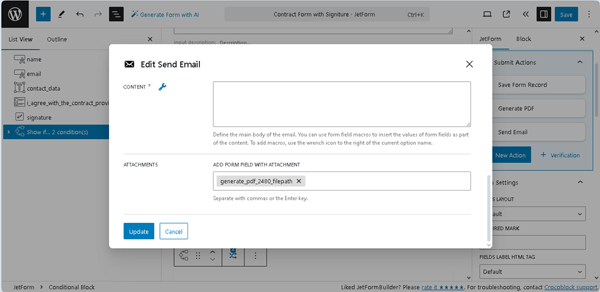
After pressing this link, the “Send Email” Edit Action pop-up will appear. Scroll down to the ATTACHMENTS section and add the generated PDF file as an attachment.
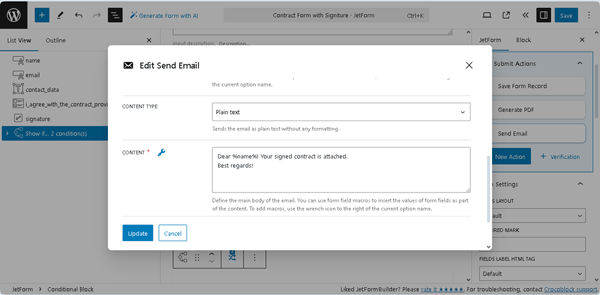
Then, we scroll up this pop-up, select the “Email from submitted form field” option from the MAIL TO drop-down list, and choose the form’s “Email” Text Field in the appeared FROM FIELD field. Then, we complete the SUBJECT field (type the “contract” text), set the “Plain text” CONTENT TYPE, and add the text in the CONTENT text field (“Dear %name%! Your contract is attached. Best regards!” text, in this case).
Finally, click the “Update” button. The form is built now, so press the “Save/Publish” button.
Add the Form to a Page
Create a page or open a page/post you need in the editor you prefer (we use Elementor) and add the JetForm widget/block/element to the page. Learn about its settings from the JetForm Overview.
Select the built form in the Choose Form drop-down list.
To display the form in other page builders (i.e., the Block Editor or the Bricks theme), check our guide on How to Display a Form on the Front End.
Also, for better usability, you can insert the form into a pop-up that will appear if pre-specified conditions are met. Read how to do it in the How to Set Up a WordPress Pop-up tutorial.
Press the “Publish” button to save the page.
Test the Flow
Let’s check how the form works. We’ll fill out the form’s fields and check the mailbox and the form records.
Fill out the form
Navigate to the front end and fill out the form’s fields. First, insert the text data (e.g., name, email, etc.) into the corresponding fields and tick the Checkbox Field.
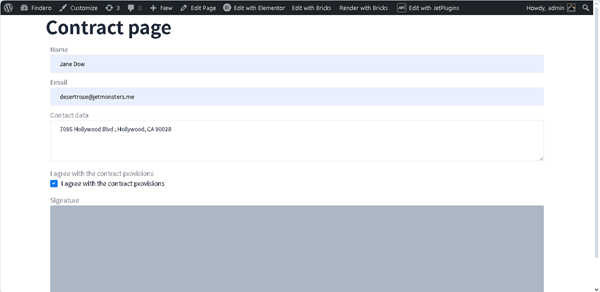
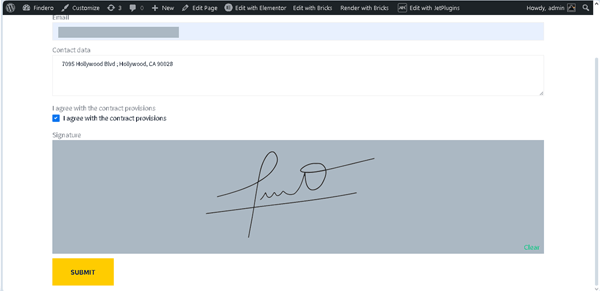
Second, draw your signature in the Signature Field canvas and press the newly-appeared “SUBMIT” button.
Check the Mailbox
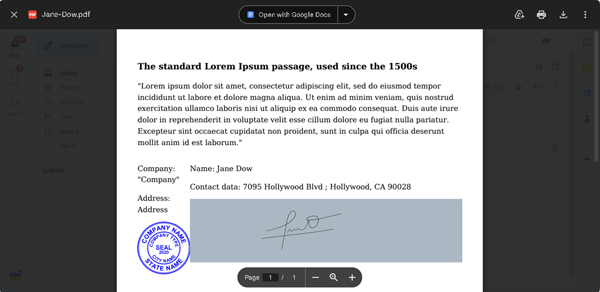
Open the mailbox you entered in the form and check if you received the email. The PDF file should be attached.
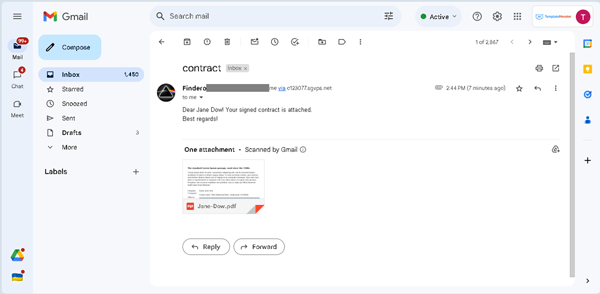
Open the attached file and check if the signature is inserted correctly.
Check the form record
Finally, navigate to the WordPress Dashboard > JetFormBuilder > Form Records tab.
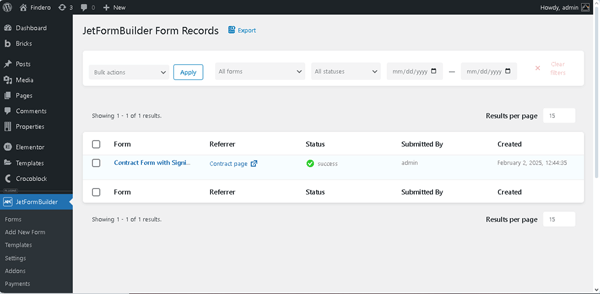
Unroll the submitted form details. Scroll the record down and find the Generated PDF section.
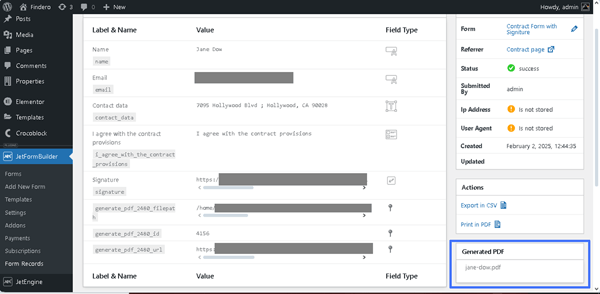 Press the “View“ link to open the attachment in the Media Library. You can also copy the file path link under the Label & Name section and paste it into the browser to view the created PDF file.
 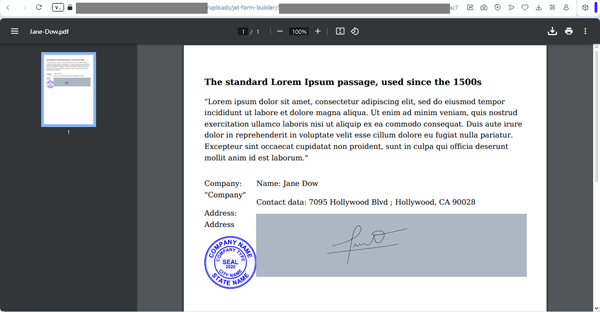 Read the How to Access the Generated PDF Files tutorial to learn how to find the PDF file storage location generated with the JetFormBuilder plugin and PDF Attachment add-on for the WordPress website.
That’s all about creating the PDF file of a predefined design with the online entered signature and emailing this file to a specified address using the Signature and PDF Attachment PRO Addons from the JetFormBuilder plugin for WordPress.