How to Create a WordPress Post Management and Publishing System
Tutorial Requirements:
- Elementor (Free version);
- Formless Actions Endpoints addon installed and activated;
- JetEngine plugin installed and activated with the Account Page set;
- JetFormBuilder plugin installed and activated.
This tutorial details setting up WordPress front-end post management using the JetFormBuilder plugin, making it available to preview and publish posts from the front end.
With the Formless Actions Endpoints addon, you can create an endpoint and attach it to the button so that the user can publish the posts that are pending review.
In this tutorial, we will describe how to create the endpoint and how it can be used in two use cases:
- How to create a custom front-end post manager with a listing of user’s pending posts on the User Account page that can be published;
- How to set a pending post review system with a dedicated Pending Review page, where the user can review their submitted posts before publishing.
Contents:
- How to create endpoints
- Listing with the User Posts with the Pending Status
- Single Post template as the Pending Preview Page
How to Create Endpoints
This chapter describes how to create endpoints that can be used differently on your WordPress website with the Button widgets.
Create a form
Go to WordPress Dashboard > JetFormBuilder > Add New to open the form creation page.
Press the “Start from scratch” button in the Welcome block to develop your own form.
Type the form’s name (“Publish posts” for this case) instead of the “Add title” placeholder.
Delete all field blocks except the Hidden Field, which is first.
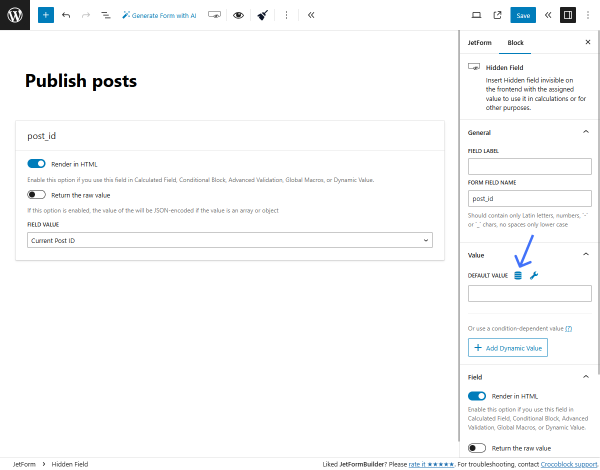
Keep the “Current Post ID” FIELD VALUE.
Navigate to the Block settings tab on the right panel and scroll to the Value section. Here, hit the “coin-stack” icon near the DEFAULT VALUE field.
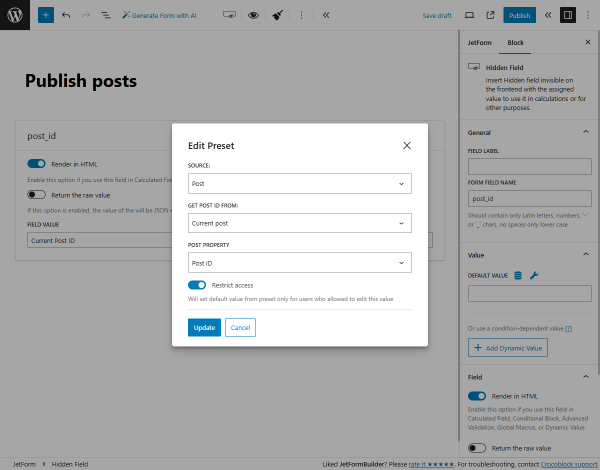
In the Edit Preset pop-up, pick the “Post” SOURCE, “Current post” option in the GET POST ID FROM field, and “Post ID” POST PROPERTY.
Then, hit the “Update” button.
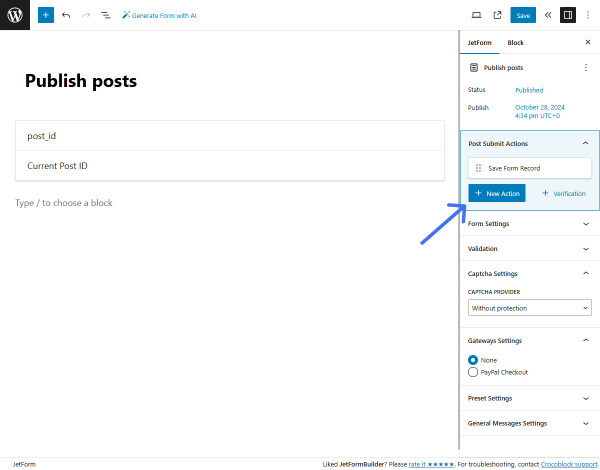
Afterward, open the JetForm settings tab on the right panel, scroll to the Post Submit Actions tab, and hit the “+ New Action” button.
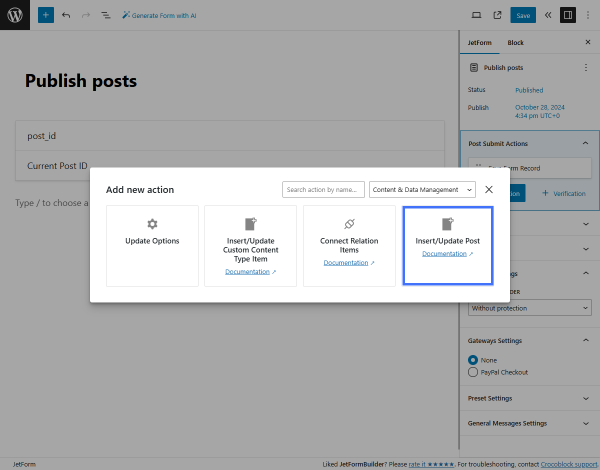
In the Add new action pop-up, find and select the “Insert/Update Post” action.
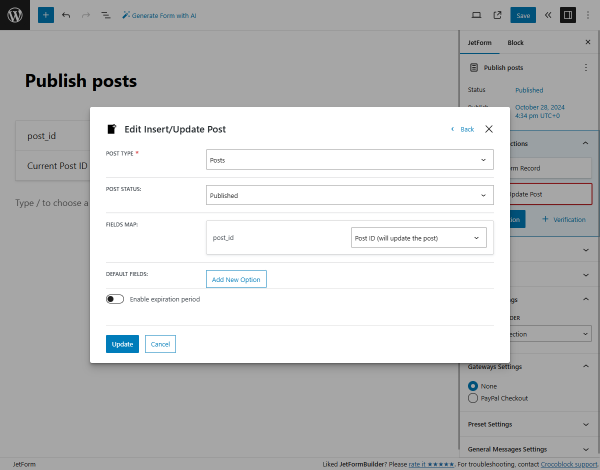
Then, set the required POST TYPE (“Posts” in our case, but it also can be a Custom Post Type (CPT)) and “Published” POST STATUS.
In the FIELDS MAP section, choose the “Post ID (will update the post)” option as the post_id.
To save the settings, push the “Update” button.
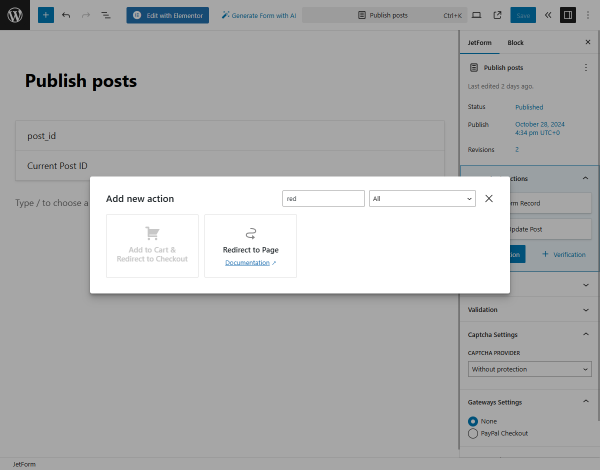
Additionally, you can add the “Redirect to Page” action. To do so, hit the “+ New Action” button and select the corresponding action from the pop-up.
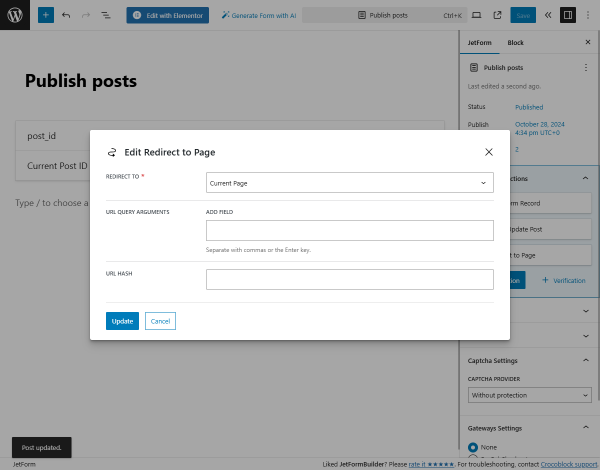
In the Edit Redirect to Page pop-up, we set the “Current Page” option in the REDIRECT TO drop-down menu, so after publishing a post, the user will be returned to the same page. You can adjust other options here that suit you more, like the “Static Page,” “Custom URL,” or “Inserted/Updated post.”
Hit the “Update” button to save the action settings.
Eventually, press the “Publish/Save” button to save the form.
Create a new endpoint
Navigate to the WordPress Dashboard > JetFormBuilder > Endpoints tab that appears when the Formless Actions Endpoints addon is installed and activated. Here, press the “+ Add new route” button.
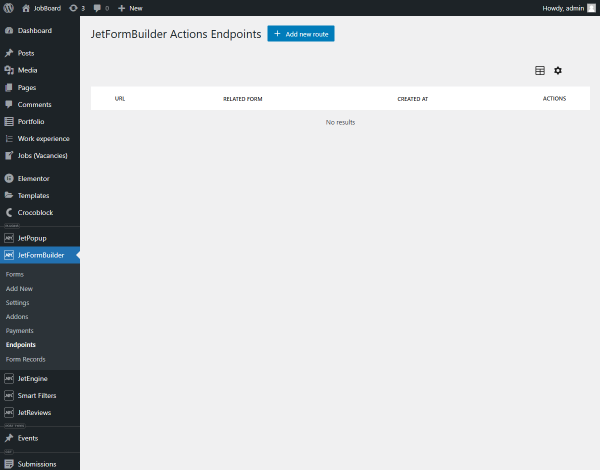
It opens the JetFormBuilder Actions Endpoint page in a new tab.
In the Settings section, pick the newly-created form as the RELATED FORM, the “WordPress AJAX” ACTION TYPE, and enter the “publish_post” AJAX ACTION SLUG.
Then, hit the “Publish” button. Keep this page open since we will return to it later.
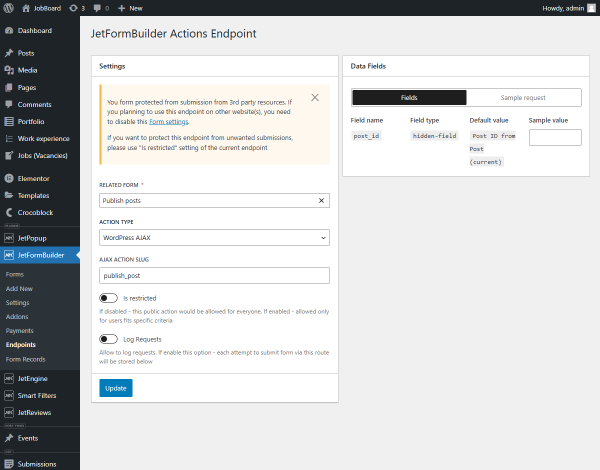
After that, you can proceed to set the Listing template or the Single page for posts with the “Pending Review” status.
Listing with the User Posts with the Pending Status
We will create a listing with the user’s pending posts and the “Publish” button and place it on the User Account page.
Create a custom query
Go to WordPress Dashboard > JetEngine > Query Builder and click the “Add New” button.
Enter the Name and keep the “Posts Query” Query Type.
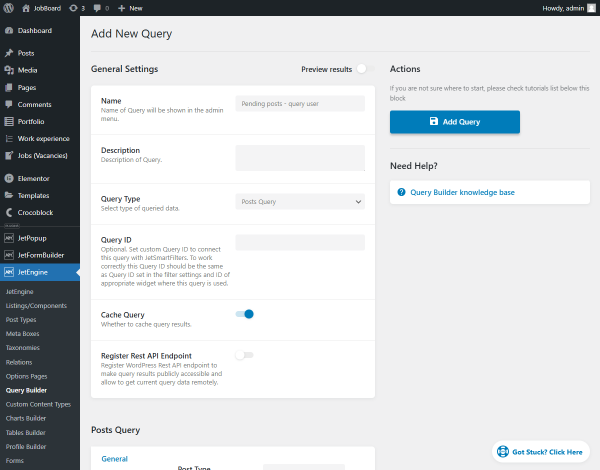
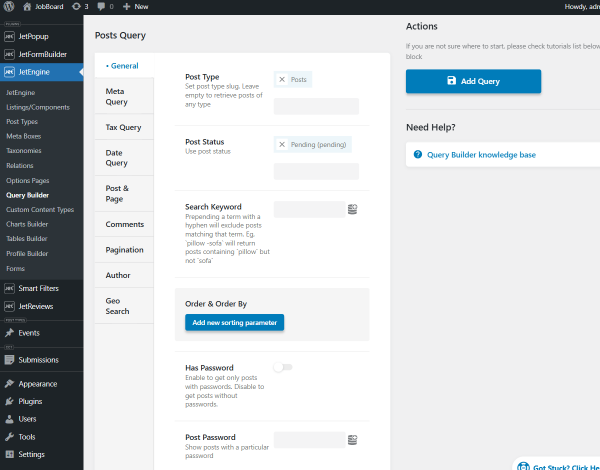
Scroll down to the Posts Query section and set the required Post Type (“Posts” in our case) and “Pending (pending)” Post Status in the General settings tab.
Then, unroll the Author settings tab, where you should hit the “coin-stack” icon near the Author ID field and set the “Queried user ID” macro.
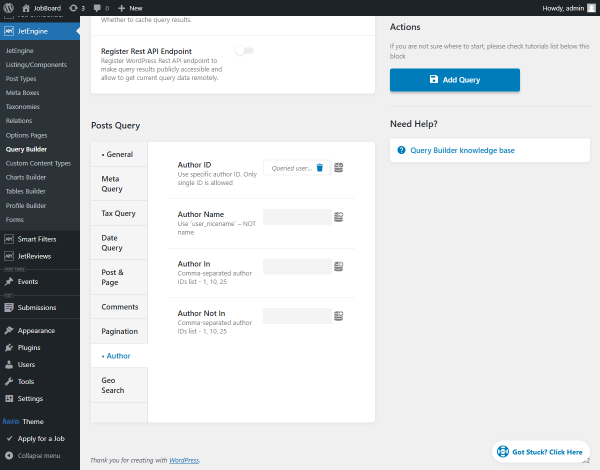
After that, hit the “Add/Update Query” button to save the query settings.
Create a Listing template
Head to WordPress Dashboard > JetEngine > Listings/Components directory and click the “Add New Listing Item” button.
Pick the “Query Builder” Listing source and the just-built query as the Query. Then, complete the Listing item name and pick the “Elementor” Listing view.
Press the “Create Listing Item” button.
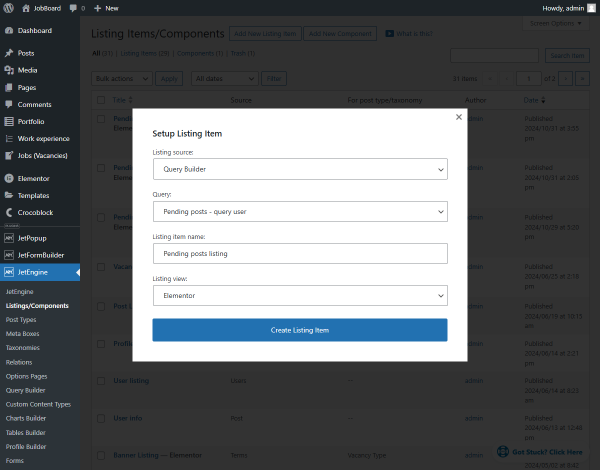
Fill in the Listing template with the needed content using Dynamic Widgets.
Additionally, you can check the How to Create a Listing Template for Post Types in Elementor tutorial.
For example, we add such widgets:
- Dynamic Field with “Post/Term/User/Object Data” Source and “Title” Object Field;
- Dynamic Field with “Post/Term/User/Object Data” Source and “Content” Object Field;
- Dynamic Image with “Post thumbnail” Source.
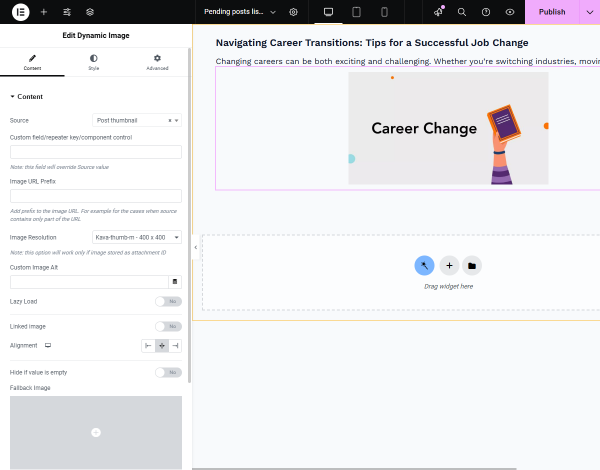
Then, add the Button (by Elementor) or Button (by the JetElements plugin) widget and adjust the general settings as needed. In the given case, we add the Elementor’s Button widget and change the Text to “Publish.”
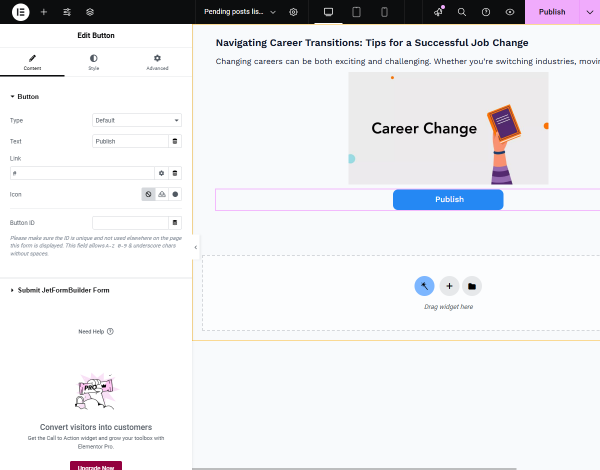
With the Formless Actions Endpoints addon installed and activated, the Submit JetFormBuilder Form settings tab is available.
Unroll it and activate the Enable form submission toggle.
In the Choose route drop-down, select the recently created endpoint URL.
Then, revisit the JetFormBuilder Actions Endpoint page with the created endpoint, open the Sample request tab in the Data Fields section from the right side, and hit the “Copy data for the request” button.
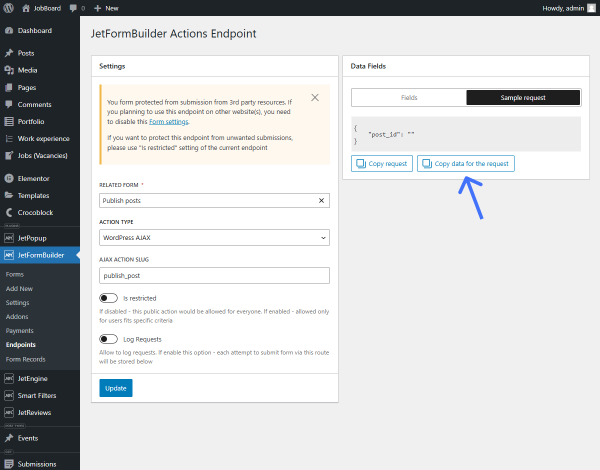
Return to the Listing template and enter the copied data into the Data for the request field.
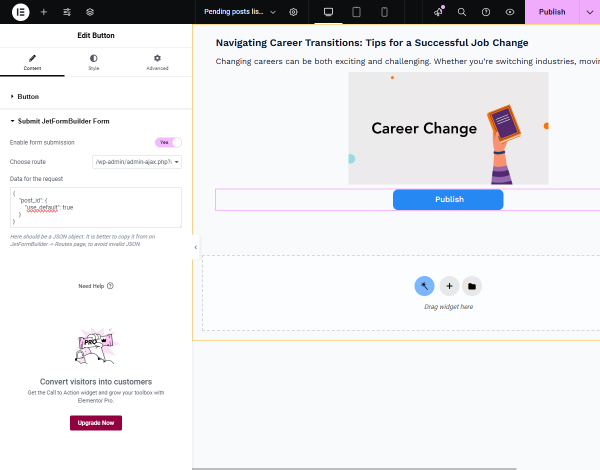
Then, press the “Publish” button to save the settings.
Attach template to Profile Builder
Move to WordPress Dashboard > JetEngine > Profile Builder and open the Account Page tab.
Scroll down the page and hit the “+ Add New Subpage” button.
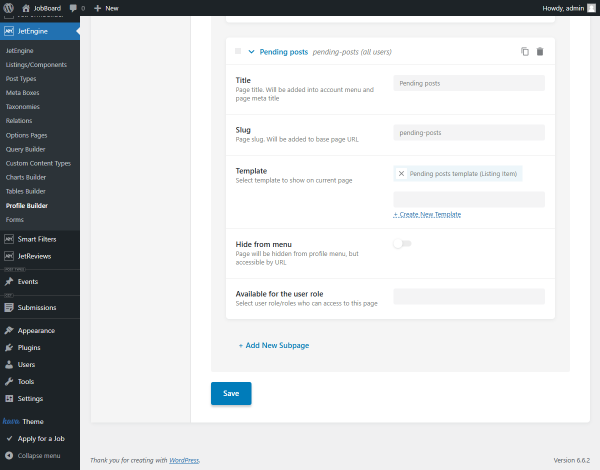
We complete the Title field with “Pending posts,” and the Slug is filled automatically.Here, you can set the pre-mage Template, but we create it from scratch, so we click the “+ Create New Template” link. In the pop-up, we enter the Template Name and pick the Template Type (it can be “Listing Item” or “Elementor Template”). Since we choose the “Listing Item” option, we also select the Listing view.
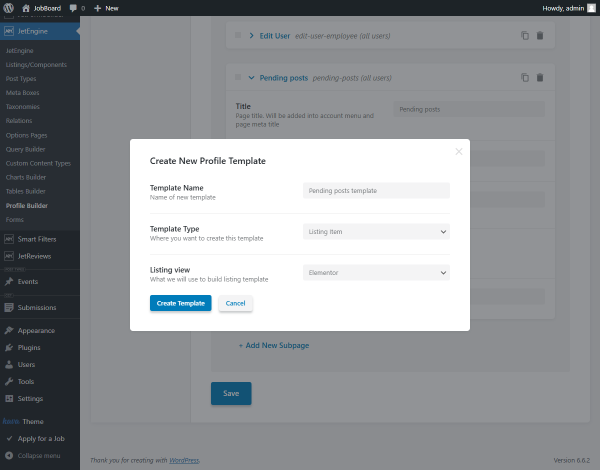
By clicking the “Create Template” button, we open the Listing template in the selected editor in the new tab.
Drag-n-drop the Listing Grid widget to the editing page and set the recently created Listing.
Customize the template additionally if needed, and whenever you are ready, hit the “Publish” button to save the template.
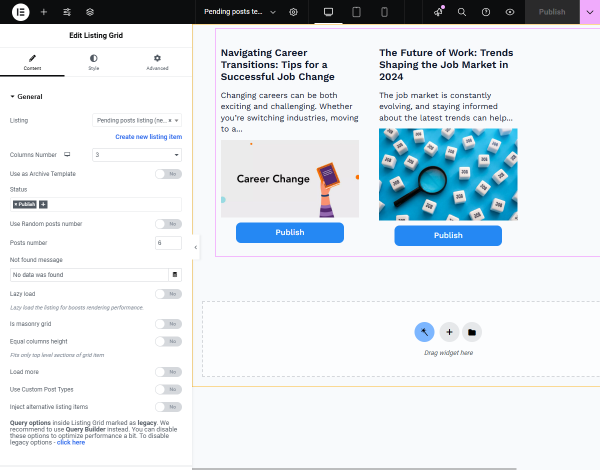
After that, you can return to the Account Page tab and set other template settings if needed.
Checking the Results
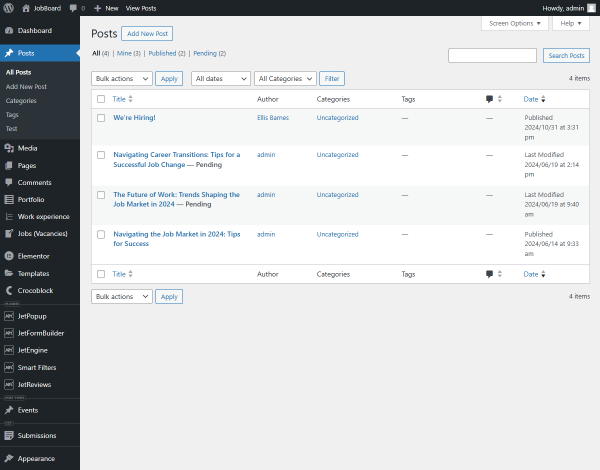
We open the WordPress Dashboard > Posts > All Posts tab to check the post list. Two of the posts have pending status.
Then, we open the Account page on the front end and proceed to the “Pending posts” tab from the Profile Menu with the recently created account template.
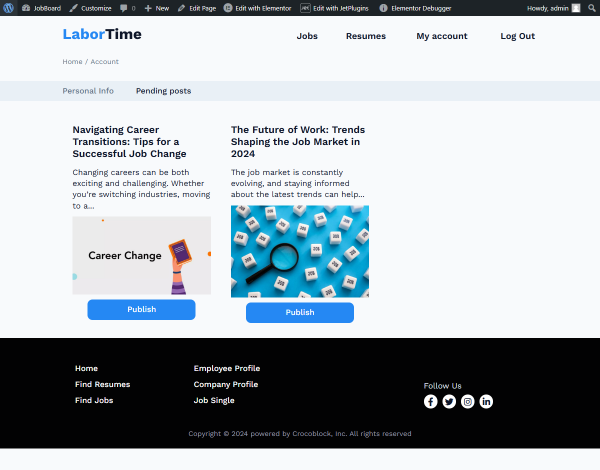
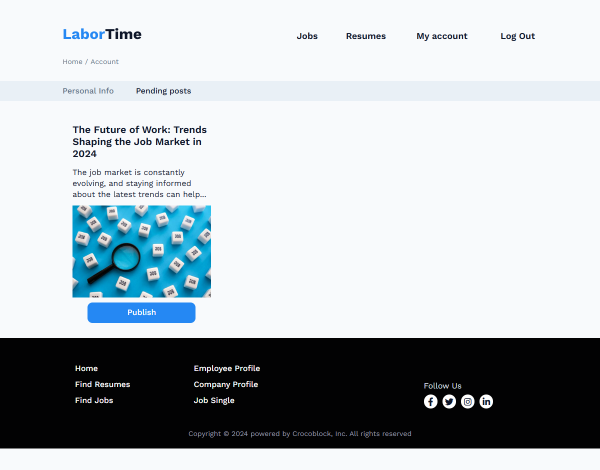
Here, we hit the “Publish” button under the “Navigating Career Transitions” post. After the page reloads, only one post with the pending status is left.
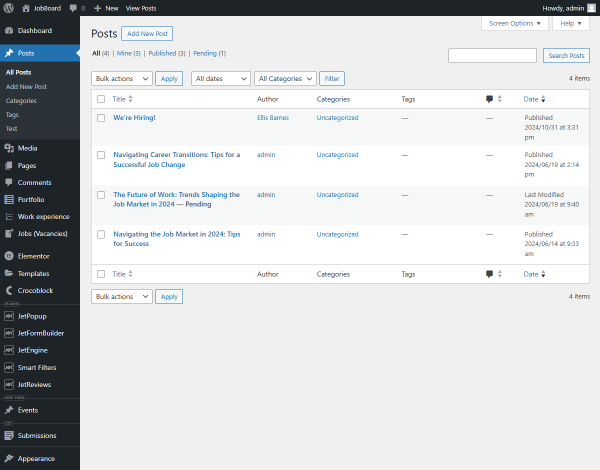
We return to the back end to check the post list. The “Navigating Career Transitions” post is published now.
By following the same steps, you can also create an Account subpage that shows the published posts.
Single Post template as the Pending Preview Page
In this chapter, we will create the “Add new post” form and place it on the User Account page. After submitting it, the user will be redirected to the Single Post template with the inserted post. Here, the “Publish” button will be placed, which will be visible only for the pending post via the Visibility Condition.
Create a new form
Go to WordPress Dashboard > JetFormBuilder > Add New to open the form creation page.
Press the “Start from scratch” button in the Welcome block to develop your own form. Type the form’s name (“Add new post” for this case) instead of the “Add title” placeholder and delete the Hidden Field.
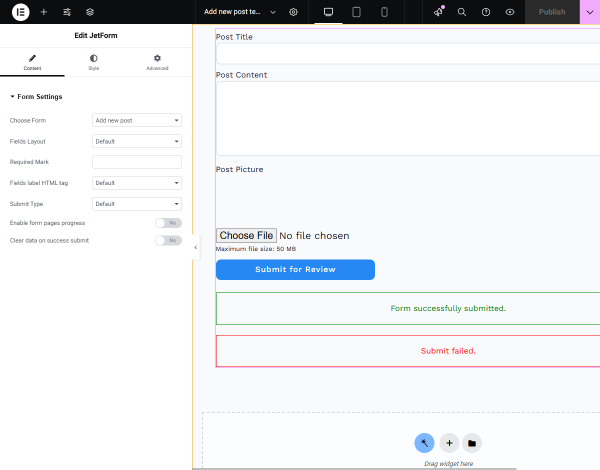
Now, you can add form fields for users to fill in the post content. In our case, we set such fields:
- Text Field with the “Post Title” FIELD LABEL;
- Textarea Field with the “Post Content” FIELD LABEL;
- Media Field with the “Post Picture” FIELD LABEL. We enable the Insert attachment toggle and set the “Attachment ID” FIELD VALUE;
- Action Button with the “Submit for Review” FIELD LABEL.
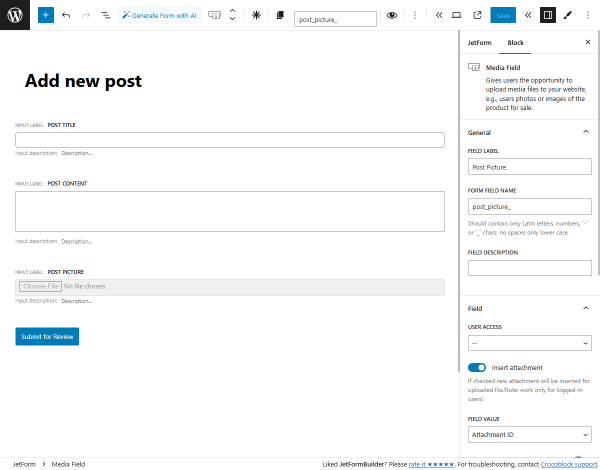
Open the JetForm settings tab on the right panel and hit the “+ New Action” button in the Post Submit Actions tab.
In the Add new action pop-up, find and select the “Insert/Update Post” action.
In the Edit Insert/Update Post pop-up, set the required POST TYPE (“Posts” in our case, but it also can be a Custom Post Type (CPT)) and “Published” POST STATUS.
In the FIELDS MAP section, choose the post’s meta field where the data from the form field will land. For example, for the “Post Picture” form field, we pick the “Post Thumbnail” option.
To save the settings, push the “Update” button.
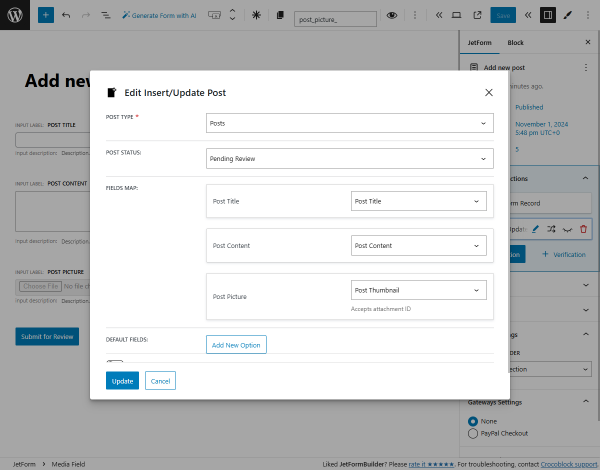
Then, hit the “+ New Action” button and select the “Redirect to Page” action from the pop-up.
In the Edit Redirect to Page pop-up, set the “Inserted/Updated post” option in the REDIRECT TO drop-down menu, so after submitting the form, the user will proceed to the unpublished post’s Single page.
Hit the “Update” button to save the action settings.
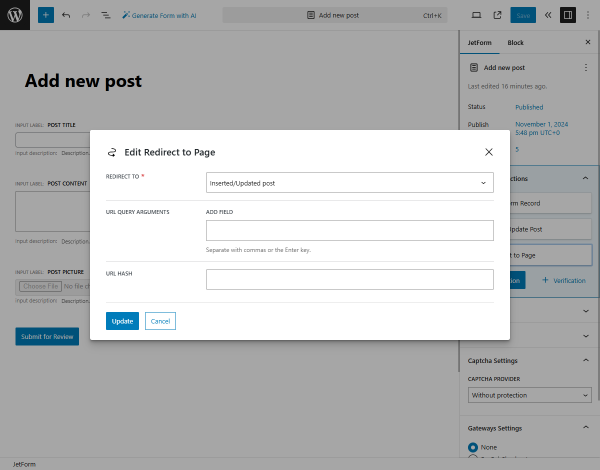
Eventually, press the “Publish/Save” button to save the form.
Add form to the account template
Move to WordPress Dashboard > JetEngine > Profile Builder and open the Account Page tab.
Scroll down the page and hit the “+ Add New Subpage” button.
Complete the Title field (“Add new post” in our case), and the Slug will be filled out automatically.
For the Template field, click the “+ Create New Template” link. In the pop-up, enter the Template Name and pick the Template Type (it can be “Listing Item” or “Elementor Template”). If you choose the “Listing Item” option, you can also select the Listing view.
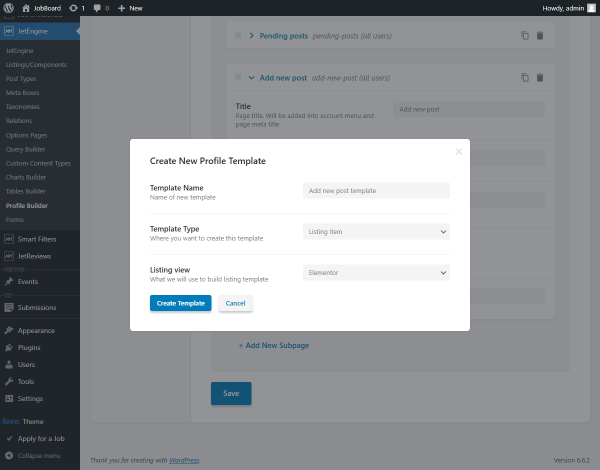
Afterward, click the “Create template” button.
In the editor, add a JetForm widget and pick a just-built form in the Choose Form field.
Customize the form settings if needed and press the “Publish/Update” button.
After that, you can return to the Account Page tab and set other template settings if needed.
Setting the Single Post template
Next, open the Single Post template in the Elementor editor. If you haven’t created it yet, proceed to the How to Create a WordPress Single Post Page Template or How to Create Single Template for Custom Post Type tutorials.
Set the post content with Dynamic Widgets and the “Publish” button as described in the Create a Listing template chapter.

Then, we will adjust the Dynamic Visibility conditions so the “Publish” button will be hidden for the published posts and shown for the pending posts.
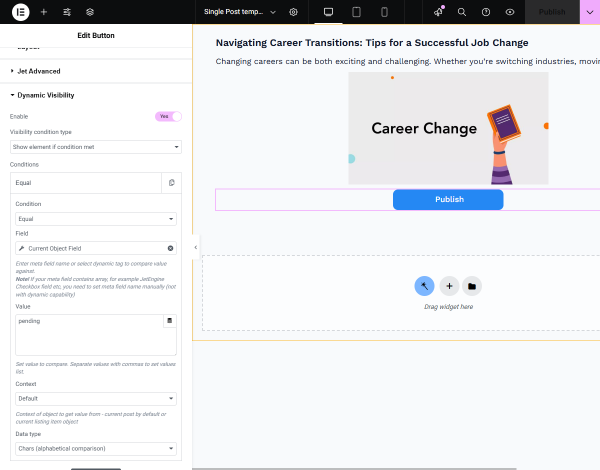
Open the Advanced section of the Button widget, unroll the Dynamic Visibility tab, and Enable the toggle.
Keep the “Show element if condition met” Visibility condition type and pick the “Equal” Condition.
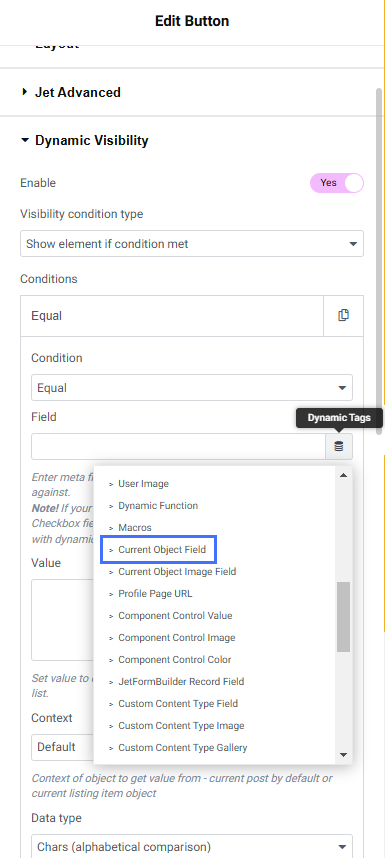
Hit the “Dynamic Tags” button near Field and select the “Current Object Field” option from the JetEngine section.
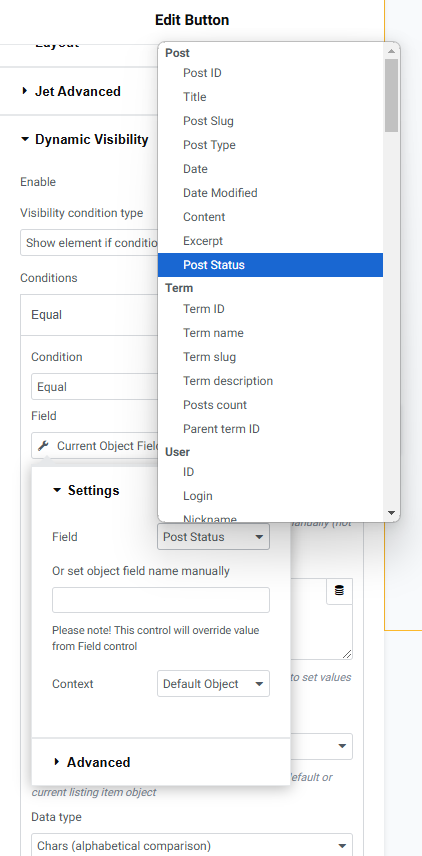
Then choose the “Post Status” Field.
In the Value texarea, type the “pending” text.
Also, you can add a button for the post editing. To learn how to create the corresponding form and place it in the template, proceed to the Front-End Post Submission Form tutorial.
Afterward, hit the “Publish” button to save the Single Post template settings.
Testing the flow
First, open the Account page on the front end and proceed to the template for adding a new post.
Fill in the fields and submit the form to create a post with the “Pending Review” status.
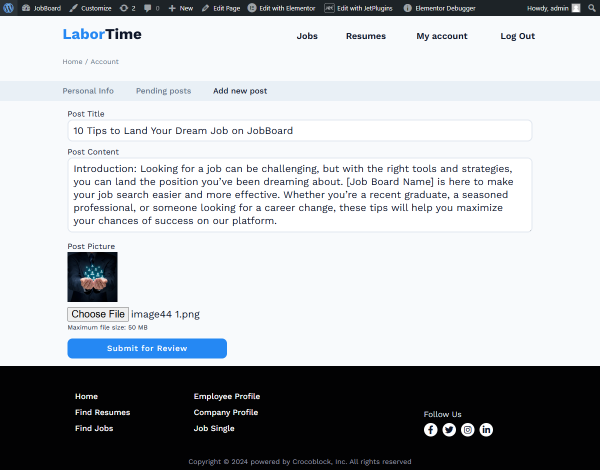
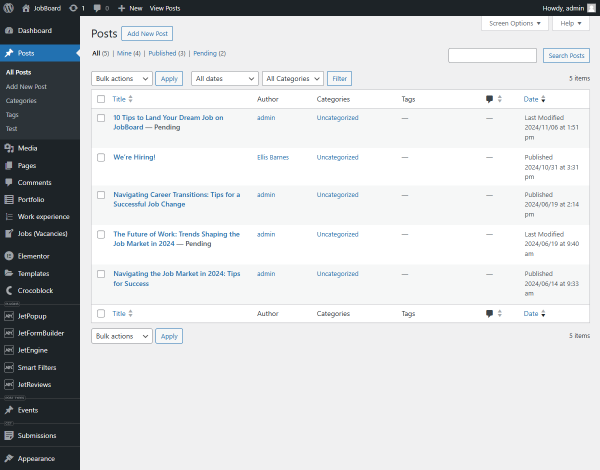
At the same time, you can navigate to the WordPress Dashboard > Posts > All Posts tab to check if the pending post appears in the list.
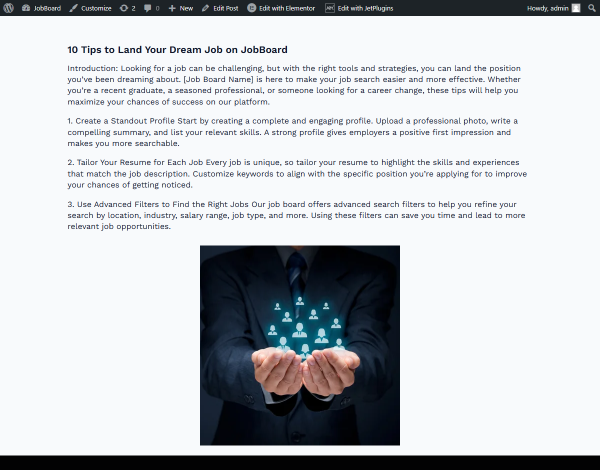
After submitting the form, it will redirect to the inserted post’s single page.
Since the post has the “Pending Review” status, the “Publish” button is visible. You can click it to publish the post.

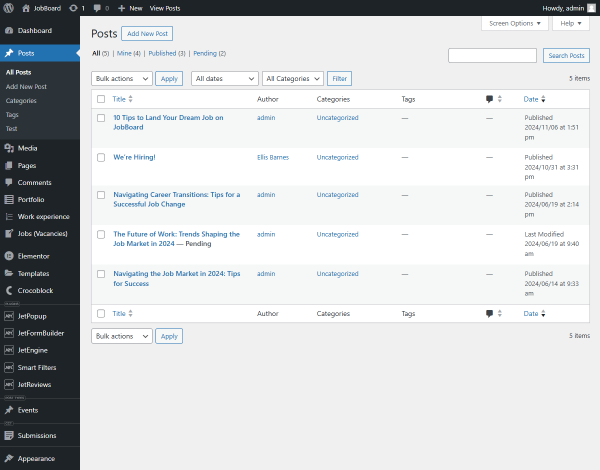
After the post is published, the “Publish” button is hidden.
On the backend, the post gets the appropriate status.
That’s all. Now you know how to create and use an endpoint that enables users to publish posts pending review with the help of the JetFormBuilder plugin and Formless Actions Endpoints addon for WordPress.