How to Create Donation Form
Build a donation form for your WordPress website with JetFormBuilder. Let users select where they want to make a one-time or a recurring donation for a set amount of time.
Contents:
- Why You Need a WordPress Donation Form
- Top WordPress Donation Form Features
- WordPress Donation Form Structure
- How to Create a WordPress Custom Donation Form
- WordPress Donation Form Pro Features
Why You Need a WordPress Donation Form
For nonprofits and even individual content creators, a donation form can be a valuable tool for raising funds directly from your audience. With the JetFormBuilder WordPress plugin, you can create a professional donation form. By integrating a donation form, you make it easier for supporters to contribute, helping to sustain your efforts and expand your reach.
Top WordPress Donation Form Features
- Adjust multiple payment gateways to offer donors flexibility;
- Activate SSL support and encryption;
- Store donation records and form submissions in the JetFormBuilder dashboard;
- Build mailing lists for MailChimp, GetResponse, Active Campaign, Zapier, Make (Integromat), and other email marketing integrations.
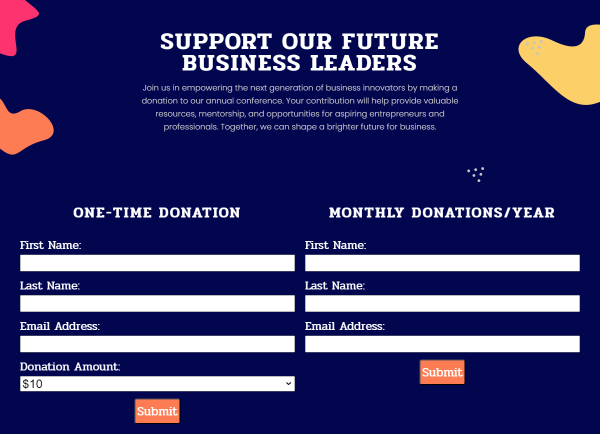
WordPress Donation Form Structure
One-time donation form
- First Name. A Text Field indicating the first name of the user;
- Last Name. A Text Field indicating the last name of the user;
- Email Address. A Text Field of the “Email” FIELD TYPE where the email address of the user should be put;
- Donation Amount. A Select Field for users to pick the desired amount of donation;
- “Submit” Button — an Action Button to send the form.
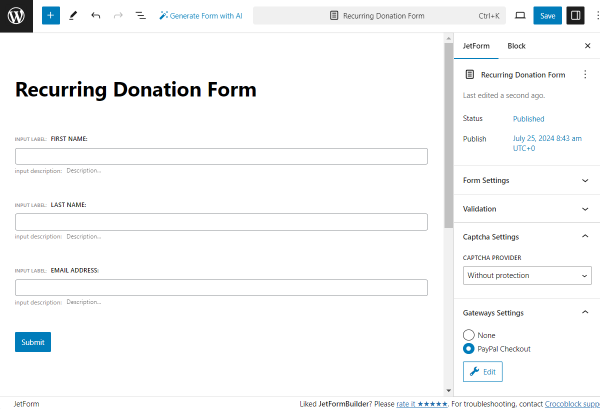
Recurring donation form
- First Name. A Text Field indicating the first name of the user;
- Last Name. A Text Field indicating the last name of the user;
- Email Address. A Text Field of the “Email” FIELD TYPE where the email address of the user should be put;
- “Submit” Button — an Action Button to send the form.
How to Create a WordPress Custom Donation Form
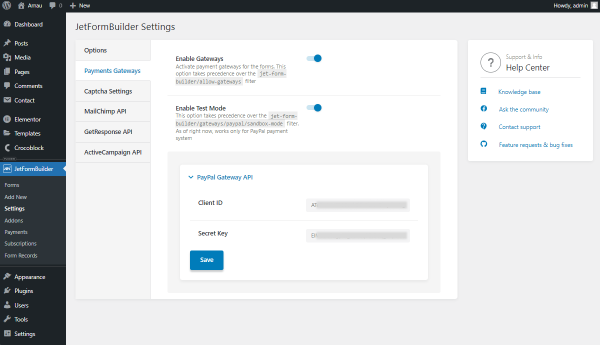
Before building a form, check that you have activated the payment gateways. To do so, open the WordPress Dashboard > JetFormBuilder > Settings > Payments Gateways tab and activate the Enable Gateways toggle.
Additionally, you can adjust the Paypal Gateway API and Stripe Gateway API (if you have the JetFormBuilder Pro version and the Stripe Payments addon installed and activated on your website) by completing the Client ID/Public Key and Secret Key fields in the needed payment system tab. These values can be found in your PayPal/Stripe account.
If changes are made to the API, don’t forget to press the “Save” button.
One-time donation form
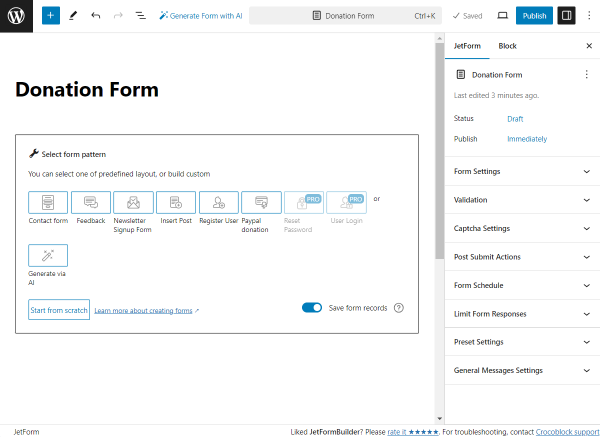
Go to WordPress Dashboard > JetFormBuilder > Add New.
Type in the title of the form.
The Welcome block is initially presented in the form. You can either create a new form by pressing the “Start from scratch” button or generate the form with AI by hitting the “Generate via AI” button.
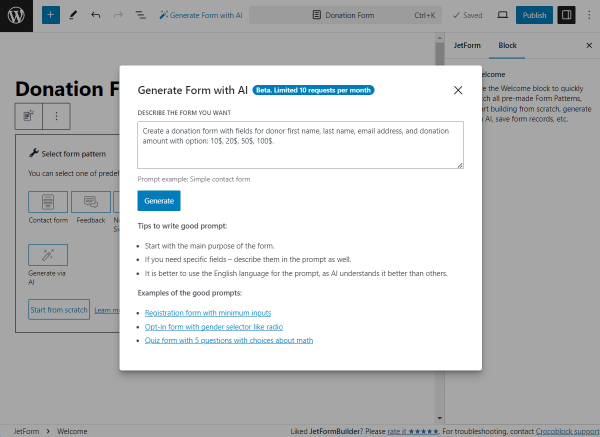
For instance, we will generate a form by using AI.
To get started with AI-generated forms, you can use the following prompt:
“Create a donation form with fields for donor first name, last name, email address, and donation amount with option: 10$, 20$, 50$, 100$.”
Click the “Generate” button.
Once clicked, you will see the preview of the form.
If the generated form is suitable, press the “Use this form” button.
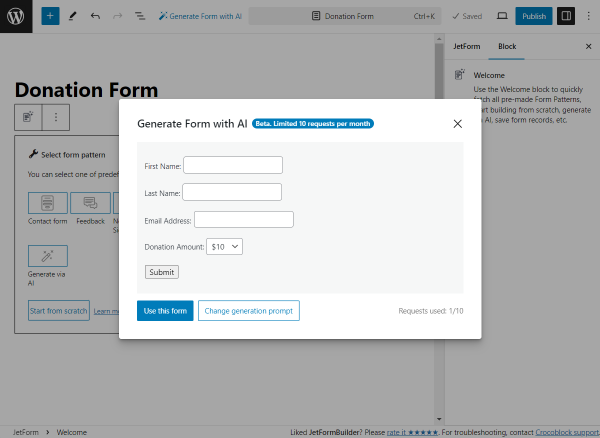
Once clicked, the form will be displayed in the editor. There, the form fields can also be edited if needed.
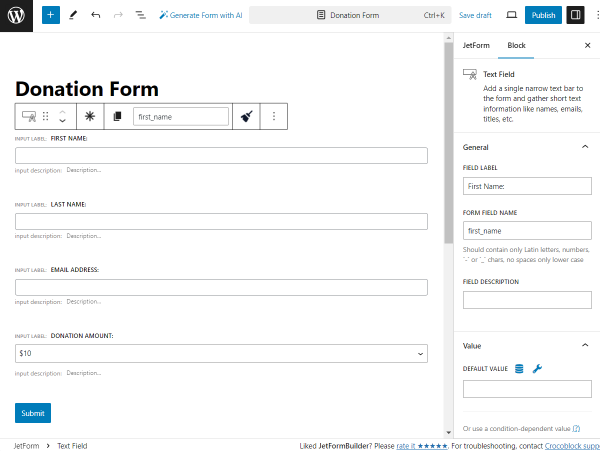
In the generated form, the following fields are presented:
- First Name — a Text Field indicating the first name of the user;
- Last Name — a Text Field indicating the last name of the user;
- Email Address — a Text Field of the “Email” FIELD TYPE where the email address of the user should be put;
- Donation Amount — a Select Field for users to pick the desired amount of donation;
- “Submit” Button — an Action Button to send the form.
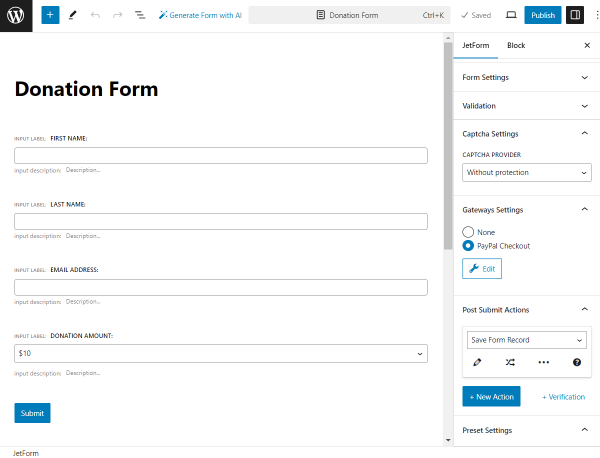
Also, open the JetForm tab and head to the Gateways Settings section.
Select the needed payment service among the options. In our case, it’s “PayPal Checkout.”
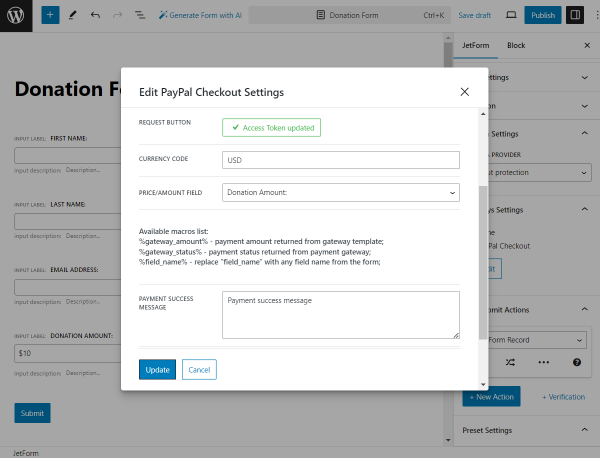
Click the “Edit” button to open the settings.
In the pop-up, complete the CLIENT ID and SECRET KEY manually or activate the Use Global Settings toggle to pull out the needed credentials from the JetFormBuilder settings.
Press the “Sync Access Token” button to synchronize the data.

Set the CURRENCY CODE; in our case, it’s “USD.”
Also, we select the “Donation Amount:” option as the PRICE/AMOUNT FIELD.
You can also change the notification messages if needed.
Once the pop-up settings are adjusted, press the “Update” button.
Then, proceed to the Post Submit Actions tab and add more actions if needed by pressing the “New Action” button.
In our case, we have the “Save Form Record” action enabled.

Once the form is ready, press the “Publish” button.
Recurring donation form
We also want to set up an alternative form for recurring donations.
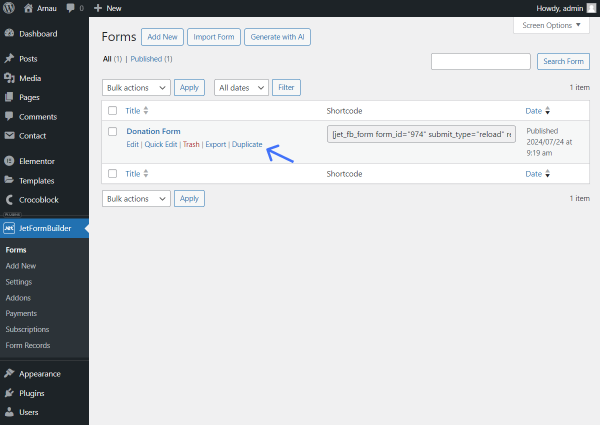
This form is intended to be similar to the previously built one-time donation form, so we go to WordPress Dashboard > JetFormBuilder, hover over the built donation form, and press “Duplicate.”
Now, we open the duplicated form by hitting the “Edit” button next to it.
The form is now open. We change the form’s title and delete the Select Field indicating price, as the amount of the donation will be set in our subscription plan.
You can also change the FORM FIELD NAME(S) of the fields to make them unique in the forms.
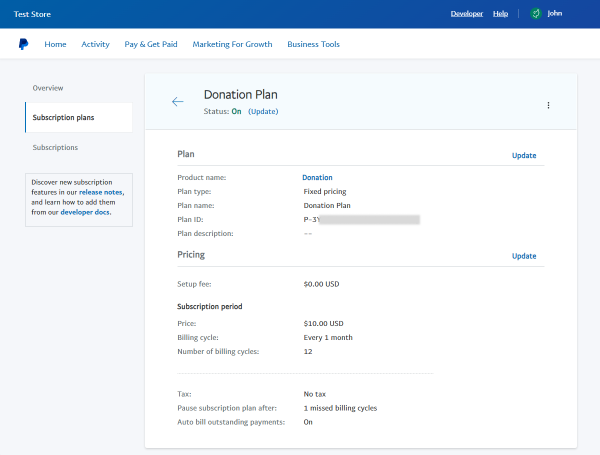
Now, we head to PayPal to set up the subscription plan. Find out how to do it in the How to Set Recurring Payments in WordPress Form tutorial.
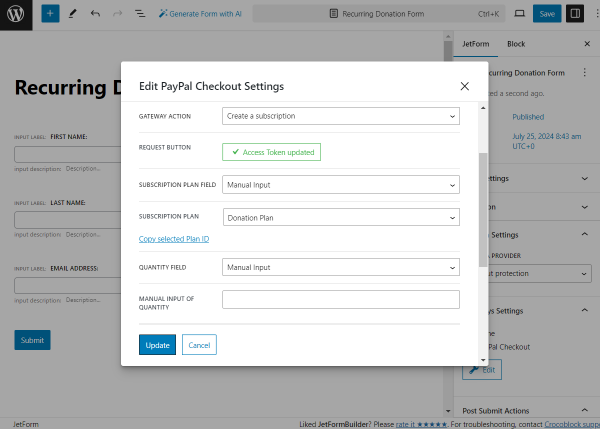
Return to the form and open the Payment Gateways settings. Press the “Edit” button below.
In the appeared pop-up, select the “Create a subscription” GATEWAY ACTION and press the REQUEST BUTTON.
In the SUBSCRIPTION PLAN FIELD, leave the default “Manual Input” option and pick the just-built plan in the SUBSCRIPTION PLAN field.
We leave the quantity settings default as the plan we built is fixed and doesn’t include the quantity settings.
Customize the success/failure messages if needed and press the “Update” button.
Adjust the Post Submit Actions if needed and press the “Update” button to save the form.
Place the form(s) on the page
Choose the page/template where you want to place the built form(s).
For instance, we go to WordPress Dashboard > Pages and open the already-built page to place the donation forms there.
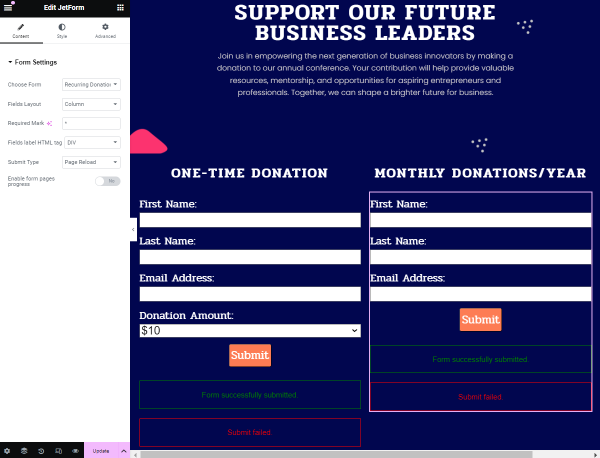
Open the page editor; the page/template can be built with Elementor, Gutenberg, or Bricks. We work with Elementor.
We add two Columns with the “One-time donation” and “Monthly donations/year” Headings.
Under the first heading we add the donation form that we have created for the one-time donation. To define the form, pick it in the Choose Form field.
We repeat the same steps for the second column by putting there the recurring donation form.
Then, adjust the Style settings and press the “Publish/Update” button to save the page.
Check the result
Open the just-edited page on the front end.
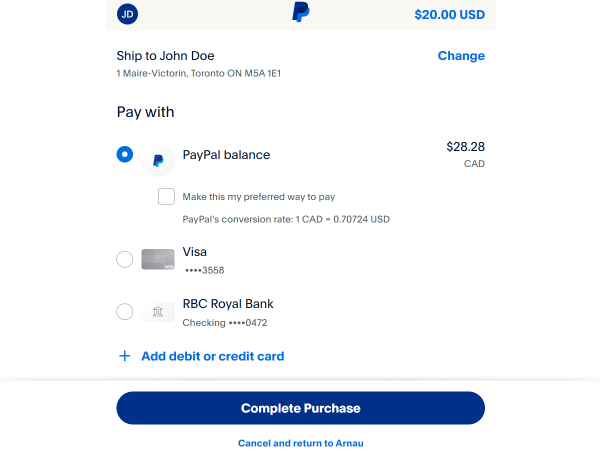
First, we complete the one-time subscription form. Once we submit it, the PayPal transaction page will open.
Complete it with the test credentials to make the transaction and press the “Complete Purchase” button.
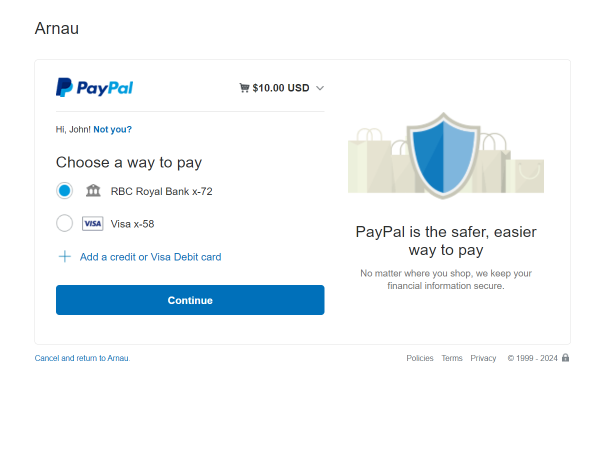
Now, as the first form is submitted, we check the second form the same way.
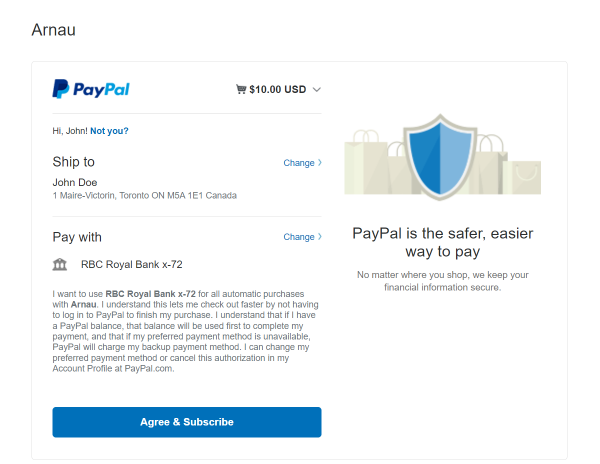
Initially, select the way to pay for the transaction.
You can also check the subscription details by clicking the arrow button next to the price.
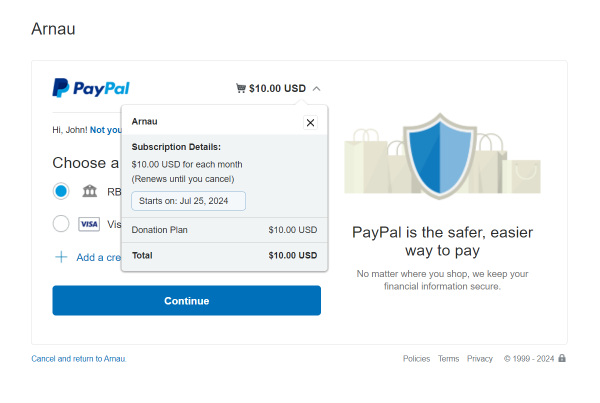
Once the “Continue” button is clicked, you can preview the details and press the “Agree & Subscribe” button.
Once the forms are completed successfully, check if the post submit actions have been worked.
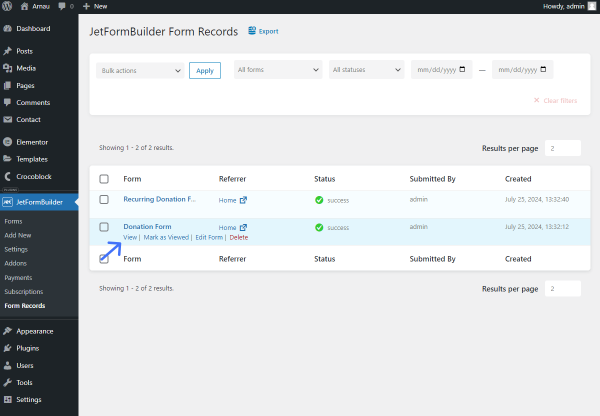
In our case, we only set the “Save Form Record” action, so we go to WordPress Dashboard > JetFormBuilder > Form Records to check if the form records have been saved.
Everything was set fine, so there will be two records: one about the one-time donation form submission and the other one about the recurring form submission.
You can check the details by pressing the “View” button next to one of the records.
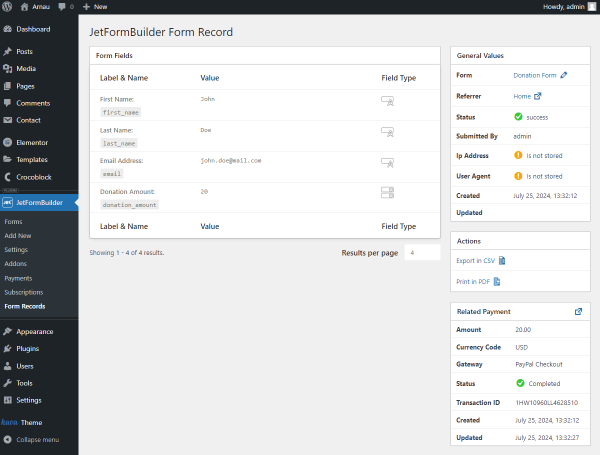
By opening the record, you can check all the details on the submitted fields.
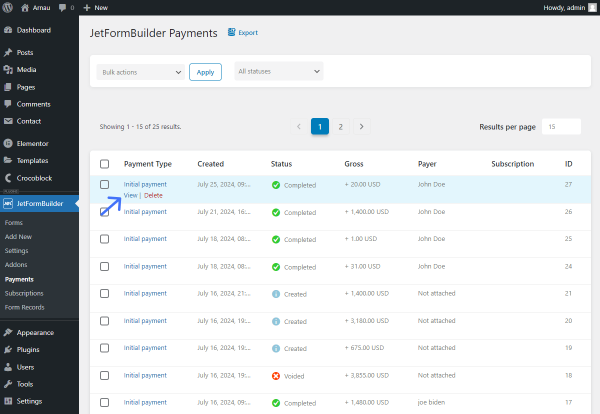
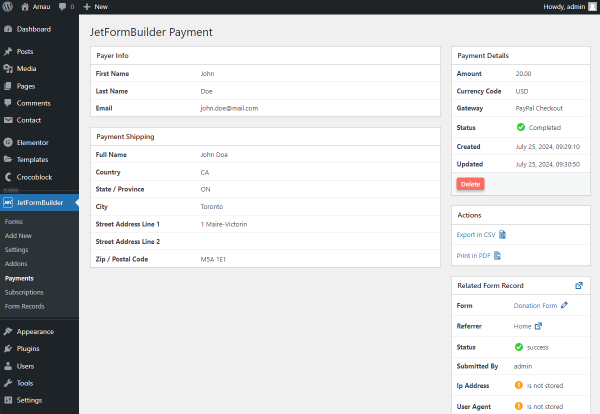
Also, let’s check the WordPress Dashboard > JetFormBuilder > Payments directory.
There, find the needed payment and press the “View” button to check the details.
On the payment page, you can check more details about the made payment.
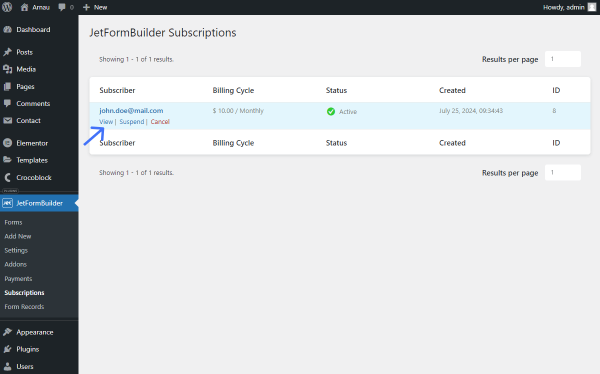
Also, you can check the recurring donation subscription made in the WordPress Dashboard > JetFormBuilder > Subscriptions directory.
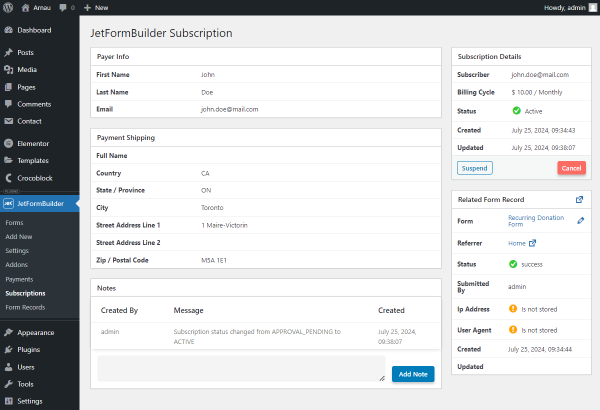
To see the subscription details, press the “View” button next to it.
Once clicked, the subscription page with details opens. Here, you can also either “Suspend” or “Cancel” the subscription.
That’s all; now, you know how to build a donation form with the JetFormBuilder plugin.