In this tutorial, we’ll figure out how to redirect our form to Thank you page with the help of the JetFormBuilder plugin and WooCommerce Cart & Checkout Action addon.
Install and Activate Add to Cart & Redirect to Checkout Addon
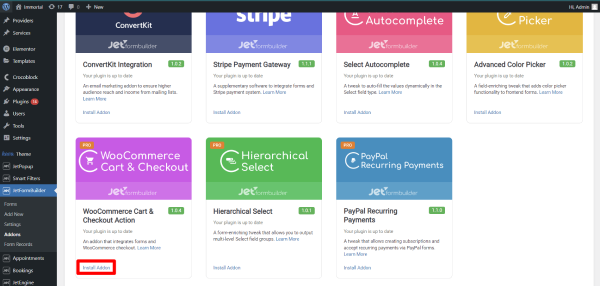
So the first step will be the installation and activation of the addon.
For this, navigate to WordPress Dashboard > JetFormBuilder > Addons and find the “WooCommerce Cart & Checkout Action” addon in the All Available Addons section. Click on the “Install Addon” and don’t forget to press the “Activate Addon” button.
Also, please, make sure that you already have the WooCommerce plugin installed and activated.
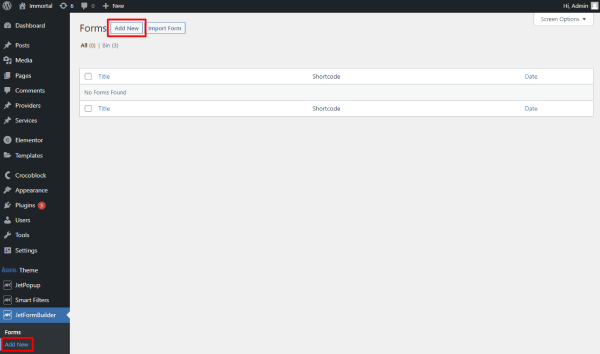
Create an Order Submission Form
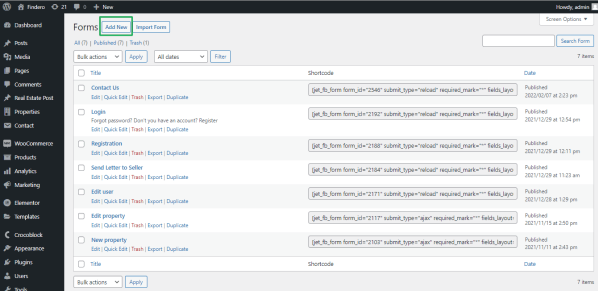
When we are done with the first step, let’s create a new form by moving to JetFormBuilder > Forms and pressing the “Add New” button.
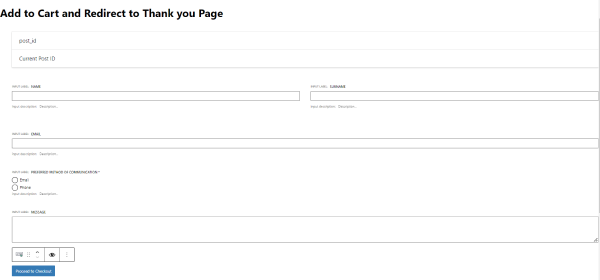
Add as many fields as you need because later, we will display the submitted info on the Thank You page.
WooCommerce Cart & Checkout Action Settings
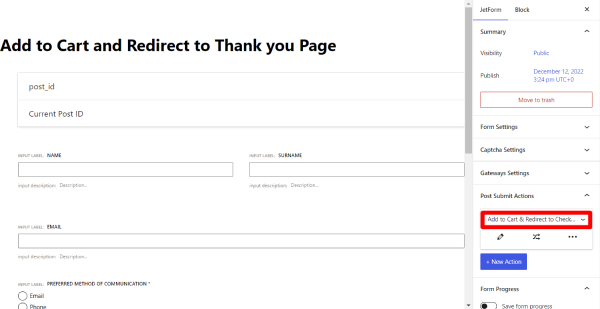
In the menu, find the Post Submit Actions section. Click on the “New Action” button and select the “Add to Cart & Redirect to Checkout” option from the list.
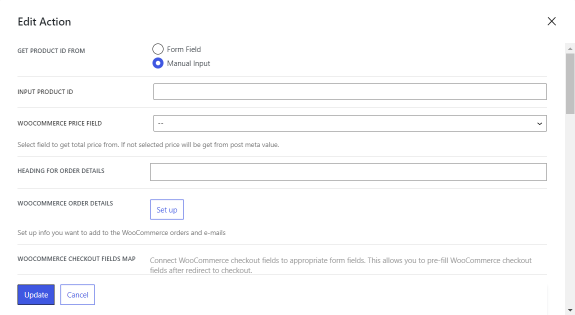
Click the pencil-shaped button to open a settings pop-up. In the action settings, we need to connect the WooCommerce checkout fields with the corresponding form fields. Let’s resume all action options:
Get product ID from. This field contains two options —“Form Field” and “Manual Input,” which can help to determine where the form will get the product ID from. By selecting the first option, ID will be pulled dynamically from the corresponding Form Field. With “Manual Input,” we can specify ID manually;
Product ID field / Input product ID. Depending on the previous step selection, here, you can select the corresponding Product ID field from your form or input the Product ID manually;
WooCommerce Price field. In this dropdown, you need to select a field that stores the total price. If the form field is left empty purposefully, the price will be received from the post meta value;
Heading for Order Details. Type in the title that you want to show before the order data on the Checkout page;
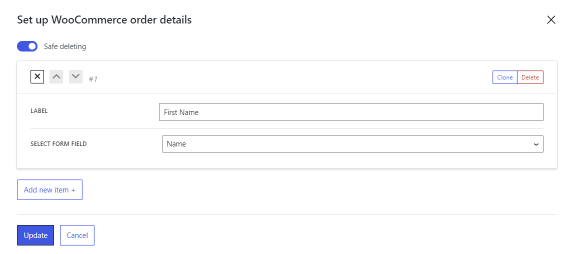
WooCommerce order details. By clicking on the “Set up” button, you can configure a list of custom fields that will be displayed on the Thank You page and during the order preview in the dashboard. To put it otherwise, you can edit the form metadata here, which means that these order details will be the same for all Redirect to Checkout actions within one particular form. Let’s check out the settings:
Safe deleting. This toggle is active by default and prevents you from deleting items unintentionally. When it is on, the item will be only removed after you confirm that you need to remove it;
Label. You can provide the field label here;
Select form field. Pick the corresponding form field that you are willing to show on the Order Details list;
Add new item. Allows you to add another custom field;
Update. Click this button to save the changes and return to the action edit window;
Cancel. Click this button to return to the action edit window without saving the changes.
WooCommerce checkout fields map. Here, you can connect the WooCommerce checkout fields to the corresponding form fields. By doing so, you get a partly pre-filled form after being redirected to the Checkout page.
NOTE
This addon allows adding just ONE item/product to the cart and redirecting the user to Checkout.
Also, keep in mind the reload method. If you choose “AJAX” in the form settings, the redirect action will be executed after ALL post-submit actions only. If you select “Reload,” the redirect will happen immediately.
Redirect to Thank you Page
After everything is set and done, let’s add the form to the Single Product page and test it.
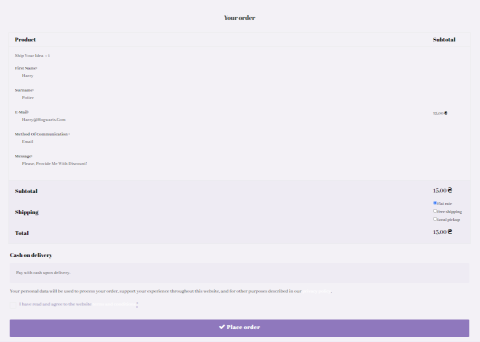
Fill in all info and press the “Proceed to Checkout” button. Then, we’ll be redirected to the Checkout page, where we need to add our billing and shipping information and place an order. As we added all form fields into Woocommerce order details, we can see them all here.
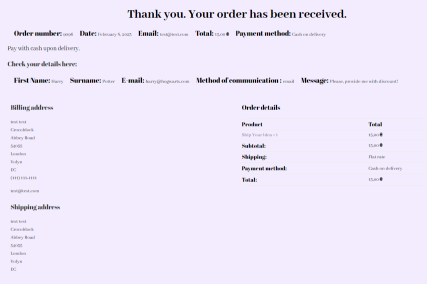
Right after we place an order, we can see Thank You page that also contains all the data we submitted during the form.
That’s all; now you know how to redirect the JetFormBuilder form to WooCommerce Thank You page on your WordPress website.
This tutorial explains how to enable/disable adding comments to front-end forms using the JetFormBuilder plugin and change the comment status.
WordPress allows adding comments to posts/pages by default. But sometimes, there is a need to allow or disallow comments on some posts/pages from the front end. This tutorial details how to enable/disable adding comments to front-end forms using the JetFormBuilder plugin and change the comment status.
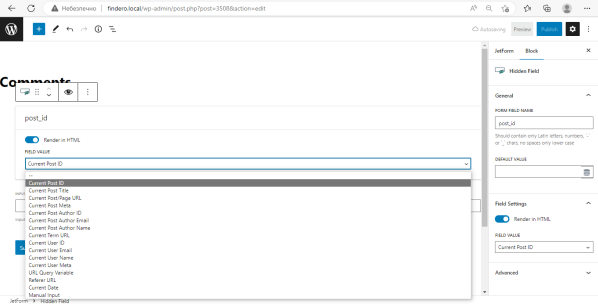
The Hidden Field block is added by default. Unroll the Field Value drop-down menu and select the Current Post ID option.
Find the Radio Field block and drop it down to the form.
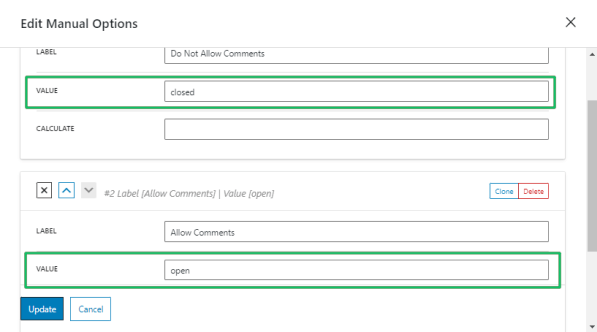
Press the “Manage Items” button of the Radio Field block to create the radio field with two manual options: allow and do not allow comments. Add the following labels and values of these options, respectively:
for the allowing option: type Do Not Allow Comments in the Label field and closed in the Value field;
for the disallowing option: type Allow Comments in the Label field and open in the Value field.
Press the”Update” button to save changes.
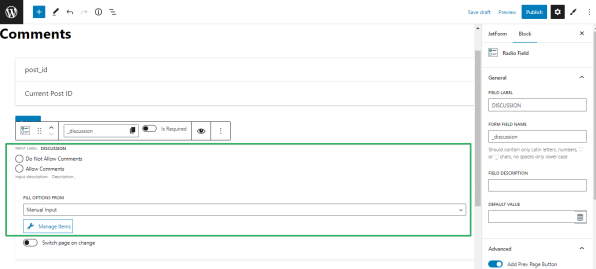
Navigate to the Settings tab of the Radio Field block and fill in the Field Name field (here, Discussion) and the Form Field Name field (here, _discussion). The Radio Field block looks as follows:
Settings of the form
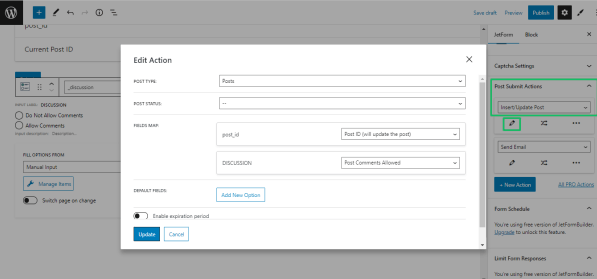
Navigate to the Post Submit Actions of the JetForm settings. Press the “Edit Action” button (the pencil icon). Apply the following settings:
select the Posts option from the Post Type drop-down menu;
select the Post ID (will update the post) option from the post_id subfield of the Field Map field;
select the Post Comments Allowed option from the Discussion subfield of the Field Map field.
Press the “Update” button to Save changes. The Adding the Form Block in Gutenberg tutorial explains adding the different fields to forms.
Adding the Form to a Page/Post
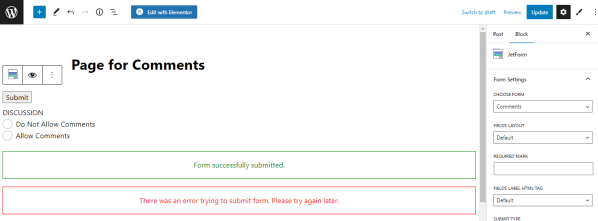
Open the page or post to add the form (here, Page for Comments). Find the JetForm block to add the form to the page. Drag and drop the block to the page.
Navigate to the Settings tab of the JetForm block and select the name of the previously built form (here, Comments) from the Choose Form drop-down menu.
Allowing or Disallowing Comments for Posts/Pages
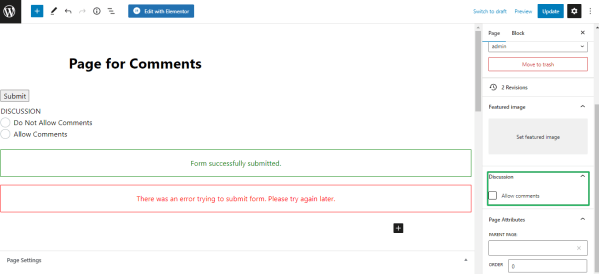
Settings to allow comments
Navigate to the Discussion tab of the JetForm block’s settings. The name of this tab corresponds to the text filled in the Field Name field (here, Discussion) while building the form (here, Comments). Tick the Allow comment and Allow pingbacks & trackbacks options.
Save changes. Publish the page.
Allowing/disallowing comments
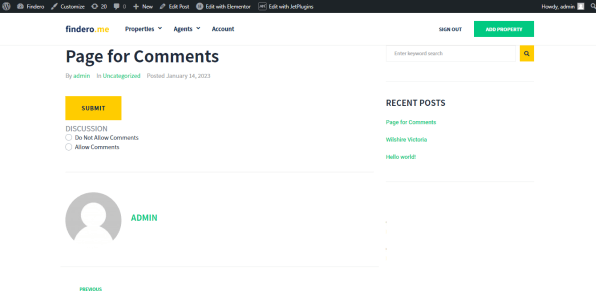
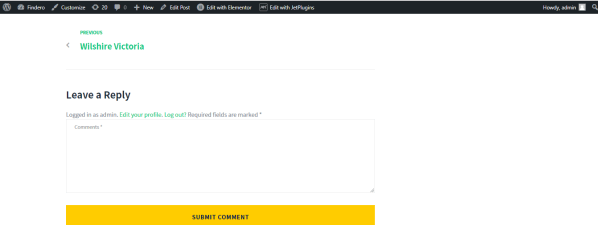
The front-end view of the page looks as follows:
Choose the Allow Comments option of the Radio Field block. Press the “Submit” button. It allows adding comments and activates the text field for comments.
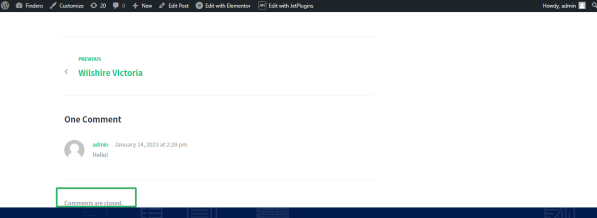
Press the “Submit Comment” button to save the comment. Choose the Do Not Allow Comment option on the front end of the Radio Field block to disable adding.
That’s all about how to allow or disallow comments for posts or pages from the front-end forms.
The Calculated field of JetForms supports ternary operators which allow for building complex conditional formulas. With the help of this feature, you can calculate the tax payable based on different levels of income and the tax rate in the threshold.
The Calculated field allows building complex conditional formulas thanks to ternary operators‘ support. Ternary operators (also called conditional operators) help us construct conditional logic between several parts of the calculated formula.
The basic steps to build a conditional formula are described in the main tutorial on How to Use Conditional Formulas in the Calculated Field. Let’s put this knowledge to praxis and move on to the main use case of this article – calculating tax rates.
Describing the Case
Listed below are the necessary conditions for calculating tax rates in our example. The tax depends on the taxable income.
For income from 0 to $18,200, the tax equals zero.
For income from $18,201 to $45,000, the tax equals 15 centsfor each dollar over$18,200.
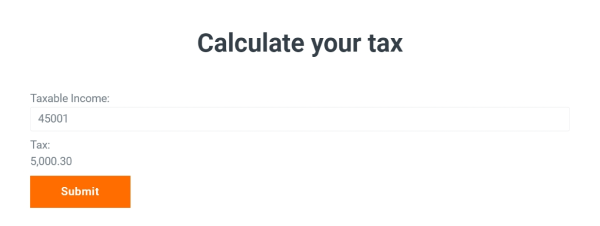
For income from $45,001 to $120,000, the tax equals $5,000; additionally, the person should pay 30 cents for each dollar over $45,000.
For income from $120,001, the tax equals $30,000; additionally, the person should pay 40 cents for each dollar over $120,000.
Building the Formula for Calculating Tax Rates
Add the necessary fields
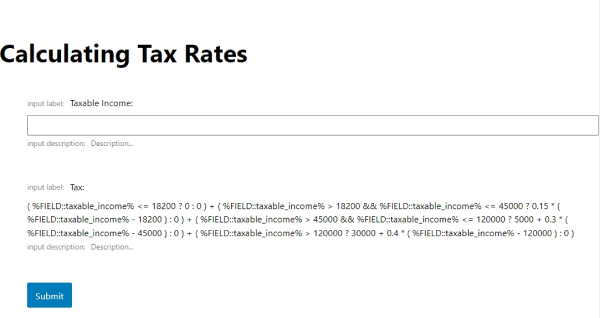
Navigate to JetFormBuilder > Forms > Add New and open the Gutenberg editor. We need two fields for our purpose – a Number field where the user can input the taxable income and a Calculated field. Let’s name the Number field “taxable_income”.
Prepare for building the formula
As outlined in our main tutorial on How to Use Conditional Formulas in the Calculated Field, a ternary operator takes three operands – a condition, an expression that needs to be executed if the condition is true, and an expression that will be executed if the condition is false. The primary condition is always followed by a question mark “?”, while the expressions are separated with a colon “:”.
In this specific use case, we combine several ternary operators in one formula to set several separate conditions.
The first condition can be articulated like this: “If the “taxable_income” field contains a value less than or equal to 18200, then the final value 0; if not, the condition returns 0”.
The second condition: “If the “taxable_income” field contains a value greater than 18200 but less than or equal to 45000, then subtract 18200 from the value of the “taxable_income” field and multiply by 0.15; if not, the condition returns 0”.
The third condition: “If the “taxable_income” field contains a value greater than 45000 but less than or equal to 120000, then subtract 45000 from the value of the “taxable_income” field and multiply by 0.3 plus add 5000; if not, the condition returns 0”.
The fourth condition: “If the “taxable_income” field contains a value greater than 120000, then subtract 120000 from the value of the “taxable_income” field and multiply by 0.4 plus add 30000; if not, the condition returns 0”.
Finally, all these conditions need to be summed to return a positive result.
Build the formula
Firstly, let’s build each conditional part of the whole formula separately.
For the first condition, the conditional formula should be the following:
The article on the Calculated fieldprovides an overview of the values you can use in the Calculated field of JetFormBuilder. In that article, we gave examples of basic mathematical operations like addition, subtraction, multiplication, and division. However, the Calculated feature is not limited to these arithmetic operations – it supports more complex calculation operations that will help you build conditions within the Calculated field’s formula.
The Calculated field gives a possibility to build conditional formulas using ternary operators.In JavaScript, the ternary operator (also called the conditional operator) is an operator that takes three operands – a condition, an expression that needs to be executed if the condition is true, and an expression that needs to be executed if the condition is false:
condition ? exprIfTrue : exprIfFalse
The primary condition is always followed by a question mark “?”, while the expressions are separated with a colon “:”.
In this way, you can set one value for the Calculated field if a specific condition returns true and another value if the condition returns false. Below, we will discuss how you can benefit from ternary operators and will look into some usage examples.
Using Ternary Operators in the Calculated Field
Using complex calculations, you can make the value of the Calculated field conditional. The most common case is to adjust the output of the Calculated field to the value the user enters into a different field in the form.
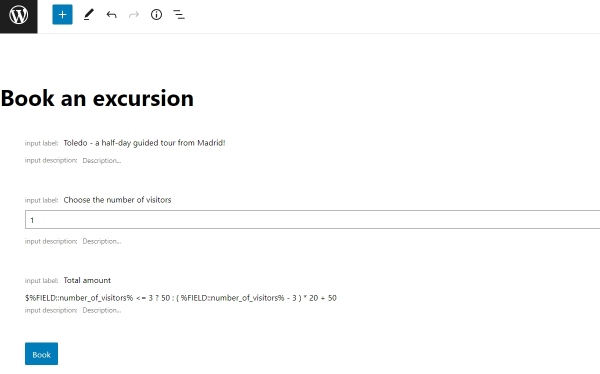
Let’s consider the following example. On a tour booking website, a filling form lets the users sign up for an additional paid excursion. The final price for a tour depends on the number of guests. The total price remains static if the number of people taking the tour is up to three. If the number of people exceeds three, the price increases by a set amount per every new person. This rule of price dependency can be built with ternary operators.
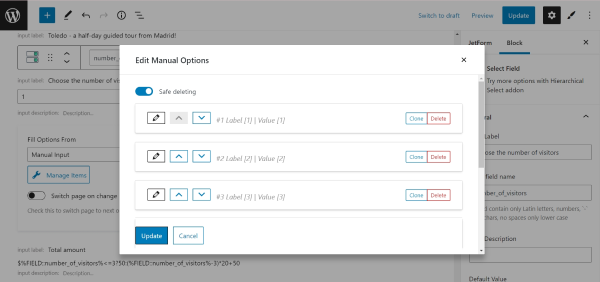
Let’s move to the form’s settings in the Block Editor. The first added block to the form is the Select field which has the name “number_of_visitors”. For the Select field, we added a set of options through the Manual Input source type. The list of options consists of seven items, each being a number from 1 to 7.
In the Select field, the user can choose the number of visitors joining the tour. The final value of the Calculated field will depend on this number.
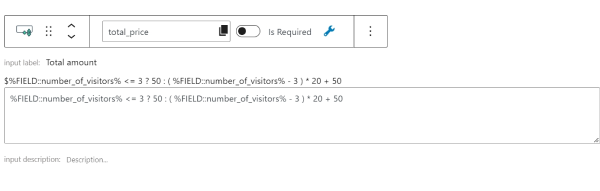
The second added block in the Gutenberg editor is the Calculated field. Inside the input box of the field, we inserted this formula:
As a result, the user will pay $50 if the number of guests is less or equal to 3; if the number is greater than 3, the user will pay an additional $20 for each new guest. The formula looks complex, but let’s look at each part.
“%FIELD::number_of_visitors% <= 3” – This is the main condition. It defines which formula from those that come next will be executed. This part tells: “If the field with the name number_of_visitors is less or equal to the value of 3, then…”
“? 50” – This value will be set as the final value of the Calculated field if the previous condition returns true. We can continue the rule we articulated earlier in the following way: “If the field with the name number_of_visitors is less or equal to the value of 3, then the final price is 50”.
“: ( %FIELD::number_of_visitors% – 3 ) * 20 + 50” – This is the formula that will be used to calculate the final value if the previous condition returns false. The formula calculates the price the user will pay for the tour if the number of chosen guests is higher than 3.
Take the number of visitors the user specified in the Select field and subtract 3 – this way we get the number of additional guests; then, multiply this number by 20 (“20”, in our case, is the price for each new guest); finally, add 50 to the total price, which is the price for the first three guests.
Now, the rule can be articulated like this: “If the field with the name number_of_visitors is less or equal to the value of 3, then the final price is 50; otherwise (if the value in the field number_of_visitors is greater than 3), the price will be calculated from the formula of the third part of condition”.
Each part of the condition can use formulas, static numbers, form field values, and meta field values.
Below is the final result on the front end. The price for the tour is $50 if the user selects three guests:
Then, the price for the tour increases by an additional $20 for each new guest:
Combining Several Ternary Operators in One Formula
In the Calculated field, there is a possibility to combine several conditions to calculate the final value. Assume that the price for a certain product depends on the product’s quantity. In this case, we need to integrate several conditions into one formula.
Let’s consider the following case. The price for products on an e-commerce website should be calculated by the following rules:
$1 for 250 units.
$0.75 for 250 – 500 units.
$0.50 for 500+ units.
The main task is to combine several conditions: “The price for the product is $1 if the number of units is less or equal to 250; the price is $0.75 if the number of units is greater than 250 but less or equal to 500; the price is $0.50 if the number of units is greater than 500”.
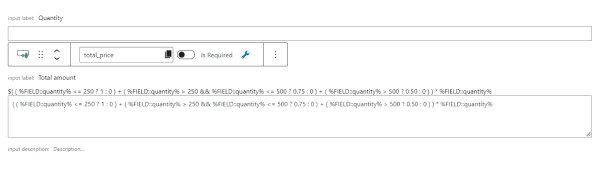
To build this type of form, add two fields to the block editor – a Calculated field that will contain the formula and a Number field that will be responsible for quantity input. Let’s name the Number field “quantity”.
That means the price in the Calculated field depends on the value of a Number field which has the name “quantity”. Finally, the solution is the following:
There are several conditions in the above formula.
“%FIELD::quantity% <= 250 ? 1 : 0” – If the “quantity” field contains a value less or equal to 250, then the final value is 1; if not, the condition returns 0.
“%FIELD::quantity% > 250 && %FIELD::quantity% <= 500 ? 0.75 : 0” – If the quantity field contains a value higher 250 OR less or equal to 500, then the final value is 0.75; if this condition is not met, it returns 0.
“%FIELD::quantity% > 500 ? 0.50 : 0” – If the quantity field contains a value greater than 500, the final value is 0.50; if this condition is not met, it returns 0.
Finally, all these three rules are summed. Thus two of the three rules return 0, and only one rule returns the needed value. Then, this value is multiplied by the quantity number – “* %FIELD::quantity%”
This example describes a possible way to combine several conditions in one calculated formula. For more examples, check our tutorial on Customizing Tax Rates with the help of ternary operators.
The PayPal Recurring Payments addon for JetFormBuilder adds PayPal subscriptions to forms, manages their settings, keeps them up to date, and tracks all payments.
The PayPal Recurring Payments addon is a PRO addon for the JetFormBuilder plugin. The addon integrates pre-created PayPal subscriptions to forms and manages payment settings. The addon transfers payments according to the PayPal subscription settings (pricing plans, billing cycles, trial periods, subscription quantities, etc.). The addon aggregates subscription data through one dashboard.
Addon functionality:
Recurring payments: automatically supports periodic payments of different types (fixed, quantity-based, volume-based, or tiered) with trial time consideration;
Convenient subscriptions dashboard: allows viewing and editing subscription details (subscribers, billing cycle, status) and payment details (payer, payment shipping, dates, gross sums) through the dashboard;
Refunds: carries out refund payment from the Subscription dashboard;
Suspend or cancel subscriptions: sets the needed status for the user subscription from the dashboard.
Action Events: applies different actions as form settings (events) instead of the callbacks as php-functions;
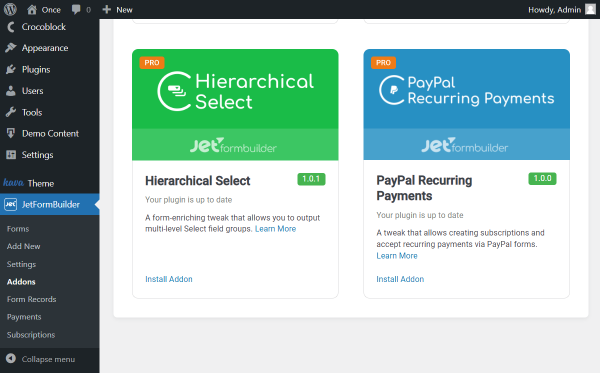
Head to WordPress Dashboard > JetFormBuilder > Addons. Among all the available items, find the PayPal Recurring Payments and press the “Install Addon” button.
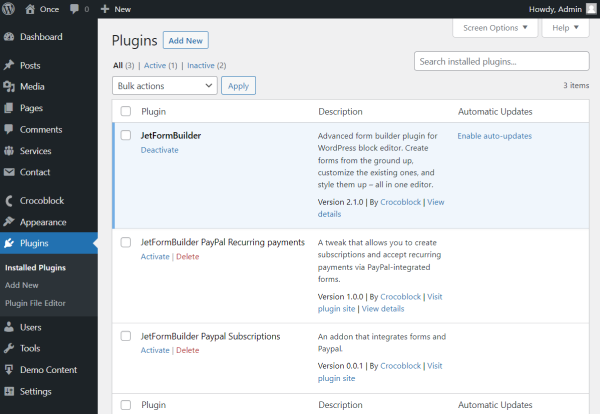
Then don’t forget to activate the addon to get access to all of its features.
To do so, proceed to WordPress Dashboard > Plugins and find the installed addon. Hit the “Activate” button.
NOTE
The addon should be installed and activated on the remote website. It is because PayPal sends information about the made subscriptions and payments that is possible only if the site is located on remote hosting.
How to Create a Subscription Plan
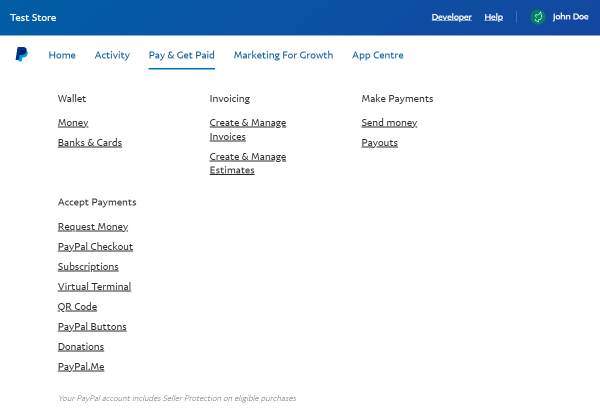
Initially, log in to your PayPal Developer account. Hover over the Pay & Get Paidsection to see the available pages. The Subscriptions page is the one we need.
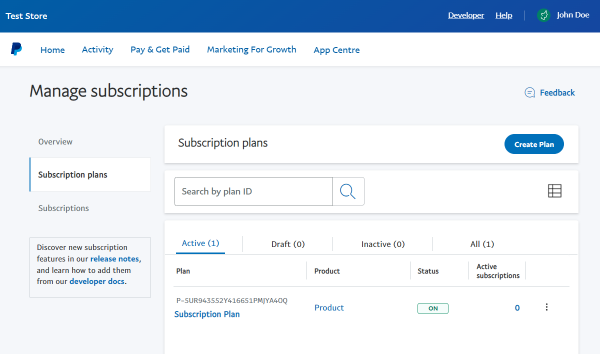
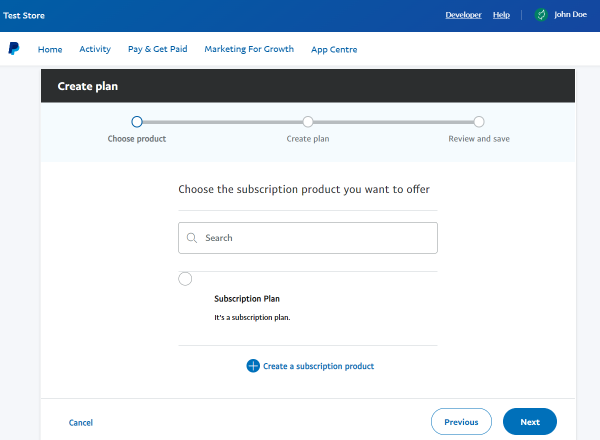
So, here we can see the PayPal subscription plans in the samely named tab. Click on the “Create Plan” button to build a new one.
If you have already built some plans before, they will be suggested to you as options for selection.
Or, press the “Create a subscription product” button to set a plan from scratch.
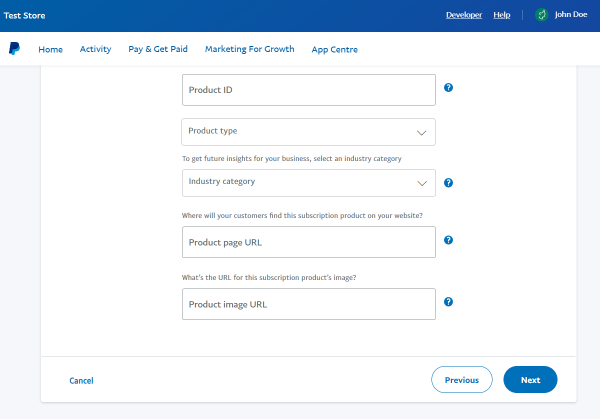
Fill in the suggested fields that correspond to the info about the product you will provide in a subscription.
You can complete the fields or leave some empty as they are not obligatory. Hit the “Next” button to proceed to the following step.
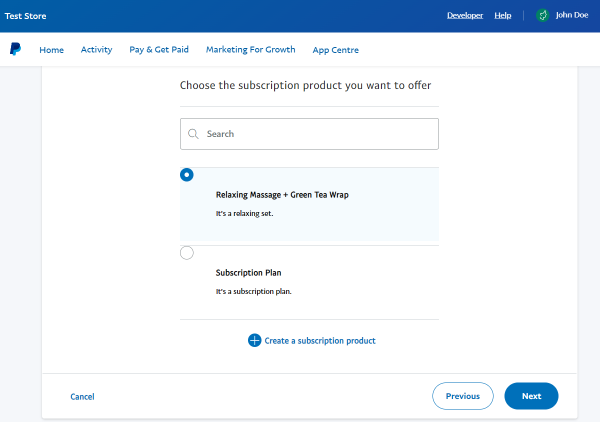
You can see the same window displayed before, but now the list includes the item we have just added. Select it and click the “Next” button.
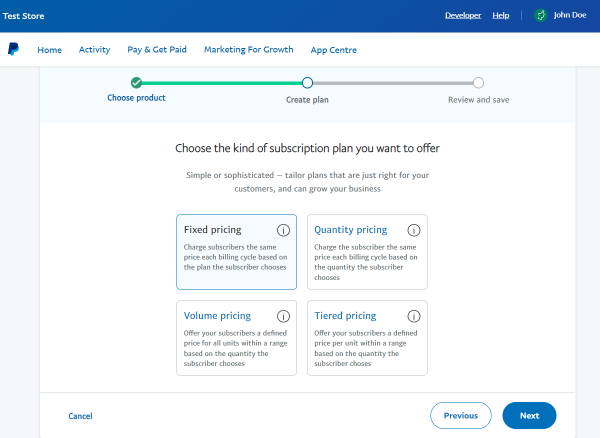
This step is one of the most important for customization. Pick the pricing option that is the most preferable for the subscription plan you create.
Then push the “Next” button once again.
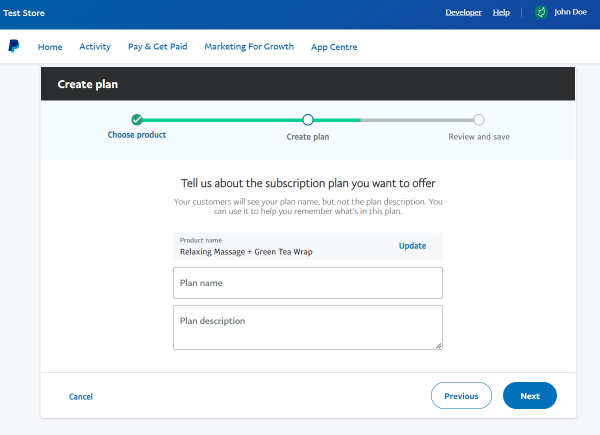
Give a name to the PayPal subscription plan and write a description. Click the “Next” button to continue the setup.
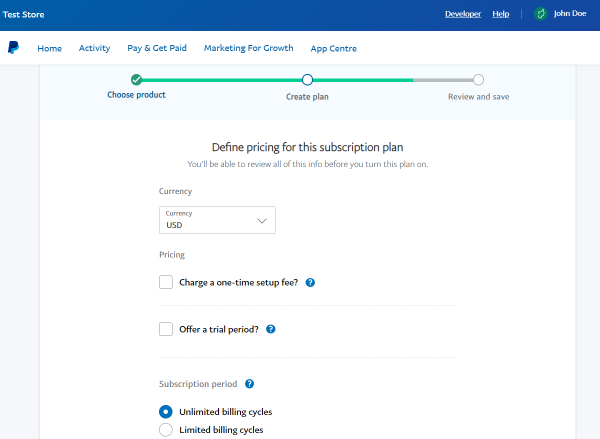
Adjust the settings concerning pricing. Specify the currency and check the other options available.
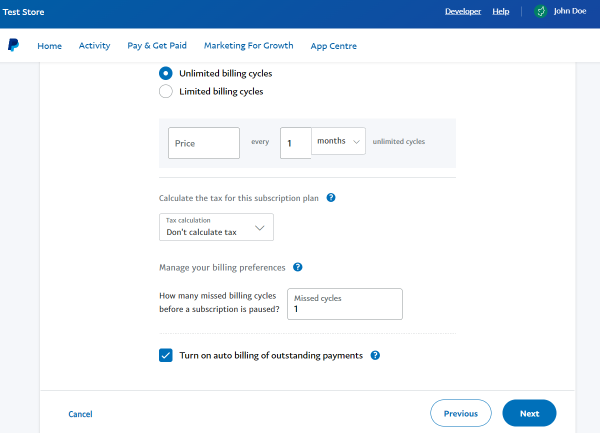
Don’t forget to specify the price in the corresponding field and decide how it will be charged. Hit the “Next” button to review the plan you have just customized.
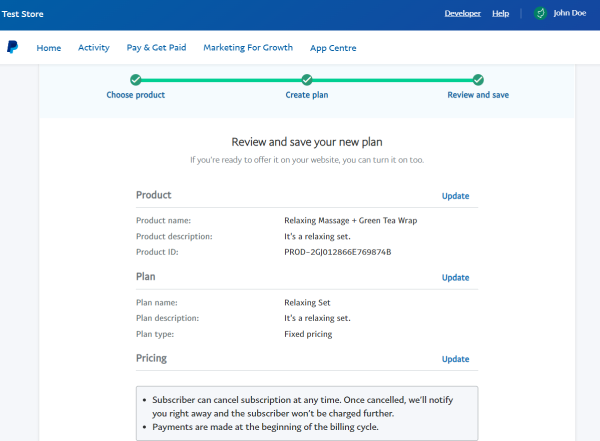
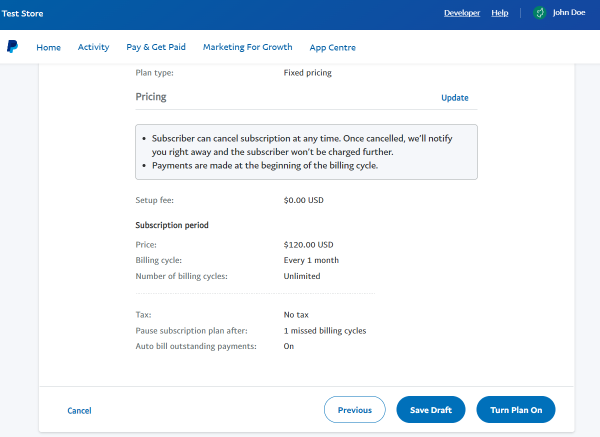
It is the last step, now check the details and push the “Update” button next to the information if it needs to be edited.
Once done, hit the “Turn Plan On” button to make the plan live.
How to Create a Form with Plans
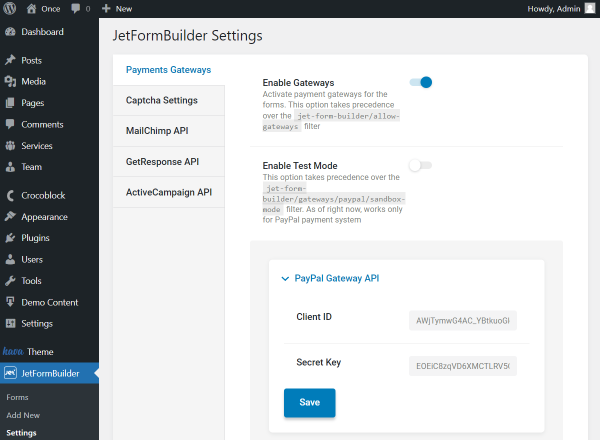
Before building the form, ensure that the PayPal gateways are activated for your website. Open the WordPress Dashboard > JetFormBuilder > Settings directory and check the Payments Gatewayssettings.
Toggle the Enable Gateways switcher. Optionally, you can also activate the Enable Test Mode feature.
Also, mind filling in the following Client ID and Secret Key fields. Complete them with the corresponding data and hit the “Save” button.
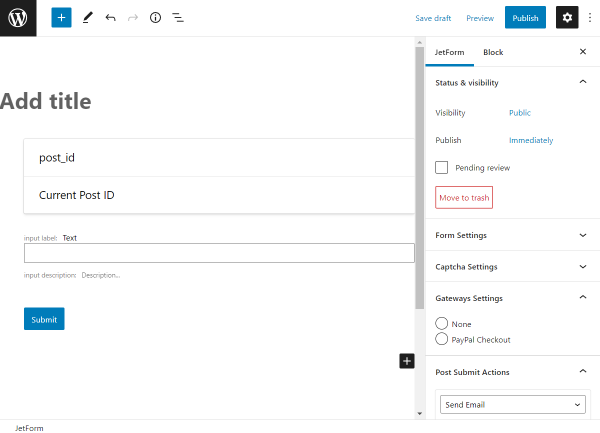
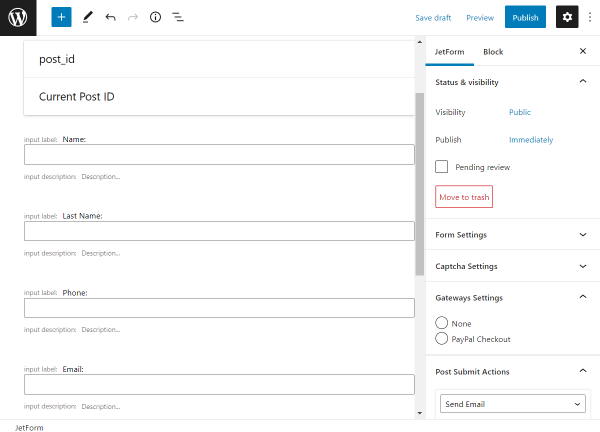
Go to WordPress Dashboard > JetFormBuilder > Add New. Give a title to the form and delete the default fields if you don’t need them.
Add all the desired fields to the form. For instance, our form includes a Hidden Field, several Text Fields, and one Action Button.
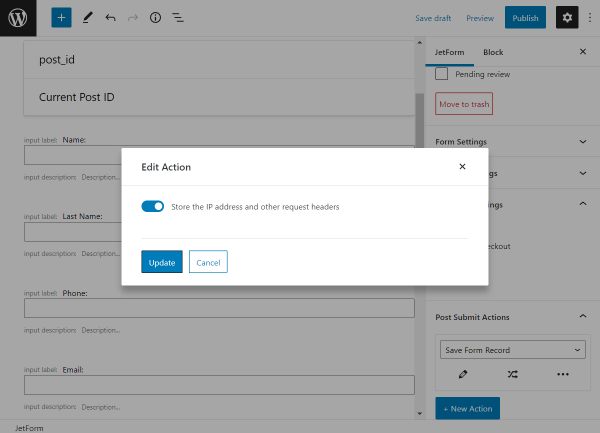
Navigate to the Post Submit Actions tab and select the “Save Form Record” option from the available drop-down list. Otherwise, the PayPal Checkout settings will not be active.
Also, click on the pencil-shaped button to edit the action. In the appeared window, you can enable the “Store the IP address and other request headers” that will save the user’s IP address and User Agent data.
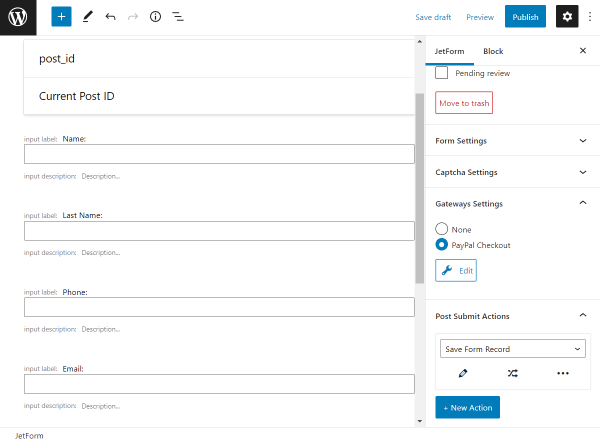
The “Edit” button next to the enabled PayPal Checkout becomes active. Press it to get to the settings.
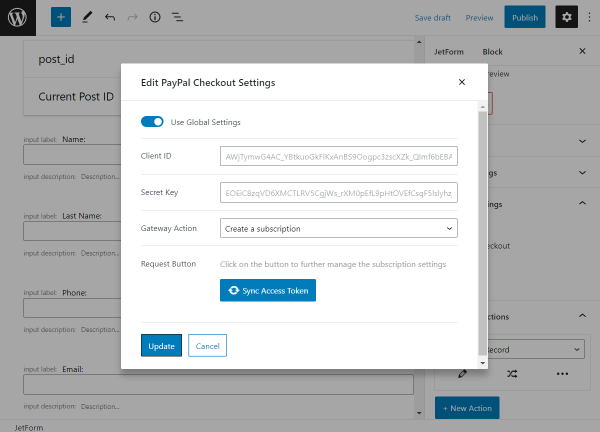
Enable the Use Global Settings toggle to inherit the Client ID and Secret Key you have entered earlier in the JetFormBuilder settings.
Or, if you haven’t done it before or need to substitute data, you can do it right in the following fields.
Mind setting the Gateway Action by selecting the “Create a subscription” option from the drop-down menu.
Push the “Sync Access Token” button to synchronize the data.
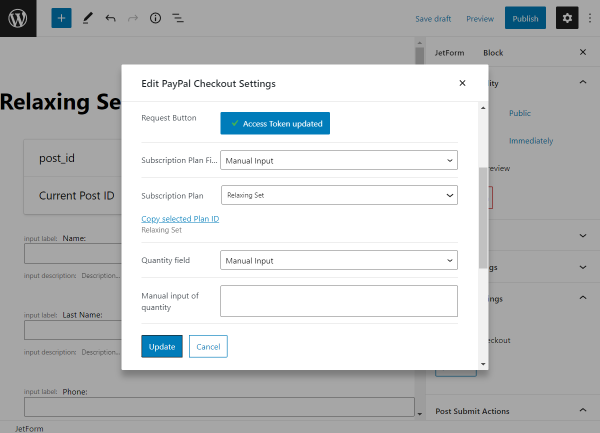
As you see, the access token data is now updated.
Select the needed option in the Subscription Plan Field. Here you can choose one of the fields you have added to the form or pick a “Manual Input” option. Now the last mentioned option is our case.
So as we have picked manual input, we need to specify the Subscription Plan we built earlier.
As for the Quantity field and Manual input of quantity fields, we leave them with the default values entered because, in our case, we don’t need to specify a quantity.
Or, type “1” in the Manual input of quantity field, and it will work in the same way.
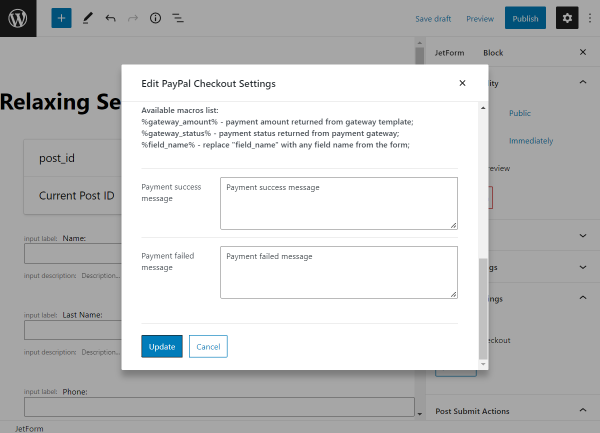
Scroll down to available macros and fill in the messages shown to the user in the specific cases.
Click on the “Update” button to save the adjusted settings.
That’s it for the form; now, you can hit the “Publish” button.
Action Events
This tool applies actions at different performing moments, i.e., during its execution, after request processing, after checkouts, etc.
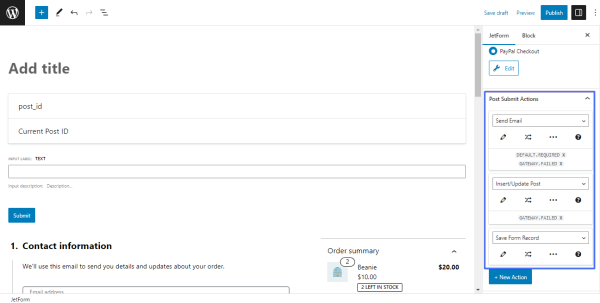
Navigate to the Post Submit Action settings of the form settings and select the action you need from the appropriate drop-down menu.
NOTE
Except for the Save Form Record option, the Action Event settings are available for all Post Submit Actions from the drop-down menu..
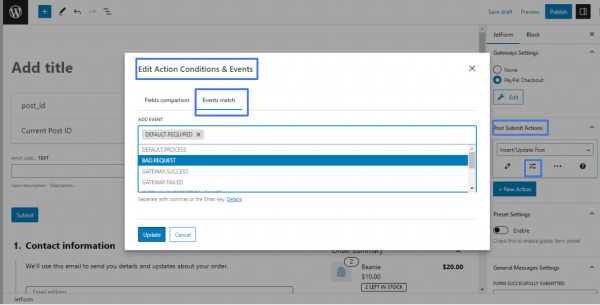
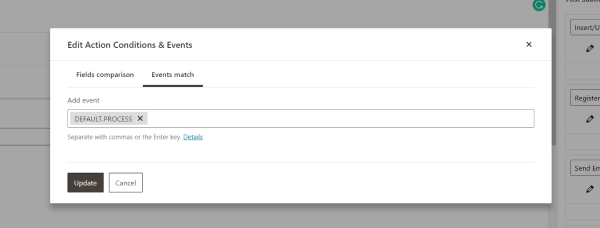
Press the Condition button to open the Edit Action Conditions & Events popup window. Here select the Events Match tab and choose one or some options from the Add Event drop-down menu:
DEFAULT.PROCESS ー the event is performed simultaneously with the specified action. This event is executed before redirecting to check out if the PayPal/Stripe is functionality enabled;
BAD.REQUESTー the event is performed after processing the request if the form fields have errors like the wrong field format of the media field or the field text exceeds the limit;
DEFAULT.REQUIREDー the event is performed in any case, even if the form fields have errors or unsuccessfully performed actions. This event is launched at the end of the form response is submitted.
NOTE
The DEFAULT.REQUIRED event is a default event for the Save Form Record action and cannot be added to other events.
GATEWAY.SUCCESSー the event is performed after the payment system has checked up on the payment made or subscription issued;
GATEWAY.FAILED ー the event is performed if users have returned from the checkout page of the payment system without making a payment or subscribing.
GATEWAY.SUBSCRIPTION.CANCELLEDー the event is performed if users have canceled the subscriptions;
GATEWAY.SUBSCRIPTION.EXPIREDー the event is performed if the subscription term of use has been expired;
GATEWAY.SUBSCRIPTION.SUSPENDED ー the event is performed if the subscription is suspended.
Users can add different actions with different events.
NOTE
If you have some actions referring to the DEFAULT.REQUIRED event, assigning the Save Form Record the last action is recommended. Otherwise, the completed action status can be saved incorrectly.
Place a Form on the Page
You can place the form on the needed page or in the pop-up. Let’s take a look at the second case.
Navigate to WordPress Dashboard > JetPopup > Create New Popup. Give a title to the pop-up and push the “Edit with Elementor” button to open the Page Builder.
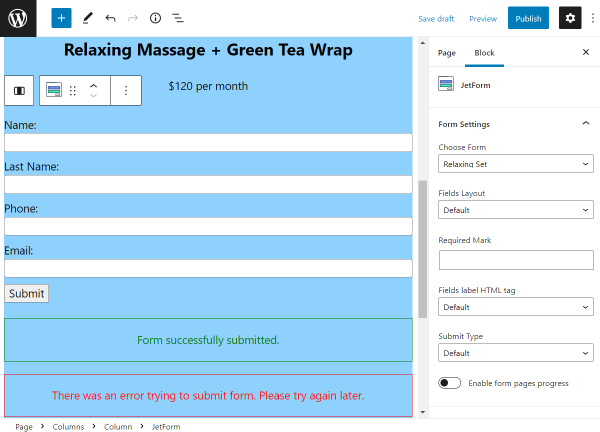
Add the needed widgets to the pop-up and search for the JetForm one.
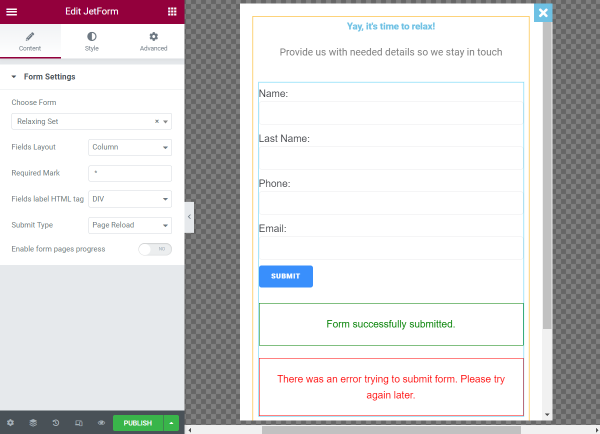
Choose Form — select the JetFormBuilder form you have just created;
Fields Layout — pick how the fields will be displayed, in a column or a row;
Required Mark — change the default mark for the obligatory fields if desired;
Fields label HTML tag — define the HTML tag used for the label of the fields;
Submit Type — select whether the page will be reloaded or the AJAX type will be applied once the form is submitted;
Enable form pages progress — activate the toggle if you have used Form Break Fieldin the form.
Publish the achieved result and head to the page editor where you want to place the button, which will lead to the pop-up. You can edit the existing one or create a new page. Once again, there are no limits; you can build a page both in Elementor and Gutenberg.
Form in Elementor
Add or search for the Button widget. Open the Advanced tab and find the needed item in the Attached Popup selector.
That’s it for the page editor, press the “Publish/Update” button and open the front end page.
Form in Gutenberg
As the JetPopup plugin is not available for Gutenberg, you can add a form there with the help of the JetForm block.
The settings presented here are the same as in Elementor.
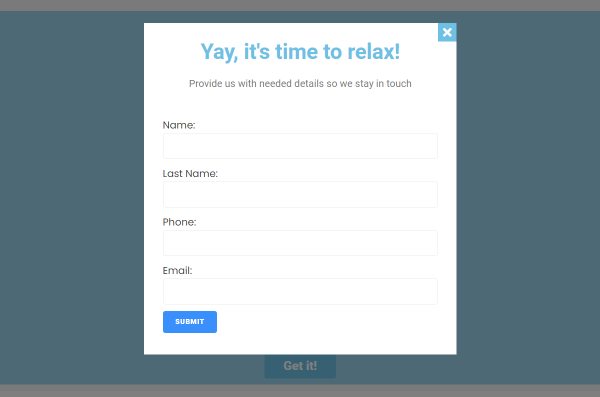
We press the button to which we have attached a pop-up to see the form.
Complete the form with the required information and submit it by pressing the button below.
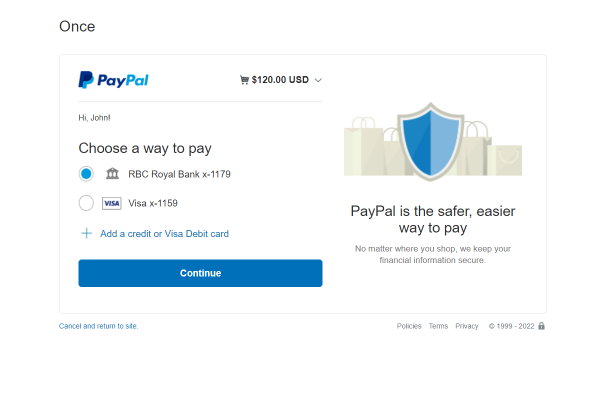
The user will be redirected to the PayPal payment page. Now log in to the account and select the bank card if needed. Press the “Continue” button.
Check the provided info and press the “Agree & Subscribe” button.
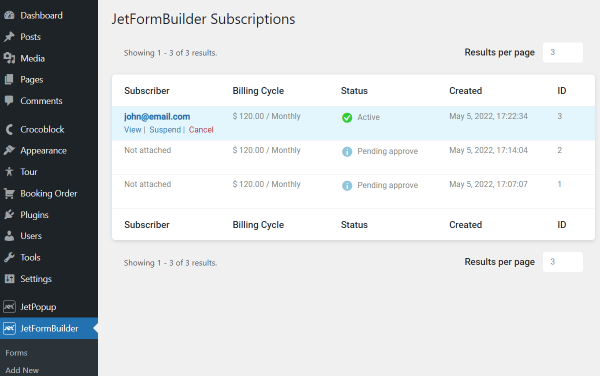
Let’s check the subscription status by heading to WordPress Dashboard > JetFormBuilder > Subscriptions.
NOTE
The payment status may be updated several minutes after the payment is actually made.
The new subscription info is right here. We can also see that its status is set to active.
If we hover over the item, we can spot the “Suspend” and “Cancel” buttons. We will return to these features later.
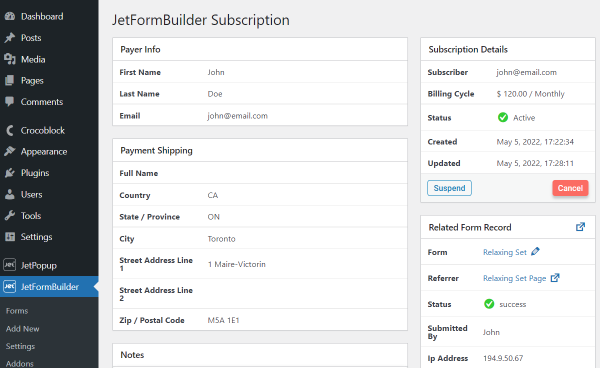
Open the created subscription to see additional details about it.
Look at the several blocks presented here. It is Payer Info, Payment Shipping, Subscription Details, and not less critical Related Form Record.
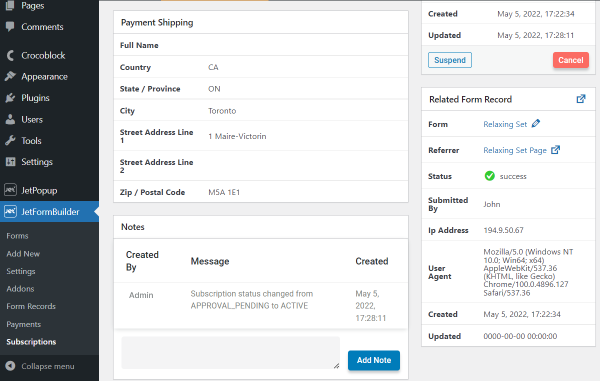
One more section available is Notes. Here you can see the messages about subscription status changes or add your note by completing the field and pressing the “Add Note” button.
You may also notice the “Suspend” and “Cancel” buttons here.
How to Suspend a Subscription
Let’s take a look at the ability to suspend the subscription. Press the “Suspend” button.
Specify the reason or leave the default value and push the “Suspend Subscription” button.
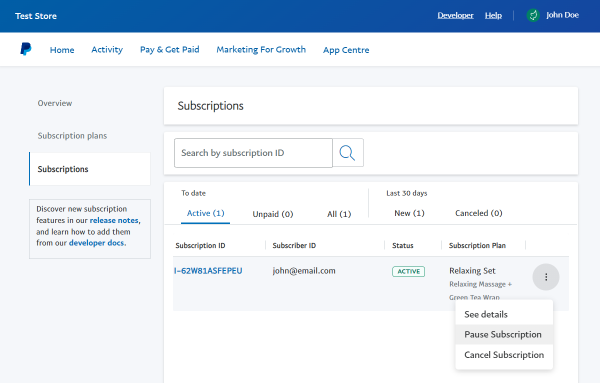
Or, there is another way to suspend the subscription. You can do it right through the PayPal account. Head to the Subscriptions tab and find the needed subscription.
Press the three dots shaped button and hit “Pause Subscription” there. From now on, the subscription will be paused.
NOTE
If you suspend the subscription via PayPal, you need to wait a couple of minutes before the status will change on the WordPress website.
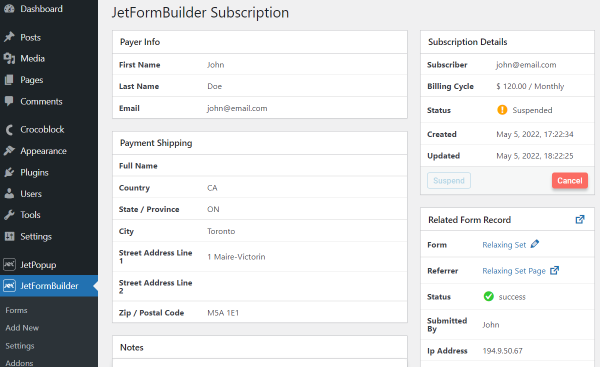
Check the status; now it is changed to “Suspended.”
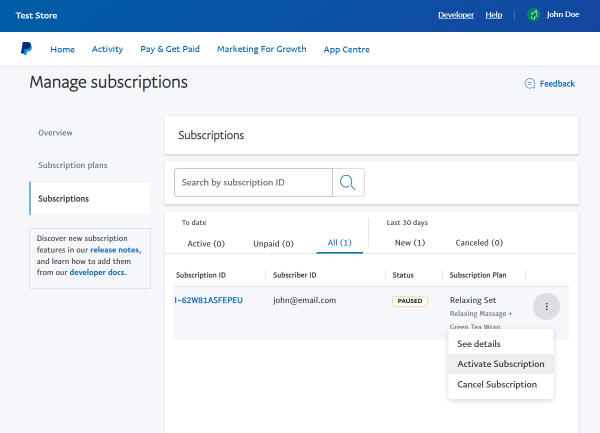
How to Activate a Subscription
The subscription can be reactivated if needed. However, you can do it only from the PayPal account.
Click the “Activate Subscription” button next to the item to enable the subscription once again.
How to Cancel a Subscription
Besides, you can discontinue the subscription. Press the “Cancel Subscription” button in the PayPal account.
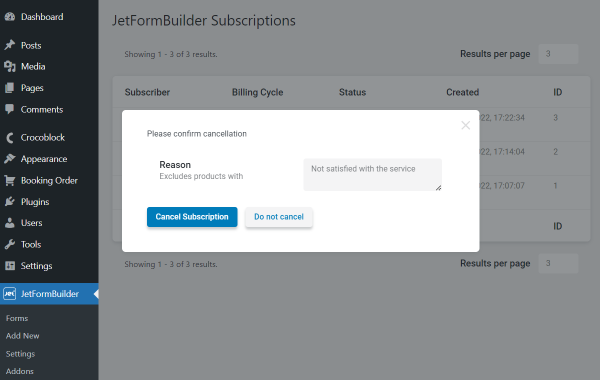
Or, you can cancel the subscription from the WordPress Dashboard > JetFormBuilder > Subscriptions section.
NOTE
If you cancel the subscription, it can not be activated once again.
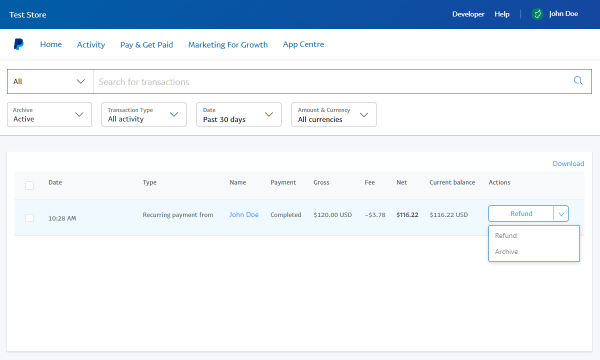
How to Make a Refund
A refund can also be made via PayPal. Head to the Activity > All Transactions and find the “Refund” button next to the received payment. Click on it to see the refund details.
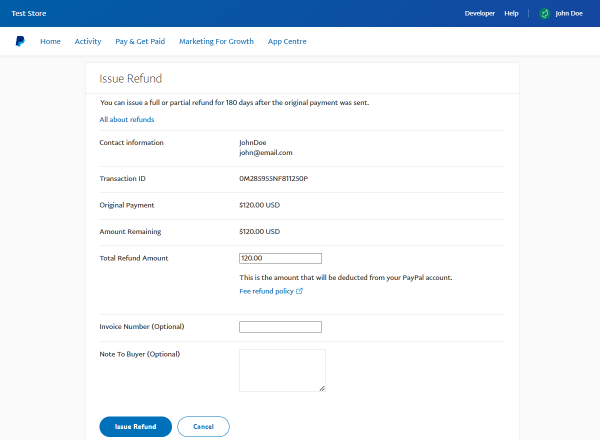
Specify the total of the refund in the Total Refund Amount. Optionally, you can fill in the Invoice Number and leave the Note to Buyer.
That’s it; now you know how to use the PayPal Recurring Payments addon available with the JetFormBuilder PRO plugin.
Stripe Payments is a JetFormBuilder addon that links JetFormBuilder and JetEngine forms to Stripe’s software, allowing you to carry out any payments online via Stripe Gateway.
With the help of this addon, your clients will be able to pay for product orders, all sorts of specialty services, tickets to various events, and so on. Stripe Payments will also come in handy if you offer booking and rental services.
Addon Functionality:
Stripe Gateway
AJAX redirect to Checkout
Actions before & after payment
How to Create a Stripe Payment Form
Before we begin, make sure you have the following plugins installed and activated:
JetFormBuilder — build a form, edit the post-submit actions, and add a CAPTCHA if needed;
JetEngine — create a CPT, add custom meta fields and taxonomies;
Elementor free — add the created form into the editor to finalize the customization and style up the page. Alternatively, you can use Gutenberg block editor; it is fully compatible with the JetFormBuilder plugin.
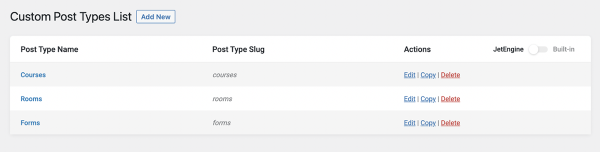
1. Add Custom Post Type
Proceed to the WordPress Dashboard > JetEngine > Post Types directory. Add a new custom post type by pushing the “Add New” button or open one of the previously created CPTs.
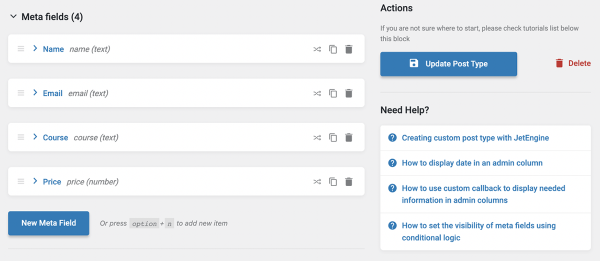
Once you open the custom post type editor and adjust the General Settings, scroll down to the Meta fields tab.
As your form will include fields for completing, some of them will repeat the CPT meta fields you edit here. That’s why you need to set up the potential form fields.
After implementing the changes, press the “Add/Update Post Type” button.
2. Create New Form
Before we start, let’s check the Payments Gateways settings by navigating to WordPress Dashboard > JetFormBuilder > Settings.
Here you can activate the Enable Gateways toggle to have the possibility to work with payments.
The following Stripe Gateway API section includes two Public Key and Secret Key fields, which should be completed with the corresponding data from your Stripe account.
Press the “Save” button after you fill in all the fields.
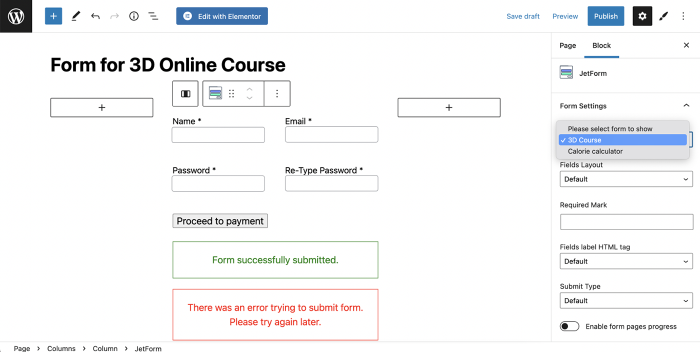
The following form will allow the user to register and enroll in an online course.
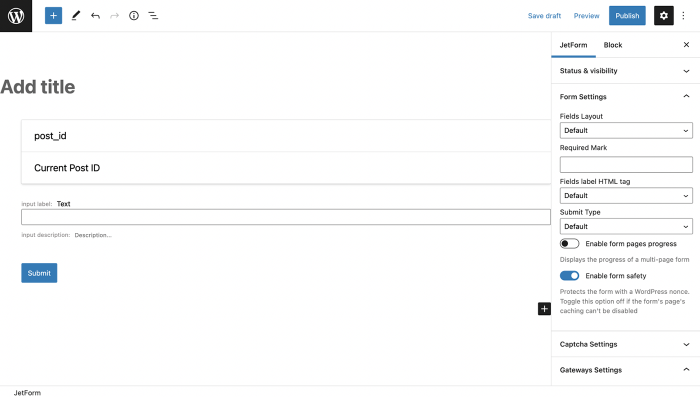
Go to WordPress Dashboard > JetFormBuilder > Add New.
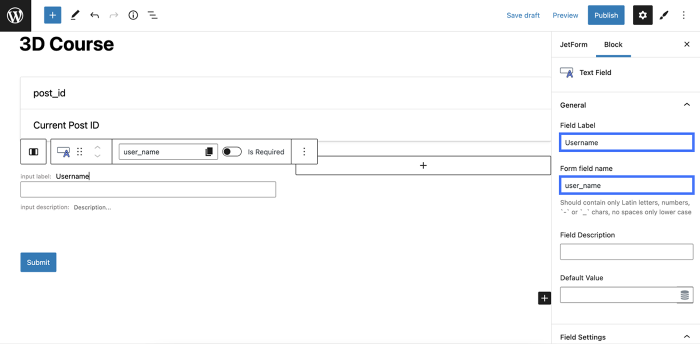
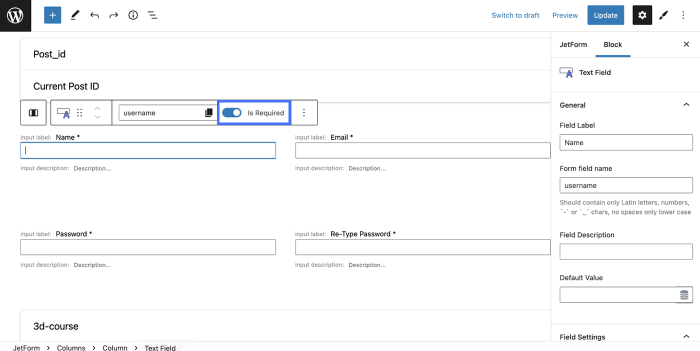
Give a title to the form and move on to the default Text Field.
Change the Field Label and Form field name values to “Username” and “user_name” accordingly.
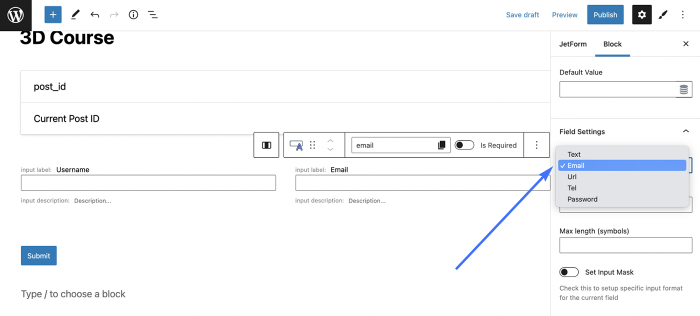
Hit the plus-shaped button to add one more Text Field block for email.
Fill in the Field Label and Form field name accordingly, and don’t forget to select the right field type in the Field Settings.
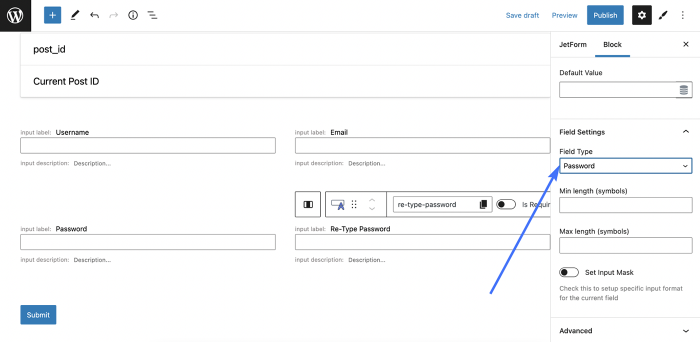
There will be two more fields for the password; however, you are free to add any field you want.
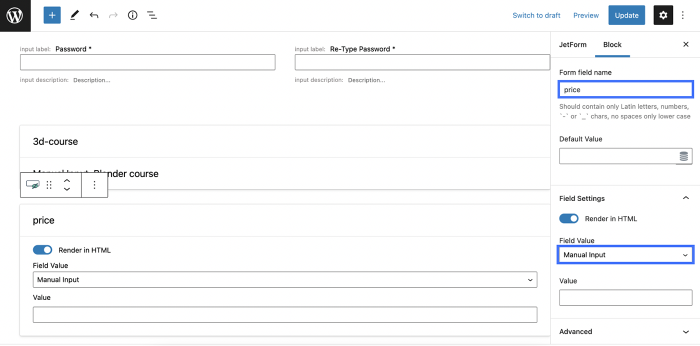
To store the price for this particular course and allow the form to carry out the payment, we need to create a field for the price.
To do it, click on the “Add Block” button and select a Hidden Field. Change the Form field name to “price” and set its value to the “Manual Input” in the Field Settings.
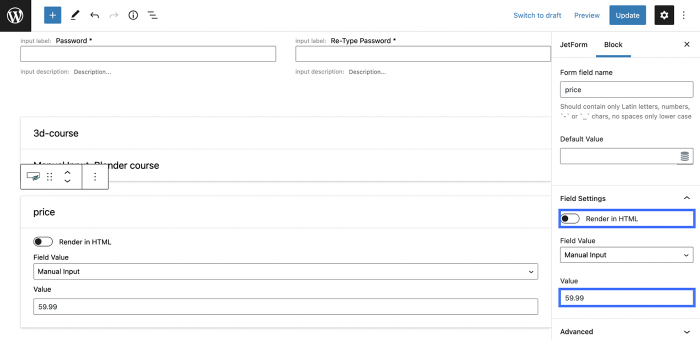
Enter the needed price in the Value field bar.
By the way, you can make the price field more secure by turning off the Render in HTML option. This way, a Hidden field will be invisible in the HTML markup.
Finally, change the button label, and let’s proceed to the form settings.
3. Set Up Post-Submit Actions
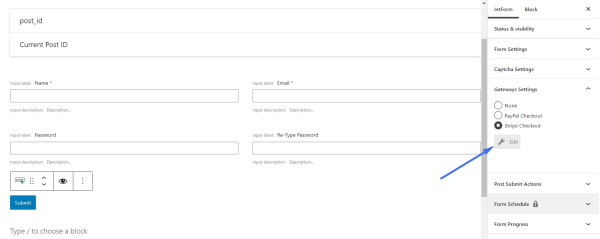
Open the JetForm tab and scroll down to the Gateways Settings section. Check the Stripe Checkout radio button.
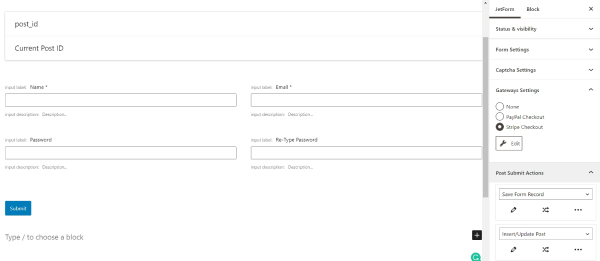
Proceed to the Post-Submit Actions section and unfold it. Now, you can add post-submit actions to the form. For example, you could add the Insert/Update Post action to create a new post.
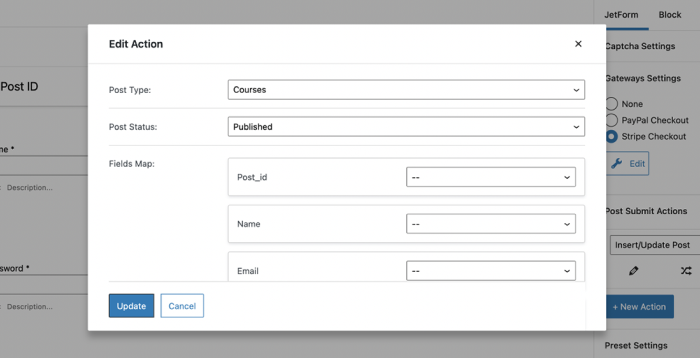
Click on the “Edit Action” button. In the Post Type field, select the custom post type you’ve previously created and set the Post Status to “Published.” You will find more information on this action in the “Insert/Update Post” action tutorial.
Don’t forget to hit the “Update” button before closing the window.
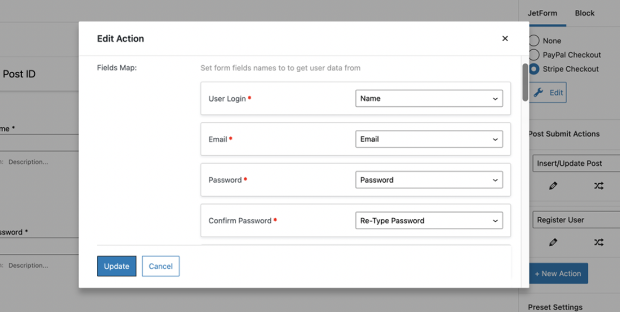
If you want to allow the users to register on the website, add the Register Useraction and set it up.
Add other actions by clicking the “New Action” button if needed and go back to the Gateways Settings section.
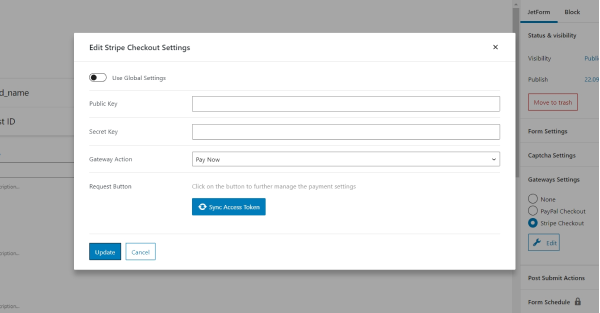
Now we can press the “Edit” button under the “Stripe Checkout” option and find out about all the fields we need to complete in the Stripe Checkout Settings.
Use Global Settings — toggle it on to pull out the Public Key and Secret Key if you have entered this information in the JetFormBuilder > Settings > Payments Gateways directory;
Public Key — complete this field with the Client ID that you can find in your PayPal account;
Secret Key — fill in the Secret Key attached to your PayPal account;
Gateway Action — here, you can choose the payment scenario. Select the “Pay Now” action to enable further settings.
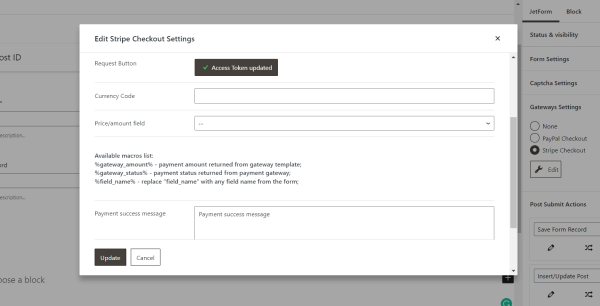
To further manage the Stripe payment settings, click the “Sync Access Token” button. Once the Access Token is updated, you will get access to more gateway settings.
Price/amount field — you can choose a form field price from the fields list here.
Lastly, adjust the Payment success/failed messages and update the settings to save all the completed data.
4. Set Up Action Events
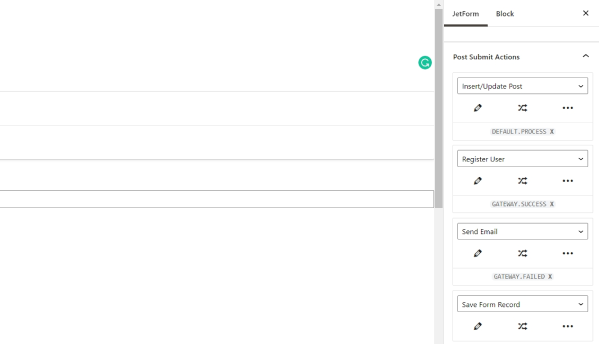
Now, it is time to configure the scenario that will be performed before payment is processed, on successful payment and the failed payment. To do this, we need to give the post-submit actions certain Events.
For example, you can choose to create a post before the payment is processed, register the user after successful payment, and send an email if the payment failed.
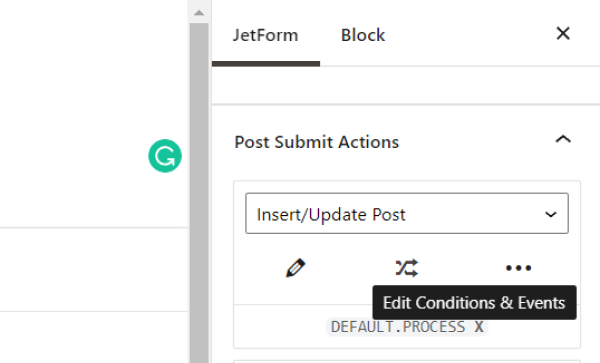
Click on the “Edit Conditions and Events” button to add action events under the needed post-submit action.
In the popup, proceed to the Events Match tab. Select one or several events from the dropdown.
DEFAULT.PROCESS – this is the moment when actions are processed. The current event will trigger the post-submit action before the payment gateway.
BAD.REQUEST – this event is executed after request processing in case some of the fields in the form return errors. For example, the action will be triggered if the user uploads a file to the Media field in the wrong format or if the user exceeds the allowed number of files to upload. This event bypasses the DEFAULT.PROCESS event.
DEFAULT.REQUIRED – this event is executed in any case. It is the last triggered event before the form response is submitted. The event runs even in case some of the other post-submit actions are not processed successfully. Note: if you set the DEFAULT.REQUIRED event to several actions and one of your actions is the Store Form Record action, make sure to put the Store Form Record action the last in the row.
GATEWAY.SUCCESS – this one is executed after the user passes the checkout on the side of the payment system; if a payment is successful, the action will be triggered.
GATEWAY.FAILED – It is performed when the user returns from the checkout page of the payment system without making a payment.
Note that the Store Form Record action does not require any Event.
Now that you have added Events to the post-submit actions, don’t forget to make the necessary fields in the form required.
Push the “Publish/Update” button on the top of the form to publish the final result.
Add the Form to a Page in Elementor
Now decide where you want to place the newly built form. In the described case, we will place the form on a separate page.
So, we navigate to WordPress Dashboard > Pages. Open an existing page or create a new one and edit it with Elementor.
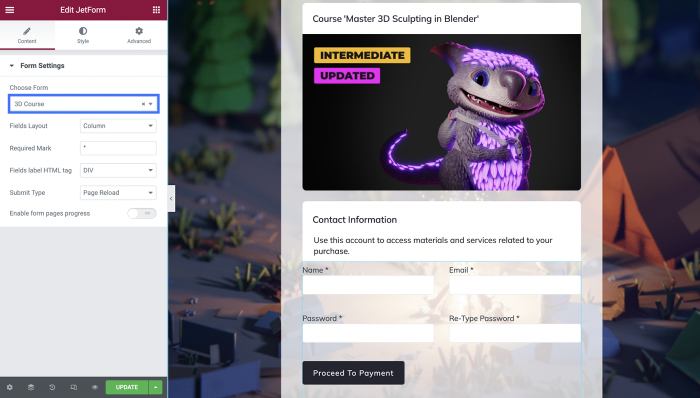
Customize it according to your needs and, right in the editor, look for the JetForm widget. Select the form you have just created in the Choose Form field.
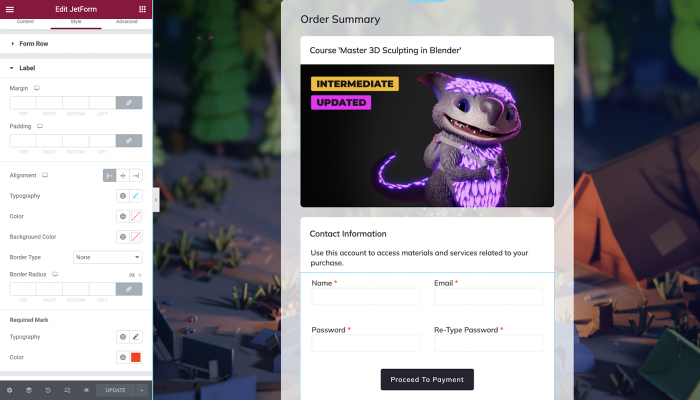
Proceed to the next tab and style the form, so it matches your website’s design.
Add the Form Block in Gutenberg
JetFormBuilder works not only with the Elementor page builder. This plugin allows adding the form block using Gutenberg as well.
Open the page in the default WordPress Editor and add a JetForm block.
Complete the Form
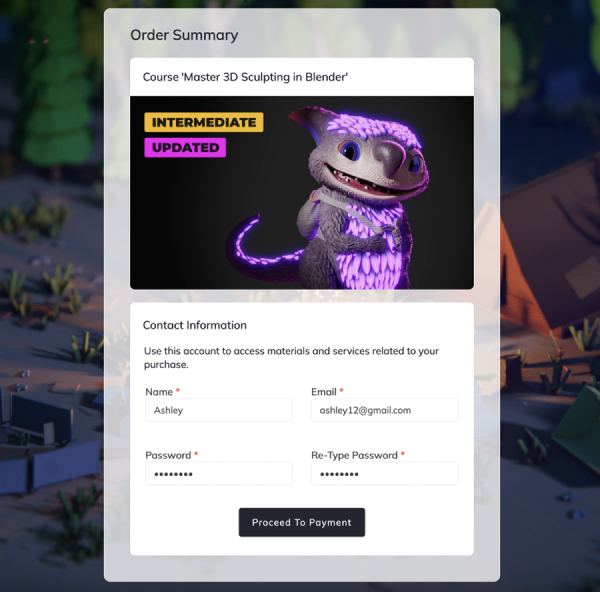
Open the page where you have placed the form on the front end.
As you can see, the page looks right as we adjusted. Complete the fields and press the button you have set as a submit one.
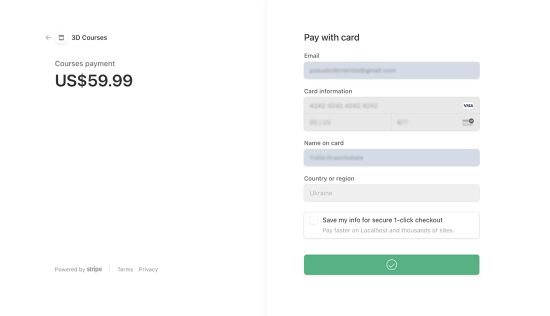
Once the obligatory fields are completed correctly, the submitted form will redirect you to the Stripe payment page.
Here the user can fill in all the details needed for successful payment.
Now you know how to adjust the form with the convenient Stripe payment using the JetFormBuilder plugin.
We use cookies to assist you with navigation and analyze site traffic. If you continue to use this site, you consent to our use of cookies.