How to Configure Hierarchical Select Form Field
In this tutorial, we exemplify building a form that allows inserting a Custom Post Type (CPT) post on a site from the front end and choosing the needed taxonomy using the Hierarchical Select block. In particular, we simulate a case of adding an ad for the sale of a vehicle via an advertisement website. Here, the selection will be provided by the “Vehicle Type 一 Manufacturer” hierarchy.
In this use case, we are focusing on configuring the Hierarchical Select Form Field settings. Other details about creating CPT and taxonomies, building forms for users to submit their posts from the front end, setting the needed Post Submit Actions, placing the form on a page, and more can be found in the corresponding tutorials.
To provide the hierarchical select form functionality, the Hierarchical Select Addon for the JetFormBuilder plugin should be installed and activated. Read the JetFormBuilder WordPress Plugin Installation tutorial to select the way of plugin installation.
Create the CPT and Taxonomies
Since we intend to get the ads of a specific design, we create the CPT, name it “Vehicle Ads,” and add the following meta fields: “User Name” Text field, “Email” Text field, “Model” Text field, “Engine Type” Checkbox field, “Mileage” Number field, “Engine Capacity” Number field, and “Price” Number field to collect the corresponding data.
Read the How to Create Custom Post Types in WordPress tutorial to learn how to organize the site’s content.
After that, in order for the ads to be inserted, we create the “Vehicle Type” taxonomy for the previously built “Vehicle Ads” CPT.
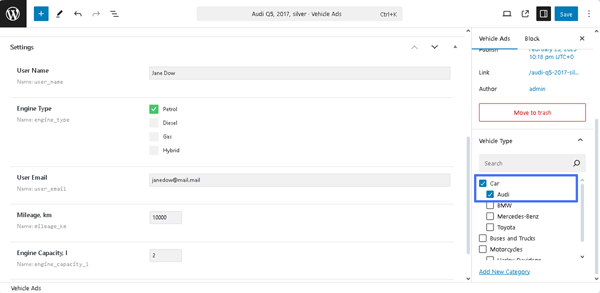
The taxonomy includes the “Cars,” “Motorcycles,” “Buses and Trucks,” and “Special Machinery” categories with child subcategories. For example, the “Cars” Category includes the subcategories “Audi,” “BMW,” “Toyota,” etc., and the “Motorcycles” Category includes the subcategories “Kawasaki,” “Ducatti,” etc.

Read the WordPress Taxonomy Explained: Categories, Tags, Custom Taxonomies article to learn the differences between these groups.
Create a Form
Insert the form’s fields
Navigate to the WordPress Dashboard > JetFormBuilder > Add New tab to create a new form. The form will be opened in the Block editor, and the Welcome block, which allows the application of pre-created or AI-generated forms, will be displayed.
Learn how to build forms from the form creation tutorial.
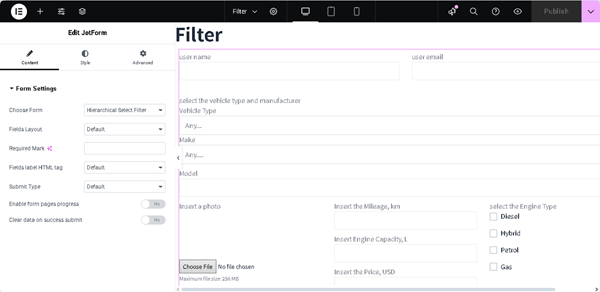
In this case, we delete the Welcome block and type the form’s name (here, “Hierarchical Select Form”). After that, we divide the layout into two Columns and insert Text Fields to enter the user’s name and email, respectively.
After that, we add the Hierarchical Select Form Field and adjust the following settings. First, unroll the TAXONOMY TYPE drop-down list and select the needed taxonomy (the “Vehicle Type” taxonomy, in this case). Next, choose the “Term ID” option in the TERM VALUE FROM drop-down list and the “Hide all children levels until parents level selected” option in the ACCESS TO CHILD LEVELS drop-down list. After that, navigate to the block settings and enter the text in the FIELD LABEL field (“select the vehicle type and manufacturer” in this tutorial). The FORM FIELD NAME field will be filled out automatically (“select_the_vehicle_type_and_manufacturer”).
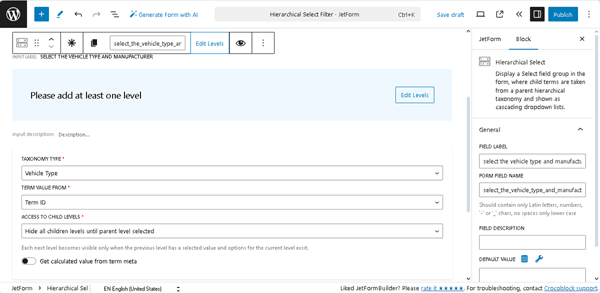
Second, press the “Edit Levels” button and complete the newly-appeared Edit Levels pop-up. Here, put the cursor in the NAME field, and it will be filled out using the default text (the “select_the_vehicle_type_and_manufacturer_level_0”, in this case). Then insert the text that will be displayed as the level’s LABEL and in the PLACEHOLDER (here, we type the same “Vehicle Type” and “Any…” texts, respectively). Next, scroll this pop-up down and press the “+Add new level” button.

In the next step, press the “Edit Levels” button and complete the newly-appeared Edit Levels pop-up. Here, we add the following texts: “select_the_vehicle_type_and_manufacturer_level_1” in the NAME field, “Make” in the LABEL, and “Any…” in the PLACEHOLDER field. After that, press the “Update” button in the Edit Levels pop-up.

In the last step, we divide the layout into two Columns and insert the block fields to fill out the needed fields of the created “Vehicle Ads” CPT: “Model” Text field, “Photo” Media field, “Engine Type” Checkbox field, “Mileage, km” Number field, “Engine Capacity, l” Number Field, and “Price” Number field to collect the corresponding data. Next, we add the Action Button block.
Configure the Post Submit Action settings
Navigate to the JetForm settings tab and open the Post Submit Actions tab. Since we deleted the Welcome block, the “Save Form Record” Post Submit Action was not set by default. We press the “+ New Action” button and add this action to collect and manage data via the JetFormBuilder dashboard.
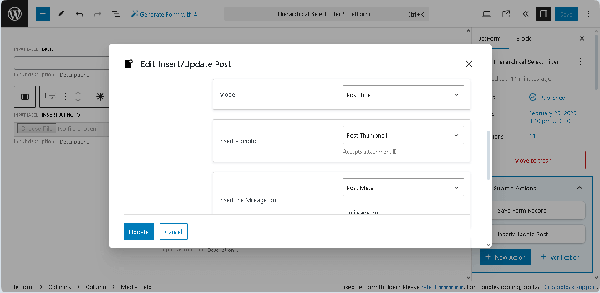
Then, press “+Add New Action” and select the “Insert/Update Post” action in the newly-appeared Add new action pop-up. The Edit Insert/Update Post pop-up will then appear. First, in this pop-up, in the POST TYPE field, choose the post type for which posts will be created (the “Vehicle Ads” CPT in this case). Second, select the “Published” POST STATUS and head to the FIELDS MAP setting block.
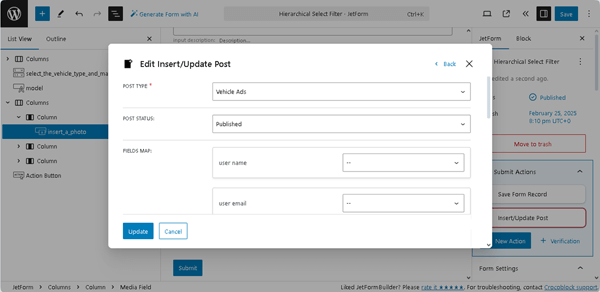
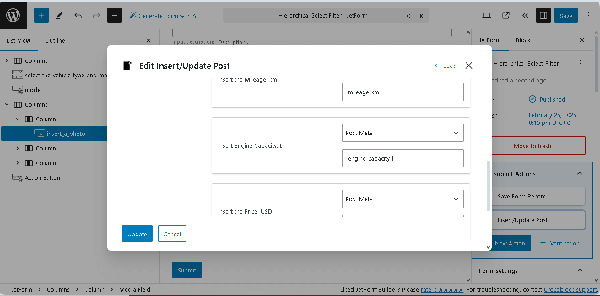
Second, assign the form fields to the corresponding post field names. In this case, we select the “Post Meta” options and specify the CPT‘s meta fields in the pop-up fields.
After that, we select the “Post Term” option in the drop-down related to the parent taxonomy field and the needed taxonomy (the “Vehicle Type” taxonomy, in this case) in the newly-appeared drop-down list near the parent taxonomy (the “(select_the_vehicle_type_and_manufacturer) Vehicle Type” text). Next, select the same options for the child taxonomy: choose the “Post Term” option in the drop-down related to the taxonomy field (the “Vehicle Type” taxonomy, in this case) in the newly-appeared drop-down list near the parent taxonomy (the “(select_the_vehicle_type_and_manufacturer) Make” text).
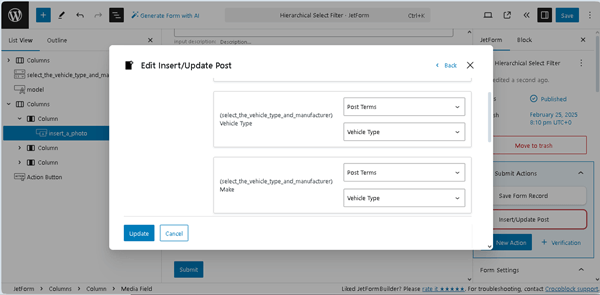
Also, we set the data inserted in the form’s Model field as the “Post Title” and the Insert a photo form field as the “Post Thumbnail.”
Once completed, click the “Update” button. To improve the form’s usability, you can add another Post Submit Action, for example, the “Send Email” or “Redirect to Page.”
Finally, publish the form.
Place the Form on a Page
Create a page or open a page/post you need in the editor you prefer (we use Elementor) and add the JetForm widget/block/element to it. Learn about its settings from the JetForm Overview. Select the built form in the Choose Form drop-down list.
Read the Displaying a JetFormBuilder Form in Any Page Builder tutorial to learn how to add the JetForm widget/block/element in Elementor, Block Editor, and the Bricks theme. Press the “Publish” button to save the page.
Test the Flow
Navigate to the front end and fill out the form. Since we selected the “Hide all children levels until parents level selected” option in the ACCESS TO CHILD LEVELS drop-down list of the Configure Hierarchical Select Form field settings, the drop-down list displaying the child taxonomy (the “Manufacturer” in this case) is not visible.
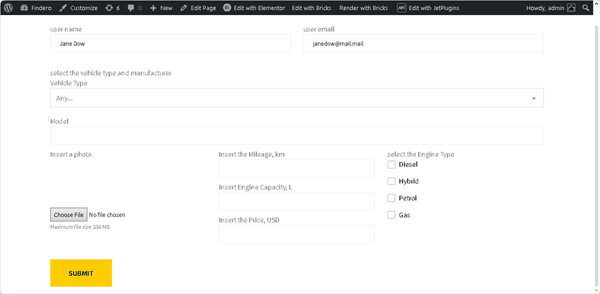
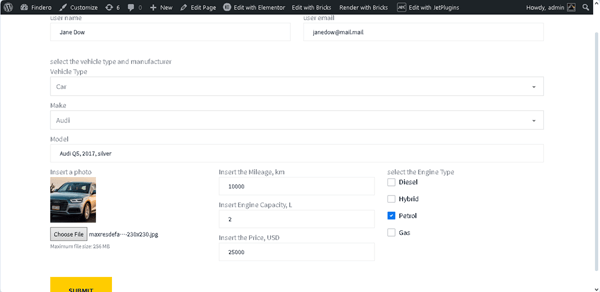
After selecting the needed option in the parent taxonomy drop-down list, the child taxonomy drop-down will be displayed. Add the required data and press the “SUBMIT” button.
After selecting the needed option in the parent taxonomy drop-down list, the child taxonomy drop-down will be displayed. Add the required data and press the “SUBMIT” button.
After that, the “Form submitted successfully.” notice will appear. In the next step, move to the WordPress Dashboard and observe if a post was created.
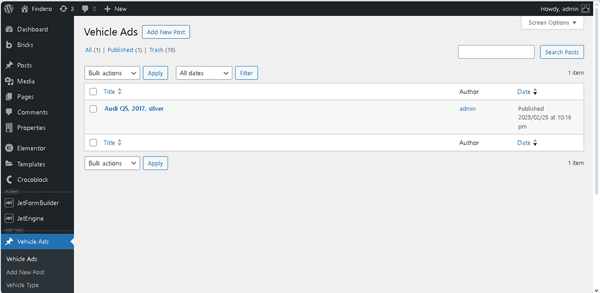
Finally, open the post and check if all data was added correctly.
That’s it. Now you know how to use the Hierarchical Select Form Field to insert Custom Post Type posts of the prespecified taxonomy (including a child taxonomy) using the JetFormBuilder plugin for WordPress.