The contact form lets visitors send messages or inquiries to the website administrator.

Contact forms often use CAPTCHA (Completely Automated Public Turing test to tell Computers and Humans Apart) to prevent automated bots from spamming the form with irrelevant or malicious content. Without CAPTCHA, bots can easily submit large volumes of spam messages, which can overwhelm the recipient’s inbox or database and interfere with legitimate communication.

In this tutorial, we will create a support contact form with hCaptcha, as an example.

The JetFormBuilder plugin also supports ReCaptcha, Turnstile Captcha, and Friendly Captcha.

Contents:

Register the Captcha Site Key and Secret Key

First, we proceeded to hcaptcha.com and registered the Site Key and Secret Key as described in the How to Add hCaptcha to a Form tutorial. If you want to add another CAPTCHA type, head to the ReCaptcha, Turnstile Captcha, and Friendly Captcha tutorials.

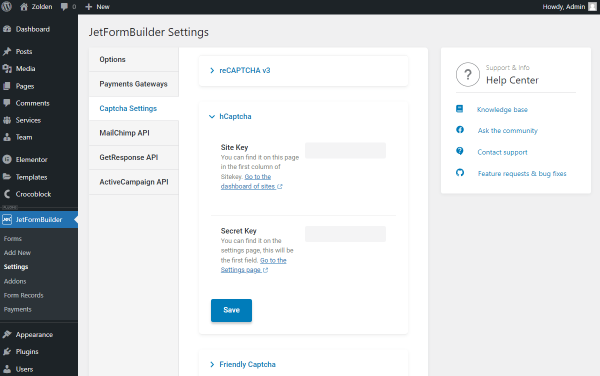
Then, we went to the WordPress Dashboard > JetFormBuilder > Settings > Captcha Settings tab and unfolded the hCaptcha tab, where we entered the Site Key and Secret Key. Here, the keys can be stored and used in numerous forms.

After configuring the settings, we hit the “Save” button.
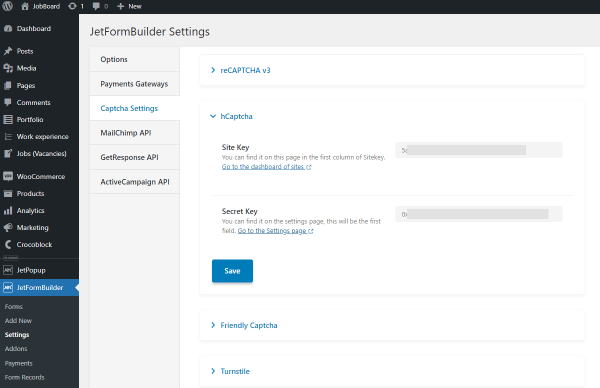
hCaptcha site key and secret key

Setting Contact Form Fields

We moved to WordPress Dashboard > JetFormBuilder > Add New to create a new contact form and entered the form title.

The “Contact form” pattern is available in the Welcome block. We used it to create a simple contact form to facilitate the form-crafting process.
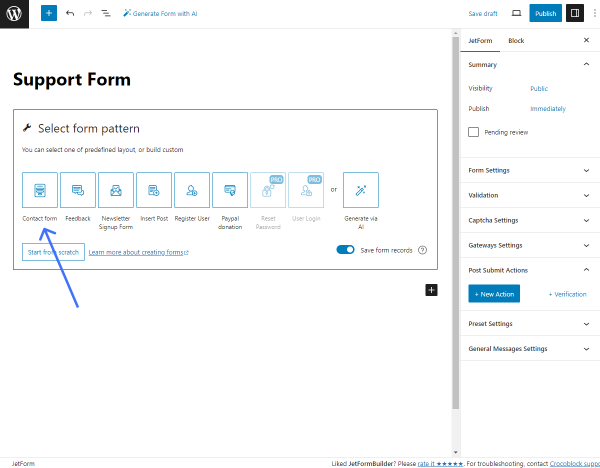
contact form pattern

The pattern adds two Text Fields (“Email” and “Subject”), one Wysiwyg Field (“Message”), and an Action Button.

The “Email” Text Field block has the “Email” FIELD TYPE set.
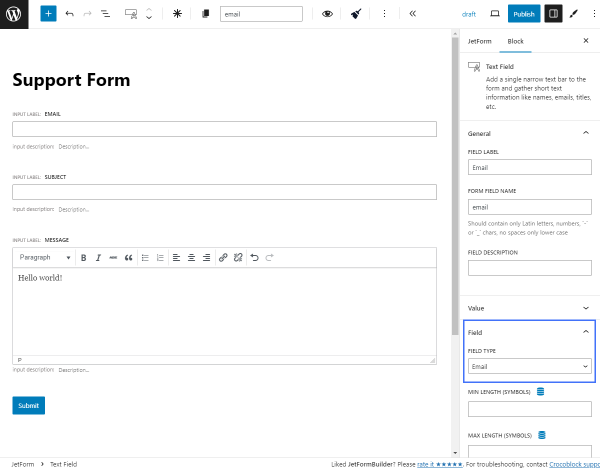
email text field

We added two additional Text Fields (“Full name” and “Phone”) and set the FIELD LABEL and FORM FIELD NAME.

NOTE

Be aware that the FORM FIELD NAME is required, should be unique for every field of the form, and should contain only Latin letters, numbers, `-` or `_` chars, no spaces, only lower case.

For the “Phone” Text Field, we set the “Tel” FIELD TYPE.
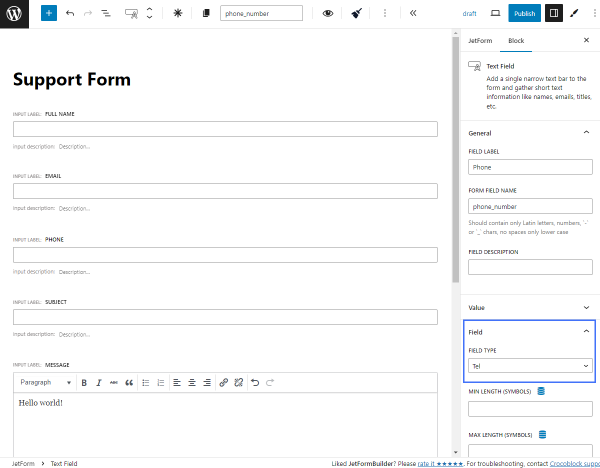
phone text field

We also added a Media Field block to allow users to attach files to the form. 

We set the FIELD LABEL and FORM FIELD NAME and enabled the Insert attachment toggle to attach the file added to the email during the form submission. After that, the FIELD VALUE can be set.
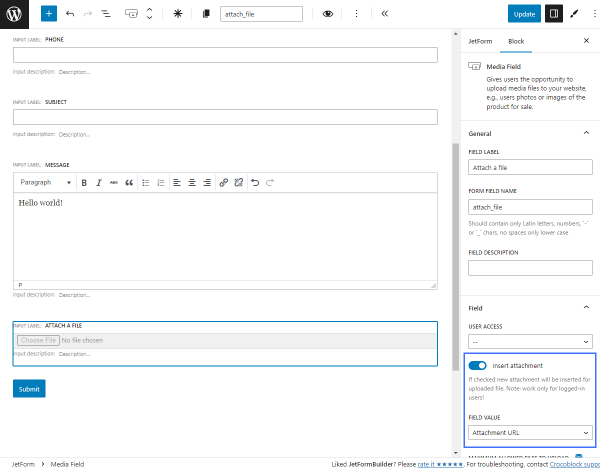
media form field for file attaching

To designate certain form fields as mandatory, the “Required” button can be hit in the settings panel corresponding to the desired field blocks. Required fields will be marked with asterisks next to their labels. Users will be unable to submit the form without completing these mandatory fields.
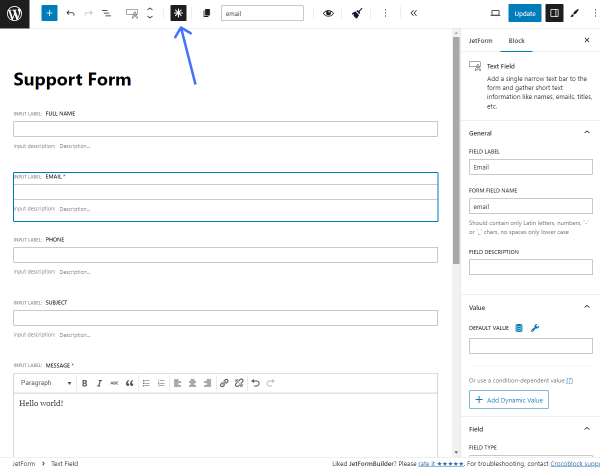
required form fields

Setting Contact Form Post Submit Actions

We headed to the JetForm settings tab and unrolled the Post Submit Actions tab. The “Contact Form” pattern added two actions: “Send Email” and “Save Form Record.”
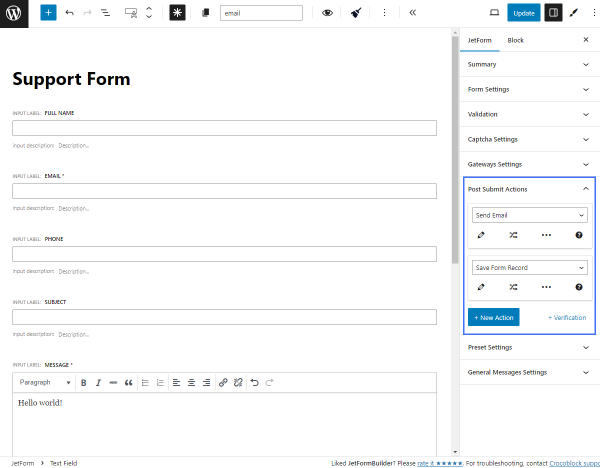
form post submit actions

The “Save Form Record” action stores the form entries in the database, which can be accessed from the Form Records Page.

The ”Send Email” action sends a message to the admin or customer email, depending on the settings. To customize the action, we pressed the “pencil” button under it.
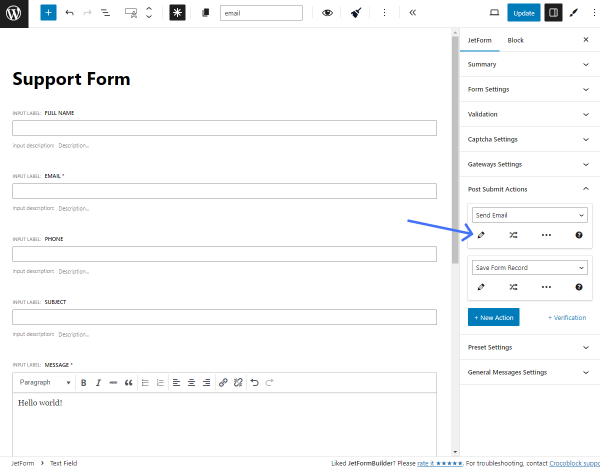
send email action

As an example, we adjusted such settings in the Edit Action pop-up:
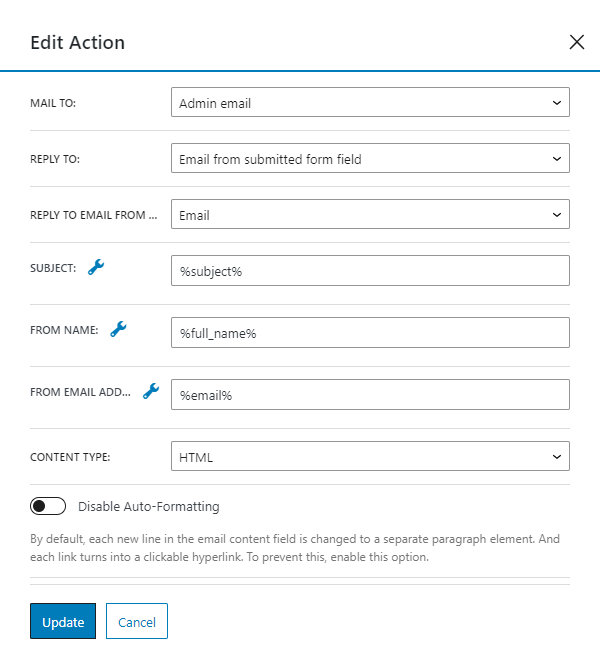
send email action settings
  • “Admin email” option for the MAIL TO field to send email with user questions and issues to the email that is mentioned in the admin’s user account;
  • “Email from submitted form field” for the REPLY TO field and “Email” form field for REPLY TO EMAIL FROM FIELD accordingly. Here, we configured the settings to send replies to the email address provided by the user in the “Email” Text Field;
  • For the SUBJECT field, the ‘%subject%’ macro is set with the FORM FIELD NAME of the “Subject” Text Field. This implies that the text entered by the user in the “Subject” field will be appended to the email Subject bar. The needed macro can be set by clicking the “wrench” icon;
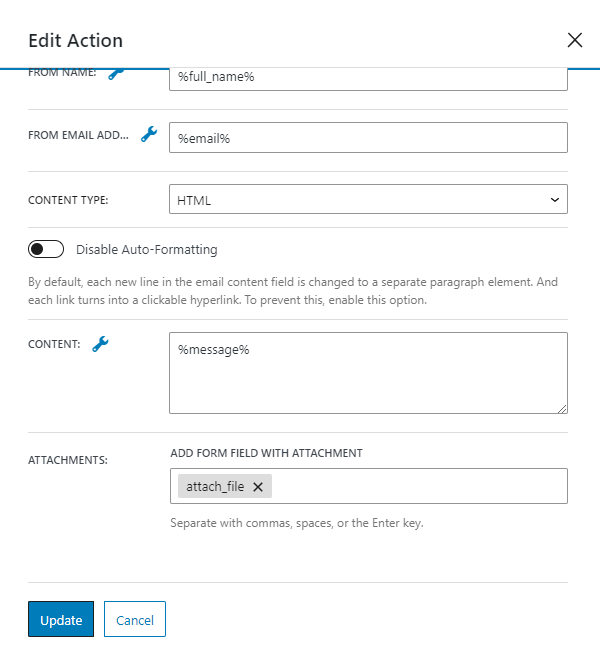
  • For the FROM NAME field, the ‘%full_name%’ macro is set with the FORM FIELD NAME of the “Full name” Text Field. This implies that the name entered by the user in the “Full name” field will be appended to the From bar of the letter. The needed macro can be set by hitting the “wrench” icon;
  • For the FROM EMAIL ADDRESS field, the ‘%email%’ macro is set with the FORM FIELD NAME of the “Email” Text Field. This indicates that the email entered by the user in the form field will be added as the address of the letter sender. The needed macro can be set by pressing the “wrench” icon;
  • “HTML” for the CONTENT TYPE field;
email content and attachments settings in the form
  • The ‘%message%’ macro for the CONTENT field to insert text from the “Message” Wysiwyg Field to the email body;
  • For the ATTACHMENTS field, we set the Media Field.

When we finished the configuration, we clicked the “Update” button to save the settings and close the pop-up.

Adjusting Contact Form Captcha Settings

Then, we unrolled Captcha Settings in the JetForm tab, picked the “hCaptcha” option for our case, and enabled the Use Global Settings toggle to pull the SITE KEY and SECRET KEY settings adjusted earlier.
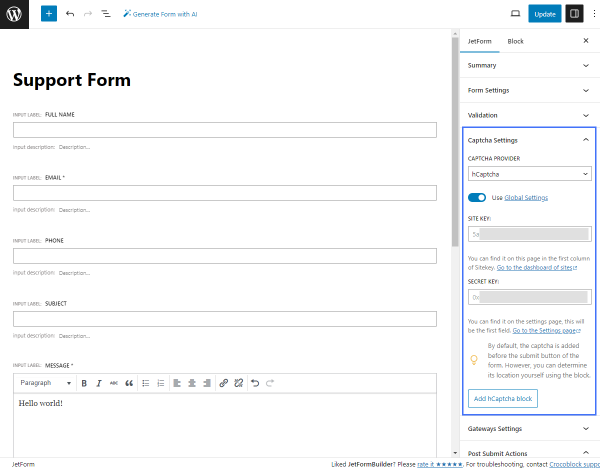
form captcha settings

By hitting the “Add hCaptcha” button, we placed the hCaptcha block at the beginning of the form. If we did not add the block, the hCaptcha would be added by default before the “Submit” button.
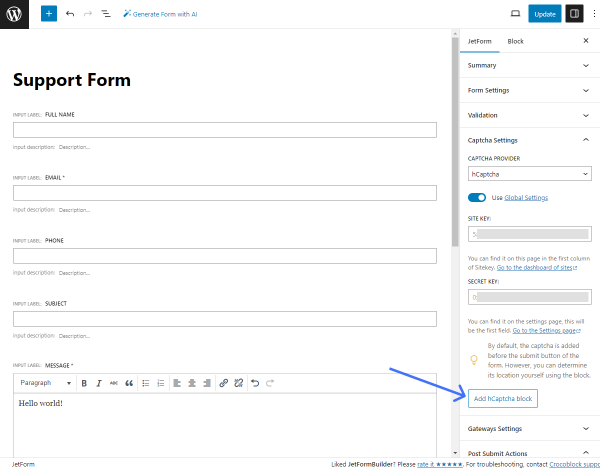
add captcha block

The block contained the same settings as the JetForm > Captcha Settings tab.
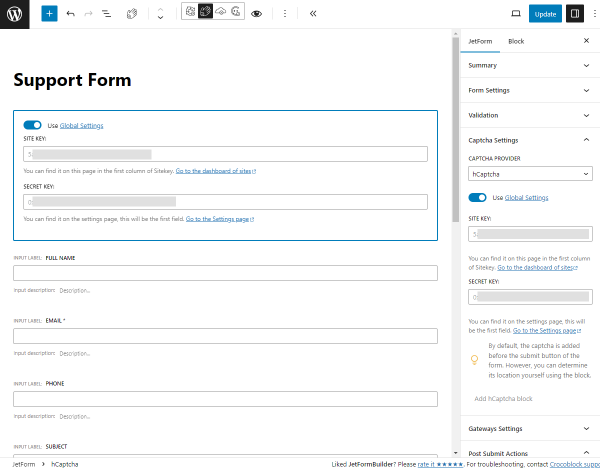
captcha block settings

After configuring the Captcha settings, we could preview how the Captcha would appear on the front end when we clicked anywhere else in the form.
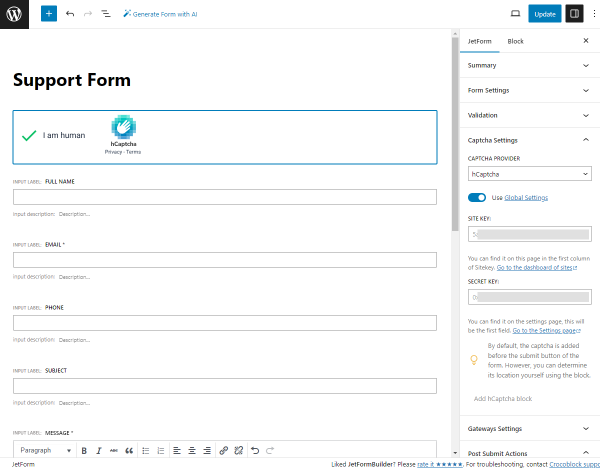
captcha preview

After finishing customizing the form, we hit the “Publish/Update” button.

Placing the Form on the Page

We moved to the WordPress Dashboard > Pages > Add New Page tab to place the form. The page can be edited in Elementor, WordPress block editor, or Bricks.

We drag-n-dropped the JetForm block to the WordPress editing page and chose the created support contact form in the namesake drop-down menu.
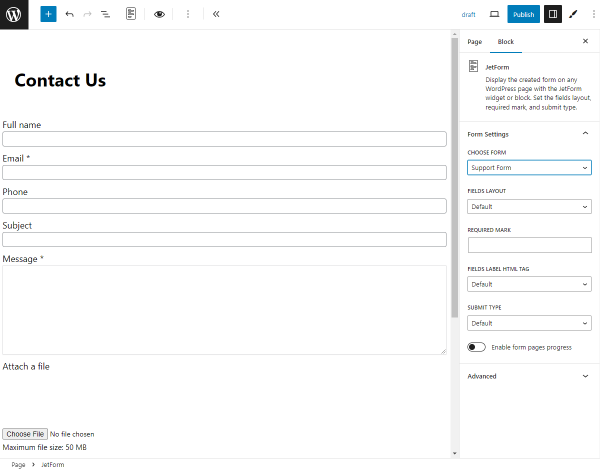
jetform block in the wordpress block editor

Checking the Results

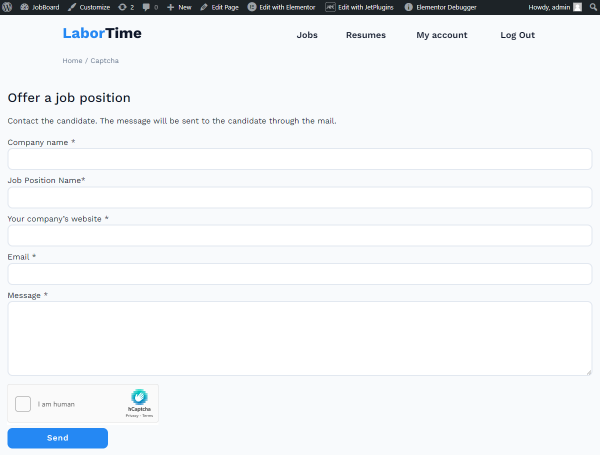
We opened the page on the front end. The hCaptcha verification appeared at the beginning of the form. We started the verification by checking the “I am human” checkbox.
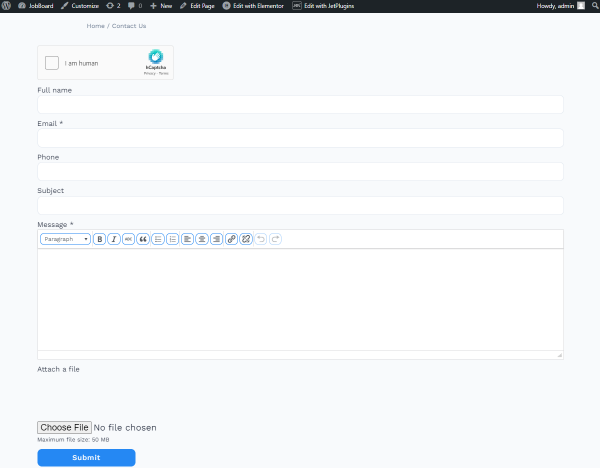
contact form with captcha on the front end

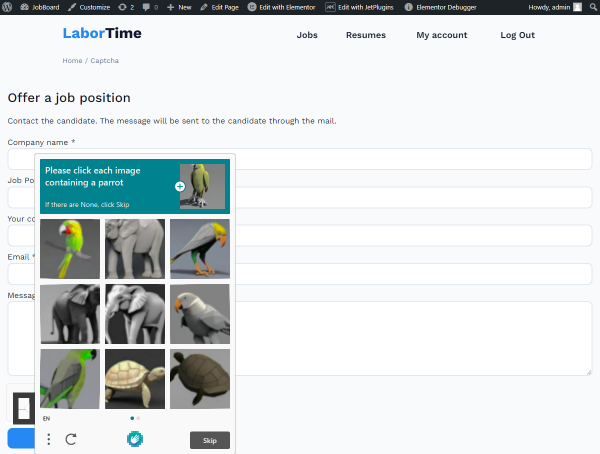
To complete the verification, we needed to complete two simple tasks by indicating objects on the pictures.
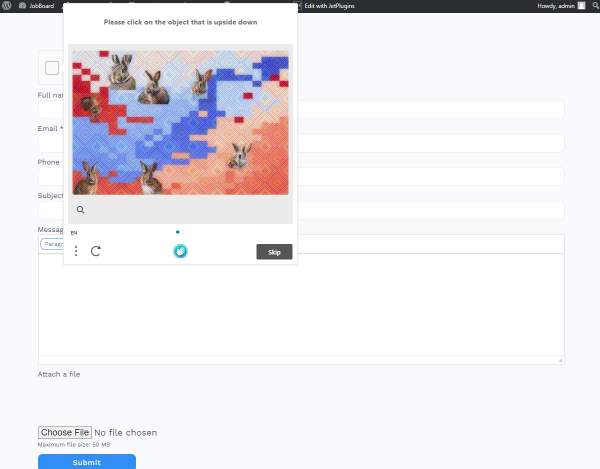
captcha verification process

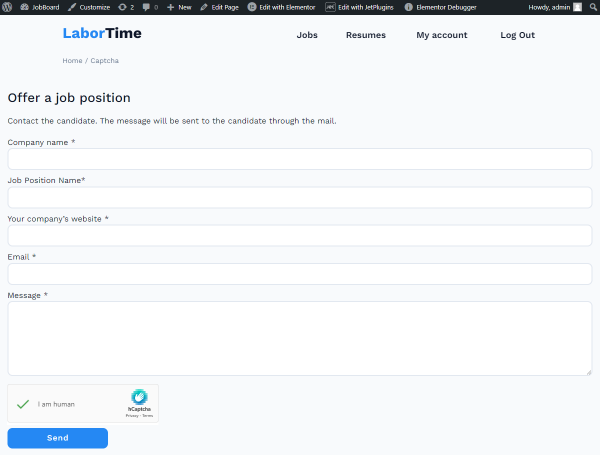
The verification was completed, so we filled in the form fields and clicked the “Submit” button.
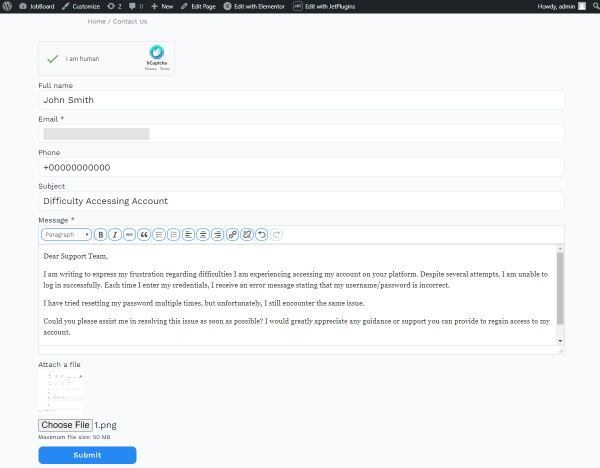
submitting the form with captcha

As the website administrator, we received an email with the issue, which contains the information entered into the submitted form fields.
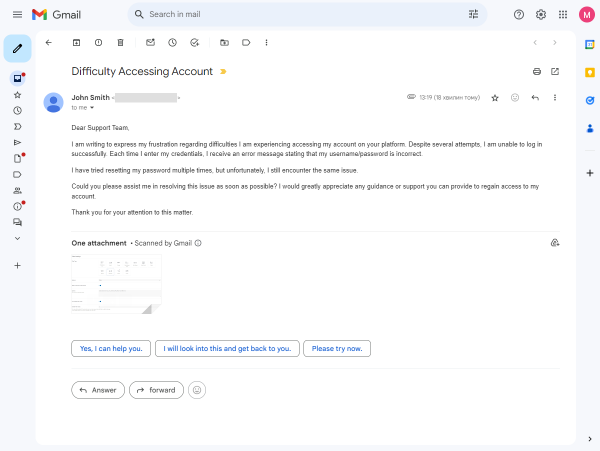
email sent by the form post submit action

That’s all. With the JetFormBuilder plugin, you can now create a secure contact form with Captcha for your WordPress website.
Friendly Captcha is a proof-of-work based anti-bot solution that generates a unique crypto puzzle for each visitor. As soon as the user fills out a form, it gets solved automatically. The process usually takes a few seconds.

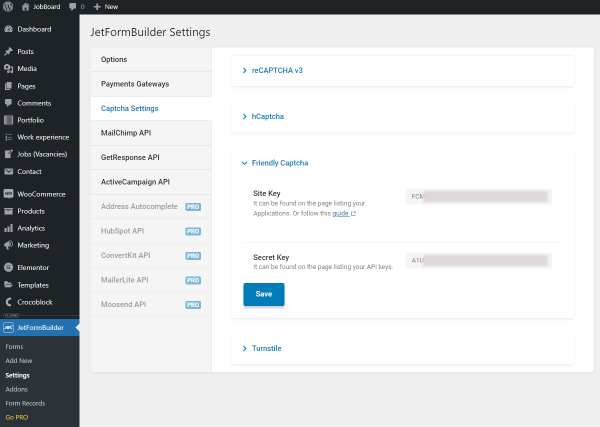
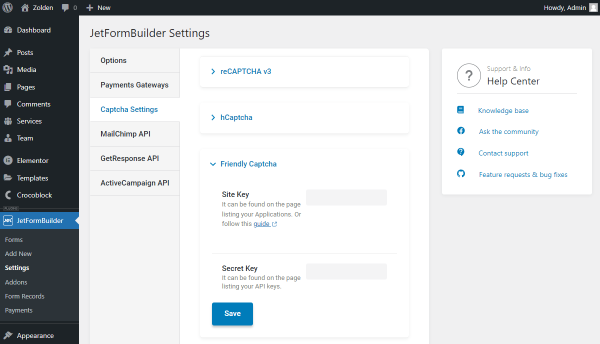
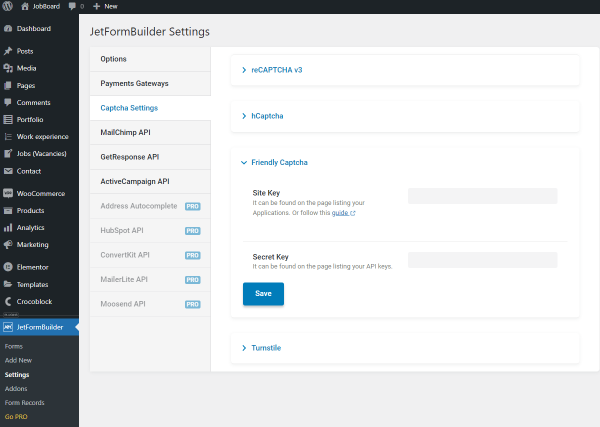
Proceed to the JetFormBuilder > Settings > Captcha Settings tab and unfold the Friendly Captcha section.

friendly captcha settings

The Site Key and Secret Key can be registered on the Friendly Captcha website. If you enter the keys in the corresponding fields, you will be able to apply them further to any form with one click.
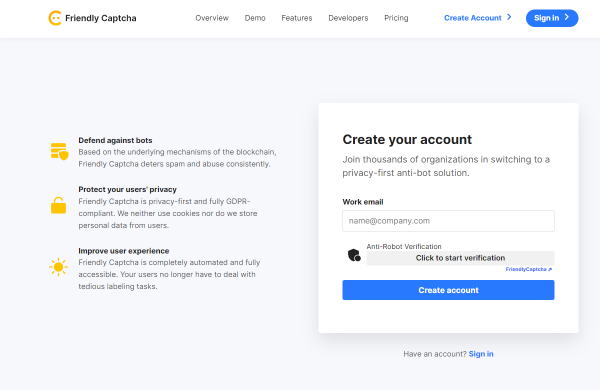
Go to the Friendly Captcha website and create an account or sign in.

create an account or sign in to friendly captcha

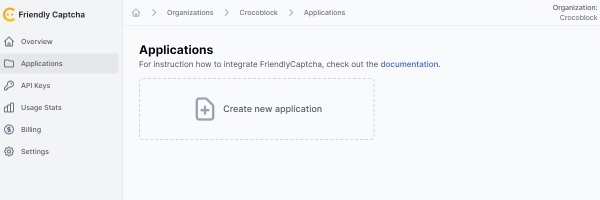
Navigate to the Applications tab and press “Create new application.

friendly captcha applications

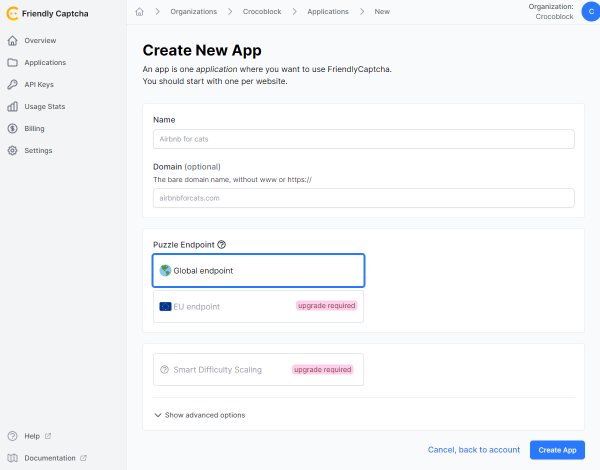
There are such settings:

  • Name. Enter a name of a new app; for example, it can be the name of the website or service;
  • Domain. This is a bar for your website domain;
  • Puzzle Endpoint. Select the geographical area in which the application will be hosted;
  • Smart Difficulty Scaling. It allows you to determine the resolution time of the Captcha according to the user’s terminal and the difficulty level you set.
create a new app on the friendly captcha

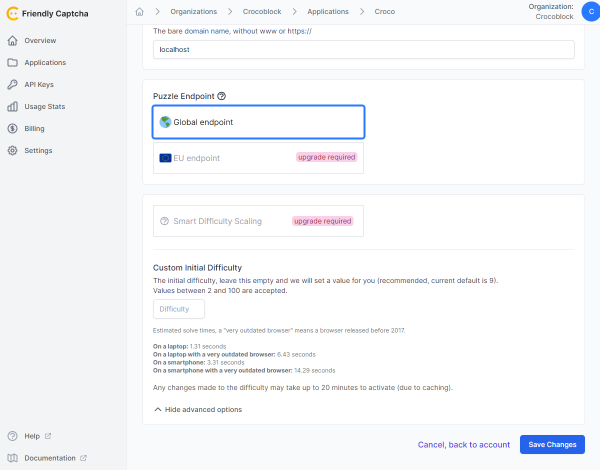
If you unfold the Show advanced options section, you’ll see the Difficulty bar. Here, you can set the difficulty rules to be applied to the Captcha attached to the Application.

friendly captcha application advanced options

When you finish, hit the “Save Changes” button.

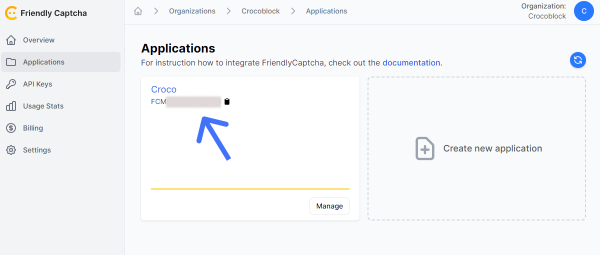
After the app is created, you can copy the Site Key from the listing item.

friendly captcha site key

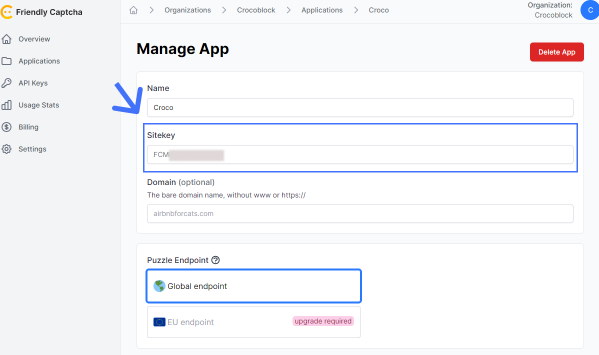
Also, you can hit the “Manage” button and see the Sitekey from the editing app page.

friendly captcha manage app page

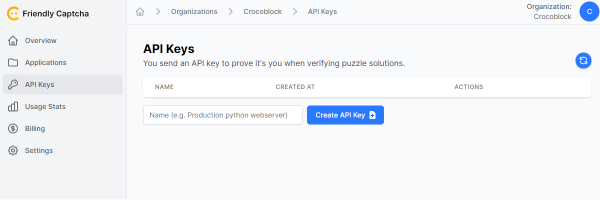
To get a Secret Key, move to the API Keys tab, enter the website or service name into the Name bar, and press the “Create API Key” button.

create API key

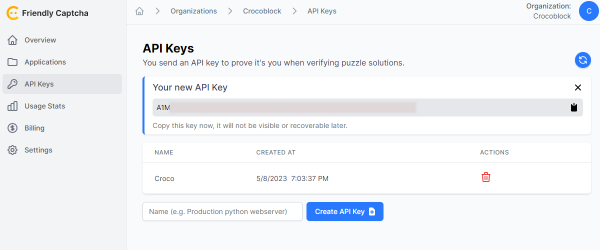
Copy the appeared API Key.

friendly captcha API key

Enter the Site Key into the corresponding bar and the API Key into the Secret Key bar. Push the “Save” button.

friendly captcha site key and secret key for jetformbuilder

Note that you can find more information about adding Friendly Captcha to your website in this documentation.

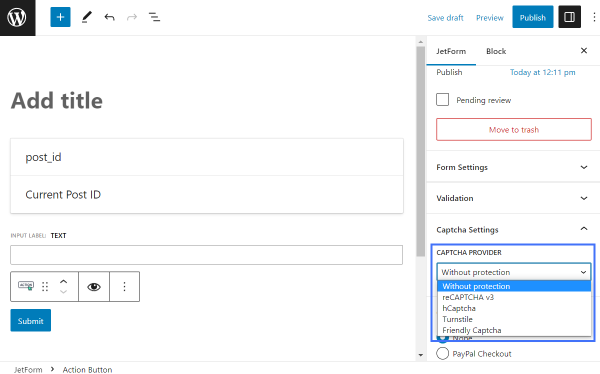
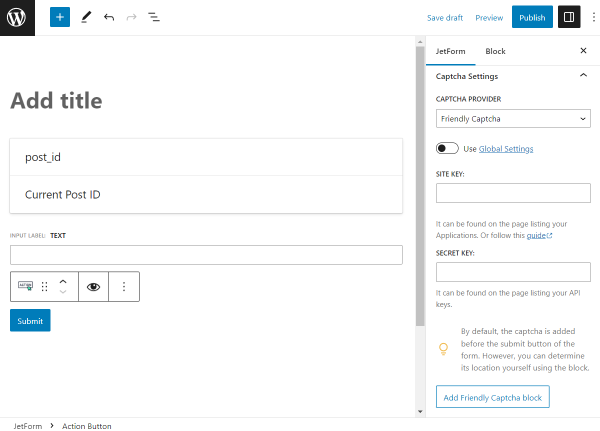
Create a new JetFormBuilder form or proceed to the created one, unfold the Captcha Settings menu section, and select the “Friendly Captcha” Captcha provider.

friendly captcha provider

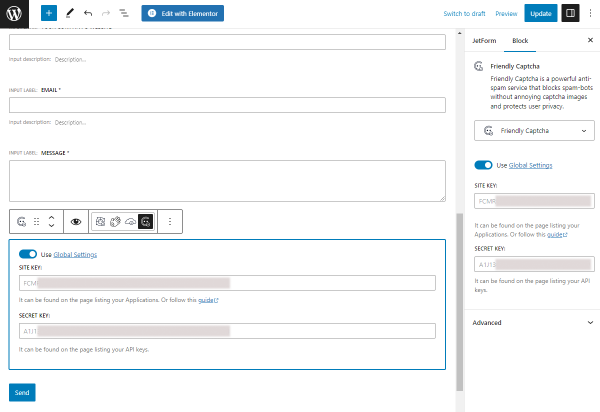
You can add the Site Key and Secret Key separately to this form or enable the Use Global Settings toggle.

friendly captcha site key and secret key added by global settings

By default, the captcha is added before the submit button. However, if you hit the “Add Friendly Captcha block” button, you’ll add the block to the form that can be moved.

friendly captcha block in the form

When you finish, hit the “Update” button.

Place the form on the page and open the page on the front end.

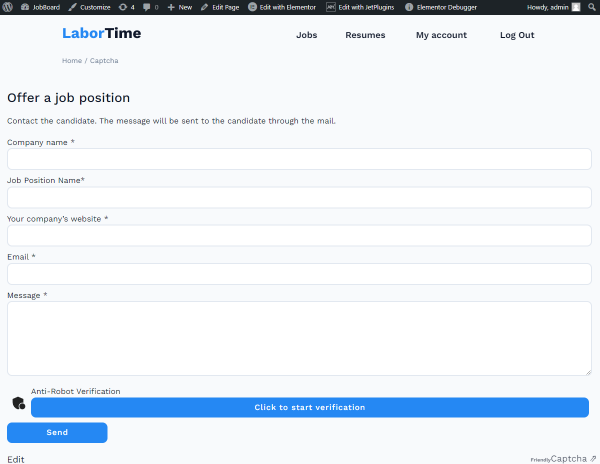
The Friendly Captcha anti-robot verification appeared before the submit button. The verification will run if you hit the “Click to start verification” button or when you start filling out the form fields.

form with friendly captcha on the front end

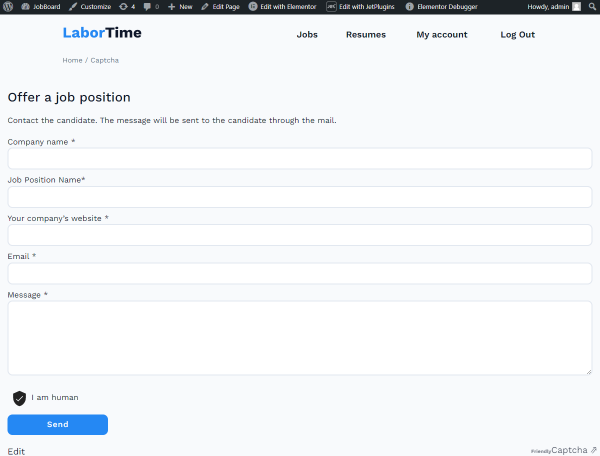
That’s what the successful friendly captcha verification looks like.

successful friendly captcha verification

That’s all. Now you know how to add the Friendly Captcha anti-bot protection to a JetFormBuilder form to protect the WordPress website from abusive activities.

Turnstile Captcha lets you make user verification via WordPress form possible and, moreover, easy. In addition, the whole customization process takes minimum effort with the JetFormBuilder plugin.

Create Turnstile Keys

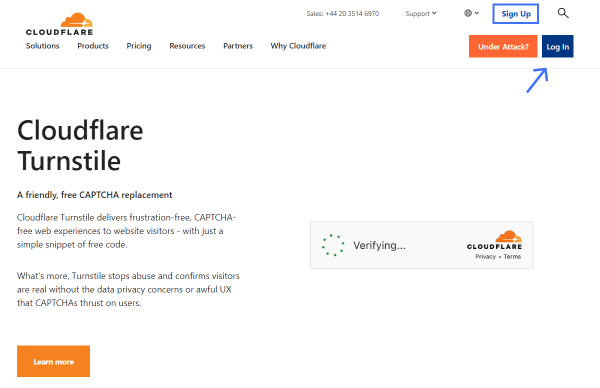
Initially, open the Cloudflare Turnstile website and press the “Sign Up/Log In” button to log into your account.

cloudflare turnstile starting page

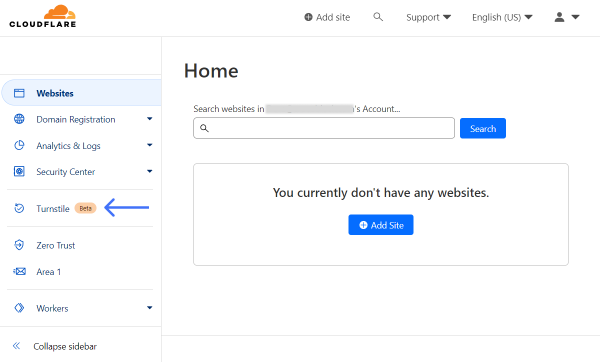
Now that the dashboard is open, find and press the Turnstile option in the sidebar.

cloudflare dashboard

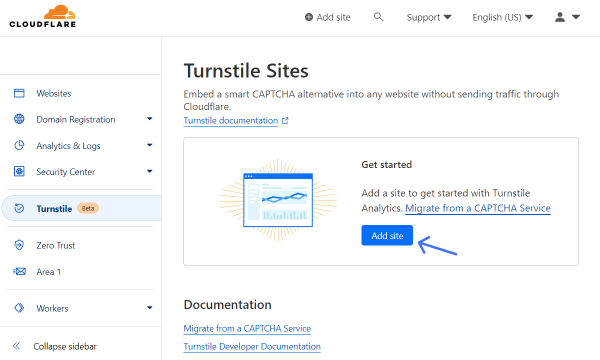
In the Get started section, click the “Add site” button to open a CAPTCHA editor.

add turnstile site

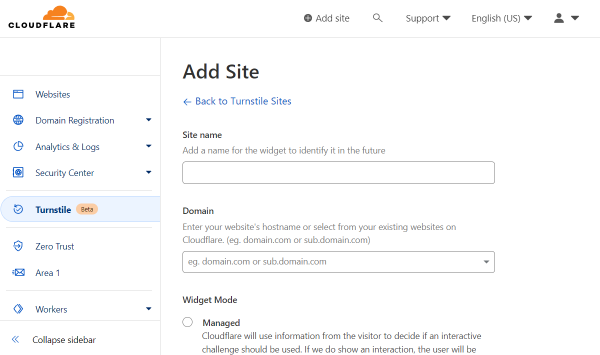
Complete the Site name field to identify the website where you will be using CAPTCHA.

Then, specify a Domain so the CAPTCHA will be connected to the particular domain. Here, you can specify several options if needed.

site name and domain fields

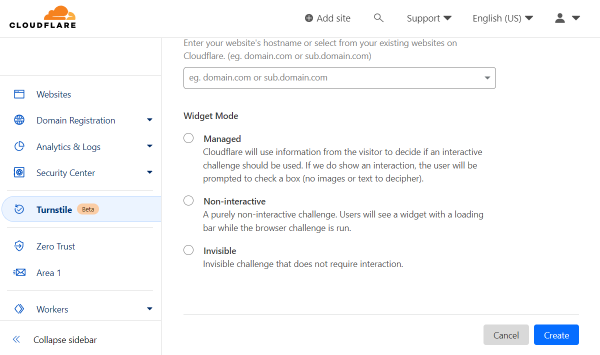
In the following Widget Mode radio field, you can pick the level of CAPTCHA interaction. 

Pick “Managed” to let Cloudflare decide if an interactive challenge should be used or not in a particular case, “Non-interactive” to make the widget run itself, or “Invisible” to make verification invisible for the user.

In the described case, we pick the “Managed” option.

Push the “Create” button to finish the setup.

widget mode field

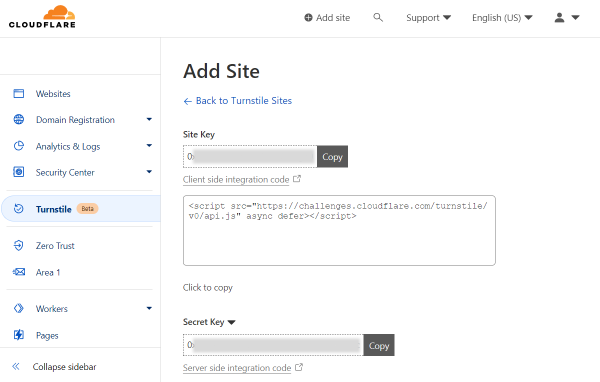
Straightaway, you will see generated Site Key and Secret Key. There are also “Copy” buttons next to these fields for user convenience.

turnstile site key and secret key

Adjust Global Settings

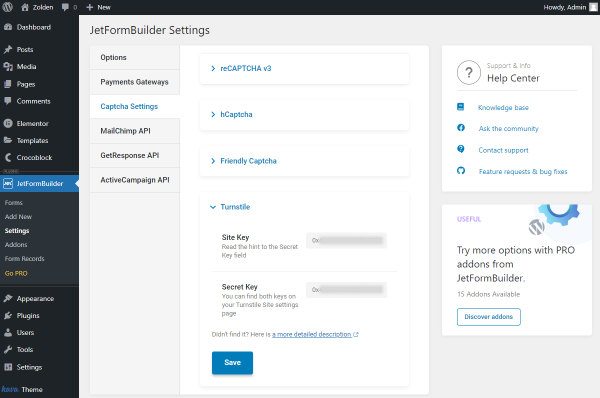
Head to WordPress Dashboard > JetFormBuilder > Settings and open the Captcha Settings tab. 

Unfold the Turnstile section to access its settings. They are called global because the changes applied here can be later pulled globally for all the needed JetFormBuilder forms.

As for the fields themselves, the Site Key and Secret Key are available for completion. Here, paste the keys generated beforehand.

Once keys are pasted into the corresponding fields, make sure to press the “Save” button.

turnstile settings

Create/Edit Form

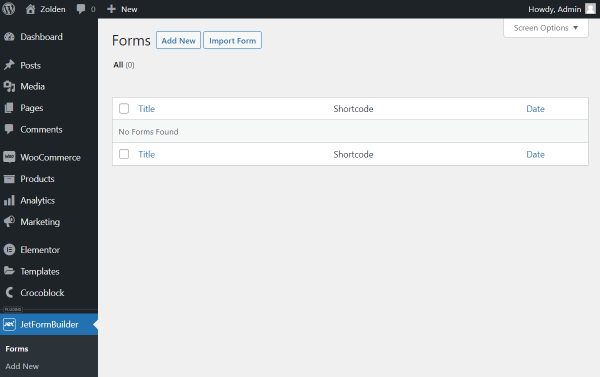
Proceed to WordPress Dashboard > JetFormBuilder > Forms. Here, you can select the already built form for editing or create a new form by pushing the “Add New” button.

jetformbuilder forms directory

You can build a form according to your needs with the various fields available with JetFormBuilder.

Then, open the JetForm settings tab and scroll down to Captcha Settings.

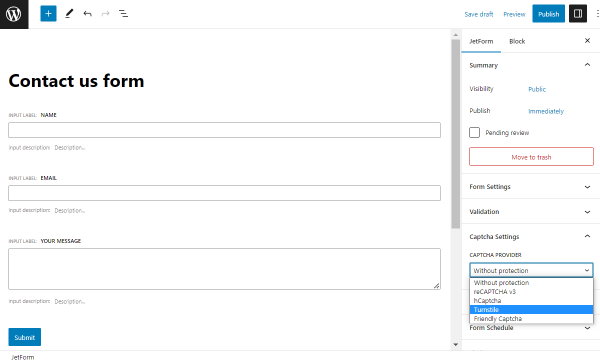
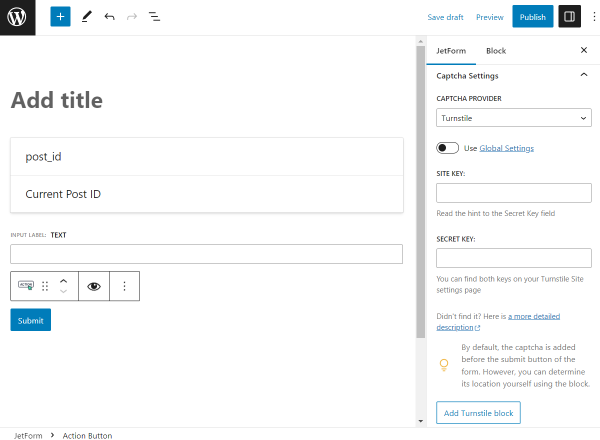
In the Captcha Provider selector, pick the “Turnstile” option to open further settings.

captcha provider selector

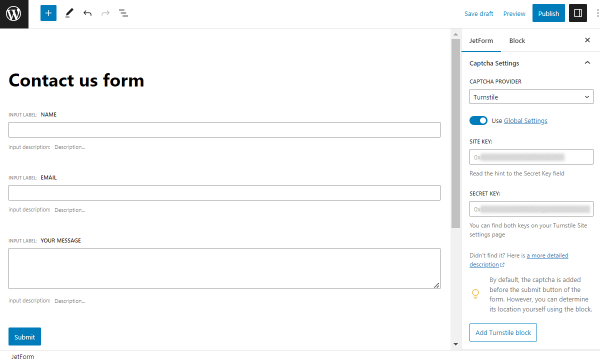
Here, you can activate the Use Global Settings toggle to use the keys we have entered before. Or, paste the Site Key and Secret Key manually right for this exact form.

turnstile captcha settings

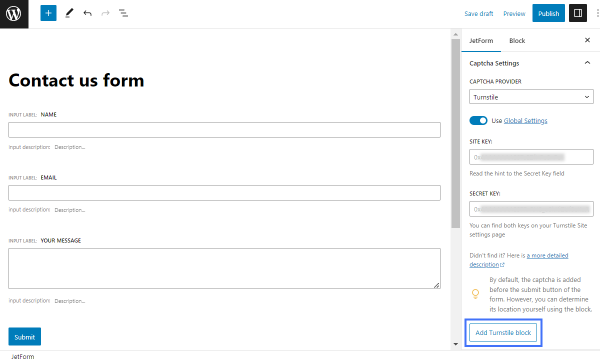
By default, the Turnstile Captcha is located before the “Submit” button of the form. However, if you want to change its position in the form, press the “Add Turnstile block” button.

NOTE

You can also find this block in the default block search in the form by pressing the plus-shaped button in the editor.

With this button, a Turnstile block is added after the “Submit” button, but you can drag it to place in any needed place of the built form.

add turnstile block button

For instance, you can put the Turnstile block next to the “Submit” button if desired.

NOTE

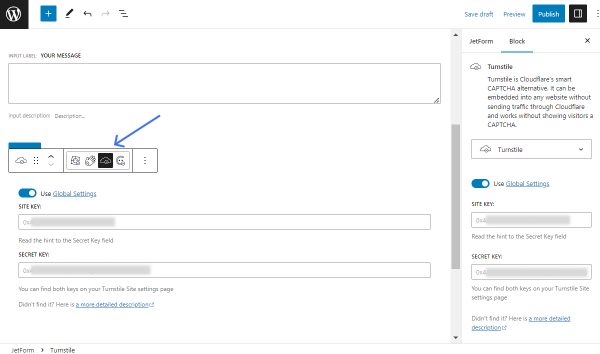
Also, make sure that the icon in the block should be left as “Turnstile.” If you click on any other icon, the Captcha provider will be changed automatically.

turnstile block icon

Press the “Publish/Update” button to save the form.

Place Form on the Page

Now it’s time to decide where to place the form itself. For instance, it can be a default page built with Gutenberg or Elementor, JetPopup item, or JetThemeCore template.

For example, we will place the form on the usual Elementor page. To do so, we navigate to WordPress Dashboard > Pages and press the “Add New” button. Here, we select Elementor as a primary editor and move on to customizing.

wordpress pages directory

Add the JetForm widget/block onto the page. Pick the newly created item in the Choose Form field.

You can adjust further settings if needed. Press the “Publish/Update” button.

jetform widget in elementor

Check the Result

Open the published content on the front end to check if the form works.

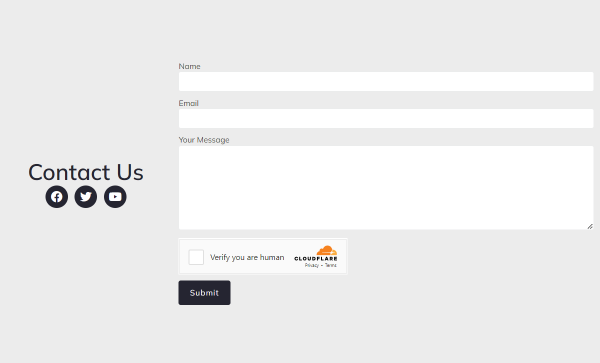
captcha form on front end

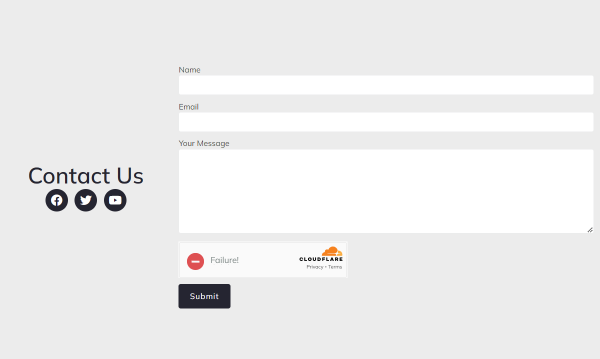
Complete the fields and a captcha. Let’s check what will happen if you fail:

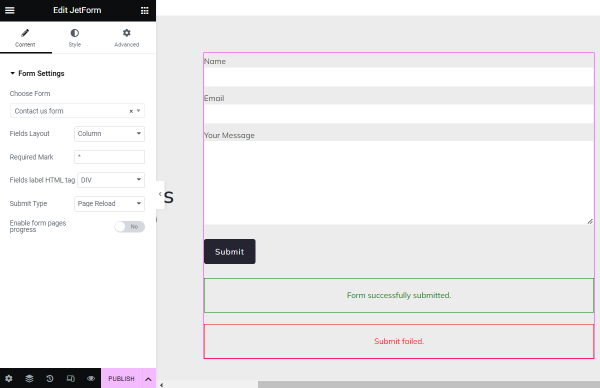
failure captcha

And the result for a captcha success will look like this:

success captcha

Now you know how to add the Turnstile Captcha to the WordPress form built with the JetFormBuilder plugin.

ReCaptcha is a Captcha system by Google that enables web hosts to distinguish between human and automated website access. The original version asked users to decipher hard-to-read text or match images.

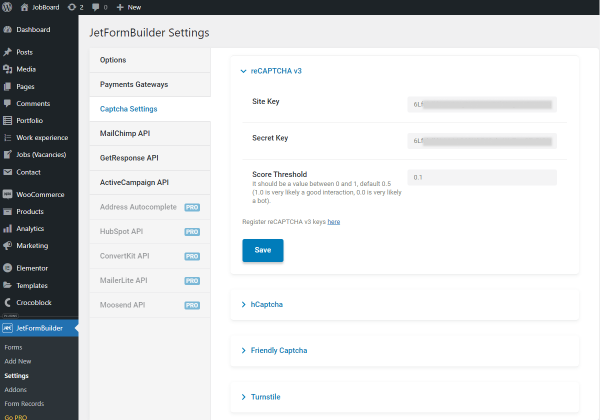
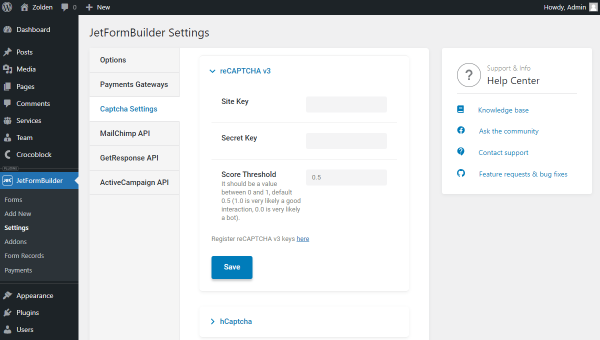
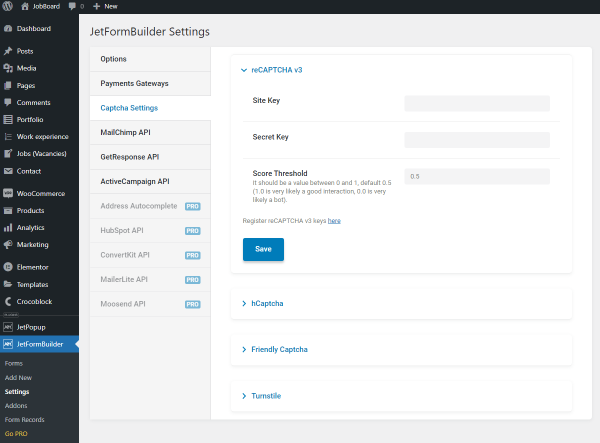
Proceed to the JetFormBuilder > Settings > Captcha Settings tab and unfold the reCAPTCHA v3 section.

jetformbuilder captcha settings

In the Score Threshold field, the default value is “0.5”. You can set the value between 0 to 1, where the “0.1” value, for example, makes the system more likely to identify a user who tries to submit a form as a bot, and the “0.9” value lets the user pass easier.

The Site Key and Secret Key can be registered on the Google reCAPTCHA website. If you enter the keys in the corresponding fields, you will be able to apply them further to any form with one click.
Proceed to the Google reCAPTCHA website and hit the “Switch to create a classic key” button.

switch to create a classic key

On the new page, there will be such settings:

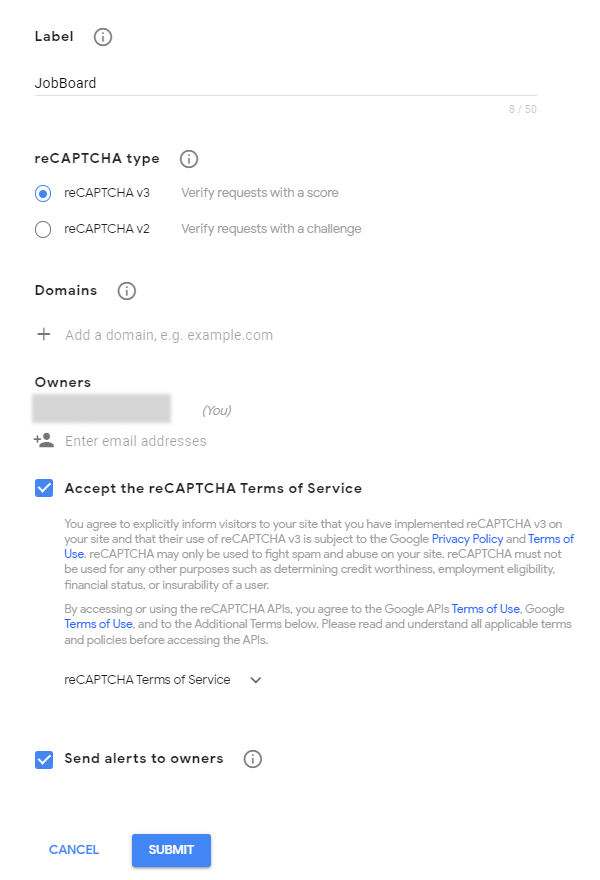
  • Label – type the name of your website into this bar;
  • reCAPTCHA type – JetFormBuilder is compatible with “reCAPTCHA v3,” so choose this option;
  • Domains – this is a bar for your website domain. You can add several domains if you wish;
  • Owners – the email of the Google account you are currently logged in will automatically appear here. However, you can add more owners;
  • Accept the reCAPTCHA Terms of Service – read the Terms of Service and tick the checkbox if you have no objections;
  • Send alerts to owners – if you tick this box, Google will send alert messages to the emails you added in the Owners section whenever a user fails to pass the verification.

After filling out this form, press the “Submit” button.

google recaptcha settings

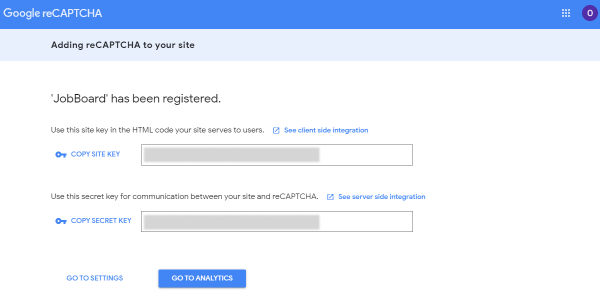
You will be redirected to the page with the Site Key and Secret Key.

copy site key and secret key

Copy and paste them to the corresponding fields of the reCAPTCHA v3 section and push the “Save” button.

recaptcha site key and secret key in the jetformbuilder settings

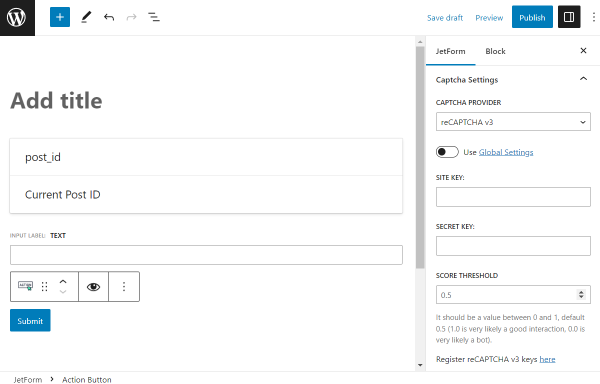
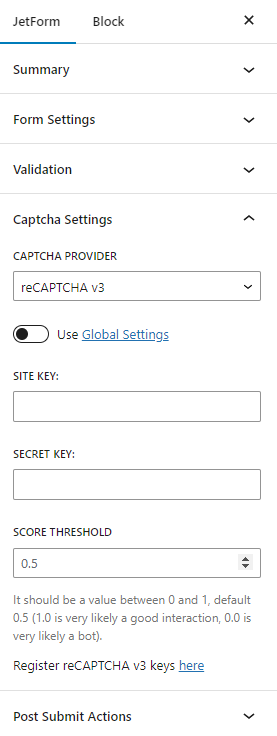
Create a new JetFormBuilder form or proceed to the created one, unfold the Captcha Settings menu section, and select the “reCAPTCHA v3” Captcha provider.

captcha form settings

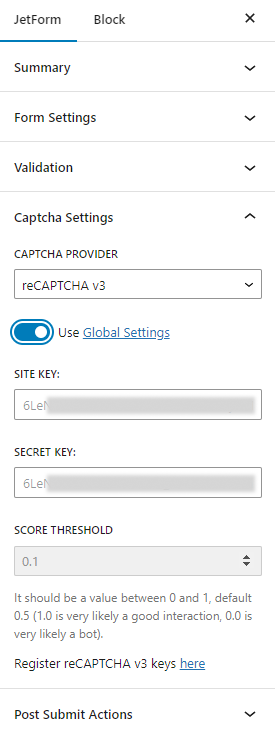
You can add the Site Key and Secret Key separately to this form or enable the Use Global Settings toggle.

site key and secret key added with the global settings

Then, hit the “Update” button.

Place the form on the page and open the page to the front end.

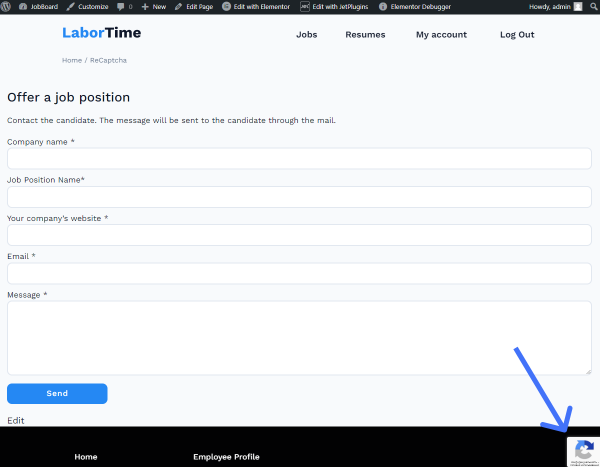
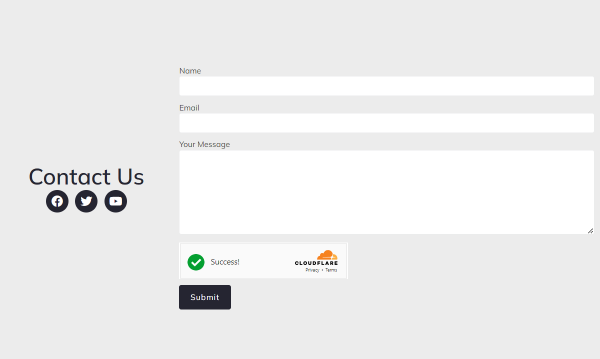
As you can see, the reCAPTCHA badge appears in the bottom right corner of the page.

form with recaptcha anti-spam on the front end

That’s all. Now you know how to add reCaptcha anti-spam protection to a JetFormBuilder form to protect the WordPress website from abusive activities.

hCaptcha is an anti-bot service that protects user privacy and rewards websites. It provides image recognition challenges to distinguish bots from humans.

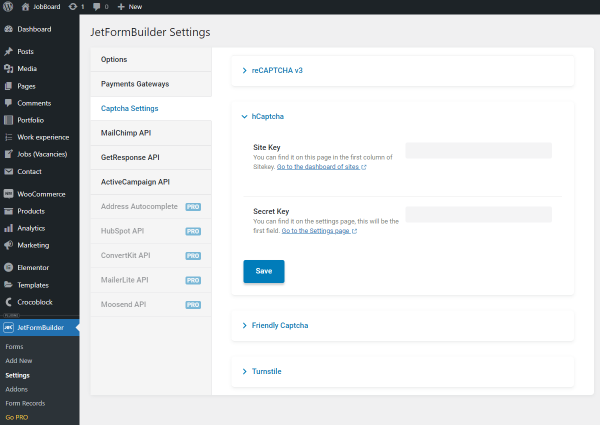
To start the hCaptcha configuration, proceed to the JetFormBuilder > Settings > Captcha Settings tab and unfold the hCaptcha section.

jetformbuilder hCaptcha

The Site Key and Secret Key can be obtained from the hCaptcha website. If you enter the keys in the corresponding fields, you will be able to apply them further to any form with one click.
Proceed to the hCaptcha website and sign in or sign up.

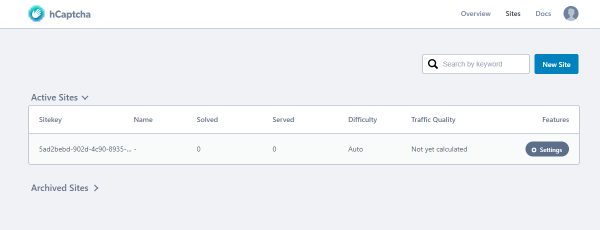
Go to the Sites tab and click on the Site Key to copy it.

hCaptcha site key

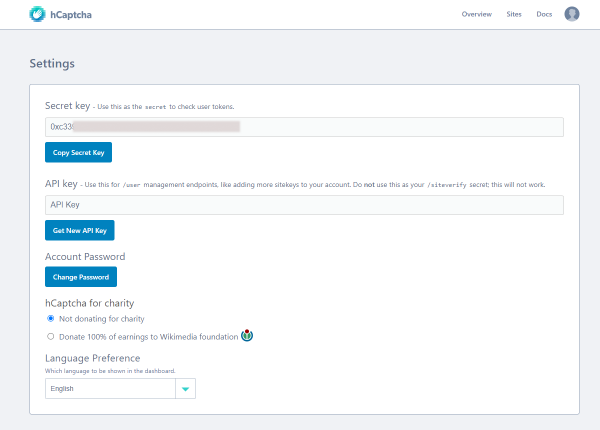
From the Settings page, you can obtain the Secret Key.

hCaptcha secret key

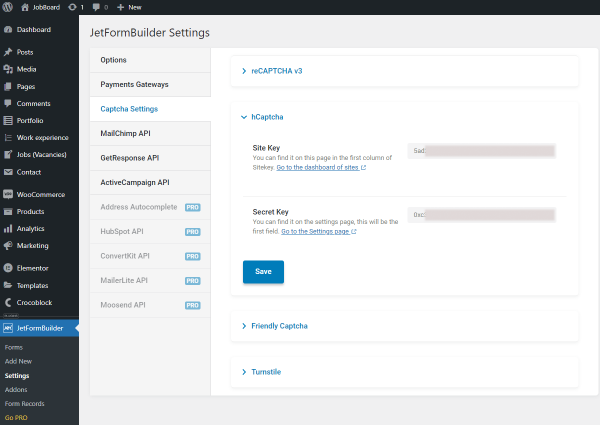
Paste keys to the corresponding fields of the hCaptcha section and push the “Save” button.

hCaptcha site key and secret key

Create a new JetFormBuilder form or proceed to the created one, unfold the Captcha Settings menu section, and select the “hCaptcha” Captcha provider.

hCaptcha provider for form

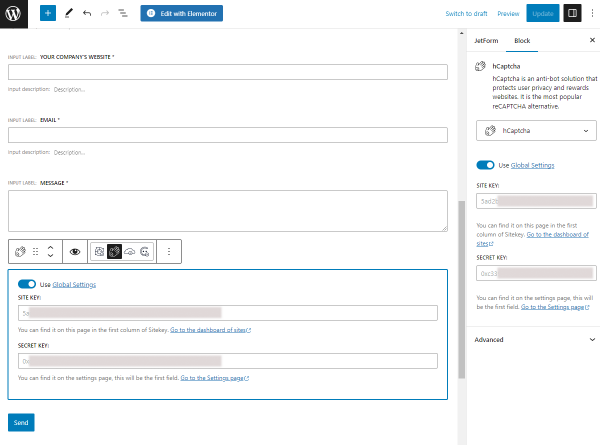
You can add the Site Key and Secret Key separately to this form or enable the Use Global Settings toggle.

hCaptcha site key and secret key added by global settings

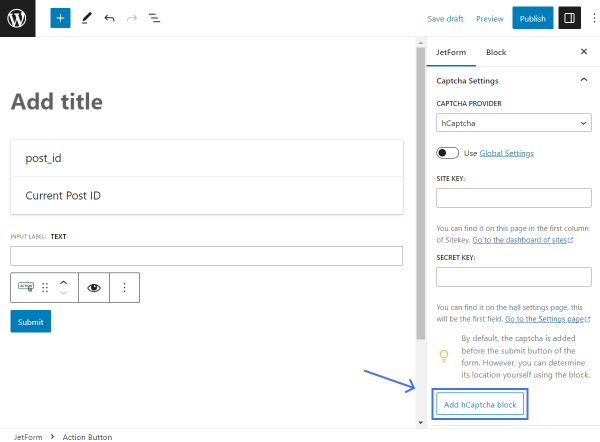
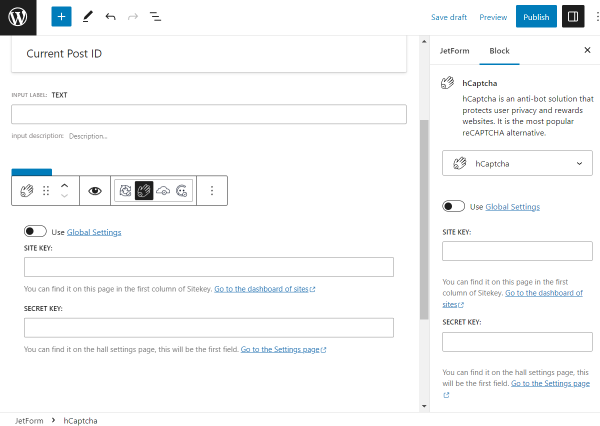
By default, the captcha is added before the submit button. However, if you hit the “Add hCaptcha block” button, you’ll add the block to the form that can be moved.

hCaptcha block in the form

When you finish, hit the “Update” button.

Place the form on the page and open the page on the front end.

The hCaptcha verification appeared before the submit button. The verification will start when you check the I am human checkbox.

form with hCaptcha on the front end

Users will have to select the appropriate pictures to prove they are not bots.

verification via a picture

And that’s what the successful hCaptcha verification looks like.

That’s all. Now you know how to add the hCaptcha anti-bot protection to a JetFormBuilder form to protect the WordPress website from abusive activities.

That’s all. Now you know how to add the hCaptcha anti-bot protection to a JetFormBuilder form to protect the WordPress website from abusive activities.

Form validation is the process when users enter data, and the browser and/or the web server will check to see that the data is in the correct format and within the constraints set by the program. To a JetFormBuilder form, you can apply the Default (browser) or Advanced validation.

The Advanced option has such advantages compared to the Default (browser) option:

  • Editing or translating the error text;
  • Customizing the appearance;
  • Custom validation rules;
  • Server-Side validation;
  • Validate non-basic inputs.

Table of Contents:

Advanced Form Validation

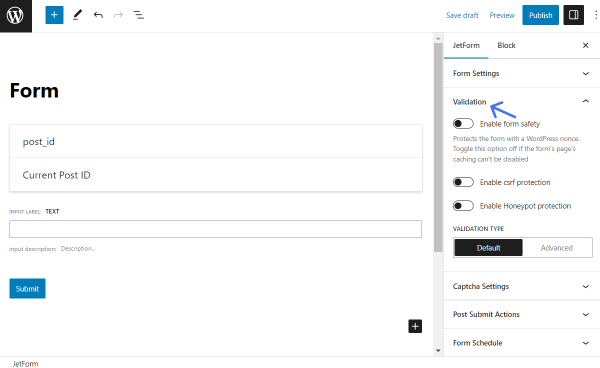
If you want to add validation to the WordPress form, proceed to the Validation menu section in the Form settings tab. Unfold it, and you’ll see such settings:

validation settings
  • Enable form safety — this option is used when there are form caching or conflict issues. It protects the form with a WordPress nonce. Toggle this option off if the form page’s caching can’t be disabled;
  • Enable csrf protection — if enabled, it protects a form from attacks that force authenticated users to submit a request to a website against which they are currently authenticated;
  • Enable Honeypot protection — this feature adds an invisible field to the form. If the hidden field is somehow completed, the form will be considered filled out by a bot;
  • Variation type — here, you can pick two options:
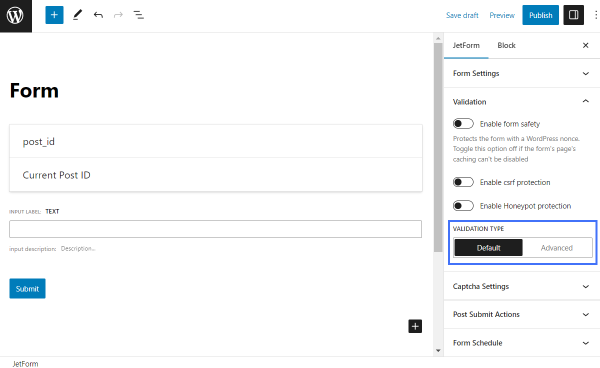
    • Default — native validation that works by browser;
validation type
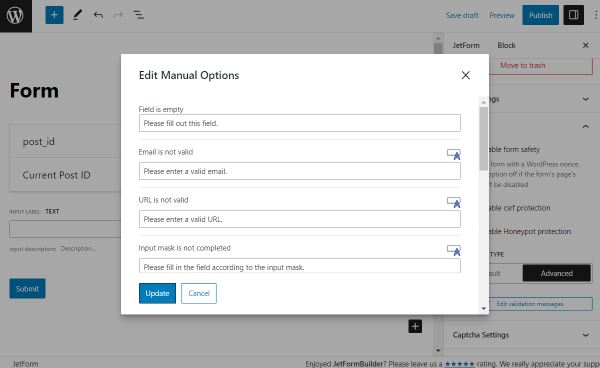
  • Advanced — if you select this option, you can click the “Edit validation messages” button, and you’ll see the “Edit Manual Options” pop-up, where you can change the error text for different field types:
the first part of the edit manual options popup
  • Field is empty — for all field types if the Is Required option is enabled for the specified field. Will be shown if users don’t fill in the Required field and click the “Submit” button;
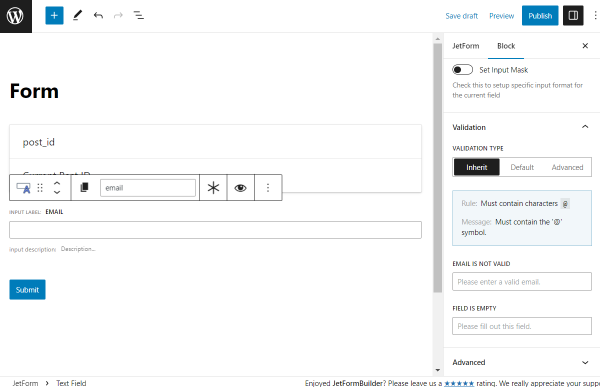
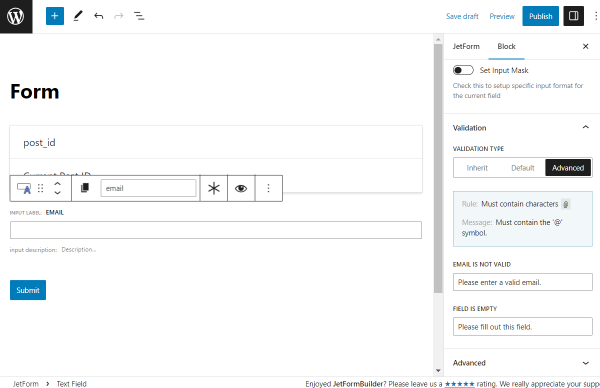
  • Email is not valid — for the Text Field with the selected “Email” Field Type in the Field Settings menu section for the block. The message will be shown if users enter an incorrect email address;
  • URL is not valid — for the Text Field with the selected “Url” Field Type in the Field Settings menu section for the block. It will be shown if users enter an incorrect web address;
  • Input mask is not completed — for the Text Field with the selected “Tel” Field Type, the enabled Set Input Mask toggle, and the filled Input mask field in the Field Settings menu section for the block. It will be shown if users enter their phone number incorrectly according to the Input mask field settings and click the “Submit” button;
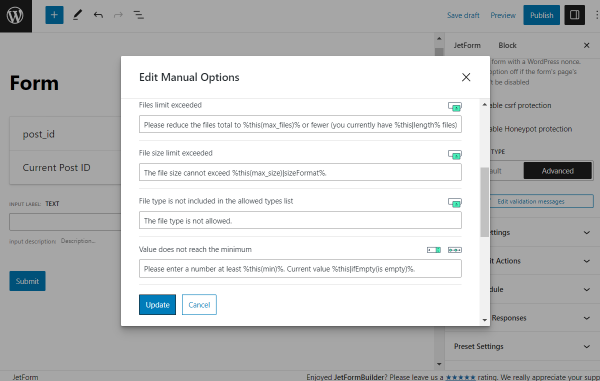
the second part of the edit manual options popup
  • Files limit exceeded — for the Media Field with the Maximum allowed files to upload field completed. For example, if you set “3,” the error message will be shown if users try to upload four files or more;
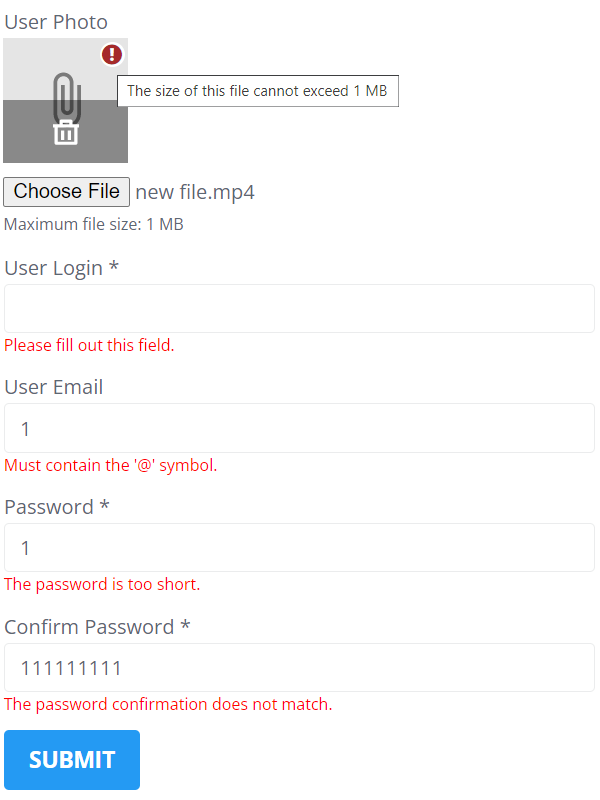
  • File size limit exceeded — for the Media Field with the Maximum size in MB field filled. For example, if you set “1” Maximum size in MB, the notification will be “The size of this file cannot exceed 1 MB” if users upload a file whose size is bigger than 1 MB;
  • File type is not included in the allowed types list — for the Media Field with the Allow mime types field filled. For example, if you set the “gif/image” option, the error message will be shown if users try to upload files of other types;
  • Value does not reach the minimum — for the Number Field and Range Field with the Min value field filled. For example, if you set “5,” the error message will be shown if users try to enter or set a number less than “5”;
the third part of the edit manual options popup
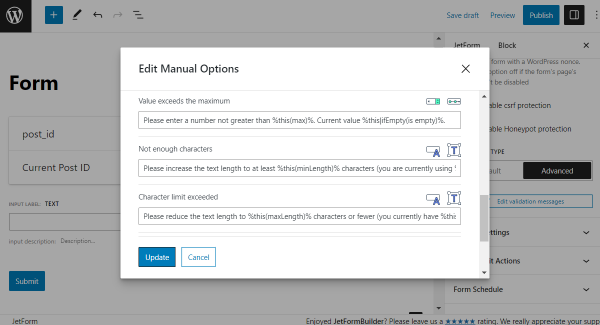
  • Value exceeds the maximum — for the Number Field and Range Field with the Max value field completed. For example, if you set “100,” the error message will be shown if users try to enter or set a number greater than “100”;
  • Not enough characters — for the Text Field and Textarea Field with the Min length (symbols) field filled. For example, if you set “5,” the error message will be shown if users try to enter less than five symbols;
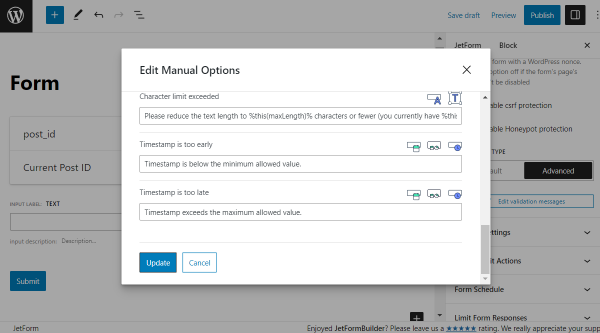
  • Character limit exceeded — for the Text Field and Textarea Field with the Max length (symbols) field filled. This message may appear if you set the Value option and the value exceeds the limit. For example, you created a post editing form and added the Text Field for the post title. In the Value section, you set it so that the field shows the current post title, and if it exceeds the limit, the error message will occur if you click the “Submit” button, so you will need to edit the title to submit the form;
the fourth part of the edit manual options popup
  • Timestamp is too early — for the Date Field, Datetime Field, and Time Field with the Starting from time/date fields filled. For example, if you set “8:00,” in the Starting from time field, the error message will be shown if users try to set the time that is earlier than 8 a.m.;
  • Timestamp is too late — for the Date Field, Datetime Field, and Time Field with the Limit time/dates to fields filled. For example, if you set “17:00,” in the Starting from time field, the error message will be shown if users try to set the time that is later than 5 p.m.

Advanced Form Validation for Separate Blocks

In addition to the advanced form validation, you can set the Validation for separate form fields in the Block settings tab. This option is available for the Text Field, Textarea Field, Media Field, Number Field, Range Field, Date Field, Datetime Field, and Time Field blocks. You can select such Validation Types:

Inherit

If you select this option, validation is inherited from the form arguments. Here, you can only add advanced rules that check the entered data in the Text Field and Textarea Field blocks, and if the data does not match the rule, the error message will appear.

block inherit validation type

Hover over the message in the blue rectangle and press the “+ Add Rule” button.

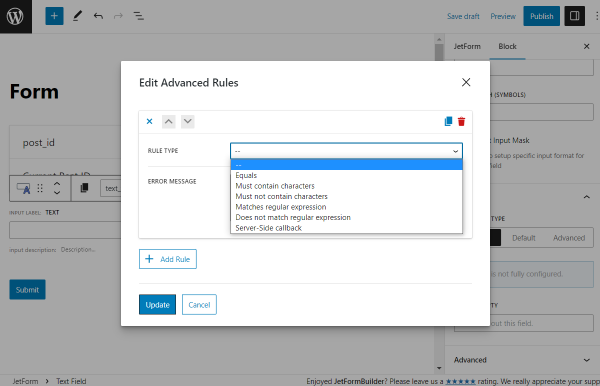
In the Rule Type drop-down menu, you can select such types:

rule type
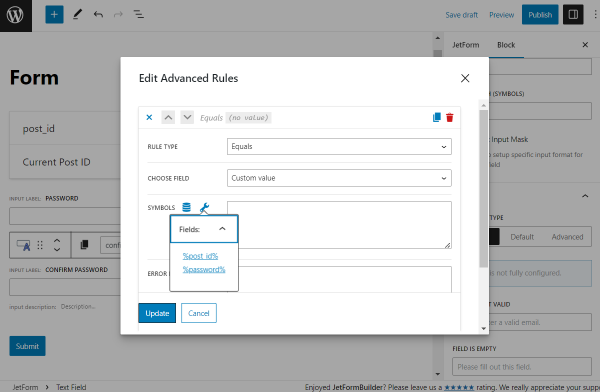
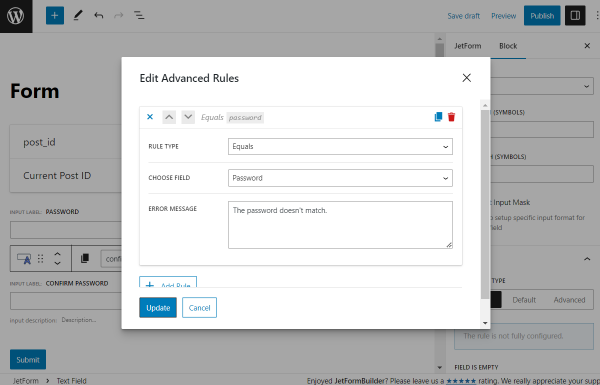
  • Equals — displays the error message if the rule’s condition doesn’t match the data users enter into the form. In the Choose Field drop-down menu, you can select one of the form fields or set “Custom value.” If you pick the “Custom value” option, the Symbols field will appear, where you can enter symbols that must be typed in the form field. If you hit the coin-stack-shaped button near the Symbols field, you can set the Preset for this field. To learn more, proceed to the Preset Settings overview. Also, if you push the wrench-shaped button, you can use macros with the form field names. In the Error Message field, you can set the custom error message.
symbols field settings

For example, you have two text fields: “Password” and “Confirm Password.” 

Click on the “Confirm Password” Text Field and hit the “Edit Advanced Rules” button. In the Edit Advanced Rules pop-up, pick the “Equals” Rule Type, select the “Password” Text Field in the Choose field, and set the custom Error Message

So the error message will appear when the text in the “Password” and “Confirm Password” fields doesn’t match.

password does not match
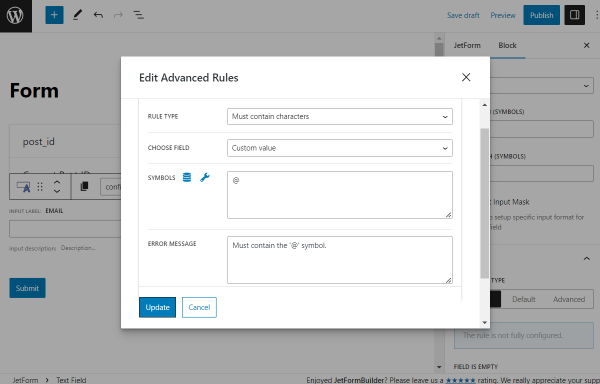
  • Must contain characters — the message will appear when users don’t enter the required characters, for example, “@” for the email field;
must contain characters rule type
  • Must not contain characters — the message will appear when users enter the restricted characters;
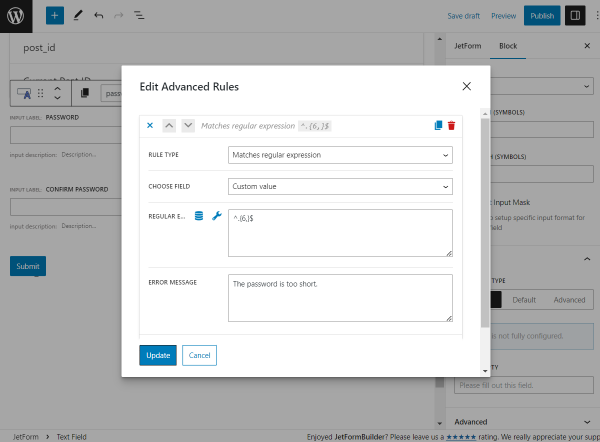
  • Matches regular expressions — the message will appear if users enter the symbols combination that does not match the regular expressions. For example, you can set the “^.{6,}$” Regular expression for the Text Field with the “Password” Field Type, and the custom Error Message “The password is too short” will appear if users enter less than six characters into the field;
matches regular expression rule type
  • Does not match regular expressions — the message will appear if users enter the symbols combination that matches the regular expressions;
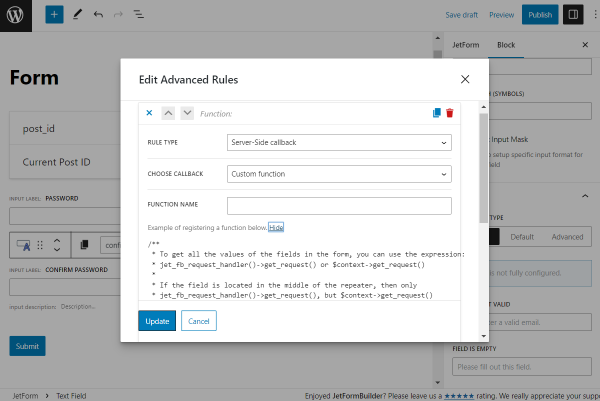
  • Server-Side callback — there are three callbacks available:
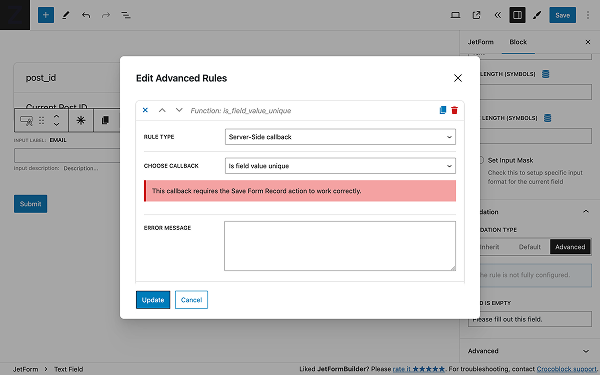
    • Custom function — with this option, the Function Name field appears, where you can enter a function. Hit the “Show” button to get examples of function registering;
server-side callback
  • Is user login unique — the custom Error Message will appear if users try to enter the login that already exists on the website;
  • Is user email unique — the custom Error Message will appear if users try to enter the email already registered on the website.

Be aware that you can add two and more advanced rules to every form field by clicking the “+ Add Rule” button.

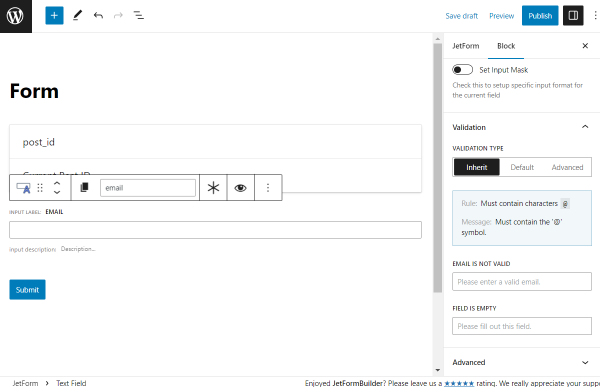
When you set all needed advanced rules and hit the “Update” button, you’ll see the rules and messages in the Validation block section.

block inherit validation type

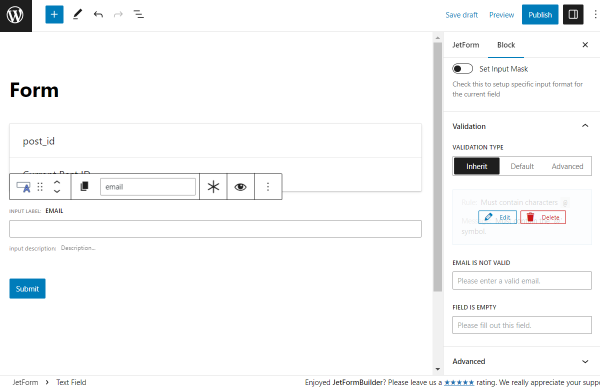
You can hover over it and click to edit or delete the rule.
edit or delete the advanced rule

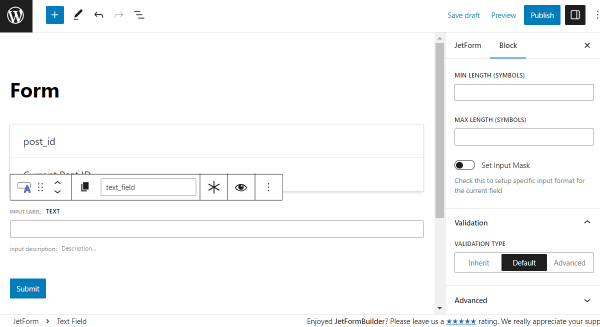
Default

That’s the native validation that works by the browser.
block default validation type

Advanced

Here, you can add the advanced rules described above and change the text of the error messages. The number of available messages is dependent on the field type and settings. All error messages are described in the Advanced Form Validation chapter. The custom messages set for the separate field will overtake the form validation settings.

advanced validation type for block

Checking Form Validation on the Front End

Proceed to the form or block Advanced Validation settings and set the custom error messages and advanced rules. Hit the “Update” button and place the form on the page. Open the page on the front end and fill in the form fields improperly to check the error messages.

advanced validation on the front end

That’s all. Now you know how to set the advanced validation and rules for the JetFormBuilder forms on the WordPress website.