In this tutorial, we focus on configuring a custom recurring subscription plan in the PayPal“Sandbox” mode and choosing it via the Select (Checkbox or Radio) Fields of the previously created form.
It allows the price range to depend on the number of ordered items (so-called tiered pricing); therefore, the chosen data will be transferred to the PayPal checkout page, and PayPal will provide tier-based payment.
Here, we assume that the PayPal Recurring Payments add-on for JetFormBuilder is installed and activated, and that the subscription plan and the form have been created. In addition, we primarily focus on configuring specific fields and settings. More details on configuring the required subscription plans, adjusting the Post Submit Actions, and managing the subscriptions via PayPal and JetFormBuilder Dashboard can be found in the How to Configure Payment Gateways and How to Set Recurring PayPal Payments in WordPress Form tutorials.
NOTE
The “Sandbox” mode of the PayPal functionality simulates transactions during payment processing without real payments. In this case, activate the Enable Test Mode switcher in the WordPress Dashboard > JetFormBuilder > Settings > Payments Gateways subtab. If you want to use the “Live” mode, you should upgrade your PayPal account. Nonetheless, the subscription plan creation workflow is the same for both modes.
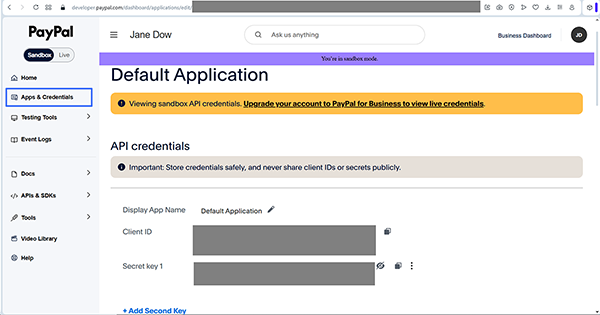
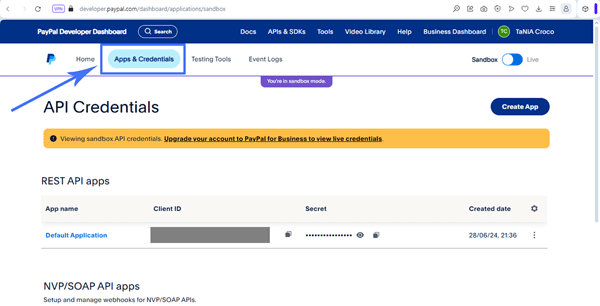
Initially, log in to your PayPal Developer account. By default, you will be redirected to the Sandbox test accounts page of your main PayPal account. Here, go to the Apps & Credentials tab and select the required credential from the unlisted options.
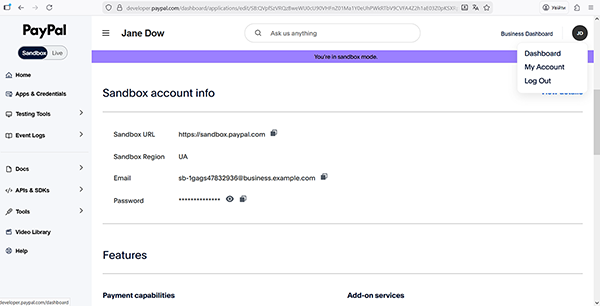
Then scroll down this page to view the Sandbox accountinfo section to the Email and Password data.
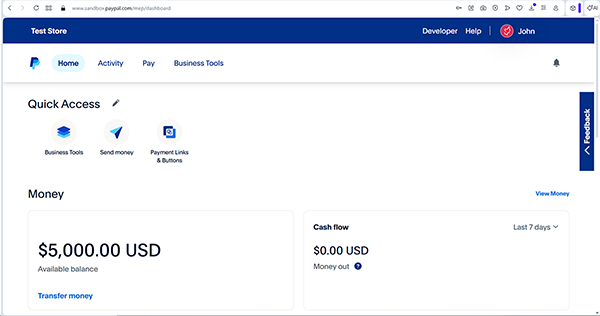
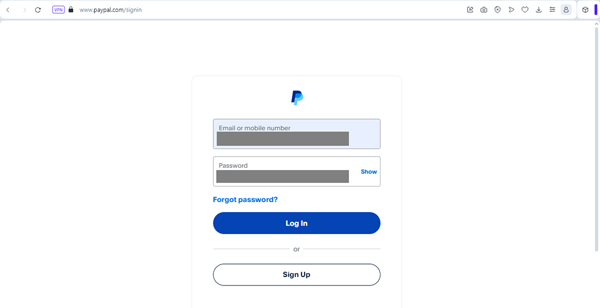
Then, enter the Sandbox PayPal account using the provided Email and Password. Here, the “John Doe” username is set by default; you can enter your desired one.
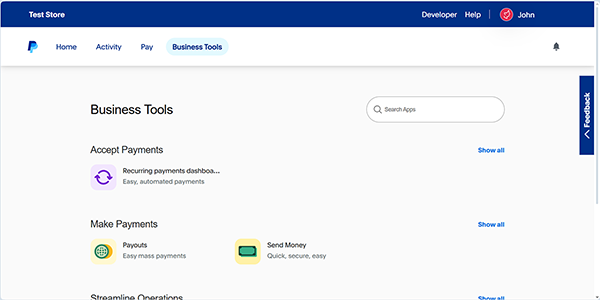
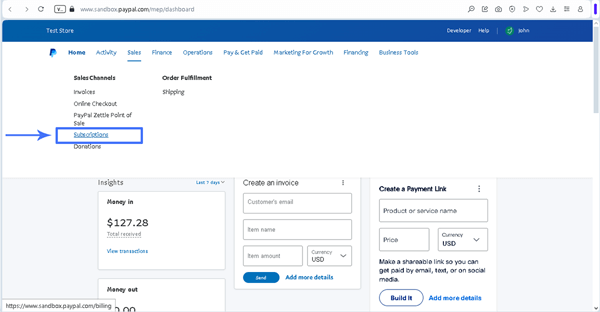
Here, unfold the Business Tools tab and press the “Recurring payments dashboard” link.
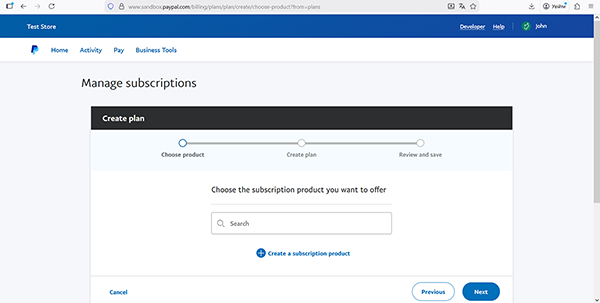
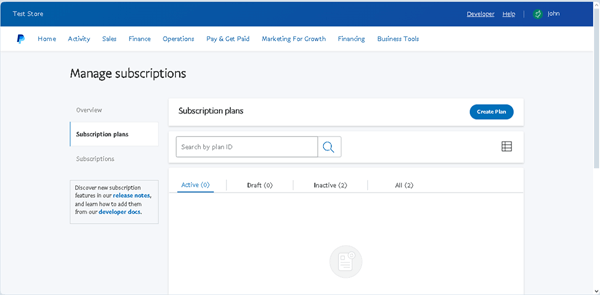
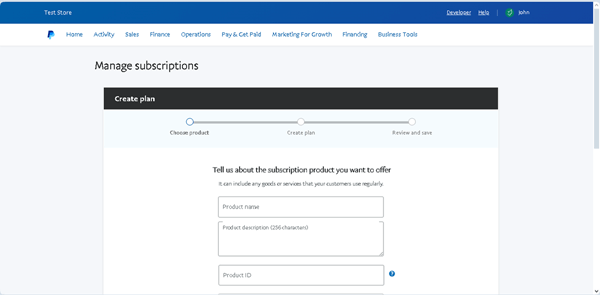
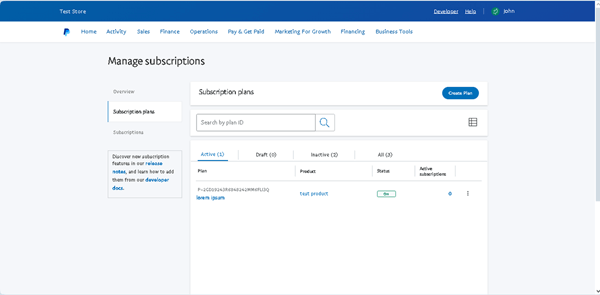
After that, you will be redirected to the Manage subscriptions page.
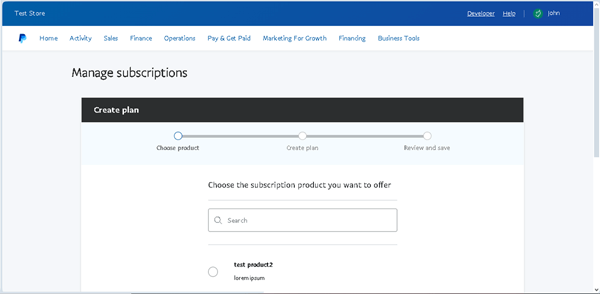
Here, click the “Create subscription product” link, fill in the required fields, and proceed to the next page.
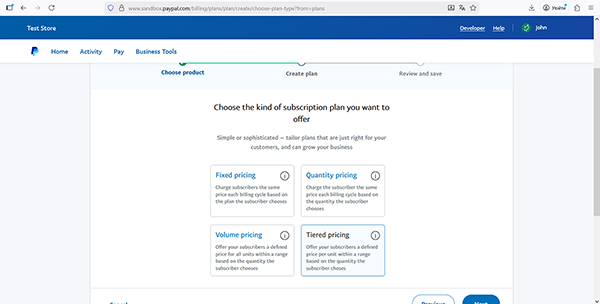
Once the product’s general data is complete, you will be redirected to the Create plan page to configure the subscription. On this page, select the “Tiered pricing” option and move to the next page.
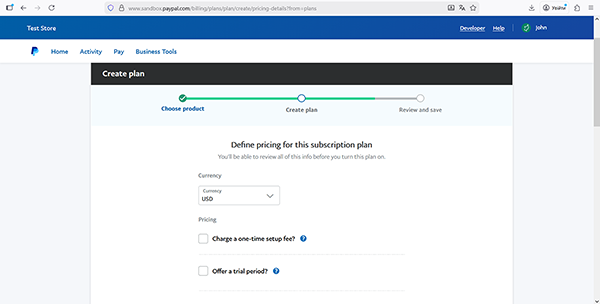
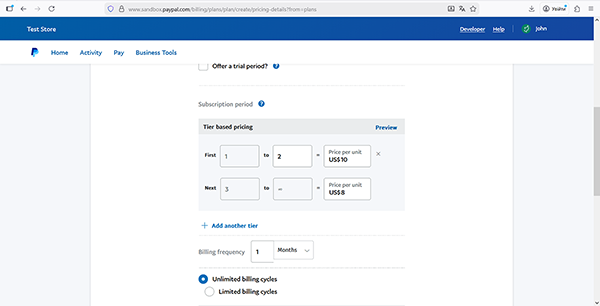
Then, adjust the pricing on the Define pricing for this subscription plan page by filling out the Currency, Pricing, and other fields.
Also, scroll the page down and configure the Tier based planning section that is intended to specify the pricing range.
Once configured, press the “Next” button in the bottom-right corner of the page.
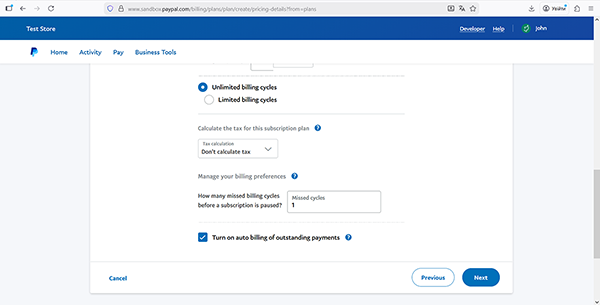
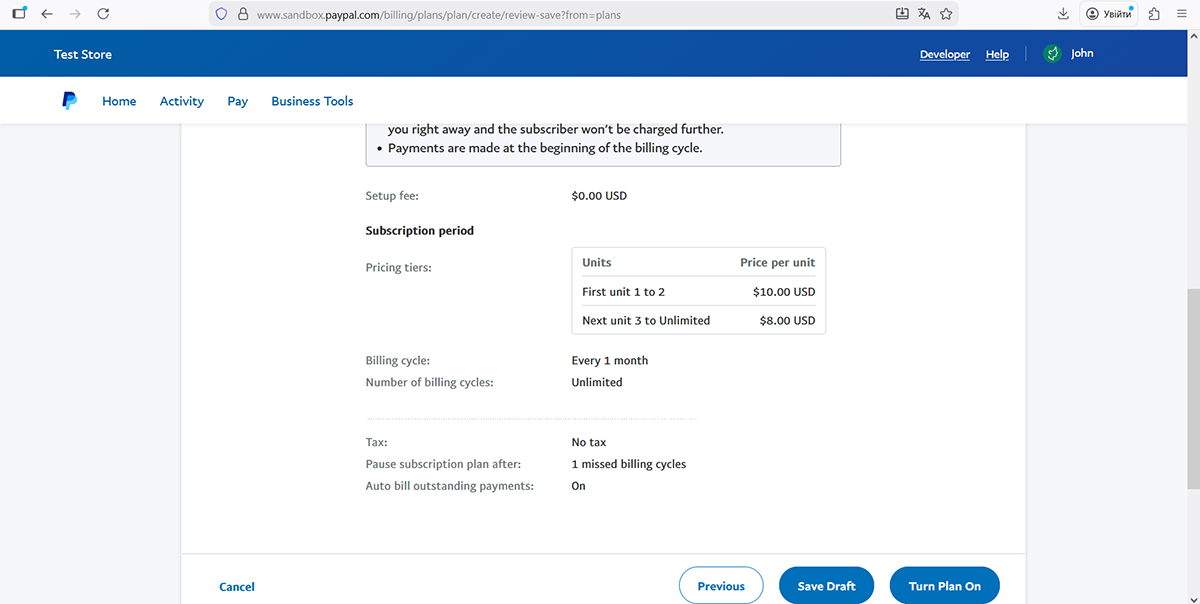
In the last step, after being redirected to the Review and save your new plan page, browse the options set, update them (if needed), scroll down the page, and press the “Turn Plan On” button in the bottom-right corner to make the plan live.
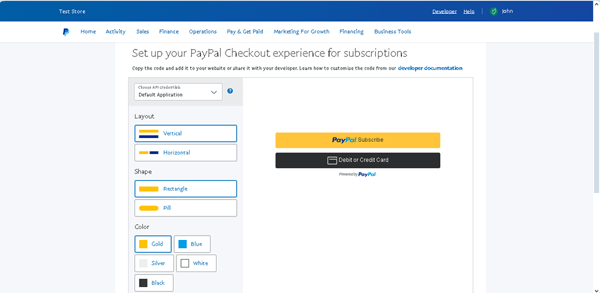
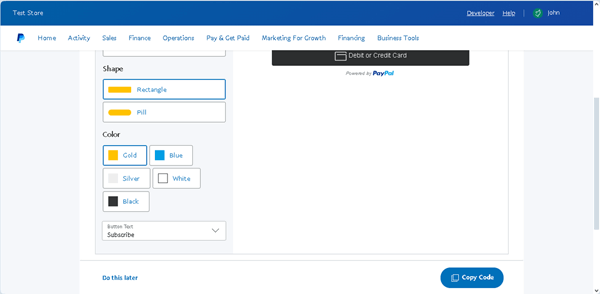
Finally, on the Set up your PayPal checkout experience for subscriptions page (if needed), set the layout options, scroll down the page, click the “Copy Code” button, then click the “Go to plans” link to be redirected to the Subscription plans page. Otherwise, press the “Do this later” link to be redirected to the Subscription planspage.
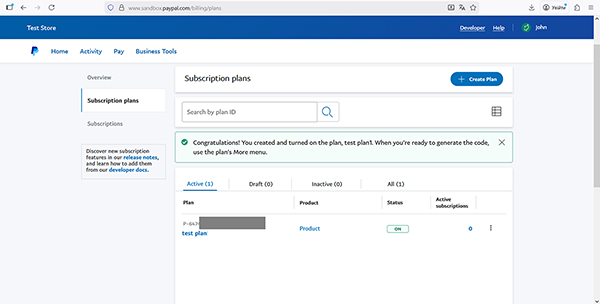
Your subscription plan is now displayed on the SandboxPayPal Dashboard > Sales > Subscriptions > Subscription plans page. Further, the Plan ID (here, “P-647****”) will be entered into the form’s Radio Field.
Configure the JetForm Settings
Then, return to your PayPal Developer account.
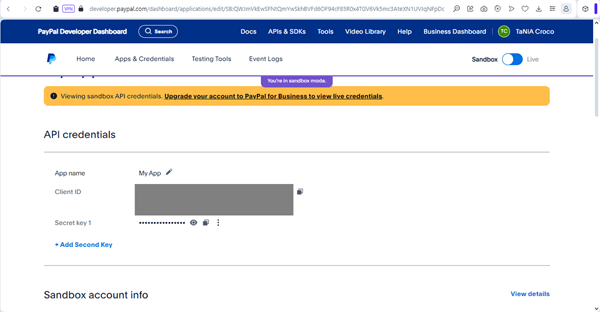
Here, go to the Apps & Credentials tab and select the required credential from the listed options. After that, copy the Client ID and Secret key 1 data.
Then, return to your site. Before building the form, ensure that the PayPal gateways are activated for your website. Open the WordPress Dashboard > JetFormBuilder > Settings page and check the Payments Gateways settings.
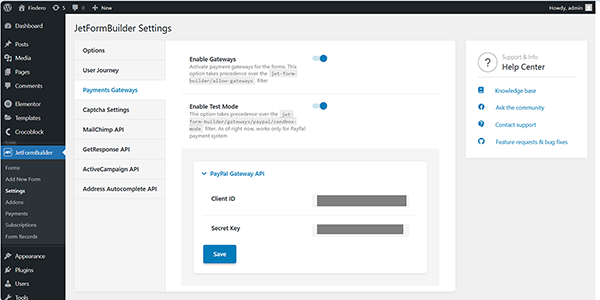
Toggle the Enable Gateways switcher. Optionally, activate the Enable Test Mode switcher if you test work with your PayPal account in the “Sandbox” mode and disable it if you work in the Live PayPal mode.
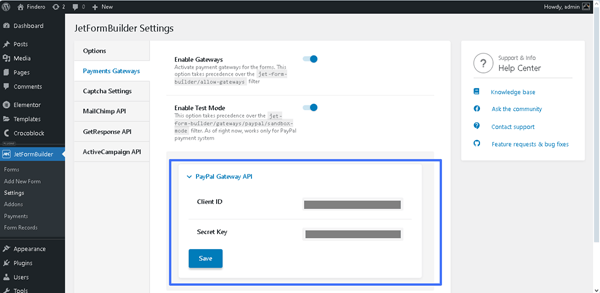
Then, in the WordPress Dashboard > JetFormBuilder > Settings > Payments Gateways subtab, complete the Client ID and Secret Key fields and the corresponding data, and hit the “Save” button.
Build the Form
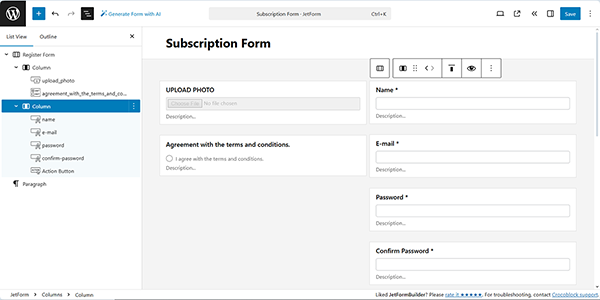
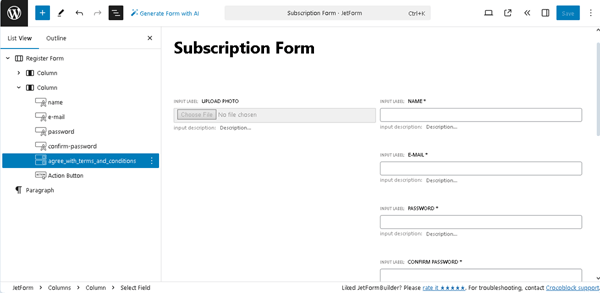
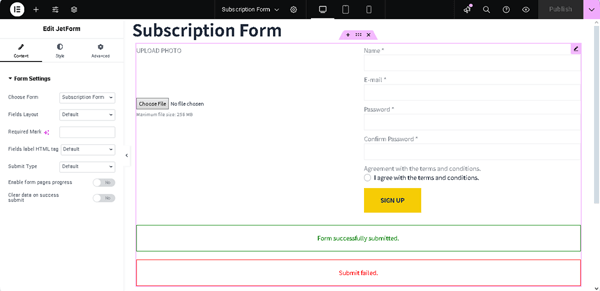
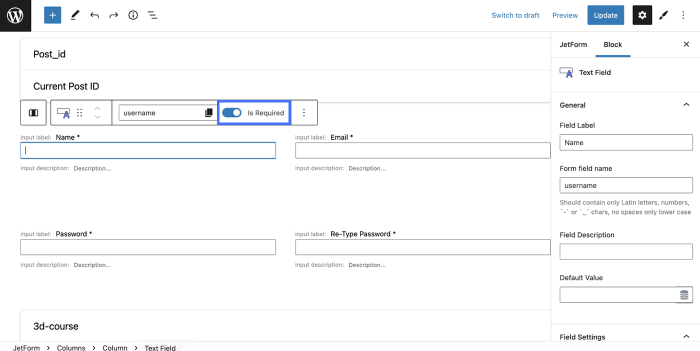
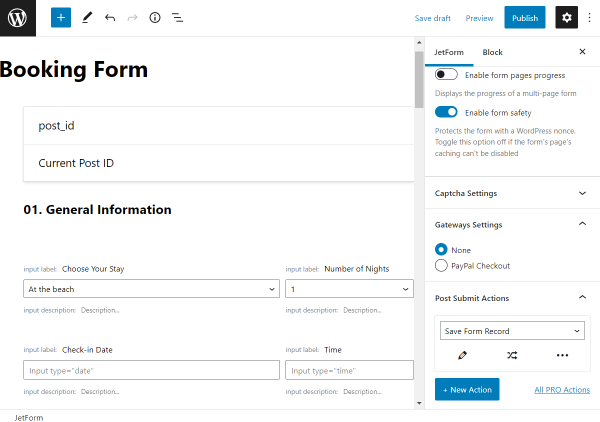
Go to WordPress Dashboard > JetFormBuilder > Add New to create a new form. Use an embedded pattern or build it from scratch. Here, we create a custom “Subscription Form” with the Text Fields, Image Field, RadioField,and Action Button. Also, the Select or CheckboxFields can be used instead of the Radio Field.
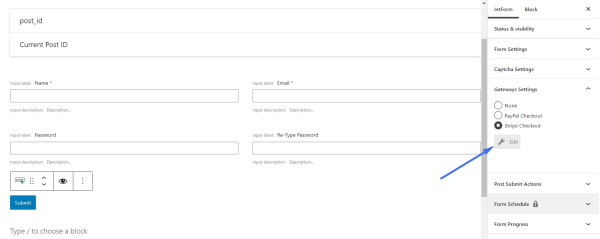
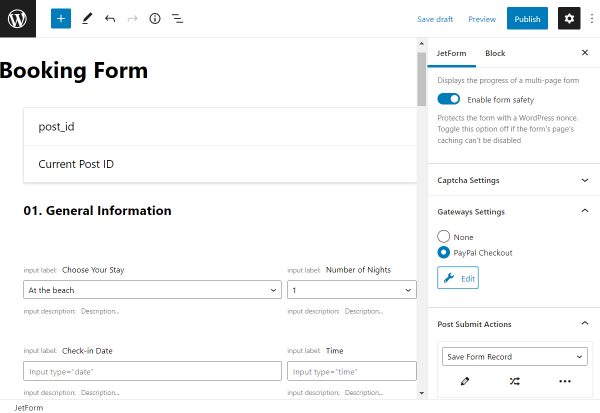
Next, move to the Gateways Settings section. Enable the PayPal Checkout option, then press the “Edit” button below to access the settings.
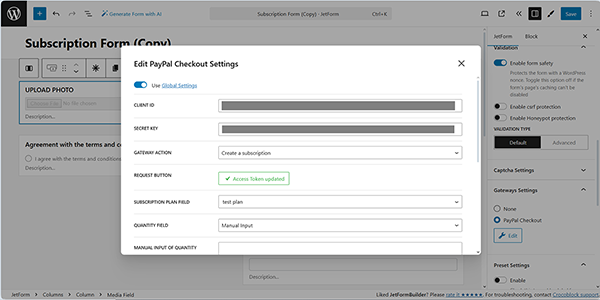
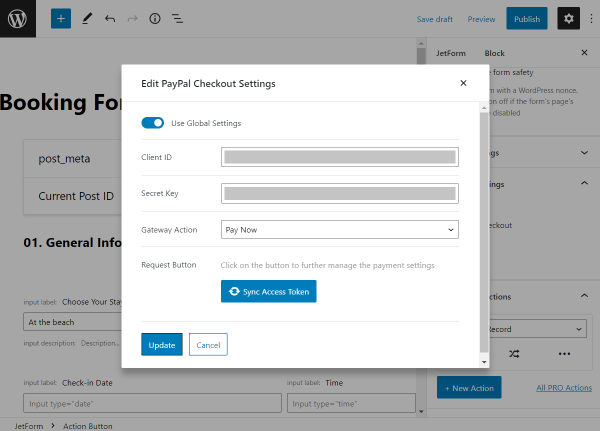
Here, in the newly opened Edit PayPal Checkout Settings window, enable the Use Global Settings toggle to inherit the Client ID and Secret Key you entered earlier in the JetFormBuilder settings.
Choose the “Create a subscription” GATEWAY ACTION from the drop-down menu.
Push the “Sync Access Token” button to synchronize the data, and after successful synchronization, select the needed plan in the SUBSCRIPTION PLAN FIELD (here, we set the “test plan” subscription plan we built earlier). As for the QUANTITY FIELD, we leave it with the default “Manual Input” value.
Click on the “Update” button to save the adjusted settings.
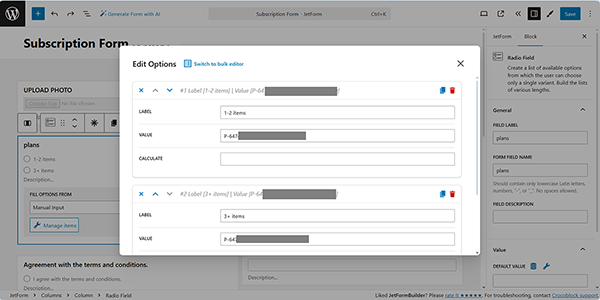
In the next step, return to the form builder and insert the multiple-choice field. For instance, we added the Radio Field with the “Manual Input” option. Press the “Manage Items” button, then enter the required price range in the LABEL fields. Then, move to the “Sandbox” PayPal account: SandboxPayPal Dashboard > Sales > Subscriptions > Subscription plans page, copy the required Plan ID (here, “P-647****”) and enter it into the VALUE fields.
Scroll the pop-up down and save the settings.
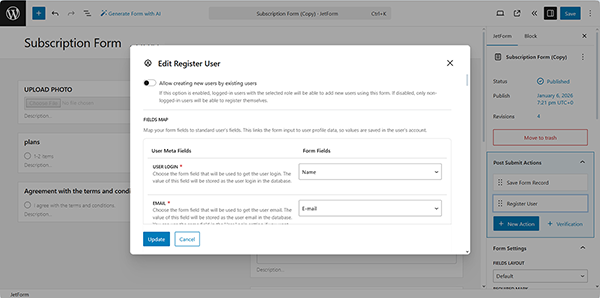
In the last step, insert the required Post Submit Actions: we keep the “Save Form Record” Post Submit Action and add the “Register User” Post Submit Action since the form is intended to manage subscribers. Once completed, press the “Update” button.
Read the Register Form tutorial to learn how to build register forms and manage their settings.
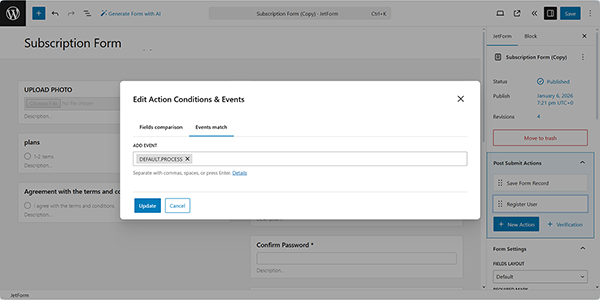
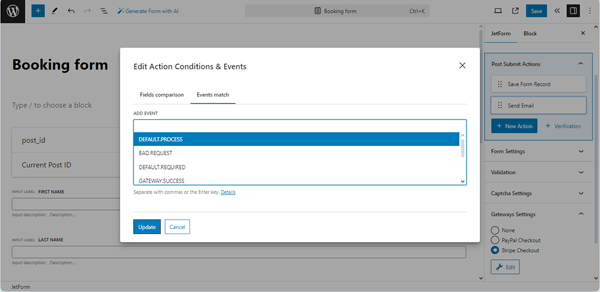
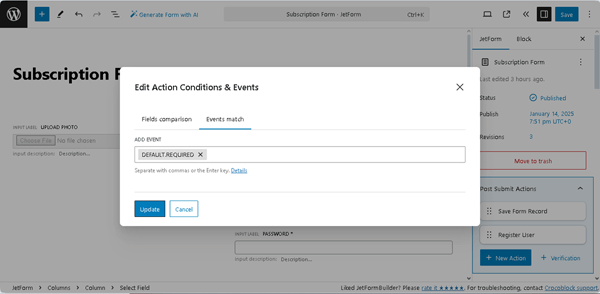
In the final stage, press the “Condition” button to open the Edit Action Conditions & Events pop-up window. Here, select the Events Match tab and choose the needed subscription event(s) from the Add Event drop-down menu: DEFAULT.PROCESS ー the event that is performed simultaneously with the specified action. This event runs before the redirect to check whether PayPal functionality is enabled.
That’s it for the form; now, you can hit the “Publish” button.
Test the Flow
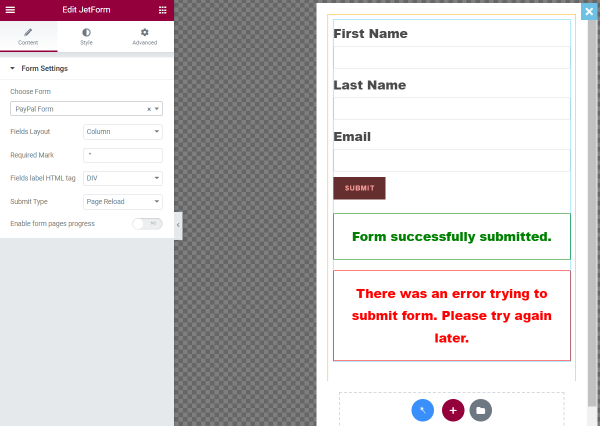
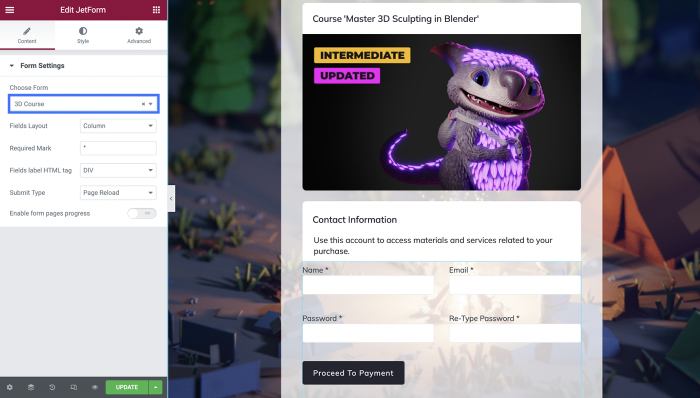
Open an editor you prefer and find the JetForm widget/block/element. In this tutorial, we use Elementor. Read the Displaying a JetFormBuilder Form in Any Page Builder tutorial to learn how to add the JetForm widget/block/element in Elementor, Block Editor, and the Brickstheme.
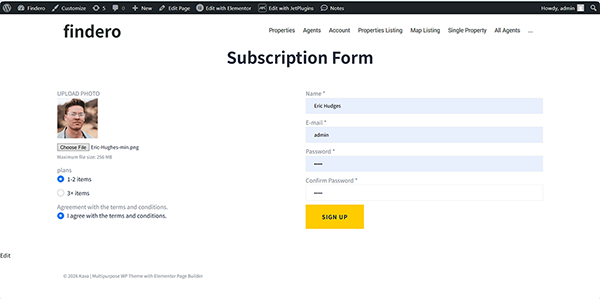
Move to the front end, complete the form with the required information, and submit it by pressing the “SIGN UP” button.
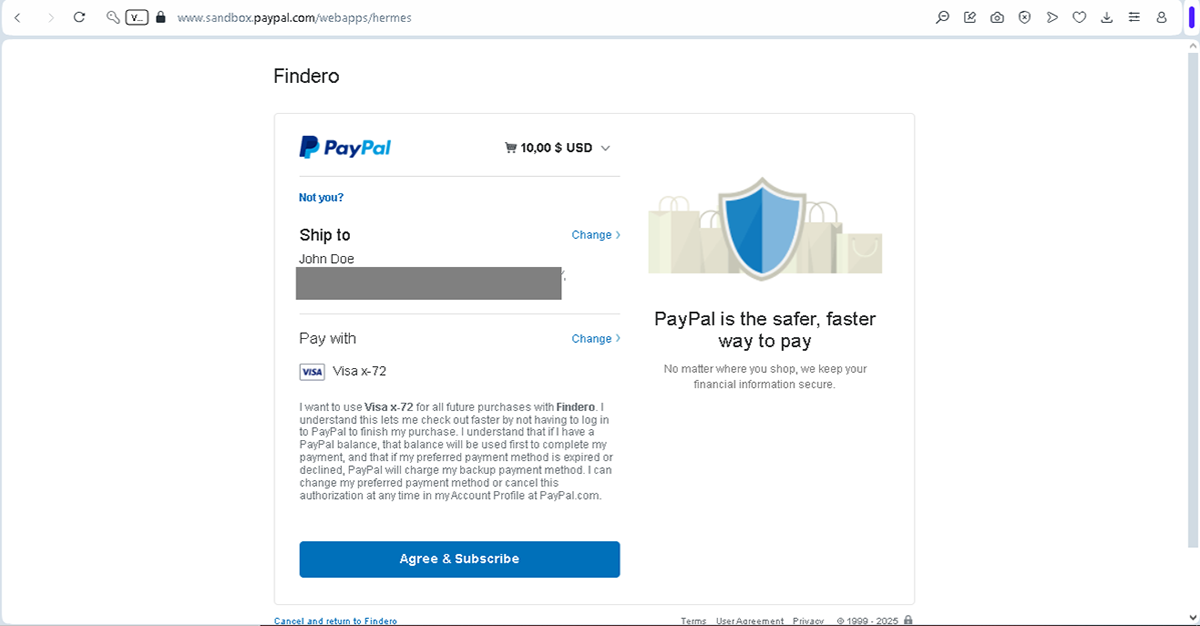
After submission of the form, you will be redirected to the PayPal payment page. After logging in, if needed, select the appropriate options and press the “Continue” button. Finally, review the provided information and click the “Agree & Subscribe” button.
After payment, you will be redirected back to the form.
Finally, the submission will be displayed in the PayPal and JetFormBuilder Dashboard. That’s all about configuring the tiered pricing PayPal subscription plan and building the JetForm form to set a price range based on the items ordered using the PayPal Recurring Payment add-on for WordPress websites.
With the JetFormBuilder WordPress plugin, you can set up payments through Stripe, PayPal, and WooCommerce. However, if you need to add additional payment methods, you can do so with Stripe integration in JetFormBuilder.
In this article, we focus on adding the Klarna payment method as an example. Klarna is one of the most popular Buy Now, Pay Later (BNPL) options available in Europe. You can also enable other popular payment methods supported by Stripe, such as Afterpay/Clearpay, Affirm, and Giropay, depending on your country and Stripe account settings.
For instance, users in the USA can enable Affirm, Afterpay, or Cash App Pay; those in Germany can add Klarna, Giropay, Sofort, SEPA, or PayPal; while in the UK, popular choices include Klarna, Afterpay/Clearpay, and Pay by Bank. You can add any payment method available in Stripe that is accepted in your country.
First, install and activate the Stripe Payments & Subscriptions add-on. Refer to the Stripe Payments & Subscriptions guide to learn how to set up integration between Stripe and JetFormBuilder correctly.
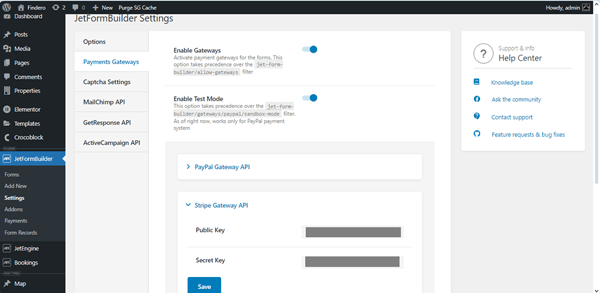
Navigate to the WordPress Dashboard > JetFormBuilder > Settings > Payments Gateways tab and turn the Enable Gateways toggle on.
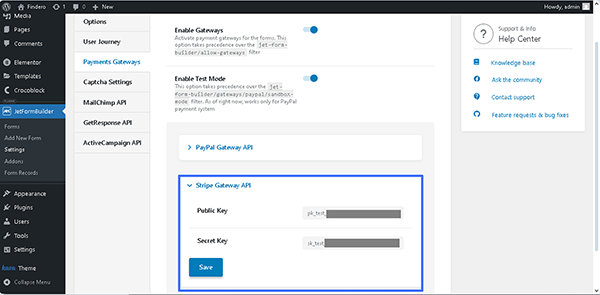
Unfold the Stripe Gateway API tab. Here, you can enter the Public Key and Secret Key copied from the Stripe website and “Save” them to use in the JetFormBuilder forms further.
Add the Code
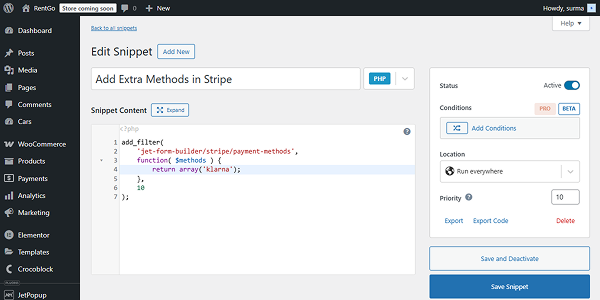
To enable additional payment methods, the custom code should be added to the functions.php file of the child theme or the Code Snippets plugin. Use the following code on the site:
Instead of “klarna,” use any needed payment method.
Click the “Save and Activate” button once you are ready.
Connect the Method
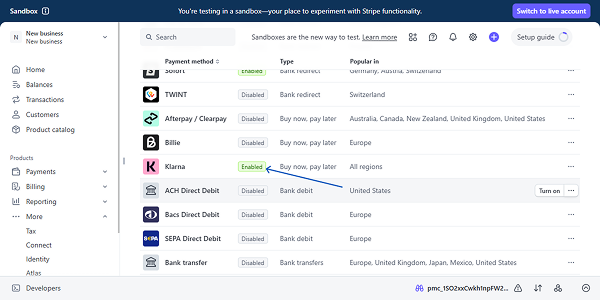
Ensure that the required payment methods are listed in the Create a Payment Method guide. Methods mentioned only on the Stripe site can be integrated with JetFormBuilder forms.
Then, in your Stripe account, navigate to Settings > Payments > Payment methods and ensure that the required payment method is enabled.
Set Up the Form
Proceed to setting up a form. For that, we navigate to WordPress Dashboard > JetFormBuilder > Add New Form.
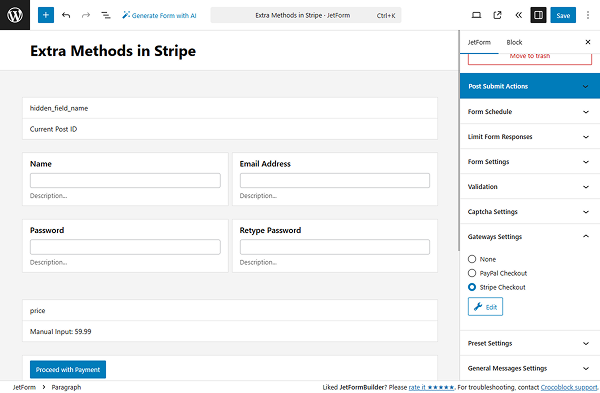
Enter the form’s title — in this case, it is “Extra Methods in Stripe”.
The Welcomeblock appears by default. From here, you can select a form pattern or generate a form with OpenAI. Otherwise, you can hit the “Start from scratch” button and use the three fields added by default; otherwise, you can delete them to begin anew.
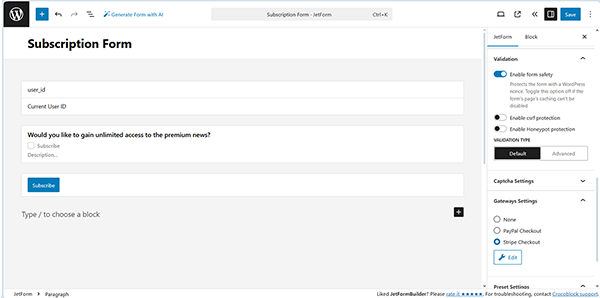
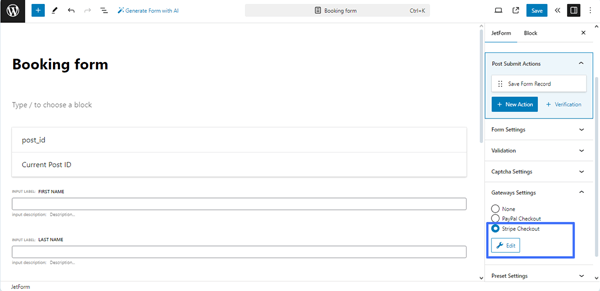
Proceed to the JetForm settings tab and open the Gateways Settings. Enable the “Stripe Checkout” option.
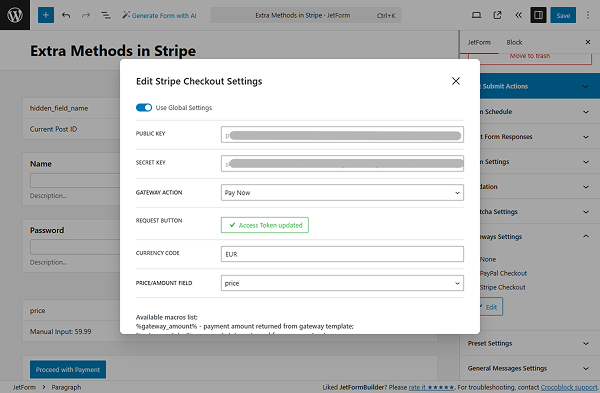
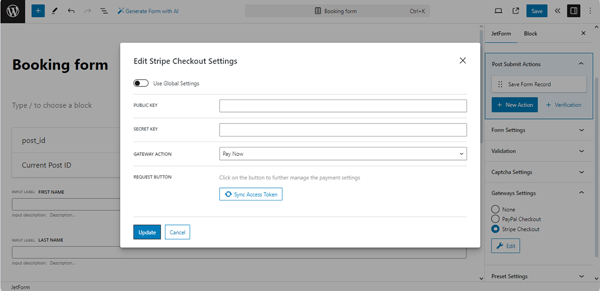
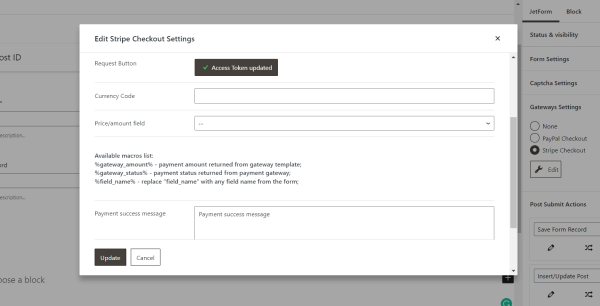
Click the “Edit” button. In the newly opened Edit Stripe Checkout Settings pop-up, enable the Use Global Settings toggle.
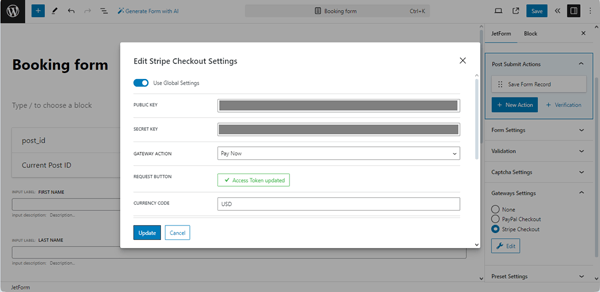
So the PUBLIC KEY and SECRET KEY are added automatically. Enter the needed CURRENCY CODE and ensure that it is supported by the payment method you use. Choose the needed field for the PRICE/AMOUNT FIELD.
You can change the PAYMENT SUCCESS or PAYMENT FAILED MESSAGES if needed. Then, click the “Update” button.
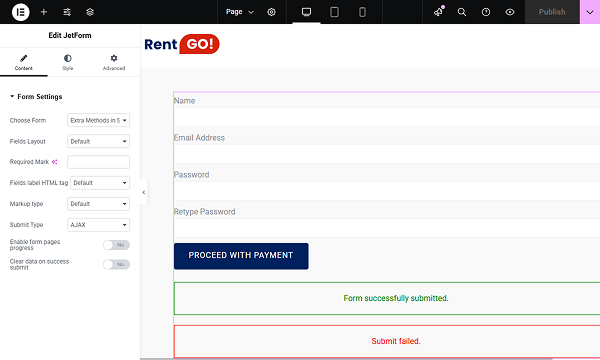
Click the “Publish” button once you are ready with the settings.
Check the Result
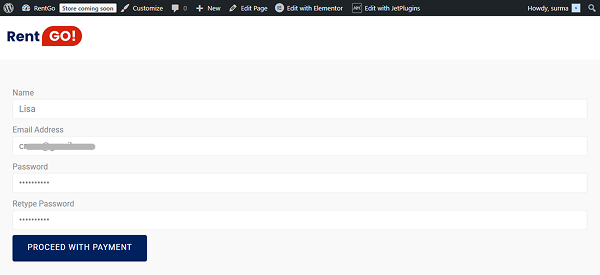
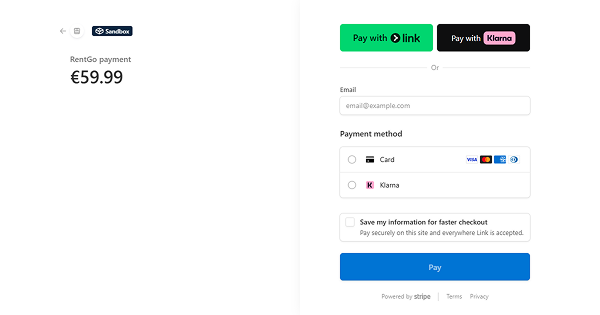
Let’s proceed to the front end and fill in the form.
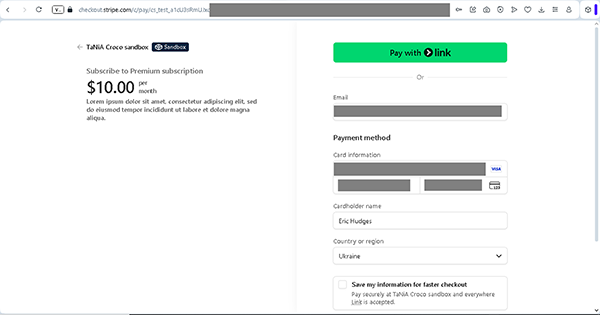
Once we click the “Proceed with Payment” button, we are redirected to the Stripe Checkout page, where we can choose whether to pay with Stripe or Klarna.
That’s it. Now you know how to add extra payment methods to your JetFormBuilder form on the WordPress site.
TheStripe Paymentsadd-on forJetFormBuilder links forms to Stripe‘s software to facilitate online payments via the Stripe Gateway (including subscriptions, recurring payments, and setting payment dates). It provides an AJAX redirect to the checkout page and enables specific actions before and after payments.
In this tutorial, we consider creating recurring payments using Stripe’s “Sandbox” mode. This mode simulates transactions during payment processing without real payments.
Here, we exemplify the use of the embedded Stripe Payments add-on’s specific events, which trigger the corresponding Post Submit Actions based on the payment status.
In particular, after registering on a site, a user can pay for a subscription to access the specific content. In turn, the content will be visible if the subscription is renewed. For more details, watch the How to Set Up Recurring Stripe Payments in WordPress Forms video.
To implement this functionality, install the Stripe Payments add-on and the JetFormBuilder plugin, and activate the Dynamic Visibility Module of the JetEngine plugin.
The add-on integrates pre-created Stripe subscriptions to forms and manages payment settings. It also transfers payments based on Stripe subscription settings (pricing plans, billing cycles, trial periods, subscription quantities, etc.). The add-on aggregates and manages subscription data through one dashboard.
The Stripe Payments add-on for JetFormBuilder provides the following specific events: STRIPE.SUBSCRIPTION.CANCEL, STRIPE.SUBSCRIPTION.EXPIRED, STRIPE.SUBSCRIPTION.SUSPENDED, STRIPE.SUBSCRIPTION.REACTIVATED, and STRIPE.RENEWAL.PAYMENT.
These events trigger specific Post Submit Actions based on the corresponding payment status.
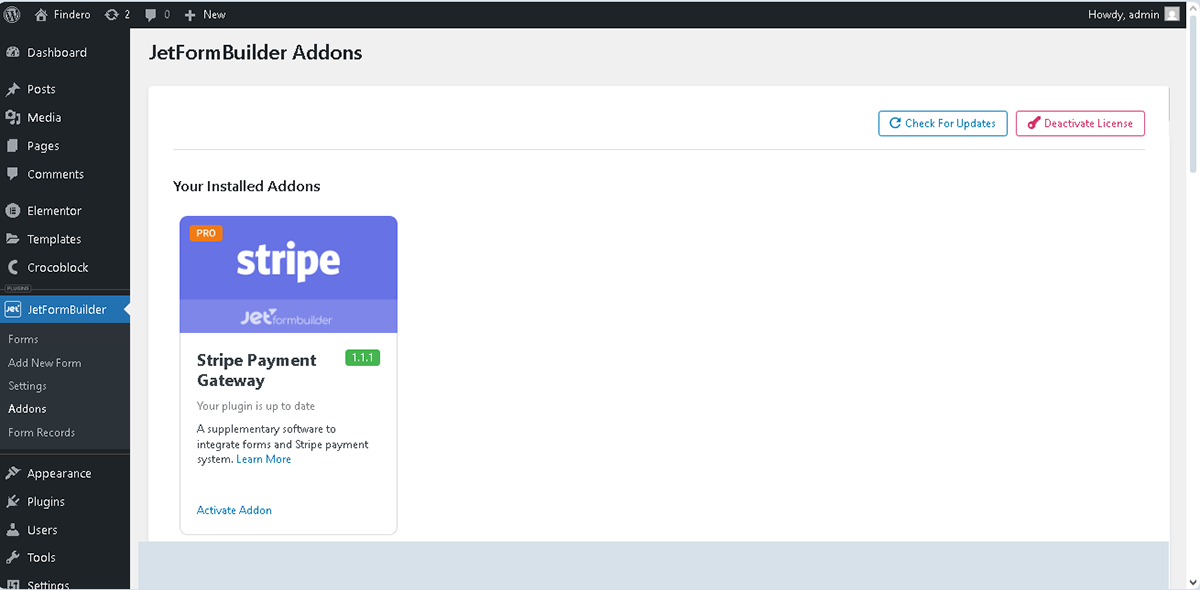
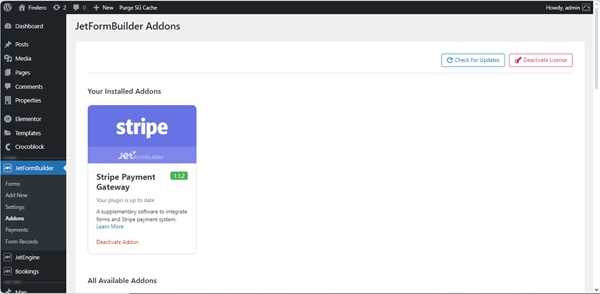
Head to WordPress Dashboard > JetFormBuilder > Addons. Among the available items, find the Stripe Payments add-on and press the “Install Addon” button.
Next, go to WordPress Dashboard > Plugins and find the installed add-on. Hit the “Activate” button.
Also, you can install and activate this add-on as any other WordPress plugin. Read a detailed tutorial to go through the installation process.
Create a Product
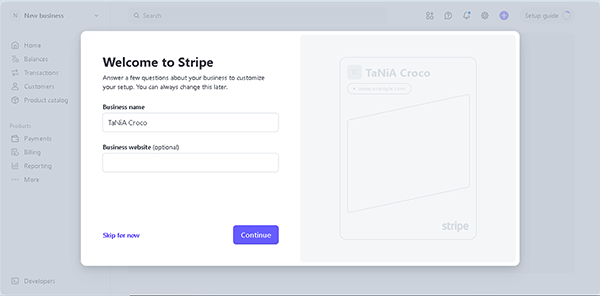
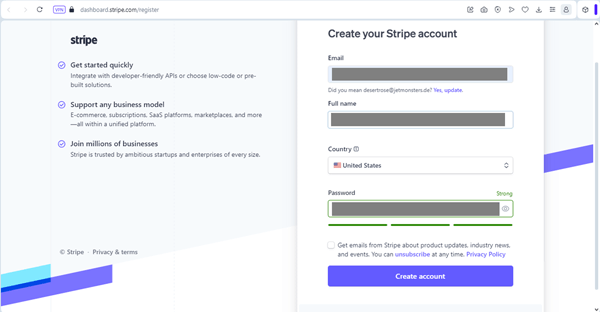
Initially, log in to your Stripe Account or create a new one. Here, the Welcome to Stripe pop-up will be opened. You can skip it or complete all necessary steps.
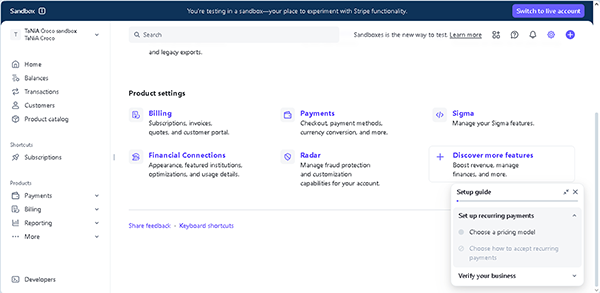
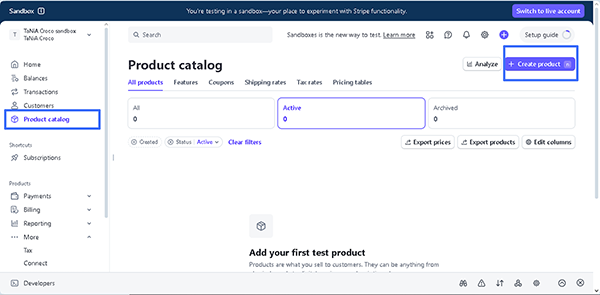
Then, you will be redirected to the Stripe Dashboard, and the “Sandbox“mode will be set by default.
Also, you can switch the “Sandbox“ to “Live“ mode or vice versa by clicking the “Switch to live account“ button in the top right corner of the page.
Next, navigate to the Stripe Dashboard > Product catalog tab and click the “Create product” button in the top-right corner.
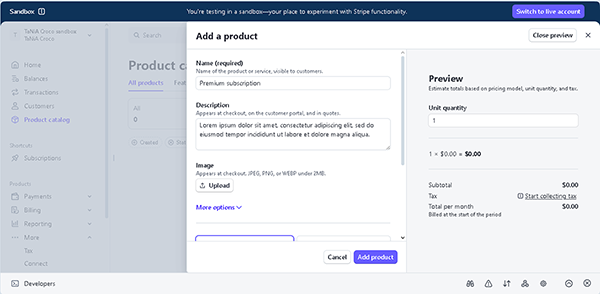
After pressing this button, the Add a product pop-up will be unrolled. Here, fill out the Name (required) field and, if needed, other fields (e.g., Description, Image).
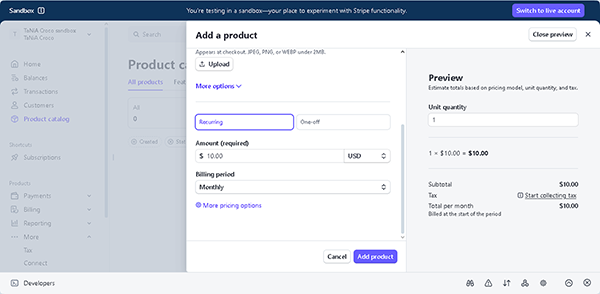
After that, scroll the pop-up down to the More options section. Here, set the “Recurring” option in the drop-down list, enter the product price in the “Amount (required)“field, and select the currency. Then, choose the Billing period (e.g., “Monthly” or “Yearly)”). Finally, press the “Add product” button.
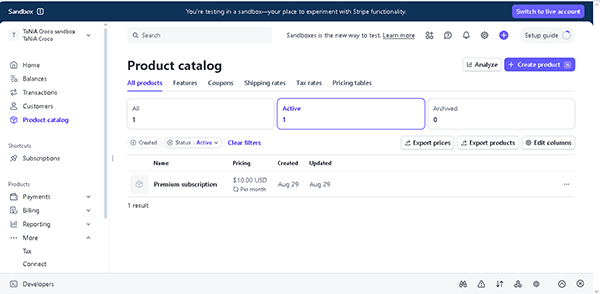
In the next step, you will be redirected to the Stripe Dashboard > Product catalog tab, where all added products are listed.
Obtain API Keys in the Stripe Account
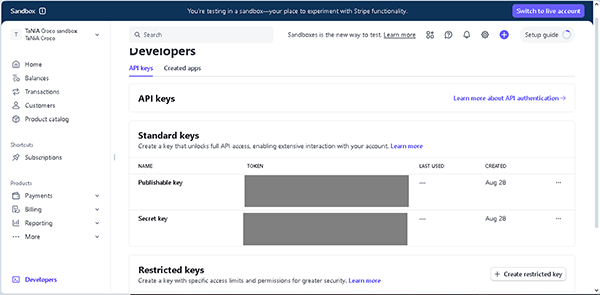
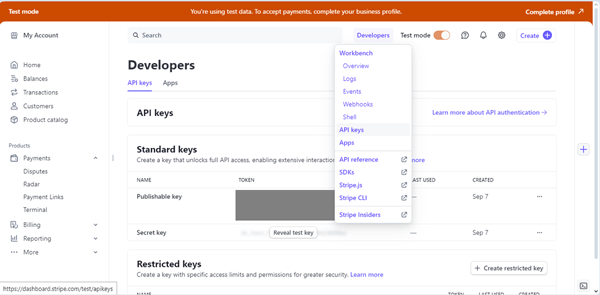
Next, move to the Stripe Dashboard > Developers > API keys tab.
Here, the generated API keys will be shown.
Copy the keys from the Publishable key and Secret key fields.
Configure the JetFormBuilder Settings
Before building the form, ensure Stripe gateways are activated on your website. Open the WordPress Dashboard > JetFormBuilder > Settingspage and check the Payments Gateways settings.
Toggle the Enable Gateways switcher. Optionally, enable the Enable Test Mode switcher if you test with your Stripe account in the “Sandbox” mode. Insert the copied data from the Stripe Dashboard > Developers > API KeysPublishable key and Secret key fields to the WordPress Dashboard > JetFormBuilder > Settings Public Key and Secret Keyfields.
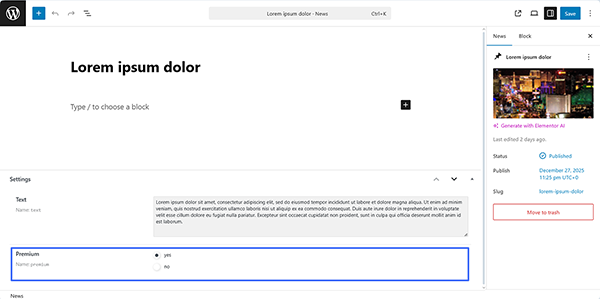
In this case, we create the “News” CPT with the “Premium” Radio Field, which has two possible options 一 “yes” and “no”. These options control whether the post is visible to site visitors: if the “yes” option is set, the CPT post will be visible only to subscribers.
After that, we fill out the CPT posts with the corresponding data.
Build a query
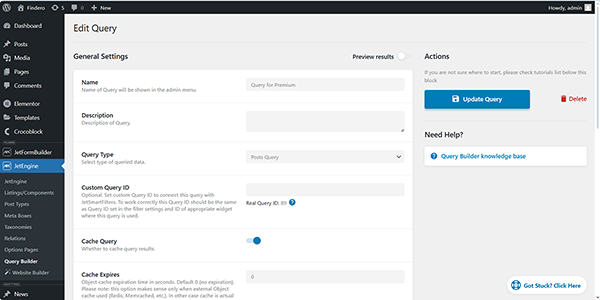
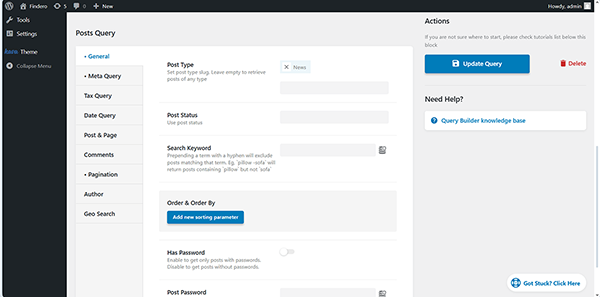
In the next step, move to the WordPress Dashboard > JetEngine > Query Buildertab and create a “Posts Query” query with the following settings: first, insert the Name of the query (here, the “Query for Premium”) and set the “Posts Query” Query Type.
Next, move to the Posts Query section and specify the needed CPT in the Post Type field (here, the “News” CPT) of the General tab.
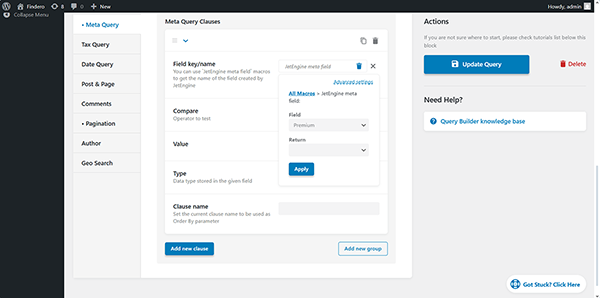
Then, unroll the Meta Query tab and press the “Add new clause” button. After that, click the “Dynamic Tag” icon in the Field key/name field. Here, select the “JetEngine meta field” macro from the list, choose the needed meta field (here, “Premium”) in the Field drop-down, and save the changes by pressing the “Apply” button.
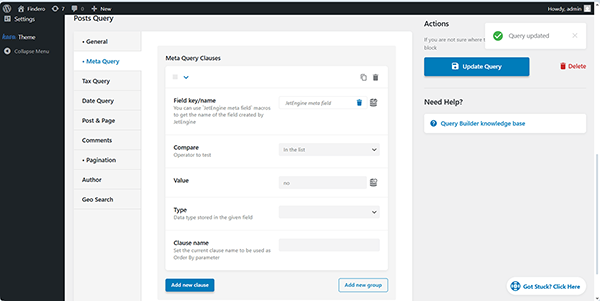
In the last step, set the “Like” or “In the list” Compare operator and insert the “no” Value, which means that only non-premium CPT posts will be shown.
Finally, if required, limit the number of posts displayed per page in the Posts Per Page field in the Pagination tab, then save the query.
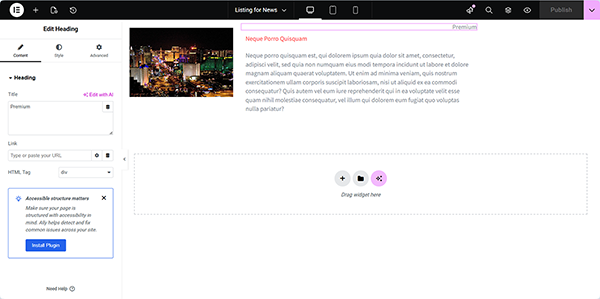
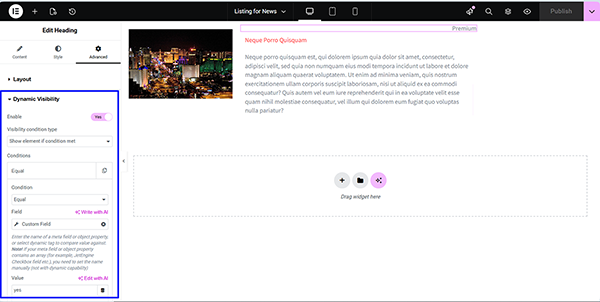
Proceed to the WordPress Dashboard > JetEngine > Listings/Components tab to create a Listing Item. Display the needed meta fields via the Dynamic Field, Dynamic Image, or other widgets. In particular, we add the Heading widget to indicate the premium posts.
Next, apply the Dynamic Visibility conditions to this widget: move to the Advanced tab, open the Dynamic Visibility block, and enable the corresponding toggle.
Here, set the “Show element if condition met” Visibility condition type. After that, select the following settings in the Conditions fields: “Equal” Condition, press the “Dynamic tag” icon, then choose the required Custom Field (here, “Premium”), and insert the “yes” Value of this field to specify that only specific posts should be shown (the “Premium” posts in this case).
Finally, publish the Listing Item.
Add the listings on a page
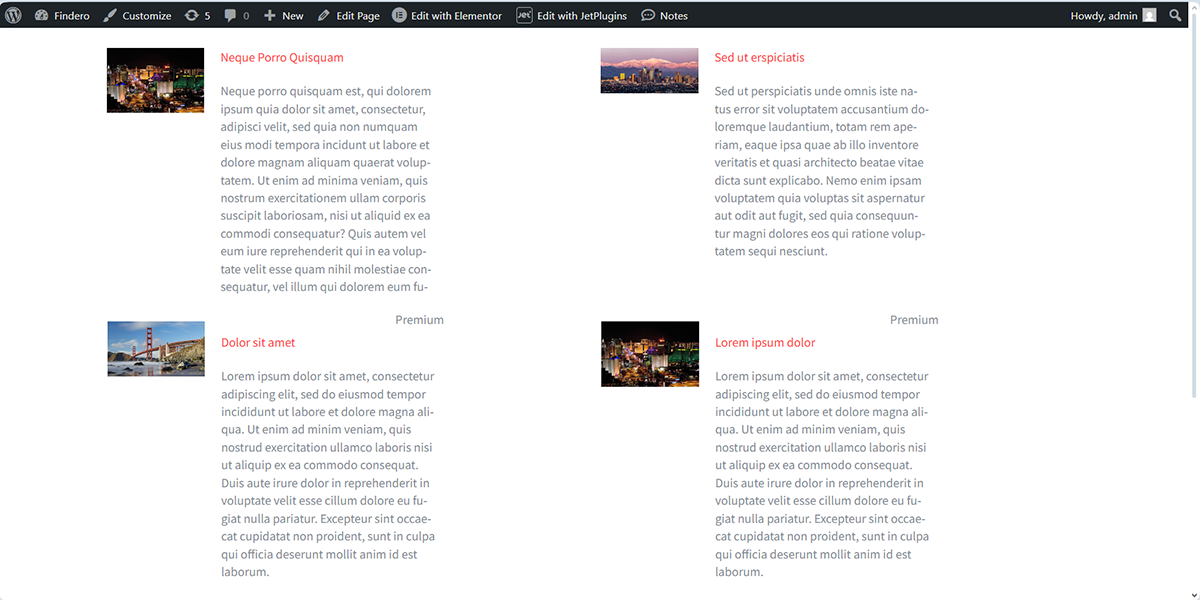
In this section, we add two Listing Grids to a page to display listings with different rules for showing items: the first shows only non-premium posts, and the second shows all posts.
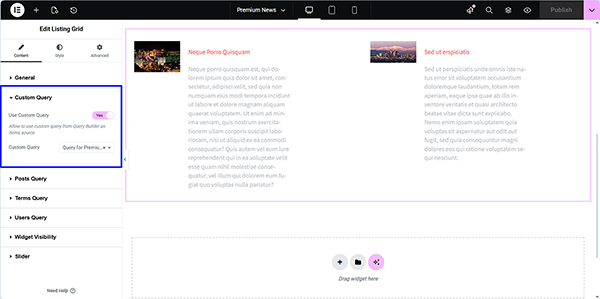
First, open a page in your preferred editor and insert the first Listing Grid. We use Elementor and the Listing Grid widget correspondingly.
Then, after assigning the required listing, open the Custom Query tab, unroll it, enable the Use Custom Query toggle, and select the created query in the Custom Query drop-down.
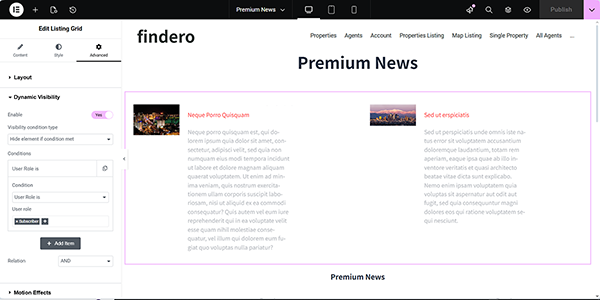
After that, open the Advanced tab, then the Dynamic Visibility block, and enable the corresponding toggle.
Here, set the “Hide element if condition met” Visibility condition type and select the “User Role is” Condition, and “Subscriber” User role.
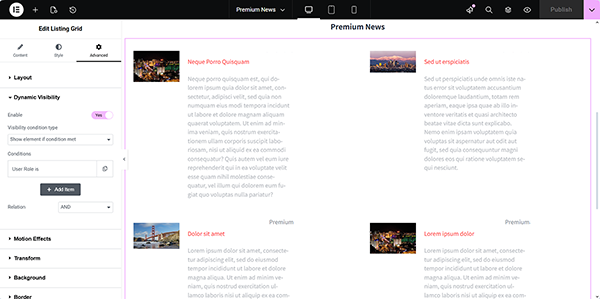
Next, insert the second Listing Grid widget on the page and display the same listing via it. Then, open the Advanced tab, then the Dynamic Visibility block, and enable the corresponding toggle.
Here, set the “Show element if condition met” Visibility condition type and select the “User Role is” Condition, and the “Subscriber” User role.
Build the Registration and Subscription Forms
In this case, the functionality is implemented via two forms 一 one for registration of the user and the second for subscription to the premium news. Also, you can combine the registration and login forms as described in the How to Set Registration and Login in One Form Using Render States tutorial.
Build the registration form
Go to WordPress Dashboard > JetFormBuilder > Add New Form. The form will be opened in the Block Editor (Gutenberg).
Select the needed pre-built form in the Welcome block or build the form from scratch.
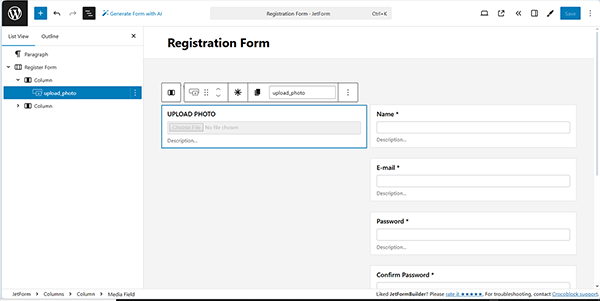
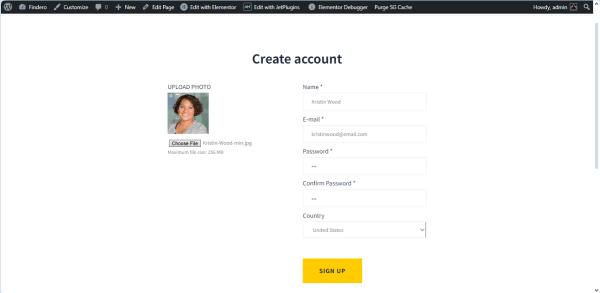
In this case, we type the form’s name (the “Registration Form” text), press the “Start from scratch” button, and create a form with the Text Fields, Media Field, Radio Field, and Action Button.
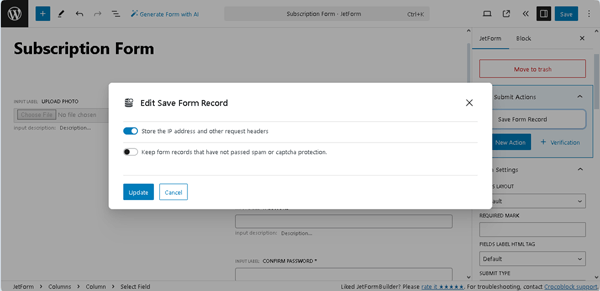
In the next step, navigate to the Post Submit Actions tab. Press the “+ New Action” button and select the “Save Form Record” Post SubmitAction in the newly appearing Add new action window. If the “Save Form Record”action is set by default, press the “pencil” icon to configure its settings.
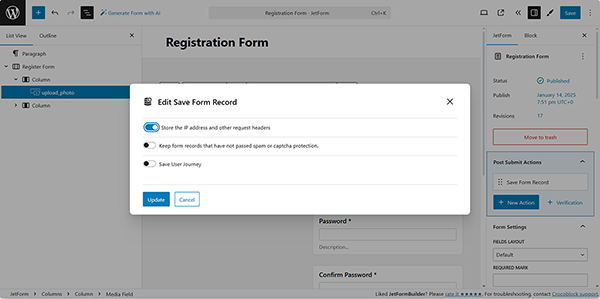
After that, activate a required toggle, for example, the Store the IP address and other request headers toggle to save the user’s IP address in the Edit Save Form Record window.
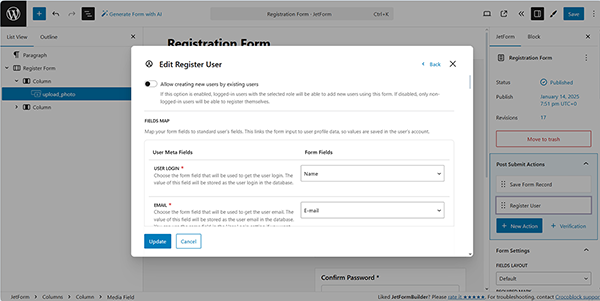
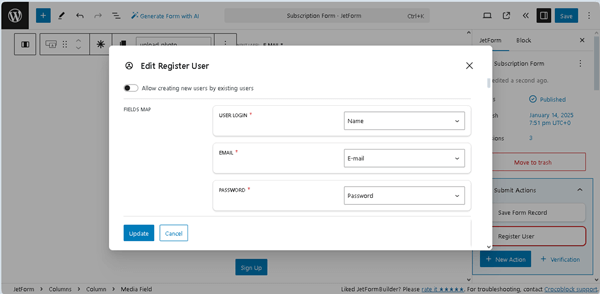
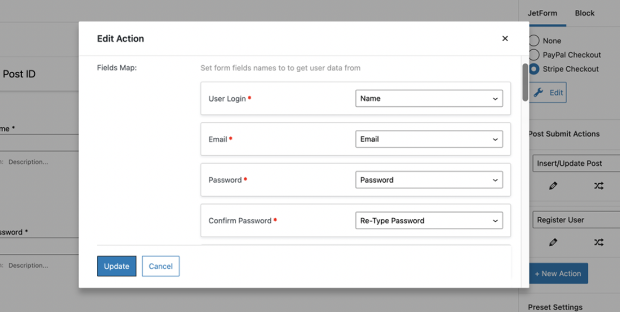
In the Edit Register User pop-up, we assign the corresponding FIELDS MAP fields to the form’s block fields.
Read the Register Form tutorial to learn how to build register forms and manage their settings.
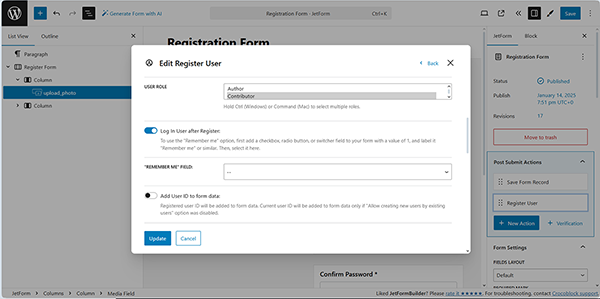
After that, we scroll the pop-up down, set the “Contributor” USER ROLE, and enable the Log In User after Register toggle.
Once completed, press the “Update” button to close the pop-up.
The next step is configuring the Action Events. Navigate to the Post Submit Actions tab of the form settings and select the action you need from the corresponding drop-down menu.
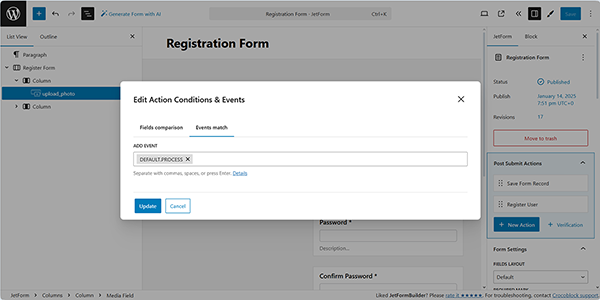
Hover over the action and press the crossed arrows-shaped button to open the Edit Action Conditions & Events pop-up window. Here, select the Events match tab and choose the “DEFAULT.PROCESS” option from the ADD EVENT drop-down menu.
Press the “Update” button. That’s it for the registration form; now, you can hit the “Publish” button.
Build the subscription form
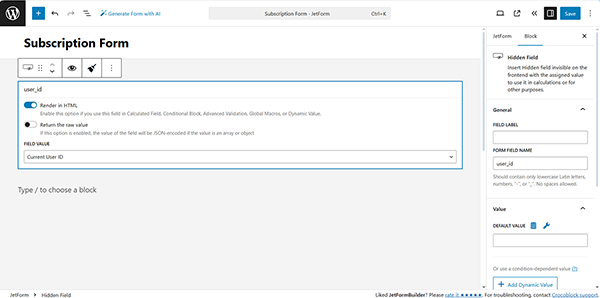
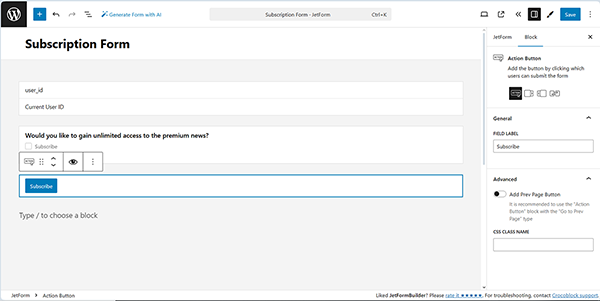
We build this form from scratch. Here, we add the Hidden Field and set the “Current User ID” FIELD VALUE.
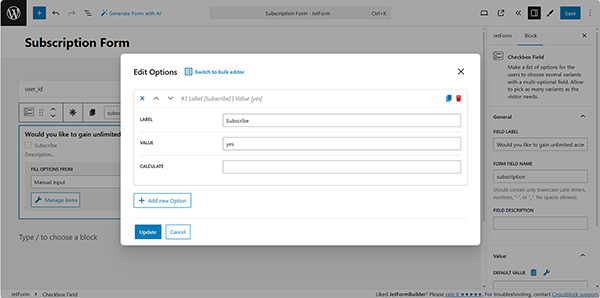
Next, we insert the Checkbox Field, type “Subscribe” as the LABEL, and set the “yes” VALUE.
The last field is the Action Button, whose text we change to “Subscribe”.
The next step is configuring the Stripe checkout settings. In this step, scroll down to the Gateways Settings section in the JetForm settings.
Enable the Stripe Checkout option and click the “Edit” button below to access the settings.
After that, the Edit Stripe Checkout Settings pop-up will be opened.
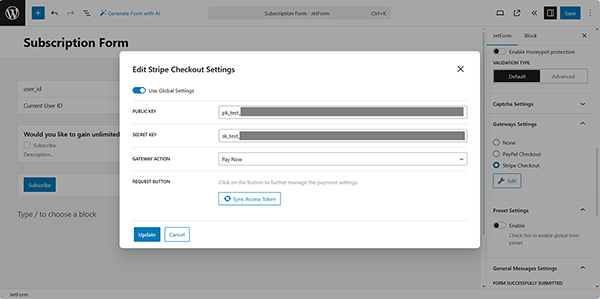
In this pop-up, you can add the API Keys to the specific form, in particular by pasting them into the PUBLIC KEY and SECRET KEY fields. In this case, we enable the Use Global Settings toggle to inherit the Public Key and Secret Key that we entered earlier in the JetFormBuilder settings.
After that, push the “Sync Access Token” button to synchronize the data. Once the synchronization is successfully updated, the “Refresh Plans From Stripe” button will appear.
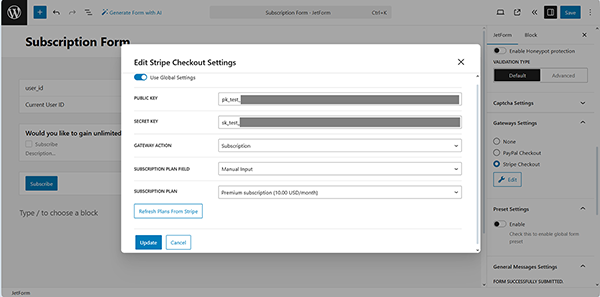
Then, set the “Subscription” in the GATEWAY ACTION drop-down list and choose the “Manual Input” in the SUBSCRIPTION PLAN FIELD. Since we created only one subscription plan, it will be added automatically. Otherwise, select the needed one in the SUBSCRIPTION PLAN drop-down list.
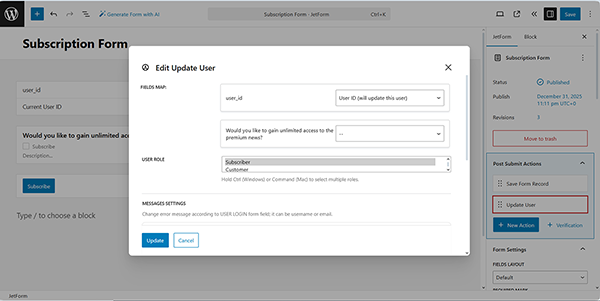
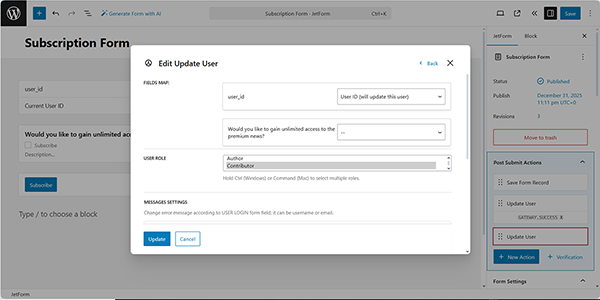
In the next step, navigate to the Post Submit Actions tab. Press the “+ New Action” button and select the “Update User” Post Submit Action. In the newly appeared pop-up, assign the “User ID (will update the user)” option to the form’s Checkbox Field and set the “Subscriber” USER ROLE.
Press the “Update” button to close the pop-up.
After that, move to the “Update User” Post Submit Action for configuring the Action Events.
Set the condition: hover over the action and press the “crossed arrows” button to open the Edit Action Conditions & Events pop-up window. Here, select the Events match tab and choose the “GATEWAY.SUCCESS” option from the ADD EVENT drop-down menu to enable the “Register User” Post Submit Action after the payment system verifies the payment.
Next, insert the second “Update User” Post Submit Action, assign the “User ID (will update the user)” option to the form’s Checkbox Field, and set the “Contributor” USER ROLE, which allows seeing the nonpremium content.
Press the “Update” button to close the pop-up.
After that, move to the “Update User” Post Submit Action for configuring the Action Events.
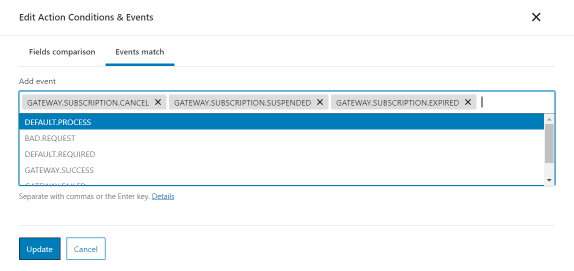
Next, set the condition: hover over the action and press the crossed arrows-shaped button to open the Edit Action Conditions & Events pop-up window. Here, select the Events Match tab and choose the “STRIPE.RENEWAL.PAYMENT” option from the ADD EVENT drop-down menu.
Press the “Update” button. That’s it for the forms; now, you can hit the “Publish” button.
Place the forms on the page
Return to the page where you have previously inserted two Listing Grid widgets and place the created forms one under another via the JetForm widget.
If you are logged in, log out of the site. Then, move to the front end, complete the form with the required information, and submit it by pressing the “SIGN UP” button.
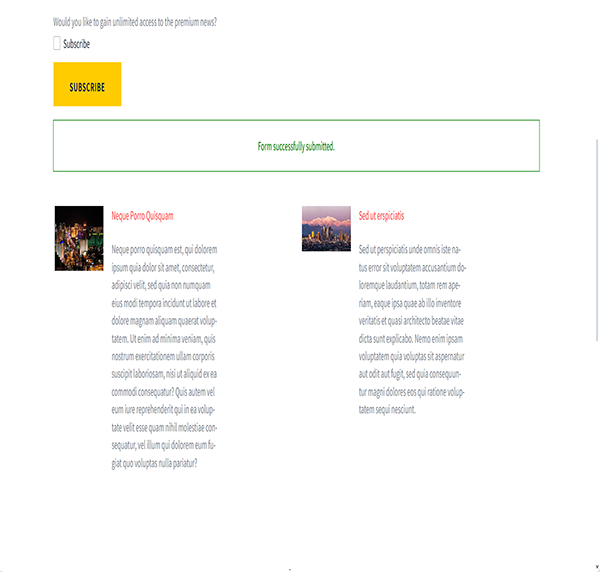
After submitting the form, you will be returned to the same page that will display the subscription form and the listing of non-premium news.
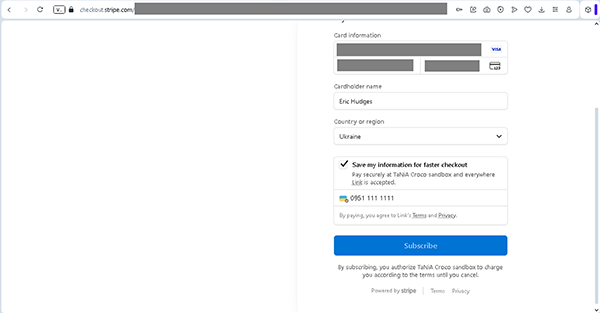
Here, after ticking the corresponding answer and pressing the “SUBSCRIBE” button, users will be redirected to the Stripe checkout page.
Now, log in to your account and select the bank card, if needed.
Press the “Continue” button.
NOTE
Although the subscription via the form is confirmed only once, recurring payments are processed according to the settings specified when creating the Stripe product.
Fill out the fields and scroll down the page. Finally, click the “Subscribe” button.
After that, you will be redirected to the site’s page without registration forms. Here, only the listing that includes premium news will be displayed.
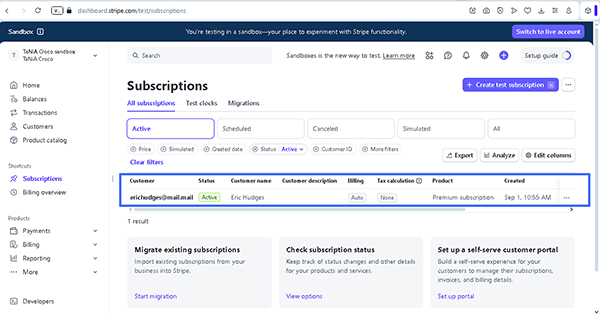
Then, return to the Stripe account and navigate to the Stripe Dashboard > Subscriptions tab to check whether the subscription has been added.
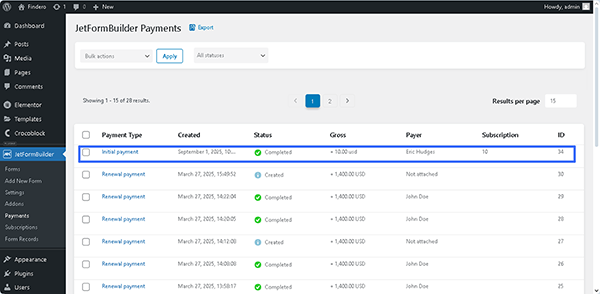
Also, the payment data will be collected in the WordPress Dashboard > JetFormBuilder > Payments tab.
The subscription data will be displayed in the WordPress Dashboard > JetFormBuilder > Subscriptions tab.
That’s it; now you know how to use the JetFormBuilder PRO add-on on WordPress websites for configuring recurring payments.
Learn how to use the PayPal and Stripe functionality with the JetFormBuilder plugin for WordPress. In particular, the tutorial details how to obtain the API keys, configure the JetFormBuilder settings, and add the gateway functionality to a specific form.
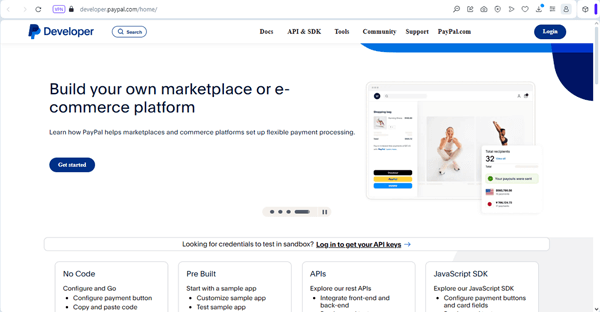
Go to the PayPal Developer website and hit the “Login” button if you already have an account and log into it. Otherwise, create one by pressing the “Get started” button.
Then, enter your account.
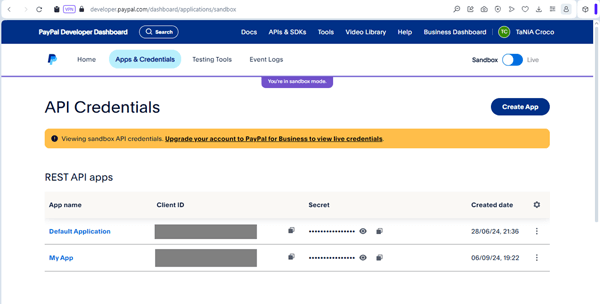
Unroll the App & Credentials tab and navigate to the REST API apps section. The Default Application is generated by default.
For a form to work correctly in a live environment, set up the appropriate API credentials (the “Live” or “Sandbox” mode; the instructions are in the Get Started with PayPal Developer tutorial) and indicate a proper currency code (the list of codes can be found on the Country Currency Codes page).
NOTE
The “Sandbox” mode is intended to create test REST APIs, for instance, to simulate transactions during payment processing. Please note that non-test form usage is available for the “Live” mode; therefore, you need to upgrade your PayPal account and switch from the “Sandbox” to “Live” mode in the PayPal Dashboard > Apps & Credentials section, as stated in the official PayPal Developer tutorial.
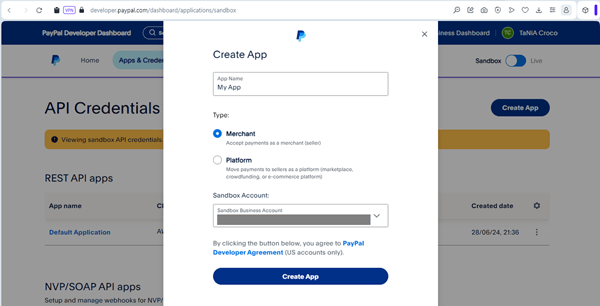
If you need another API Key, press the “Create App” button and fill in the fields of the newly-appeared “Create App” pop-up.
Once created, the new REST API will be displayed on the app’s page.
Return to the API Credentials tab that enlists all created REST API apps. Copy the Client ID and Secret Key of the needed REST API apps.
Configure the JetFormBuilder settings
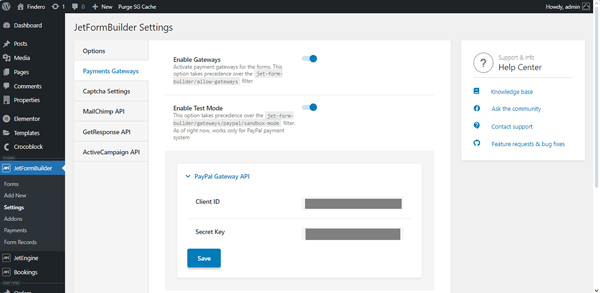
Proceed to WordPress Dashboard > JetFormBuilder > Settings. In the Payments Gateways tab, find the PayPal Gateway API drop-down and click on it. Paste the obtained Client ID and Secret Key into the corresponding fields and press the “Save” button.
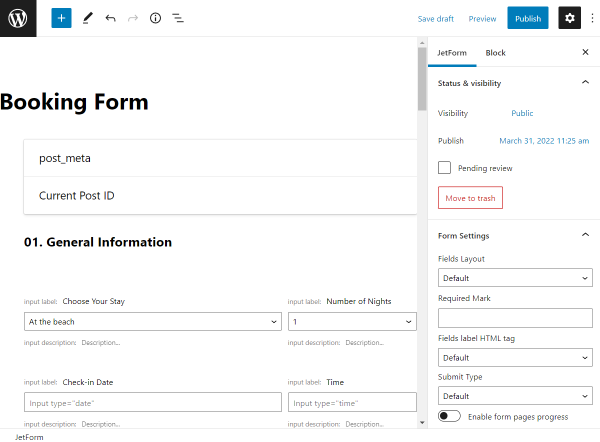
Adjust the form’ settings
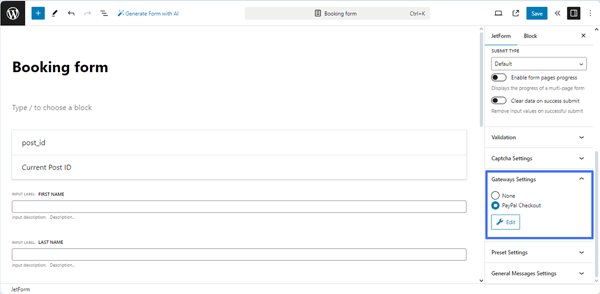
Now, go to WordPress Dashboard > JetFormBuilder > Forms and open one of the created forms. In the right-side menu, you will see the Gateways Settings section. Choose the “PayPal Checkout” option and click the “Edit” button to open its settings.
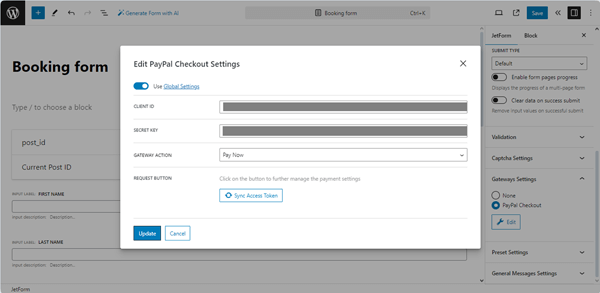
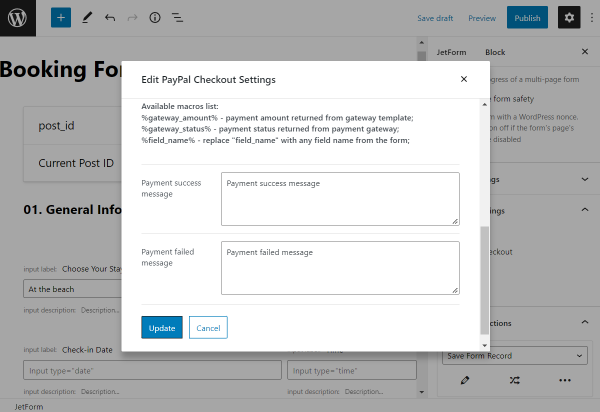
Then, the Edit PayPal Checkout Settings pop-up will appear.
Use Global Settings — a toggle that pulls the data from the PayPal Gateway API’s settings and pre-fills the Client ID and Secret Key fields;
Client ID and Secret Key — automatically filled-in text fields that take data from the Client ID and Secret Key fields of the WordPress Dashboard > JetFormBuilder > Settings > Payments Gateways tab. Moreover, you can paste the corresponding data here manually;
Gateway Action — a drop-down list that allows picking a payment scenario that will perform once the form is submitted;
Request Button — press the “Sync Access Token” button to work on the payment settings.
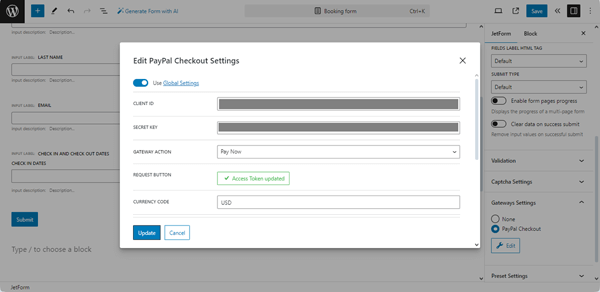
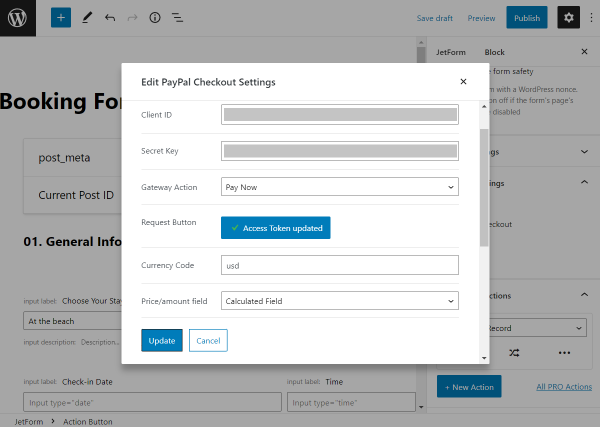
Once synchronization is completed, the text on this button turns to “Access Token updated.”
After that, the following fields will be added to this pop-up:
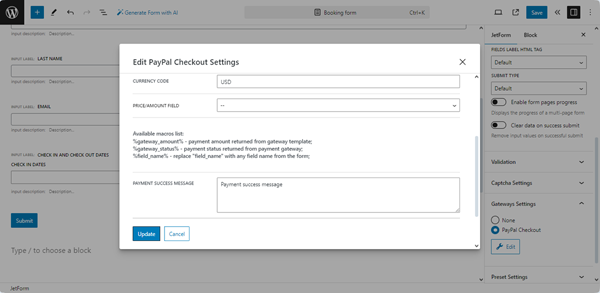
Currency Code — a text field for typing a three-letter code that represents the currency used in your form. More details on getting payments in different currencies can be found in the Currency codes tutorial;
Price/amount field — a drop-down list for selecting the corresponding price field within your form;
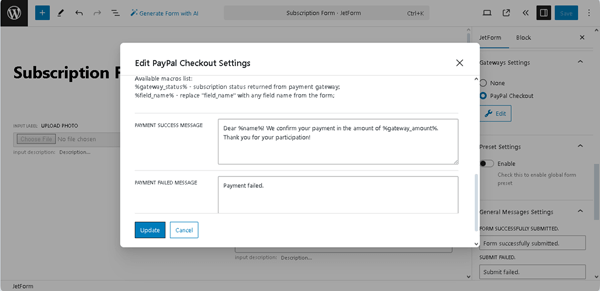
Available macros list — a text block enlisting the macros that can be used in the Payment success message and Payment failed message fields. The following macros are available:
%gateway_amount% — a macro that will provide the payment amount returned from the gateway template;
%gateway_status% — a macro that will give the payment status returned from the payment gateway;
%field_name% — a macro that will provide any necessary details from the form field, the name of which you write instead of the “field_name”;
Payment success message — a text field to add the message that will be shown to the user after their payment is confirmed to be successful;
Payment failed message — a text field to add the message will be directed to the user if their payment does not come through.
Finally, scroll down the pop-up and press the “Update” button. Then, “Save” the form.
Navigate to the WordPress Dashboard > JetFormBuilder > Addons tab and install and activate the Stripe Payments add-on.
Obtain the Stripe API Key
Go to the Stripe website and enter your account or create a new one.
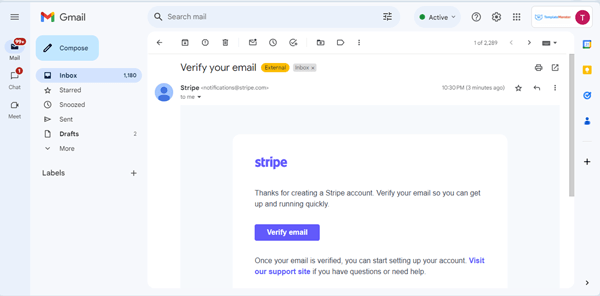
A confirmation letter will be sent to your email. Proceed to the inbox and click the “Verify email” link in the email to pass verification.
Afterward, you’ll be redirected to the Stripe dashboard page. In your Stripe account, move to the Developers > API keys tab and copy the Publishable key and the Secret key.
Configure the JetFormBuilder settings
Proceed to WordPress Dashboard > JetFormBuilder > Settings> Payments Gateways tab. Once the Stripe addon is activated, the Stripe Gateway API drop-down will appear on the Payments Gateways tab. Unroll this tab, paste the copied Publishable key and Secret key into the corresponding fields, and press the “Save” button.
Adjust the form’s settings
Now, go to WordPress Dashboard > JetFormBuilder > Forms and open one of the created forms. If you need to build a booking form with the payment functionality, refer to our How to Create a Booking Form guide.
In the right-side menu, you will see the Gateways Settings section. Choose “Stripe Checkout” and click the “Edit” button to open its settings.
Then, the PayPal Checkout Settings pop-up will be open.
The Stripe CheckoutSettings are similar to PayPal Checkout except for one field. Instead of the Client ID field, there is the Public Key field. You are supposed to input the Publishable Key obtained from Stripe here.
However, if you enable the Use Global Settings toggle, both fields with the keys will be pre-filled automatically. After that, press the “Sync Access Token” button and click the “Update” button in the pop-up.
Using WooCommerce for Payment Processing
If you prefer to process payments through WooCommerce instead of connecting payment gateways directly in JetFormBuilder, you can use the WooCommerce Cart & Checkout Action add-on.
This add-on sends the submitted form data to WooCommerce, where all payment gateways configured in your WooCommerce store (for example, Stripe, PayPal, or others) will be available during checkout.
Use this method if you already have WooCommerce set up with its own payment gateways and want JetFormBuilder to create orders or pass product data to WooCommerce, rather than processing payments directly through the form.
Action Events Settings
The Event logic for the Submit Actions is available after the 2.1.0 version of the JetFormBuilder plugin.
With this feature, you can set the time and condition for every action in the form when it should be performed. If you use the PayPal or Stripe payment method in the form, you can also set what action should be executed after a successful or failed payment.
To set an action event, proceed to the Post Submit Actions tab of the form and hit the “Edit Conditions & Events” button.
In the Events match tab, you can add such events:
DEFAULT.PROCESS — an event that defines the time of action performance. This event is needed when the payment (PayPal/Stripe) function is included in the form so that the JetFormBuilder plugin can complete the submit actions with such an event before a user is redirected to the checkout page;
BAD.REQUEST — an event that is executed after processing the request if there are errors in the form fields (for example, when you filled out a MediaField with the wrong format file or exceeded the file limit). Overtakes the DEFAULT.PROCESS event;
DEFAULT.REQUIRED — an event that is executed in any case, even if the form fields contain some errors or if actions are unsuccessfully performed. This event runs before the form response is sent. By default, this event is used by the Save Form Record action and cannot be added to other events through the form editor;
NOTE
If you use several actions with the DEFAULT.REQUIRED event, set the Save Form Record action last; otherwise, the status for the completed action will be saved incorrectly.
GATEWAY.SUCCESS – replaces the former “On success payment” option for actions. It is executed after passing the checkout page on the side of the payment system if a payment or a subscription has been made;
GATEWAY.FAILED — an event that replaces the former “On failed payment” option for actions. It is performed when the user returns from the checkout page of the payment system without making a payment or subscribing.
After you select one or several events, hit the “Update” button. The Post Submit Action will have the text that refers to the set Event.
Don’t forget to “Update” the form to save changes.That’s it. Now you know how to configure WordPress Payment Gateways and use them in JetFormBuilder forms.
JetPopup plugin installed and activated (optional, compatible with Elementor only).
After the successful subscription payment in PayPal with the JetFormBuilder form, a user gets the content during the paid period. However, when the subscription expires, the user still will have access to the content. The easiest way to avoid it is to apply Dynamic Visibility rules to the content according to the user role condition and fine-tune the logic with the action events.
Proceed to the JetFormBuilder > Formstab on the WordPress Dashboard and click to edit the form that you have customized for the recurring PayPal payments.
Add the Hidden Fieldto the form and select the “Current User ID” option as the Field Value.
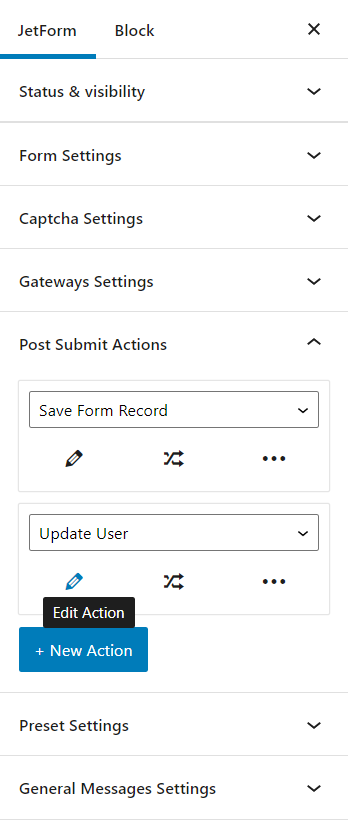
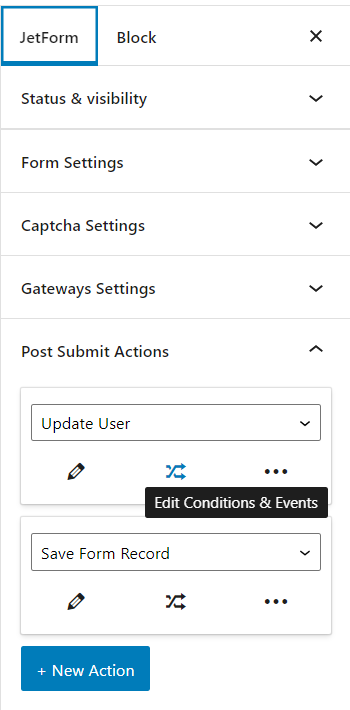
Head to the Post Submit Actions tab in the JetForm section and push the “+ New Action” button. Select the “Update User” option in the drop-down menu, and hit the pencil-shaped button.
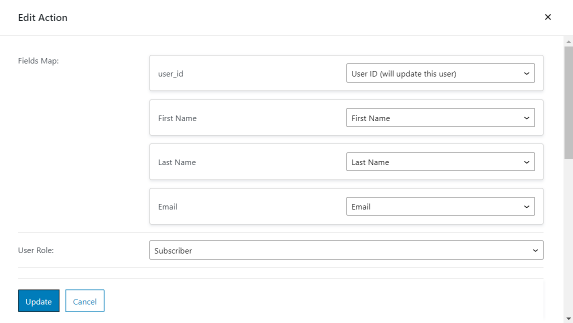
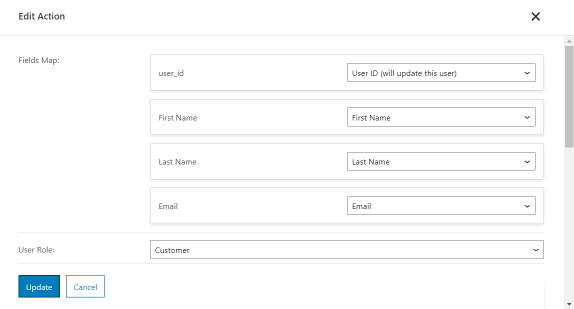
For the Hidden Field with the “Current User ID” value (named as the user_id in our case), select the “User ID (will update this user)” option in the Fields Map. Set other fields so that they’re assigned to the appropriate user fields.
In the User Role,we select the “Subscriber” option so that all users with the Customer role who submit the form and buy the subscription also upgrade their role to Subscriber.
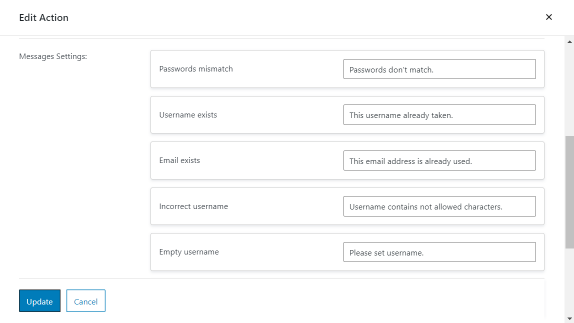
You can also pay attention to the Messages Settings and change the text that appears when users submit the form.
After you finish customizing the action, don’t forget to press the “Update” button.
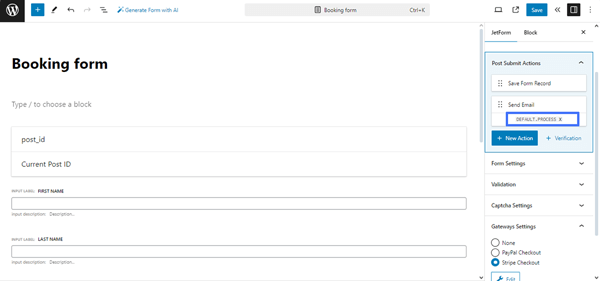
Push the “Edit Conditions & Events” button under the “Update User” action.
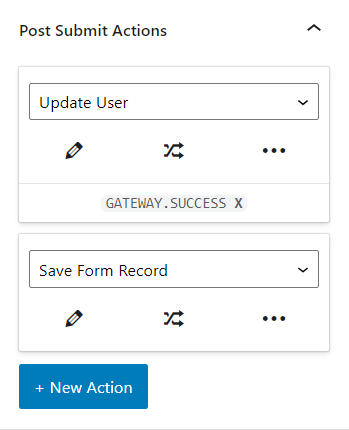
Move to the Events match tab and select the GATEWAY.SUCCESS event. With this event, the action will be executed only after a user passes the checkout page on the side of the payment system. So the user will change the status to the subscriber after the successful payment.
Press the “Update” button. The event in the submit action will look like that:
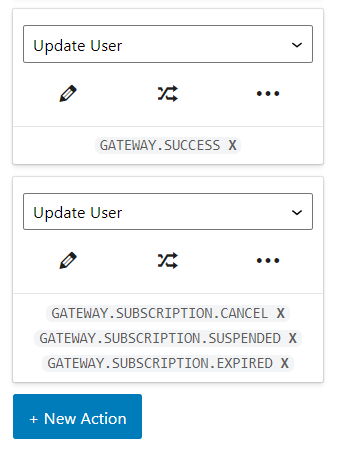
To change the user role back to customer when the subscription expired, add another the “Update User” action. The Field Map settings are the same as in the previous action, but set the “Customer” User Role and hit the “Update” button.
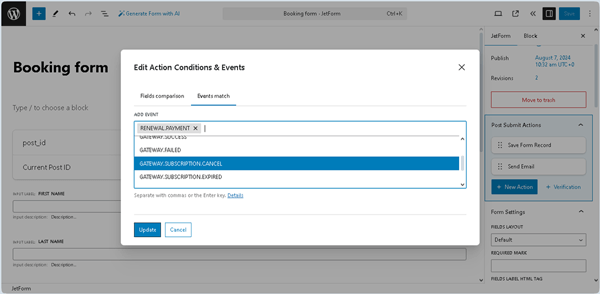
Push the “Edit Conditions & Events” button under the newly created “Update User” action, move to the Events match tab and select the GATEWAY.SUBSCRIPTION.CANCEL, GATEWAY.SUBSCRIPTION.EXPIRED, and GATEWAY.SUBSCRIPTION.SUSPENDEDevents. Press the “Update” button.
At the end, two “Update User” submit actions will look like that:
Finally, click the “Update” button to update the form settings.
Step 2. Set the page with content
How to set the page with the Elementor editor
Set a pop-up (optional)
You can place the form right on the page or can set a pop-up with it. If you have the JetPopup plugin installed and activated, proceed to the JetPopup > Create New Popuptab, enter the title, and hit the “Publish,” and then “Edit with Elementor” buttons.
Drag-n-drop the JetForm widget to the pop-up and select the recently updated form. When you finish, press the “Update” button.
Set Dynamic Visibility
Proceed to the page with the content that you want to show only to subscribers.
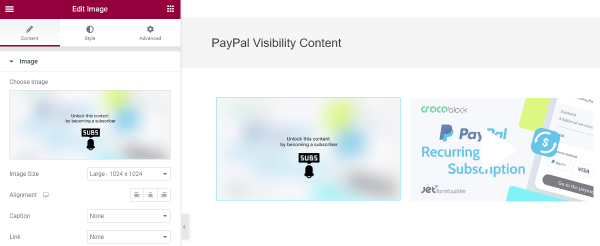
Place a new section with two columns in the editor. In the first column, add some Image or Button widget that will show the message that the content is locked and users have to subscribe to see it. In the second column, place the content (e.g., video, image) that will be shown to subscribers.
You can also place widgets above each other and align them in the center.
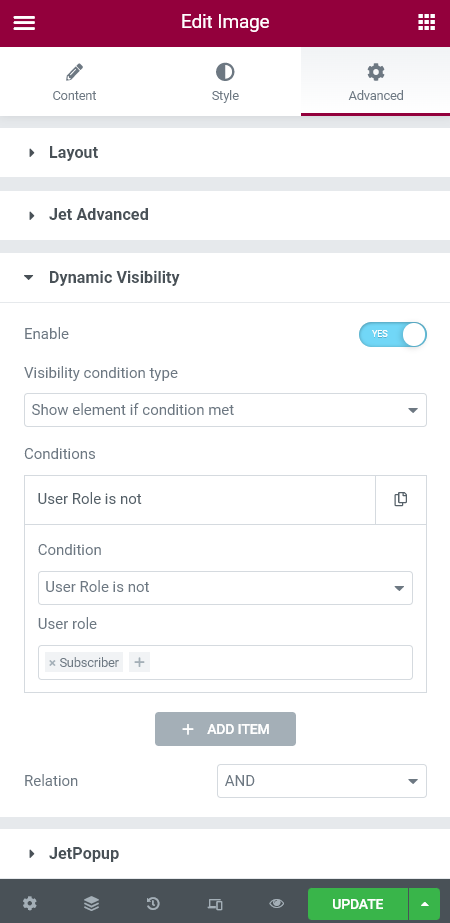
Click on the first column and navigate to the Advanced section. Go to the Dynamic Visibility tab, open it and enable the toggle.
Select the “Show element if condition met” Visibility condition type, “User Role is not” Condition and “Subscriber” User role.
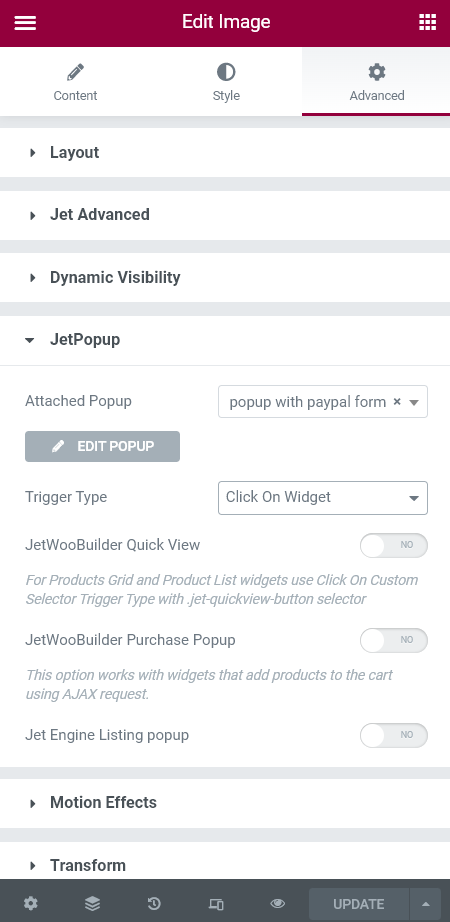
Move to the JetPopup tab on the same widget and attach the recently created pop-up. Select the Trigger Type you need. For example, if you want to attach the pop-up to the Button widget, select the “Click on Button” option. We’re good with the “Click on Widget” type.
If you haven’t created a pop-up, you can place the JetForm widget in the column and apply the Dynamic Visibility condition to it.
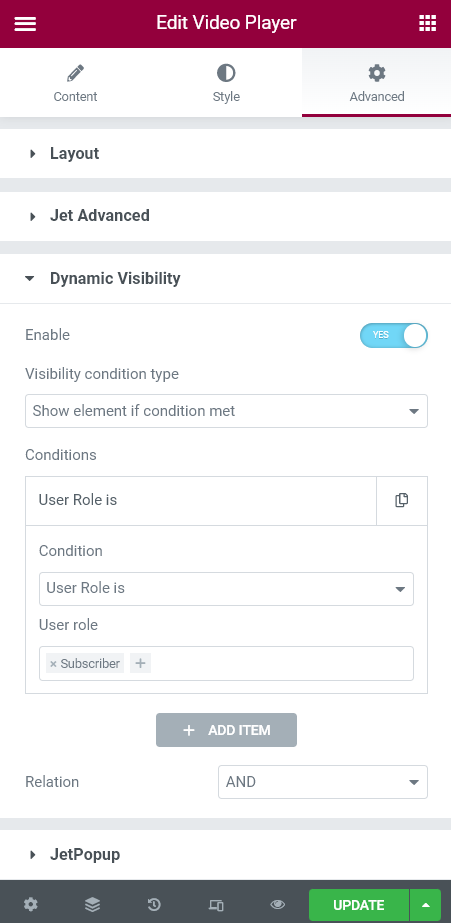
Click on the second column and proceed to the Advanced section. Go to the Dynamic Visibility tab, open it and enable the toggle for the second time.
Select the “Show element if condition met” Visibility condition type, “User Role is” Condition and “Subscriber” User role.It may seem that the conditions for the two columns are the same, but be attentive.
At the end of customizing, hit the “Publish/Update” button.
How to set the page content with Dynamic Visibility in the WordPress block editor
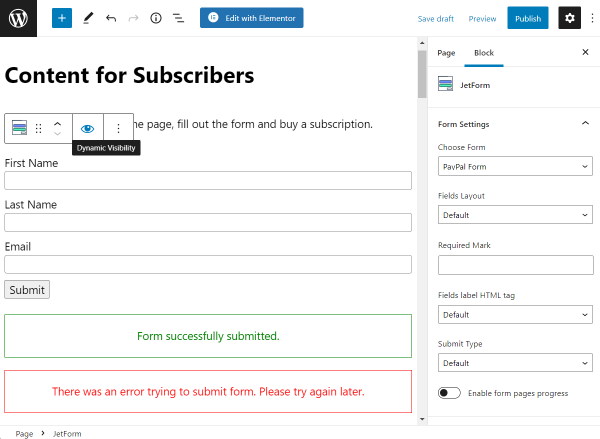
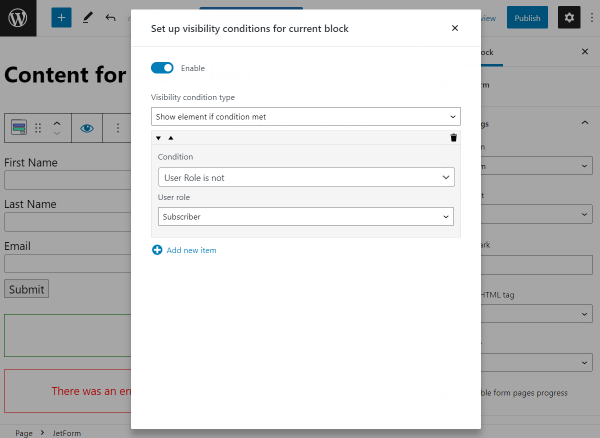
Create a new page or click to edit the existed one. We place the JetForm block on the page and select the form for the PayPal payments. If we click on the form, we will see the Dynamic Visibilityicon.
Click on the icon and enable the toggle. Leave the “Show element if condition met” Visibility condition type, hit the “Add new item” button, and select the“User Role is not” Condition and “Subscriber” User role.
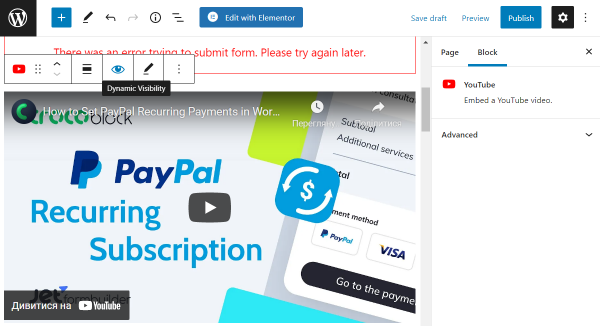
Close the pop-up and proceed to the content for subscribers (to the Video or Image block, for example).
Press on the “Dynamic Visibility” icon and enable the toggle. Leave the “Show element if condition met” Visibility condition type, hit the “Add new item” button, and select the“User Role is” Condition and “Subscriber” User role. It may seem that the conditions for the form and content are the same, but be attentive.
When you finish customizing the page, push the “Publish/Update” button.
Condition is set so a user can see form or content on the page, according to the user role.
Step 3. Check the Results
NOTE
Be aware of logging into the second account with the customer role to test the form. If you submit the form from the main account, your administrator role can be changed to the subscriber.
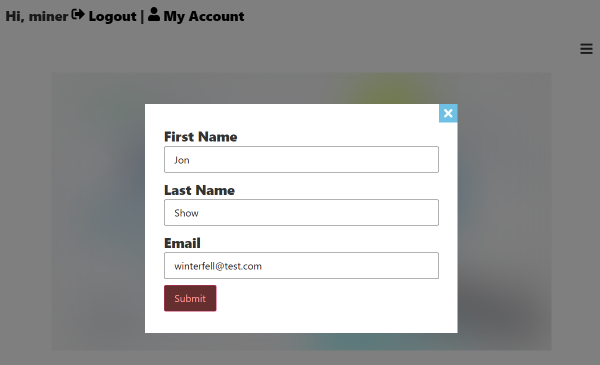
Open the page with the form and content on the front end. Since the user role on our current account is the customer, we can see only the image with the pop-up yet.
We click on the image, fill out the form in the pop-up, and hit the “Submit” button.
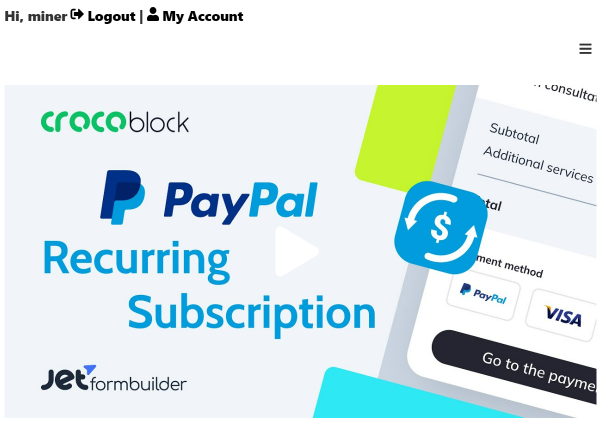
Log in to the PayPal account and buy a subscription. After that, you will return to the page where the Dynamic Visibility will show the paid content. That means that the user role was successfully changed.
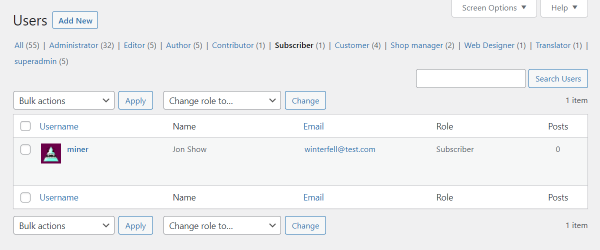
To ensure that the role was changed, we log into the administrator account and move to the Users tab on the WordPress Dashboard.
As we can see, the user truly gets the subscriber role after the PayPal payment.
That’s all. Now you know how to set the logic so that the user role changes after a successful subscription payment in PayPal with the JetFormBuilder plugin and the JetEngine Dynamic Visibility to show content only to subscribers.
The PayPal Recurring Payments add-on for JetFormBuilder adds the PayPal subscriptions to forms, manages their settings, keeps them up to date, and tracks all payments.
In this case, we explain creating a subscription plan using the Sandbox mode of the PayPal functionality. This mode simulates transactions during payment processing without real payments. If you want to use the Live mode, you should upgrade your PayPal account. Nonetheless, the Subscription plan creation workflow is the same for both modes. Still, you should set the appropriate API credentials for each mode (Live or Sandbox). Follow the Get Started with PayPal REST APIs tutorial to learn how.
The PayPal Recurring Payments add-on is a PRO add-on for the JetFormBuilder plugin. The add-on integrates pre-created PayPal subscriptions to forms and manages payment settings. It also transfers payments according to the PayPal subscription settings (pricing plans, billing cycles, trial periods, subscription quantities, etc.). The add-on aggregates subscription data through one dashboard.
Add-on functionality includes:
Recurring payments — supports periodic payments of different types (fixed, quantity-based, volume-based, or tiered) with trial time consideration;
Convenient subscriptions dashboard — allows viewing and editing subscription details (subscribers, billing cycle, status) and payment details (payer, payment shipping, dates, gross sums) through the dashboard;
Refunds — carries out refund payment from the Subscriptions dashboard;
Suspend or cancel subscriptions — sets the needed status for the user subscription from the dashboard;
Action Events — applies different actions as form settings (events) instead of the callbacks as php-functions;
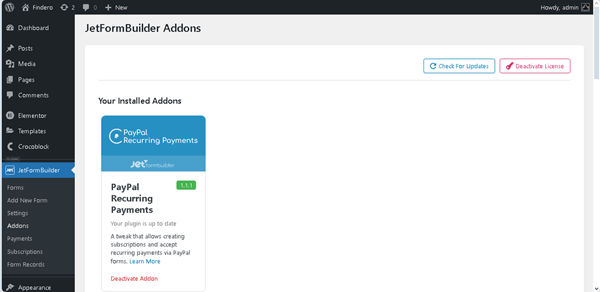
Head to WordPress Dashboard > JetFormBuilder > Addons. Among the available items, find the PayPal Recurring Payments add-on and press the “Install Addon” button.
Then, don’t forget to activate the add-on to get access to all of its features.
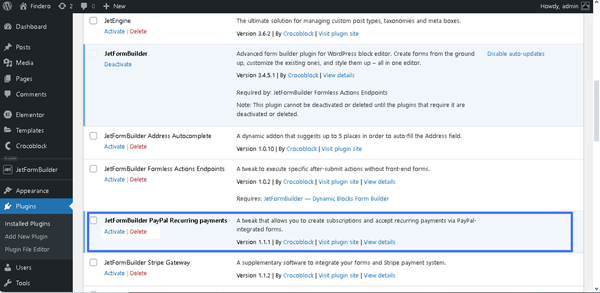
To do so, proceed to WordPress Dashboard > Plugins and find the installed add-on. Hit the “Activate” button.
NOTE
The add-on should be installed and activated on a remote (not local) website. This is because PayPal sends information about subscriptions and payments that are made, which is possible only if the site is located on remote hosting.
Also, you can install and activate this add-on as any other WordPress plugin.
Create a Subscription Plan
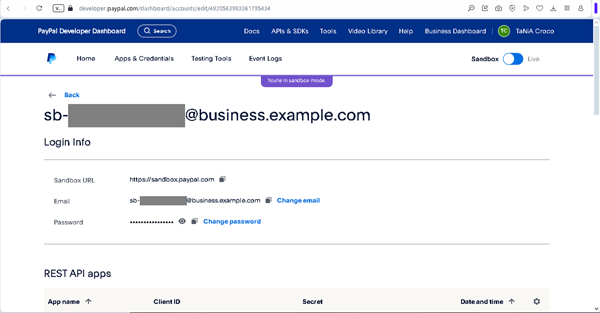
Initially, log in to your PayPal Developer account. By default, you will be directed to the Sandbox test accountspage of your main PayPal account. On this page, your business and personal accounts are listed.
Unroll the needed business account to observe the sandbox account Login Info and REST API apps sections.
Then, enter the Sandbox PayPal account using the presented “Email” and “Password” Login info. Here, the “John Doe” user name is set by default, but you can set the needed one.
Unroll the Sales tab and then observe available pages. The Subscriptions page is the one we need.
After that, you will be redirected to the Manage subscriptions page. Here, switch to the Subscriptions plans tab.
So, here we can see the PayPal subscription plans in the same named tab.
Click on the “Create Plan” button to build a new one.
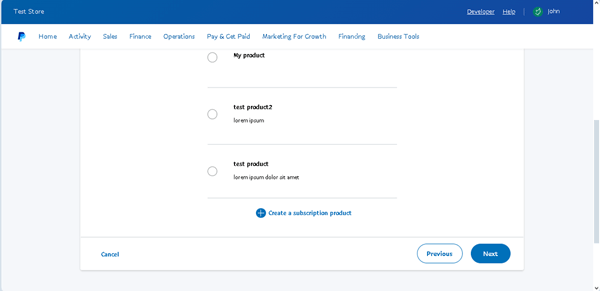
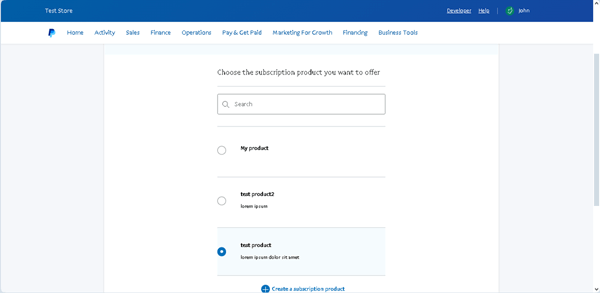
If you have already built some plans, they will be suggested to you as options for selection in the Choose the subscription product you want to offer section. You can select the needed plan, scroll down the page, and click the “Next” button at the bottom of the page.
Or, just scroll this page down and press the “Create a subscription product” button to set the plan from scratch.
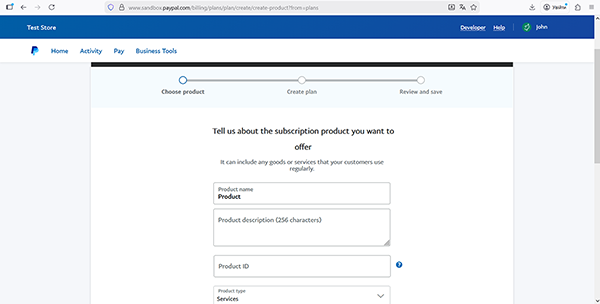
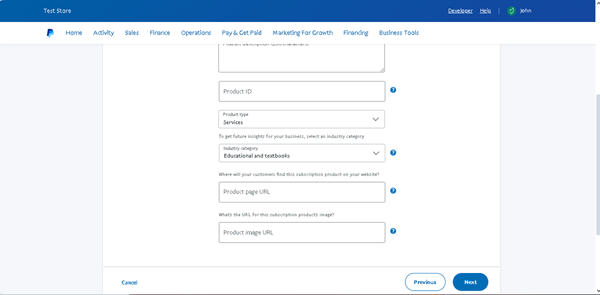
You will be redirected to the Tell us about the subscription product you want to offer section, which has the obligatory Product name and Product type fields (scroll the page to see these fields). Fill in the suggested fields that correspond to the info about the product you will provide in a subscription.
You can complete the fields or leave some empty, as they are not obligatory. Hit the “Next” button to proceed to the next step.
After that, you will be redirected back to the Choose the subscription product you want to offer step. Here, the created plan will be added to the list of other plans. Tick the needed one, scroll the page down, and click the “Next” button.
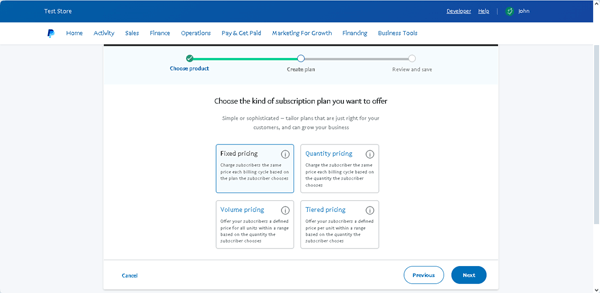
In the next step, you will be redirected to the Choose the kind of subscription plan you want to offer section. This step is one of the most important for customization. Pick the pricing option that is the most preferable for the subscription plan you create.
Then, push the “Next” button once again.
In this case, we chose the “Fixed pricing” option. To redirect to the following page, click the “Next” button at the button in the right corner of the page.
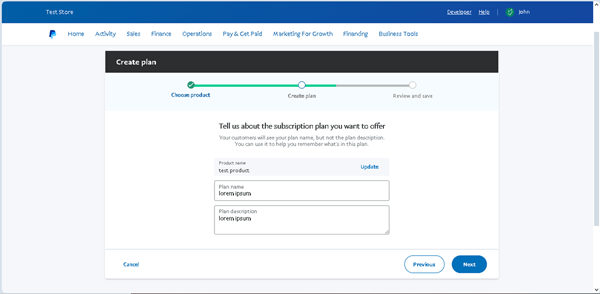
In the Tell us about the subscription plan you want to offer section, fill out the needed fields. In particular, the previously entered data will be transferred to the obligatory Product name field, and you can change this text. Also, the Plan name field is required.
Finally, click the “Next” button to continue the setup.
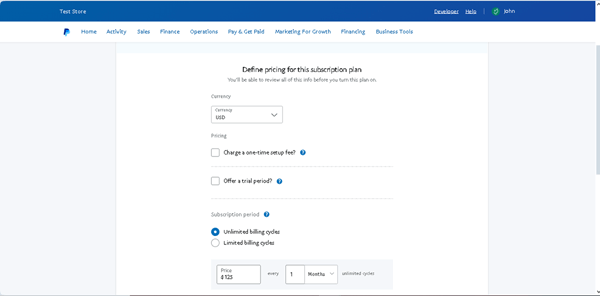
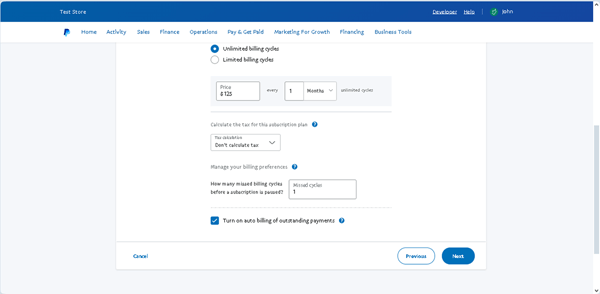
In the next Define pricing for this subscription plan section, adjust the settings concerning pricing. Specify the currency and check the other available options.
Don’t forget to specify the price in the corresponding field and decide how it will be charged. There, hit the “Next” button to review the plan you have just customized.
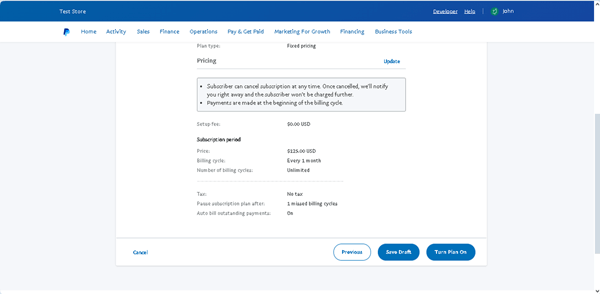
The last step is called Review and save your new plan. Here, check the details and push the “Update” button next to the information if it needs to be edited.
Once done, hit the “Turn Plan On” button to make the plan live.
Last, you will be transferred to the Set up your PayPal Checkout experience for subscriptions page, which lets you copy the code and add it to your site.
If needed, set the layout options, scroll down the page, press the “Copy Code” button, and then the “Go to plans” link to be redirected to the Subscription plans page.
Otherwise, press the “Do it later” link to be redirected to the Subscription planspage.
Now, your subscription plan is displayed on the SandboxPayPal Dashboard > Sales > Subscriptions > Subscriptionplans page.
Configure the JetFormBuilder Settings
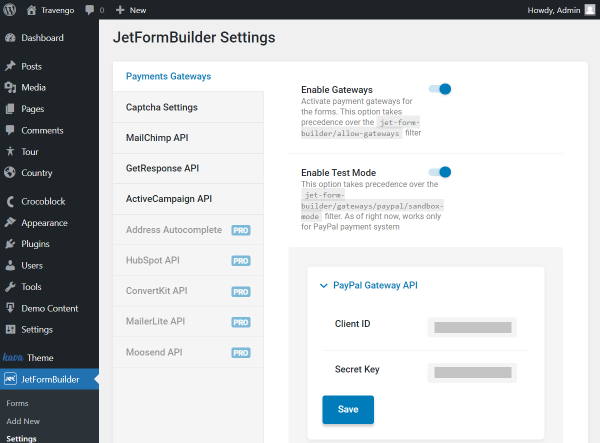
Before building the form, ensure that the PayPal gateways are activated for your website. Open the WordPress Dashboard > JetFormBuilder > Settingspage and check the Payments Gateways settings.
Toggle the Enable Gateways switcher. Optionally, activate the Enable Test Mode switcher if you test work with your PayPal account in the “Sandbox” mode.
NOTE
Activate the Enable Test Mode switcher when you test your PayPal account in the Sandbox mode and deactivate it when you work in the LivePayPal mode.
Then, return to your main PayPal Dashboard >Sandbox test accounts page, which lists your business and live accounts. Next, unfold the business account you used while creating your subscription plan; after that, move to the REST API apps section and unroll the needed app.
Here, copy the Client ID and Secret key field values for further pasting.
Then, go back to the WordPress Dashboard > JetFormBuilder > Settings> Payments Gateways subtab, complete the Client ID and Secret Key fields and the corresponding data, and hit the “Save” button.
Create a Form
Add the form’s fields
Go to WordPress Dashboard > JetFormBuilder > Add New. The form will be opened in the Block Editor (Gutenberg).
Select the needed embedded form in the Welcome block or build the form from scratch.
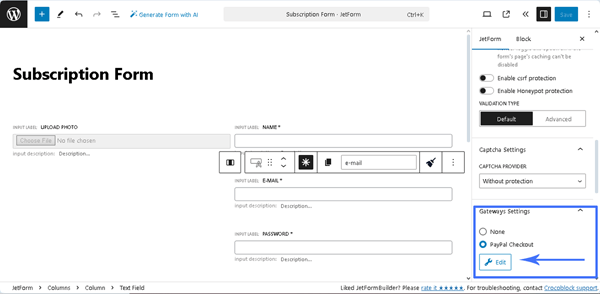
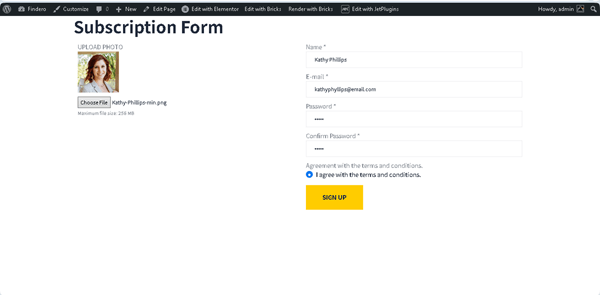
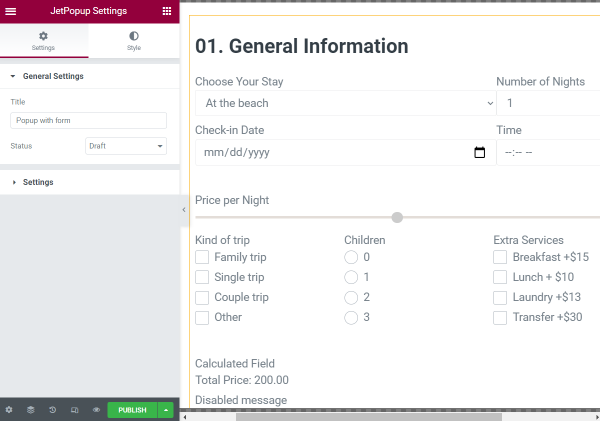
In this case, we type the form’s name (the “Subscription Form” text), press the “Start from Scratch” button, and create a form with the Text Fields, Image Field, Radio Field, and Action Button.
In this step, scroll the JetForm settings down to the Gateways Settings section. Enable the PayPal Checkout option and press the “Edit” button below to get to the settings.
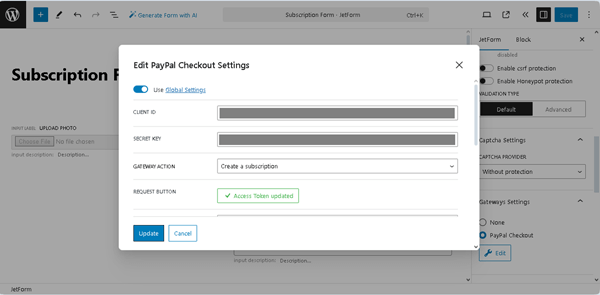
After that, the Edit PayPal Checkout Settings pop-up will be opened.
First, in the newly opened Edit PayPal Checkout Settings window, enable the Use Global Settings toggle to inherit the Client ID and Secret Key you entered earlier in the JetFormBuilder settings.
Or, if you haven’t done it before or need to substitute data, you can do it right in the following fields.
Mind setting the GATEWAY ACTION by selecting the “Create a subscription” option from the drop-down menu.
Push the “Sync Access Token” button to synchronize the data. Once the synchronization is successfully updated, the corresponding text will appear on this button.
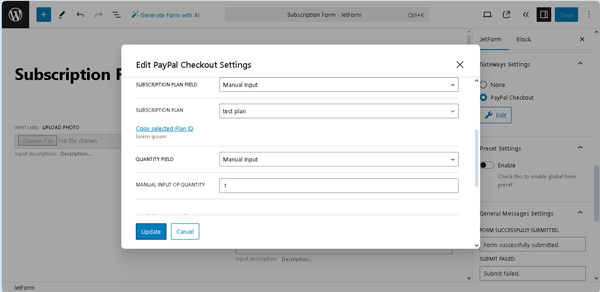
Select the needed option in the SUBSCRIPTION PLAN FIELD. Here, you can choose one of the fields you have added to the form or pick the “Manual Input” option. Now, the last mentioned option is our case.
So, as we have picked the “Manual input” option, we need to specify the required plan in the SUBSCRIPTION PLAN drop-down list (here, we selected the “test” subscription plan we built earlier.)
As for the QUANTITY FIELD, we leave it with the default “Manual Input” value, but for the MANUAL INPUT OF QUANTITY field, we type the “1” text.
Scroll down to available macros and change the messages shown to the user in the specific cases if needed.
Click on the “Update” button to save the adjusted settings.
Manage the Post Submit Actions
In the next step, navigate to the Post Submit Actions tab. Press the “+New Action” button and select the “Save Form Record” Post SubmitAction in the newly appearing Add new action window. If the “Save Form Record” Post SubmitAction is set by default, press the “pencil” icon to configure its settings.
After that, activate the Store the IP address and other request headers toggle to save the user’s IP address in the Edit Save Form Record window.
Click the “Update” button.
After that, we add the “Register User” Post Submit Action since the form is intended to manage the subscribers.
In the “Edit Register User” pop-up, we assign the corresponding FIELDS MAP fields to the form’s block fields.
Once completed, press the “Update” button.
Read the Register Form tutorial to learn how to build register forms and manage their settings.
Set the Action Events
The Action Events tool applies actions at different performing moments, e.g., during its execution, after request processing, after checkouts, etc.
Navigate to the Post Submit Actions settings of the form settings and select the action you need from the corresponding drop-down menu.
NOTE
Except for the “Save Form Record” option, the Action Events settings are available for all Post Submit Actionsfrom the drop-down menu.
Press the “Condition“button to open the Edit Action Conditions & Events pop-up window. Here, select the Events Match tab and choose the needed subscription event(s) from the Add Event drop-down menu:
DEFAULT.PROCESS ー the event that is performed simultaneously with the specified action. This event is executed before redirecting to check out if the PayPal/Stripe functionality is enabled;
BAD.REQUEST ー the event that is performed after processing the request if the form fields have errors like the wrong field format of the media field or the field text exceeds the limit;
DEFAULT.REQUIRED ー the event that is performed in any case, even if the form fields have errors or unsuccessfully performed actions. This event is launched at the end of the form response is submitted. This event runs before the form response is sent. By default, this event is used by the “Save Form Record” Post Submit Action and cannot be added to other events through the form editor;
GATEWAY.SUCCESS ー the event that is performed after the payment system has checked up on the payment made or subscription issued;
GATEWAY.FAILED ー the event that is performed if users have returned from the checkout page of the payment system without making a payment or subscribing;
GATEWAY.SUBSCRIPTION.CANCELLED ー the event that is performed if users have canceled the subscriptions;
GATEWAY.SUBSCRIPTION.EXPIRED ー the subscription expiration event that is performed if the PayPal subscription expires;
GATEWAY.SUBSCRIPTION.SUSPENDED ー the event that is performed if the subscription is suspended.
RENEWAL.PAYMENT ー the event that performs the specified Post Submit Action if the subscription is renewed and paid again.
In this case, we set the “GATEWAY.SUCCESS” event and pressed the “Update” button.
That’s it for the form; now, you can hit the “Publish” button.
Place the Form on a Page
Open an editor you prefer and find the JetForm widget/block/element. In this tutorial, we use Elementor.
Move to the front end, complete the form with the required information, and submit it by pressing the “SIGN UP” button.
Pay for the Subscription
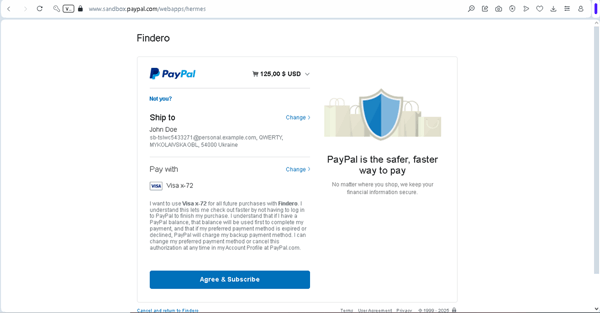
Once the form is submitted, users will be redirected to the PayPal payment page. Now log in to the account and select the bank card if needed. Press the “Continue” button.
Check the provided info and press the “Agree & Subscribe” button.
After payment, you will be redirected back to the form.
Manage the Subscription
You can manage PayPal subscriptions via PayPal and the JetFormBuilder Dashboard.
Manage the submissions via PayPal
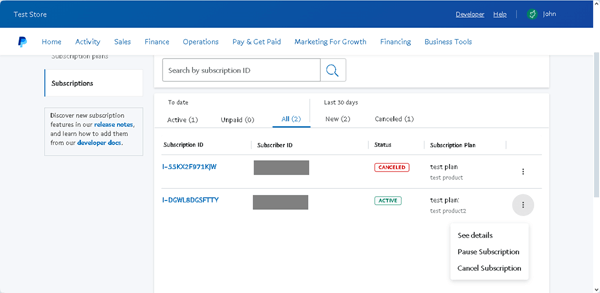
Another way to suspend the subscription is through a PayPal account. Head to the Subscriptions tab and find the needed subscription (in the Sandbox mode, the PayPal Dashboard > Sales > Subscriptions tab).
This tab displays the subscriptions and their actual status.
Press the “three dots” button and select the needed option. Since the submission is “ACTIVE,” you can change its status to “PAUSE” or “CANCELLED” by selecting the corresponding option from this list.
This way, you can change the submission’s status, i.e., reactivate it. However, you can only do this from your PayPal account. Click the “Activate Subscription” button next to the item to enable the subscription once again.
NOTE
If you suspend the subscription via PayPal, you will need to wait a couple of minutes for the status to change on the WordPress website.
Also, you can cancel the submission.
NOTE
If you cancel the subscription, it can not be activated once again.
Manage the submissions via JetFormBuilder
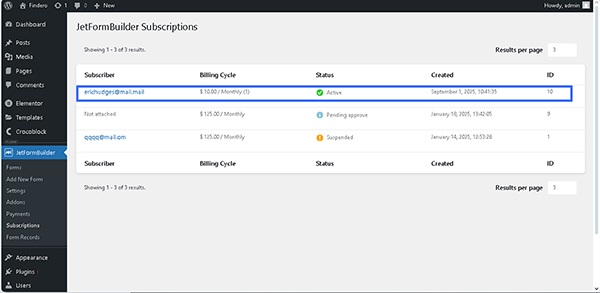
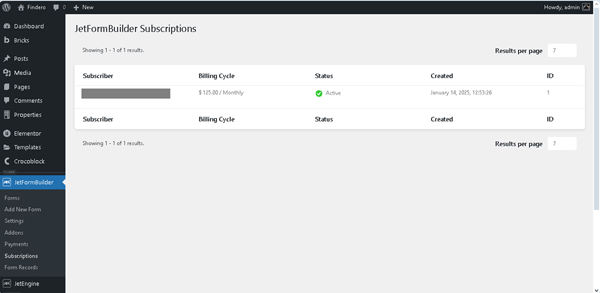
Let’s check the subscription status by heading to WordPress Dashboard > JetFormBuilder > Subscriptions.
NOTE
The payment status may be updated several minutes after the payment is actually made.
The new PayPal subscription info is right here. We can also see that its status is set to active.
If we hover over the item, we can spot the “Suspend” and “Cancel” links below the subscriber’s name.
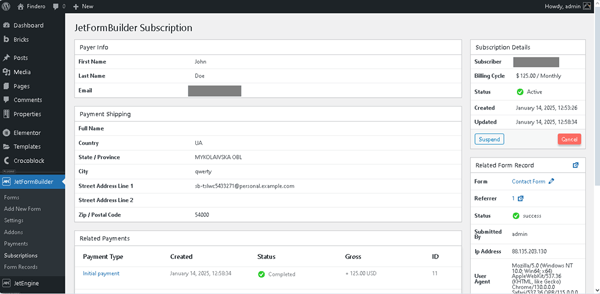
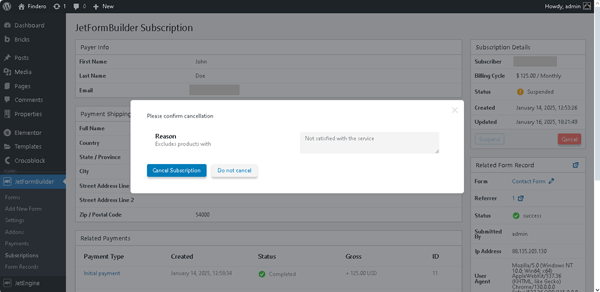
Open the created PayPal subscription to see additional details.
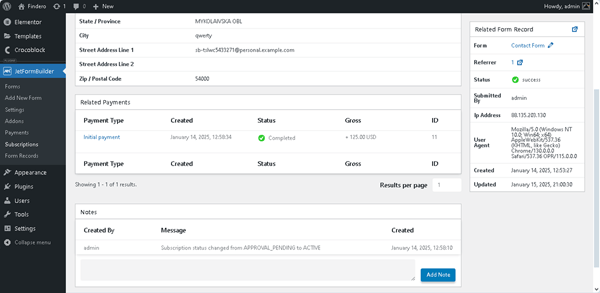
Look at the several blocks presented here: Payer Info, Payment Shipping, Subscription Details, and, not less important, Related Form Record.
Another section available is Notes. Here, you can see messages about subscription status changes or add your note by completing the field and pressing the “Add Note” button.
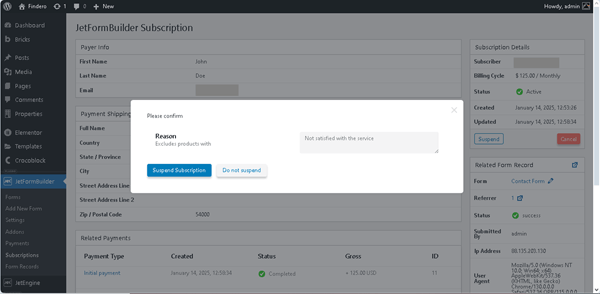
You may also notice the “Suspend” and “Cancel” buttons here.
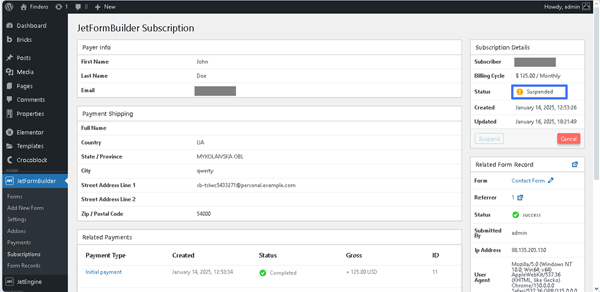
Press the “Suspend” button. If necessary, specify the reason or leave the default value and push the “Suspend Subscription” button.
Check the Status field. Now it is changed to “Suspended.”
Also, you can cancel the submission by pressing the “Cancel” button.
NOTE
If you cancel the subscription, it can not be activated once again.
Make a Refund
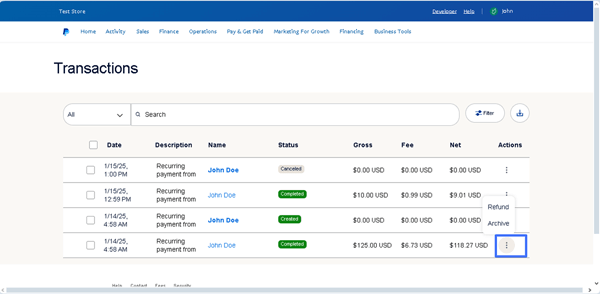
A refund can be made via PayPal as well. Go to Activity > All Transactions and click the “three dots” button next to the received payment. Then, select the “Refund” option to see the refund details.
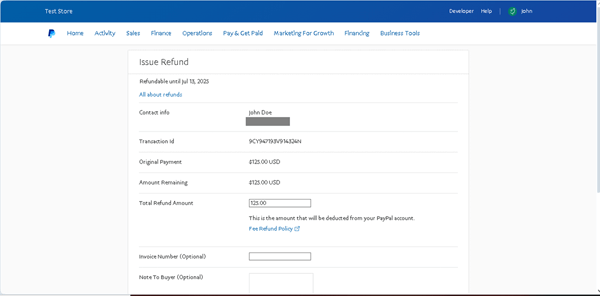
Specify the total refund in the Total Refund Amount. Optionally, you can enter the Invoice Number and leave a Note to Buyer.
That’s it; now you know how to use the PayPal Recurring Payments add-on and manage PayPal subscriptions available with the JetFormBuilder PRO plugin for WordPress websites.
Stripe Payments is a JetFormBuilder addon that links JetFormBuilder and JetEngine forms to Stripe’s software, allowing you to carry out any payments online via Stripe Gateway.
With the help of this addon, your clients will be able to pay for product orders, all sorts of specialty services, tickets to various events, and so on. Stripe Payments will also come in handy if you offer booking and rental services.
Addon Functionality:
Stripe Gateway
AJAX redirect to Checkout
Actions before & after payment
How to Create a Stripe Payment Form
Before we begin, make sure you have the following plugins installed and activated:
JetFormBuilder — build a form, edit the post-submit actions, and add a CAPTCHA if needed;
JetEngine — create a CPT, add custom meta fields and taxonomies;
Elementor free — add the created form into the editor to finalize the customization and style up the page. Alternatively, you can use Gutenberg block editor; it is fully compatible with the JetFormBuilder plugin.
1. Add Custom Post Type
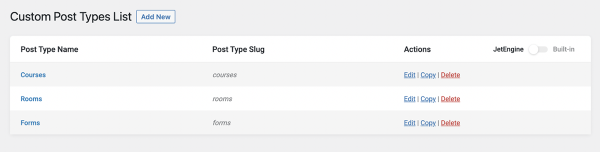
Proceed to the WordPress Dashboard > JetEngine > Post Types directory. Add a new custom post type by pushing the “Add New” button or open one of the previously created CPTs.
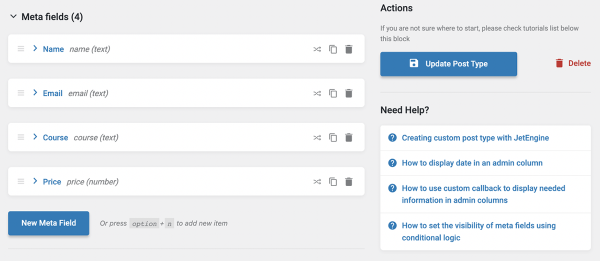
Once you open the custom post type editor and adjust the General Settings, scroll down to the Meta fields tab.
As your form will include fields for completing, some of them will repeat the CPT meta fields you edit here. That’s why you need to set up the potential form fields.
After implementing the changes, press the “Add/Update Post Type” button.
2. Create New Form
Before we start, let’s check the Payments Gateways settings by navigating to WordPress Dashboard > JetFormBuilder > Settings.
Here you can activate the Enable Gateways toggle to have the possibility to work with payments.
The following Stripe Gateway API section includes two Public Key and Secret Key fields, which should be completed with the corresponding data from your Stripe account.
Press the “Save” button after you fill in all the fields.
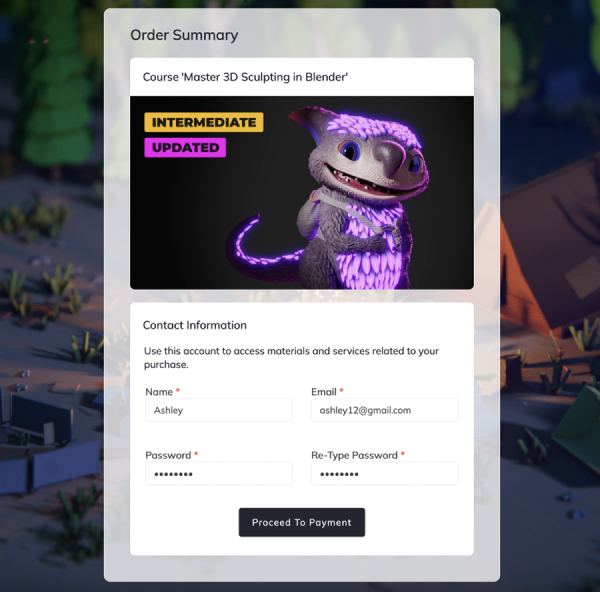
The following form will allow the user to register and enroll in an online course.
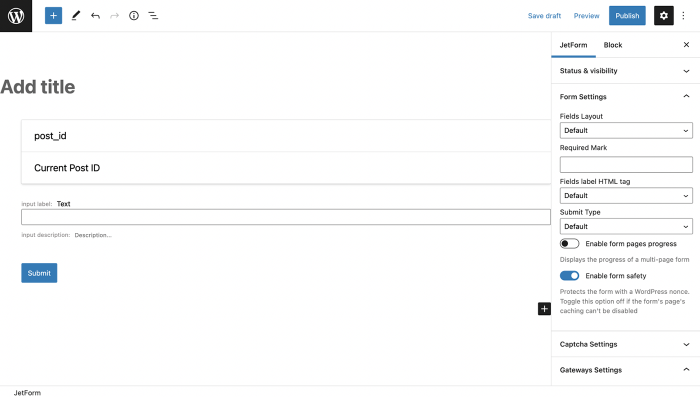
Go to WordPress Dashboard > JetFormBuilder > Add New.
Give a title to the form and move on to the default Text Field.
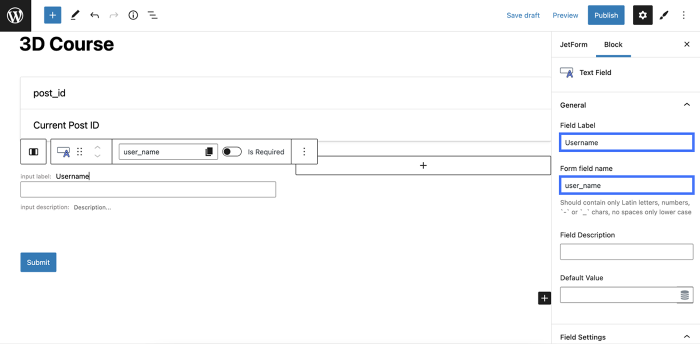
Change the Field Label and Form field name values to “Username” and “user_name” accordingly.
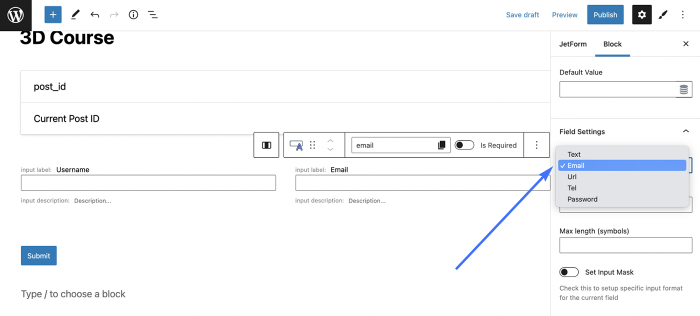
Hit the plus-shaped button to add one more Text Field block for email.
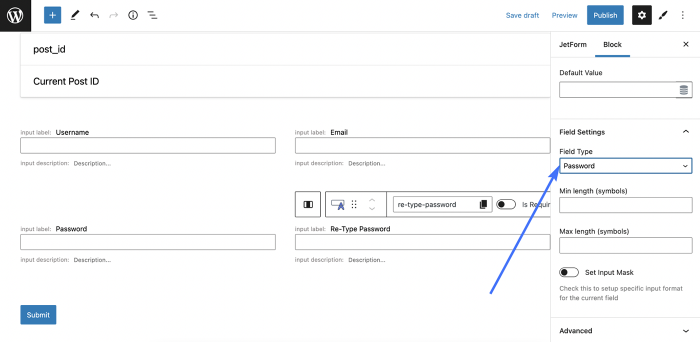
Fill in the Field Label and Form field name accordingly, and don’t forget to select the right field type in the Field Settings.
There will be two more fields for the password; however, you are free to add any field you want.
To store the price for this particular course and allow the form to carry out the payment, we need to create a field for the price.
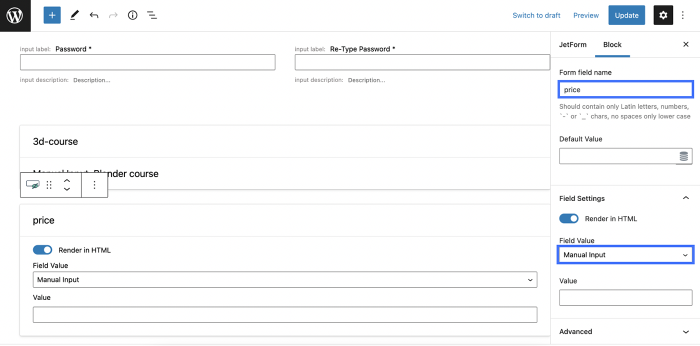
To do it, click on the “Add Block” button and select a Hidden Field. Change the Form field name to “price” and set its value to the “Manual Input” in the Field Settings.
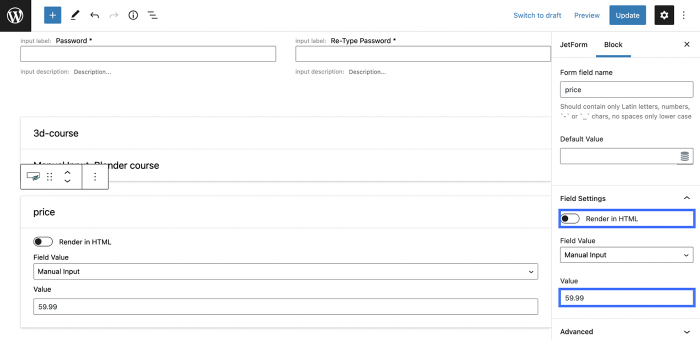
Enter the needed price in the Value field bar.
By the way, you can make the price field more secure by turning off the Render in HTML option. This way, a Hidden field will be invisible in the HTML markup.
Finally, change the button label, and let’s proceed to the form settings.
3. Set Up Post-Submit Actions
Open the JetForm tab and scroll down to the Gateways Settings section. Check the Stripe Checkout radio button.
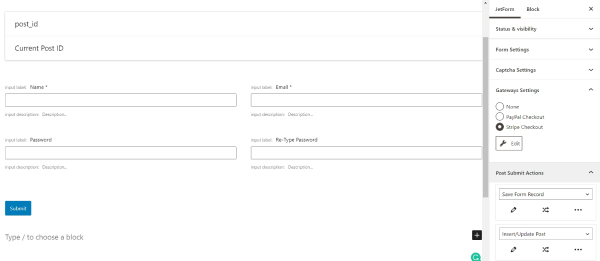
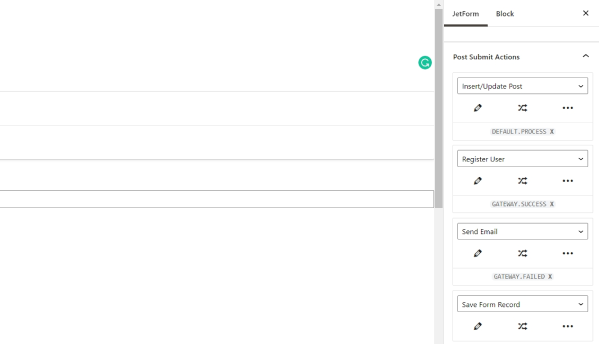
Proceed to the Post-Submit Actions section and unfold it. Now, you can add post-submit actions to the form. For example, you could add the Insert/Update Post action to create a new post.
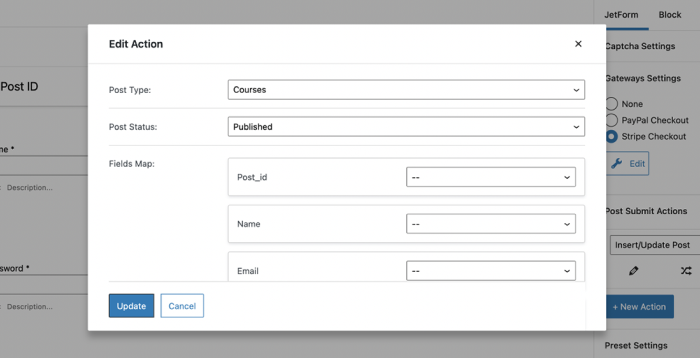
Click on the “Edit Action” button. In the Post Type field, select the custom post type you’ve previously created and set the Post Status to “Published.” You will find more information on this action in the “Insert/Update Post” action tutorial.
Don’t forget to hit the “Update” button before closing the window.
If you want to allow the users to register on the website, add the Register Useraction and set it up.
Add other actions by clicking the “New Action” button if needed and go back to the Gateways Settings section.
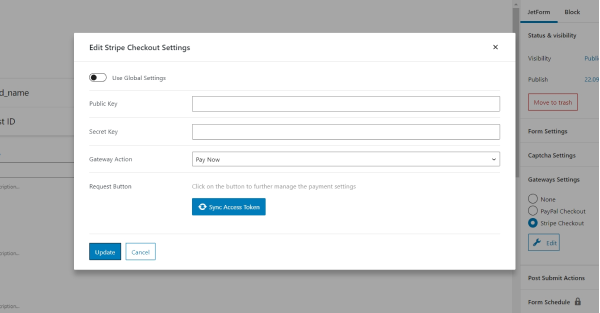
Now we can press the “Edit” button under the “Stripe Checkout” option and find out about all the fields we need to complete in the Stripe Checkout Settings.
Use Global Settings — toggle it on to pull out the Public Key and Secret Key if you have entered this information in the JetFormBuilder > Settings > Payments Gateways directory;
Public Key — complete this field with the Client ID that you can find in your PayPal account;
Secret Key — fill in the Secret Key attached to your PayPal account;
Gateway Action — here, you can choose the payment scenario. Select the “Pay Now” action to enable further settings.
To further manage the Stripe payment settings, click the “Sync Access Token” button. Once the Access Token is updated, you will get access to more gateway settings.
Price/amount field — you can choose a form field price from the fields list here.
Lastly, adjust the Payment success/failed messages and update the settings to save all the completed data.
4. Set Up Action Events
Now, it is time to configure the scenario that will be performed before payment is processed, on successful payment and the failed payment. To do this, we need to give the post-submit actions certain Events.
For example, you can choose to create a post before the payment is processed, register the user after successful payment, and send an email if the payment failed.
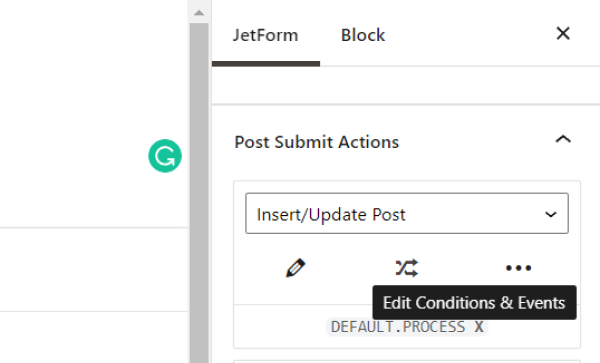
Click on the “Edit Conditions and Events” button to add action events under the needed post-submit action.
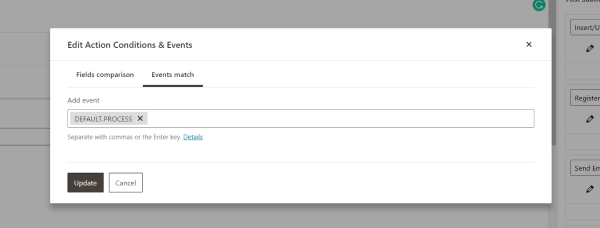
In the popup, proceed to the Events Match tab. Select one or several events from the dropdown.
DEFAULT.PROCESS – this is the moment when actions are processed. The current event will trigger the post-submit action before the payment gateway.
BAD.REQUEST – this event is executed after request processing in case some of the fields in the form return errors. For example, the action will be triggered if the user uploads a file to the Media field in the wrong format or if the user exceeds the allowed number of files to upload. This event bypasses the DEFAULT.PROCESS event.
DEFAULT.REQUIRED – this event is executed in any case. It is the last triggered event before the form response is submitted. The event runs even in case some of the other post-submit actions are not processed successfully. Note: if you set the DEFAULT.REQUIRED event to several actions and one of your actions is the Store Form Record action, make sure to put the Store Form Record action the last in the row.
GATEWAY.SUCCESS – this one is executed after the user passes the checkout on the side of the payment system; if a payment is successful, the action will be triggered.
GATEWAY.FAILED – It is performed when the user returns from the checkout page of the payment system without making a payment.
Note that the Store Form Record action does not require any Event.
Now that you have added Events to the post-submit actions, don’t forget to make the necessary fields in the form required.
Push the “Publish/Update” button on the top of the form to publish the final result.
Add the Form to a Page in Elementor
Now decide where you want to place the newly built form. In the described case, we will place the form on a separate page.
So, we navigate to WordPress Dashboard > Pages. Open an existing page or create a new one and edit it with Elementor.
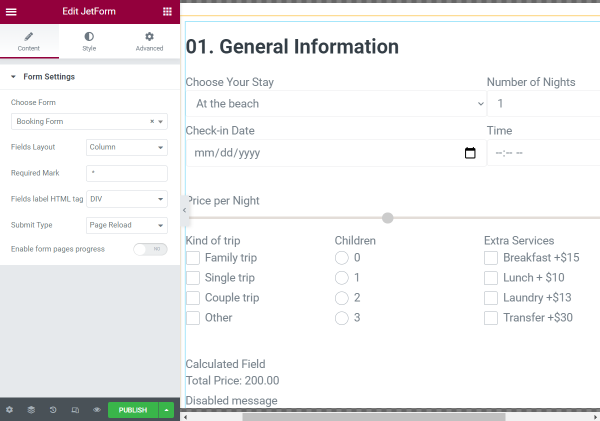
Customize it according to your needs and, right in the editor, look for the JetForm widget. Select the form you have just created in the Choose Form field.
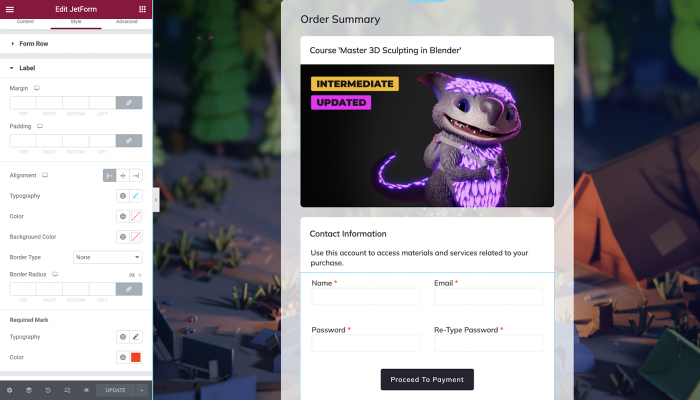
Proceed to the next tab and style the form, so it matches your website’s design.
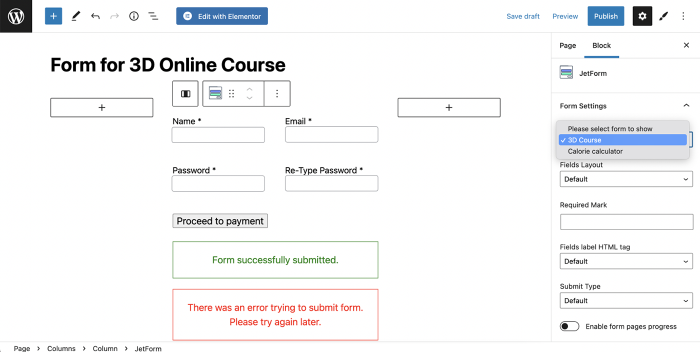
Add the Form Block in Gutenberg
JetFormBuilder works not only with the Elementor page builder. This plugin allows adding the form block using Gutenberg as well.
Open the page in the default WordPress Editor and add a JetForm block.
Complete the Form
Open the page where you have placed the form on the front end.
As you can see, the page looks right as we adjusted. Complete the fields and press the button you have set as a submit one.
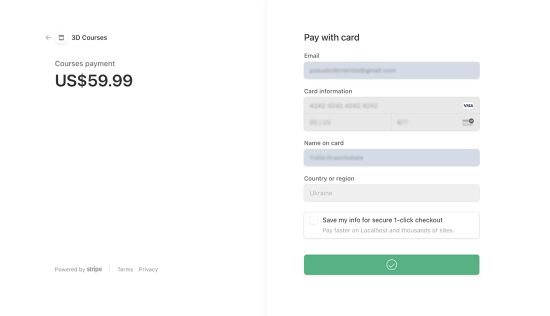
Once the obligatory fields are completed correctly, the submitted form will redirect you to the Stripe payment page.
Here the user can fill in all the details needed for successful payment.
Now you know how to adjust the form with the convenient Stripe payment using the JetFormBuilder plugin.
One of the most prominent JetFormBuilderfeatures is the ability to receive PayPal payments just with the help of the correctly adjusted form. So let’s discover how you can set the needed form and keep all payments in a well-organized database table.
Initially, let’s check the Payments Gateways settings by navigating to WordPress Dashboard > JetFormBuilder > Settings.
Here you can activate the Enable Gateways toggle to have the possibility to work with payments. Enable Test Mode is another available togglethat can be activated to test the payment system.
The following PayPal Gateway API section includes two Client ID and Secret Key fields, which should be completed with the corresponding data from your PayPal account.
Press the “Save” button after all the fields have been filled in.
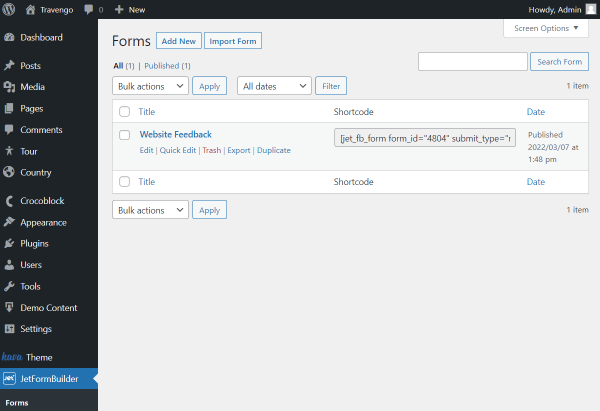
Go to WordPress Dashboard > JetFormBuilder > Forms and press the “Add New” button to build a form from the ground up.
Hover over the desired item to edit the existing form.
Adjust all the needed fields in the form. For instance, we use the Booking Form patternthat perfectly meets our needs. If you need to build a booking form with the payments from scratch, refer to our How to Create a Booking Form guide.
Except for the form fields, we need to work on the form’s settings. So open the JetForm tab and scroll down to the Post Submit Actions section. Add some actions to the form by clicking the “New Action” button.
Go to the Gateways Settings section that precedes Post Submit Actions.
Here we pick the “PayPal Checkout” option and press the “Edit” button.
Use Global Settings — toggle it on to pull out the Client ID and Secret Key if you have entered this information in the JetFormBuilder > Settings > Payments Gateways directory;
Client ID — complete this field with the Client ID that you can find in your PayPal account;
Secret Key — fill in the Secret Key attached to your PayPal account;
Gateway Action — select the scenario that will be performed once the form is submitted;
Request Button — push the “Sync Access Token” button to synchronize the data and proceed to the additional customization fields;
Price/amount field — select one of the form fields representing the final price for the rendered service.
Look at the Available macros list; you can select one of the presented options and paste them into the following fields.
Payment success message — complete the field with the text that will be shown once the user makes a payment;
Payment failed message — fill in a similar field. However, now it is meant for the unsuccessful payment.
Push the “Update” button to save all the completed data and the “Publish/Update” one on the top of the form to publish the final result.
Add the Form to a Page
Now decide where you want to place the newly built form. In the described case, we will put the form in a pop-up that will be triggered once the button on the single page is clicked. But don’t forget that you can place the form on the various pages.
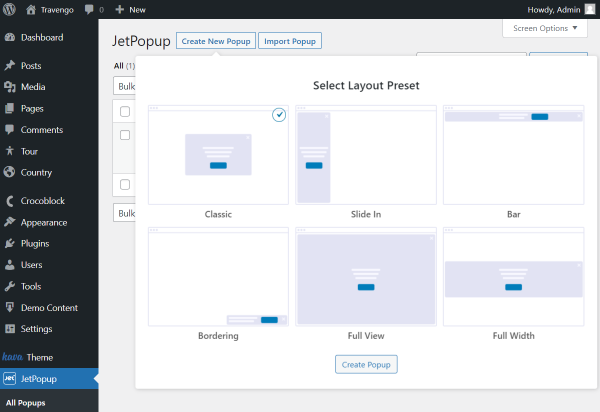
So, we navigate to WordPress Dashboard > JetPopup > All popups. Here, we can edit the existing pop-up or build a new one by pressing “Create New Popup.”
In the firstly appeared window, we select the layout preset of the pop-up.
Then click the “Create Popup” button, and, right in the editor, look for the JetForm widget. Select the form you have just created in the Choose Form field, and adjust the other settings if needed.
Also, we press the gear-shaped button to change the popup name in the Title field of the General Settings.
Press the “Publish/Update” button after all the customizations have been made.
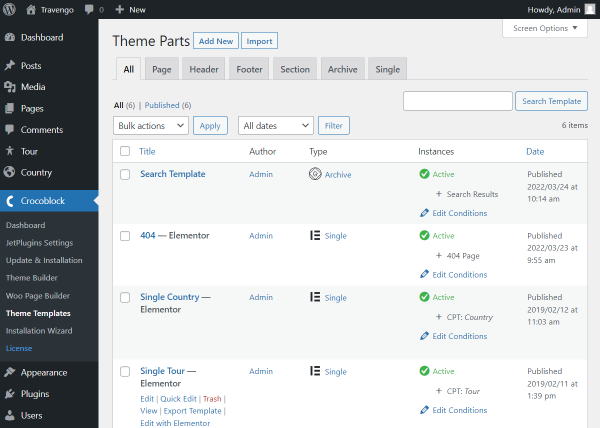
Continue by following the WordPress Dashboard > Crocoblock > Theme Templates pathway and open the Single pageeditor.
Here, place a Button, set and style it, and open the Advanced tab. Find the JetPopup section and choose the created pop-up in the Attached Popup field.
Complete the following fields, and now you are free to push the “Update” button whenever you are satisfied with the result.
Complete the Form
As we work with tours, we head to the specific tour page. If you have placed the form on the other page, open this page on the front end.
As you can see, the page looks right as we adjusted. Press the button which triggers the popup with the form.
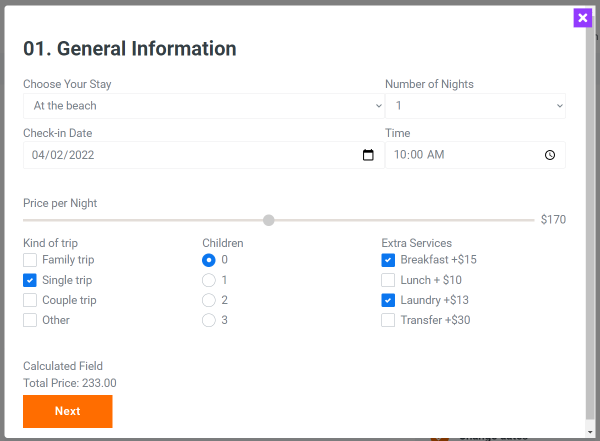
And the form is now shown in the popup. Complete the fields and press the button you have set as a submit one.
Yet, if all the obligatory fields are completed correctly, the submitted form will redirect you to the PayPal payment page.
Here the user can fill in all the details needed for successful payment.
Check the Payment
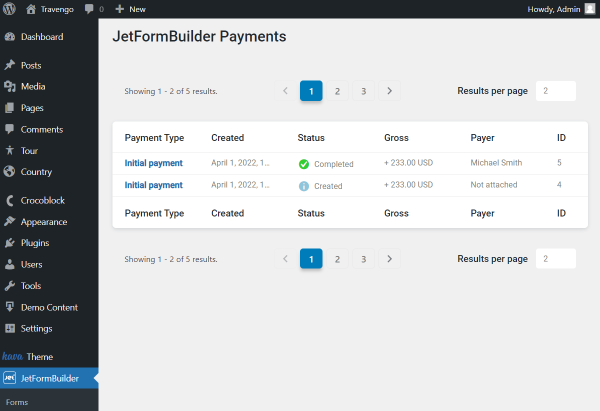
For now, if the user is still completing the required data, you can already see the order by going to WordPress Dashboard > JetFormBuilder > Payments.
The unfinished payment is now marked as “Created” and “Not attached.” The same situation will appear if the user closes the payment window.
Though, if the user completes a payment form successfully, the payment changes its status to “Completed” and gets a Payer.
You can also see the payment creation date in the Created tab, the total amount in the Gross tab, and the payment ID.
Switch pages with the help of pagination and set the desired amount of the Results per page.
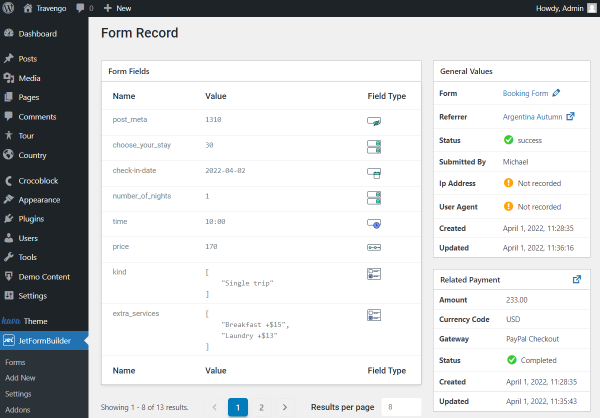
Press the item’s title in the Payment type column to see the payment details.
Now all the needed information is shown in the database table.
Pay attention that Ip Address and User Agent are set as “Not recorded.” It is caused by the disabled “Store the IP address and other request headers” toggle in the Save Form Record post-submit action editor.
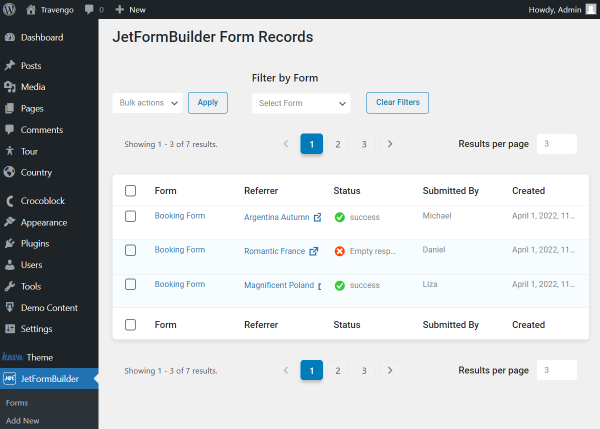
Moreover, we can head to the WordPress Dashboard > JetFormBuilder > Form Records to see more information regarding the completed form.
As you can see, the first form was created by the same author as the payment, so let’s check the additional information by pressing the title in the Form column.
Here you can see the data about the completed form in the Form Fields, General Values, and Related Payment fields.
Now you know how to adjust the form with the convenient PayPal payment and store all the financial data in one systemized WordPress database table.
We use cookies to assist you with navigation and analyze site traffic. If you continue to use this site, you consent to our use of cookies.