
How to Change User Roles After Payment
In this tutorial, we explain how to change the user role after payment using the WooCommerce Cart & Checkout Action add-on for JetFormBuilder and the “Update User” Post Submit Action.
In this case, we create a form for purchasing a WooCommerce product and apply the “WC.CHECKOUT.COMPLETE” event on the “Update User” Post Submit Action to change the user’s status after successful payment.
To provide this functionality, the WooCommerce Cart & Checkout Action add-on and WooCommerce plugin should be installed and activated. Read the JetFormBuilder WordPress Plugin Installation tutorial to learn more about different methods of installation: from the WordPress Dashboard, by uploading to your site, or manually.
Also, you can change the user role after PayPal payment using the PayPal Recurring Payments add-on, as the How to Change User Role After Successful Subscription Payment tutorial and How to Change User Role After Successful Subscription Payment in WordPress video explain.
Since in this tutorial we ponder the changing user role after payment issues, steps such as building a user profile, creating a form, creating a checkout page, or assigning the template are not detailed.
Read the Boosting WooCommerce Payments Efficiency with JetFormBuilder article to learn how to improve the checkout experience at a WooCommerce shop.
Configure the Post Submit Actions
In this case, the order form is intended to be added to a page with a WooCommerce product; it contains the Hidden Field (with the “Current User ID” FIELD VALUE set), Text Fields, and the Action Button.

The form has no fields for additional data, but if needed, you can make it a multi-step form as the How to Add a Multi-Step Order Form with Checkout to WooCommerce Sites tutorial describes. Also, look through the Easy Way to Create a WooCommerce Custom Order Form article to learn about a tailored solution that replaces or extends the standard product ordering process in your online store.
After adding the fields, move to the JetForm settings. Next, press the “+ Add New” button in the Post Submit Actions section and select the “Add to Cart & Redirect to Checkout” option in the newly appeared Add new action pop-up.

Once chosen, the Edit Add to Cart & Redirect to Checkout pop-up is opened.
Here, configure the following settings. First, select the “Manual Input” option in the GET PRODUCT ID FROM and select the name of the product to which you intend to add the form in the SELECT PRODUCT field. Since the price will be taken automatically from the product page, keep the WOOCOMMERCE PRICE FIELD empty.

After that, scroll the pop-up down to the WOOCOMMERCE CHECKOUT FIELD section and assign the form’s fields that will be displayed on the checkout page to the corresponding drop-down options.

Finally, once completed, press the “Update” button and close the pop-up.
The next Post Submit Action is the “Update User” Post Submit Action. Here, complete the Edit Update User pop-up fields:

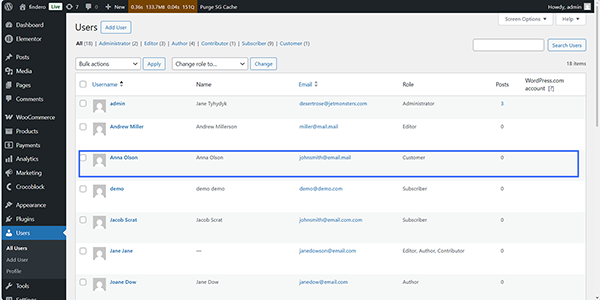
In particular, we set the “User ID (will update this user)” option for the user_id form’s field, “First Name” option for the First Name form’s field, “Email” option for the Email form’s field, and “Last Name” option for the Last Name field. These fields correspond to the names of the columns in which the user’s data is displayed via the WordPress Dashboard.
In the User Role field, we select the “Customer” option so that all users who submit the form and buy the product also upgrade their role to Customer.

In the last step, insert the required messages into the MESSAGE SETTINGS fields. Here, we keep the default data. Once completed, press the “Update” button at the bottom of the pop-up. Finally, save the form.
After that, press the “Edit Conditions & Events” icon (the crossed arrows) near the “Update User” Post Submit Action.
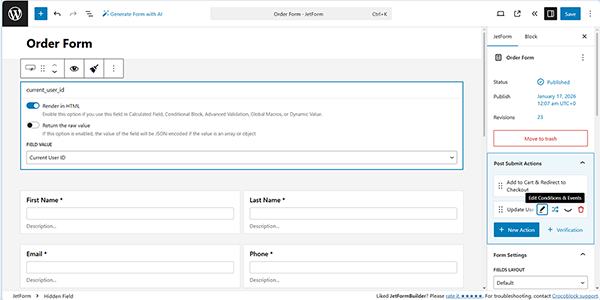
Here, select the “WC.CHECKOUT.COMPLETE” event in the appeared Edit Conditions & Events pop-up and press the “Update” button to close this pop-up.

In the last step, add other necessary Post Submit Actions (e.g., “Save Form Record”). Finally, save the form.
Add the Form to a Page
Since this form is intended to order a specific product, we add it to a product’s single product page template. More details on creating the single product templates and integrating them with WooCommerce, as well as enhancing the product pages with customizable galleries, including video options, can be found in the How to Create a Single Product Page Template in WordPress video.
Here, we add the form using the JetForm widget. To learn how to add your form to pages using Elementor, Block Editor, or the Bricks editor, read the Displaying a JetFormBuilder Form in Any Page Builder tutorial or watch the video How to Add WordPress Form to any Page Builder using the JetFormBuilder plugin.

Once completed, save the page and open the product page.
Test the Flow
Move to the front end and fill out the form fields.

If the form is built correctly, you will be redirected to the checkout page.

Scroll the page down and press the “PLACE ORDER” button.

Then you will be redirected to the thank you page.

Check if the user completed the payment in the WordPress Dashboard > WooCommerce > Orders tab.

Finally, to check the update, proceed to the WordPress Dashboard > JetFormBuilder > Form Records tab and observe that the new roles have been added to the needed user.
FAQ
Yes. Read the WooCommerce Checkout and Order Form Optimization: The Crocoblock Way for more details.
More details on the structure of the default <i>WooCommerce</i> checkout page, designs, layouts, widgets, combining pages, as well as useful code snippets, removing address fields if the product is virtual, and conditional payment options for physical and virtual products can be found in the WooCommerce Checkout Page Customization article.
Yes. Use the Uncanny Automator to facilitate the connection of plugins and apps and to enable the automation of WordPress website activity without coding. This plugin enables the seamless integration of JetFormBuilder forms with various apps, including Airtable, Google Sheets, Google Calendar, Instagram, Facebook, and more. A complete list of available integrations is on the Automator WordPress Plugin Integrations page.
Yes. Read the How to Insert/Update WooCommerce Product with Attributes article to learn more about it.
Yes. In this case, you should use the JetFormBuilder and JetProductTables (with WooCommerce) plugins to create a wholesale order form as the How to Create a Wholesale Order Form in WordPress tutorial describes.
That’s it. Now you know how to change the user role after payment using the WooCommerce Cart & Checkout Action add-on for JetFormBuilder for WordPress, and the “Update User” Post Submit Action.