
How to Troubleshoot Email Sending (SMTP, Spam, Dynamic Recipients)
Learn how to troubleshoot email delivery issues in JetFormBuilder, check form submissions, configure dynamic recipients, and display the correct field labels and values in emails.
If a JetFormBuilder form is submitted successfully but the email is not delivered, arrives in the spam folder, or contains unexpected recipient or field data, check the form’s post submit actions and email configuration first. Then verify WordPress email delivery and the dynamic data used in the email.
Table of Contents:
- Check the “Send Email” Action
- Check Form Records
- Check SMTP and WordPress Email Delivery
- Display Labels Instead of Field Values
- Use Macros to Add Dynamic Data to Emails
- Troubleshooting Checklist
- FAQ
Check the “Send Email” Action
First, check whether the form has the “Send Email” Post Submit Action added, and check the following settings:
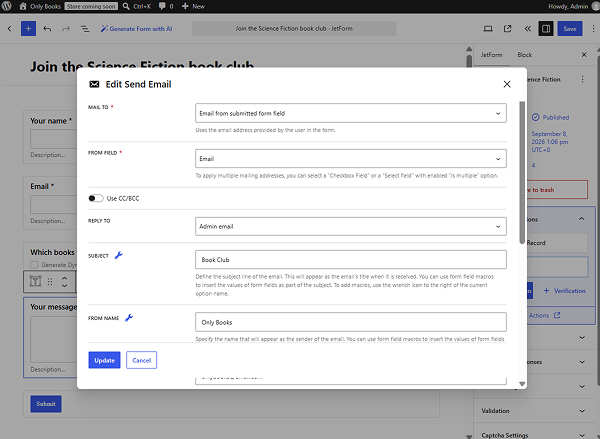
- MAIL TO — make sure the recipient is configured correctly;
- FROM FIELD — if the recipient or sender is taken from a submitted field, make sure the required form field is selected;
- REPLY TO — check whether the expected email address is specified;
- SUBJECT — make sure the subject contains the expected text or macros;
- CONTENT — check the email body and any macros used in it.
JetFormBuilder provides several options for the MAIL TO field, including the administrator email, an email taken from a submitted form field, and a custom email address. CC and BCC recipients can be configured separately when needed.
Check the recipient first
If the form is submitted but the expected recipient does not receive an email, verify the value that is passed to MAIL TO.
For example, when using “Email from submitted post field”, make sure that:
- the form contains an “Email” field;
- the correct field is selected in the FROM FIELD option;
- the submitted value is a valid email address.
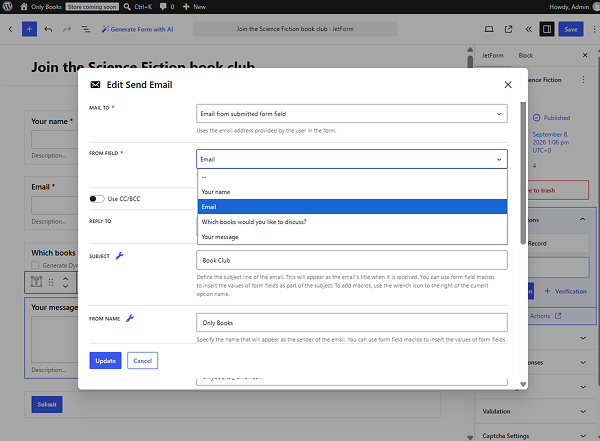
If the recipient is generated dynamically, continue with the Configure dynamic email recipients section.
Configure dynamic email recipients
A recipient does not always have to be a static email address. You can pass a dynamically generated email to the “Send Email” action.
One approach is to use a Hidden Field as a data bridge. For example, JetFormBuilder’s “Send Email” tutorial demonstrates retrieving the current post author’s email with a “JetEngine Data” shortcode, storing it in a Hidden Field, and then using that field as the custom email recipient.
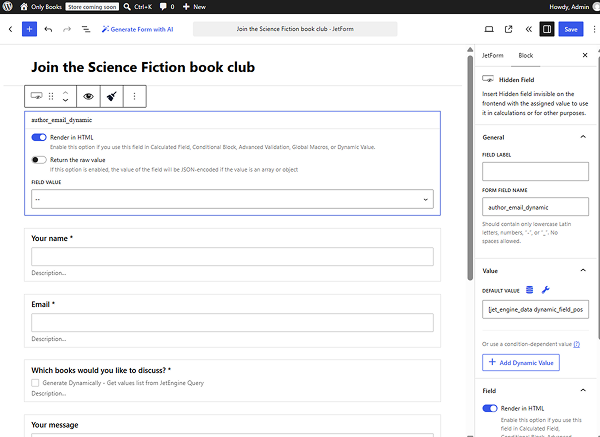
The general flow is:
Dynamic data > Hidden Field > Send Email > Email from submitted field
This pattern can be useful when the recipient depends on the post, user, or other dynamic data available when the form is submitted.
Dynamic recipient from user data
If the recipient email belongs to a user, retrieve the required user email dynamically and pass the result to the “Send Email” action.
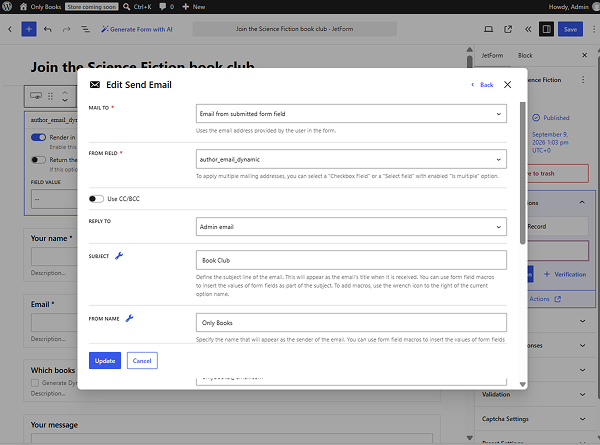
For example, the recipient can be obtained from the current post author’s user data using a “JetEngine Data” shortcode. The generated value is then placed into a Hidden Field and passed to “Email from submitted field” in the “Send email” action.
Dynamic recipient from CPT/CCT data and relations
If the recipient email is stored in a custom field of a post or Custom Content Type item, retrieve that value dynamically and pass it to the “Send Email” action.
Before testing the form, make sure that:
- the source object can be resolved when the form is submitted;
- the email field contains a valid email address;
- the dynamic value is actually passed to the field used as the recipient.
If the dynamic value is empty, the “Send Email” action cannot send the message to the expected recipient.
When the recipient is determined through a relation, first make sure that the required repeater item and email value can be resolved before the “Send Email” action runs.
If the email is not available directly in the MAIL TO settings, use a field or dynamic-value mechanism to pass the resolved email address to the “Send Email” action.
Check Form Records
If the form appears to submit successfully but the email is missing, check whether the submission was actually saved.
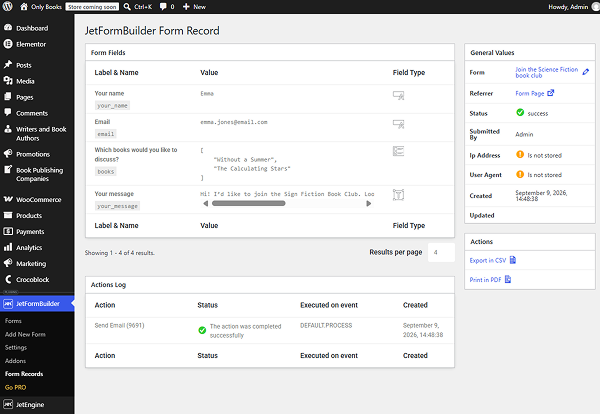
The “Save Form Record” Post Submit Action stores submitted form data in the database and makes it available on the Form Records page.
Add or check the “Save Form Record” action in the form’s Post Submit Actions.
After submitting the form, open the corresponding form record and verify:
- whether the submission was saved;
- which values were submitted;
- whether the email field contains the expected values.
This helps distinguish between a form submission problem and an email delivery problem.
If the record contains the expected data, but the email is not received, continue troubleshooting the email delivery configuration.
Check SMTP and WordPress Email Delivery
JetFormBuilder uses the WordPress email-sending mechanism for the “Send Email” action. If the form is submitted and the expected data is present in Form Records, but no message arrives, check the site’s email delivery configuration.
SMTP
Configure an SMTP service or SMTP plugin if your hosting environment does not reliably deliver WordPress emails.
After configuring SMTP, submit the form again and check whether the message is delivered.
SPF and DKIM
If emails are sent but are rejected or placed in spam, check the sender domain’s email authentication records.
Make sure that the required SPF and DKIM records are configured for the email service used to send messages.
Spam folder
Always check the recipient’s spam or junk folder before changing the form configuration.
If the email is consistently delivered to spam, check the sender address, domain authentication, and SMTP configuration.
Hosting and optimization plugins
Some hosting environments or optimization/security configurations can affect WordPress email processing.
If the form works correctly but email delivery fails, temporarily check whether server-level email restrictions, caching, optimization, or security plugins affect the result.
Display Labels Instead of Field Values
By default, a form field can submit its stored value rather than the label displayed to the user. For example, a “Select” or “Checkbox” option may have:
Label: Premium plan
Value: premium
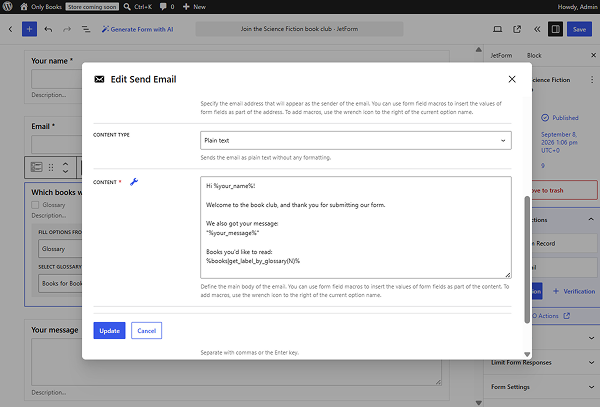
If the email displayed “premium” instead of “Premium” plan, use the appropriate macro to retrieve the label.
JetFormBuilder provides macros for working with field values and post/term data in emails. For fields that use a JetEngine Glossary, the official macro for retrieving the glossary label is:
%field_name|get_label_by_glossary(N)%Replace “field_name” with the actual form field name and “N” with the glossary ID.
This is especially useful for Select, Radio, and Checkbox fields whose stored values differ from their user-facing labels.
Use Macros to Add Dynamic Data to Emails
Macros allow you to insert submitted form data and dynamically generated values into the Subject and Content fields of the “Send Email” action.
For example, %field-name% returns the value submitted in the corresponding form field.
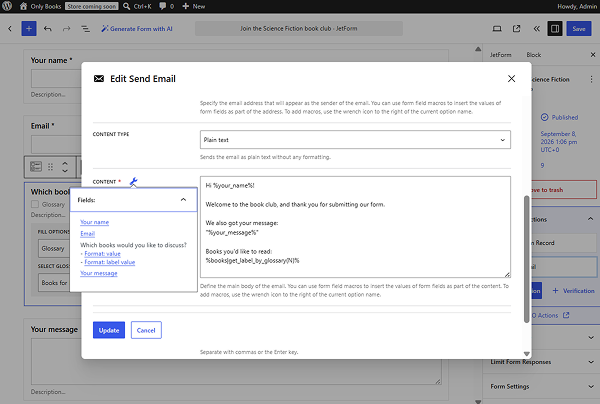
JetFormBuilder also provides macros for specific data types. To see the available macros while configuring the email, use the “wrench” icon near the Content field.
Also, check our How to Use Macros in Email Formatting guide to see the list of available macros.
Display repeater data
Macros can also be used to display data submitted through a Repeater Field.
JetFormBuilder provides a dedicated example for formatting repeater data in the “Send Email” action.
When troubleshooting a repeater-based email, first verify that the repeater values are correctly submitted in the form record. Then check the macro used to format those values in the email.
Check our How to Customize the Output Repeater in the Send Email Action guide to find out more.
Troubleshooting Checklist
If a JetFormBuilder email is not received, check the following in order:
- The form contains the “Send Email” Post Submit Action.
- The MAIL TO option points to the expected recipient.
- Any dynamic recipient field returns a valid email address.
- The FROM EMAIL and REPLY TO settings are configured correctly.
- The form submission appears in Form Records.
- The submitted email and dynamic values are correct in the form record.
- The recipient’s spam/junk folder has been checked.
- SMTP is configured if required by the hosting environment.
- SPF and DKIM records are configured for the sending domain.
- Hosting restrictions or optimization/security plugins are not blocking email delivery.
- Email macros return the expected values.
- Glossary fields use the correct macro when labels need to be displayed instead of stored values.
FAQ
First, check Form Records to confirm that the submission was saved and that the submitted data is correct. Then check the “Send Email” recipient and your WordPress/SMTP email delivery configuration.
The email may be displaying the field’s stored value. If the field uses a JetEngine Glossary, use the %field_name|get_label_by_glossary(N)% macro to retrieve the user-facing label, where “N” is the ID of the glossary.
Retrieve the required email address dynamically and pass it to the “Send Email” action. For example, a “JetEngine Data” shortcode can retrieve a post author’s email, which can then be stored in a Hidden Field and used as the Custom email recipient.
Use the “Save Form Record” Post Submit Action and check the corresponding entry on the Form Records page.
Use JetFormBuilder macros such as %field-name% in the “Send Email” action’s SUBJECT and CONTENT fields.
That’s all about ways of troubleshooting JetFormBuilder email sending for WordPress.